Add back-end AWS Autoscaling service
Efficient hosting of applications in a cloud involves easy and cost-effective management of resources depending on the application demand. To meet increasing demand, you have to scale network resources upward. When the demand subsides, you need to scale down to avoid the unnecessary cost of idle resources. You can minimize the cost of running the applications by deploying only as many instances as are necessary during any given time. To achieve this, you constantly have to monitor traffic, memory and CPU use, and so on. However, monitoring traffic manually is cumbersome. For the application environment to scale up or down dynamically, you must automate the processes of monitoring traffic and scaling resources up and down whenever necessary.
Integrated with the AWS Auto Scaling service, the NetScaler VPX instance provides the following advantages:
- Load balance and management: Auto configures servers to scale up and scale down, depending on demand. The VPX instance auto-detects Autoscale™ groups in the back-end subnet and allows a user to select the Autoscale groups to balance the load. All of this is done by auto configuring the virtual and subnet IP addresses on the VPX instance.
- High availability: Detects Autoscale groups that span multiple availability zones and load-balance servers.
-
Better network availability: The VPX instance supports:
- Back-end servers on different VPCs, by using VPC peering
- Back-end servers on the same placement groups
- Back-end servers on different availability zones
- Graceful connection termination: Removes Autoscale servers gracefully, avoiding loss of client connections when scale-down activity occurs, by using the Graceful Timeout feature.
- Connection draining for standby servers: Prevents sending any new client connections to the server in the Standby state. However, the Standby servers are still part of the Autoscaling group and they continue to handle the existing client connections until they are closed. When the server changes back to the InService state, the server resumes handling new connections. You can use the Standby state to update, modify, or troubleshoot servers, or to scale down based on the requirement. For more information, see the AWS documentation.
Diagram: AWS Autoscaling service with a NetScaler VPX Instance
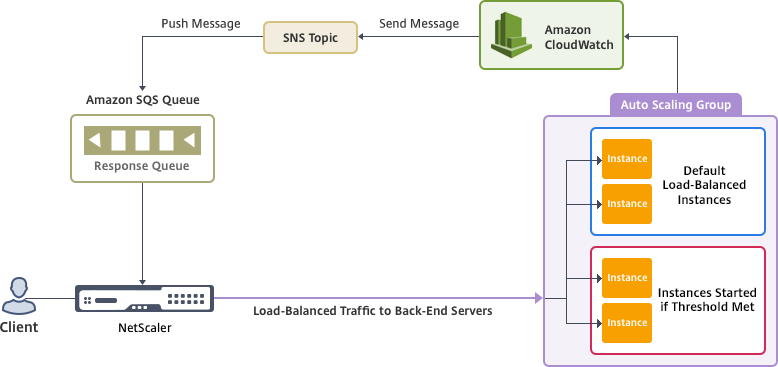
This diagram illustrates how the AWS Autoscaling service is compatible with a NetScaler VPX instance (load balancing virtual server). For more information, see the following AWS topics.
Before you begin
Before you start using Autoscaling with your NetScaler VPX instance, you must complete the following tasks.
-
Read the following topics:
-
Create a NetScaler VPX instance on AWS according to your requirement.
- For more information about how to create a NetScaler VPX standalone instance, see Deploy a NetScaler VPX standalone instance on AWS and Scenario: standalone instance
- For more information about how to deploy VPX instances in HA mode, see Deploy a high availability pair on AWS.
Note:
We recommend the following:
- Use the CloudFormation template for creating NetScaler VPX instances on AWS.
- Create three separate interfaces: one for management (NSIP), one for client-facing LB virtual server (VIP), and one for subnet IP (NSIP).
-
Create an AWS Autoscale group. If you don’t have an existing Autoscaling configuration, you must:
- Create a Launch Configuration
- Create an Autoscaling Group
- Verify the Autoscaling Group
For more information, see http://docs.aws.amazon.com/autoscaling/latest/userguide/GettingStartedTutorial.html.
-
Starting from NetScaler release 14.1-12.x, in an AWS Autoscale group, you must specify a scale-down policy only if you have enabled the Graceful option. In NetScaler releases before 14.1-12.x, you had to specify at least one scale-down policy irrespective of whether the Graceful option is enabled or not.
The NetScaler VPX instance supports only the step scaling policy. The simple scaling policy and target tracking scaling policy are not supported for the Autoscale group.
-
Make sure that your AWS account has the following IAM permissions:
 {
     "Version": "2012-10-17",
     "Statement": \[
      {
             "Action": \[
                 "ec2:DescribeInstances",
                 "ec2:DescribeNetworkInterfaces",
                 "ec2:DetachNetworkInterface",
                 "ec2:AttachNetworkInterface",
                 "ec2:StartInstances",
                 "ec2:StopInstances",
                 "ec2:RebootInstances",
                 "autoscaling:\*",
                 "sns:\*",
                 "sqs:\*"

             “iam: SimulatePrincipalPolicy”
             “iam: GetRole”
             \],
             "Resource": "\*",
             "Effect": "Allow"
         }
     \]
 }
 <!--NeedCopy-->
Add the AWS Autoscaling service to a NetScaler VPX instance
Complete the following steps to add the Autoscaling service to a VPX instance:
-
Log on to the VPX instance by using your credentials for
nsroot. -
Navigate to System > AWS > Cloud Profile and click Add.
The Create Cloud Profile configuration page appears.
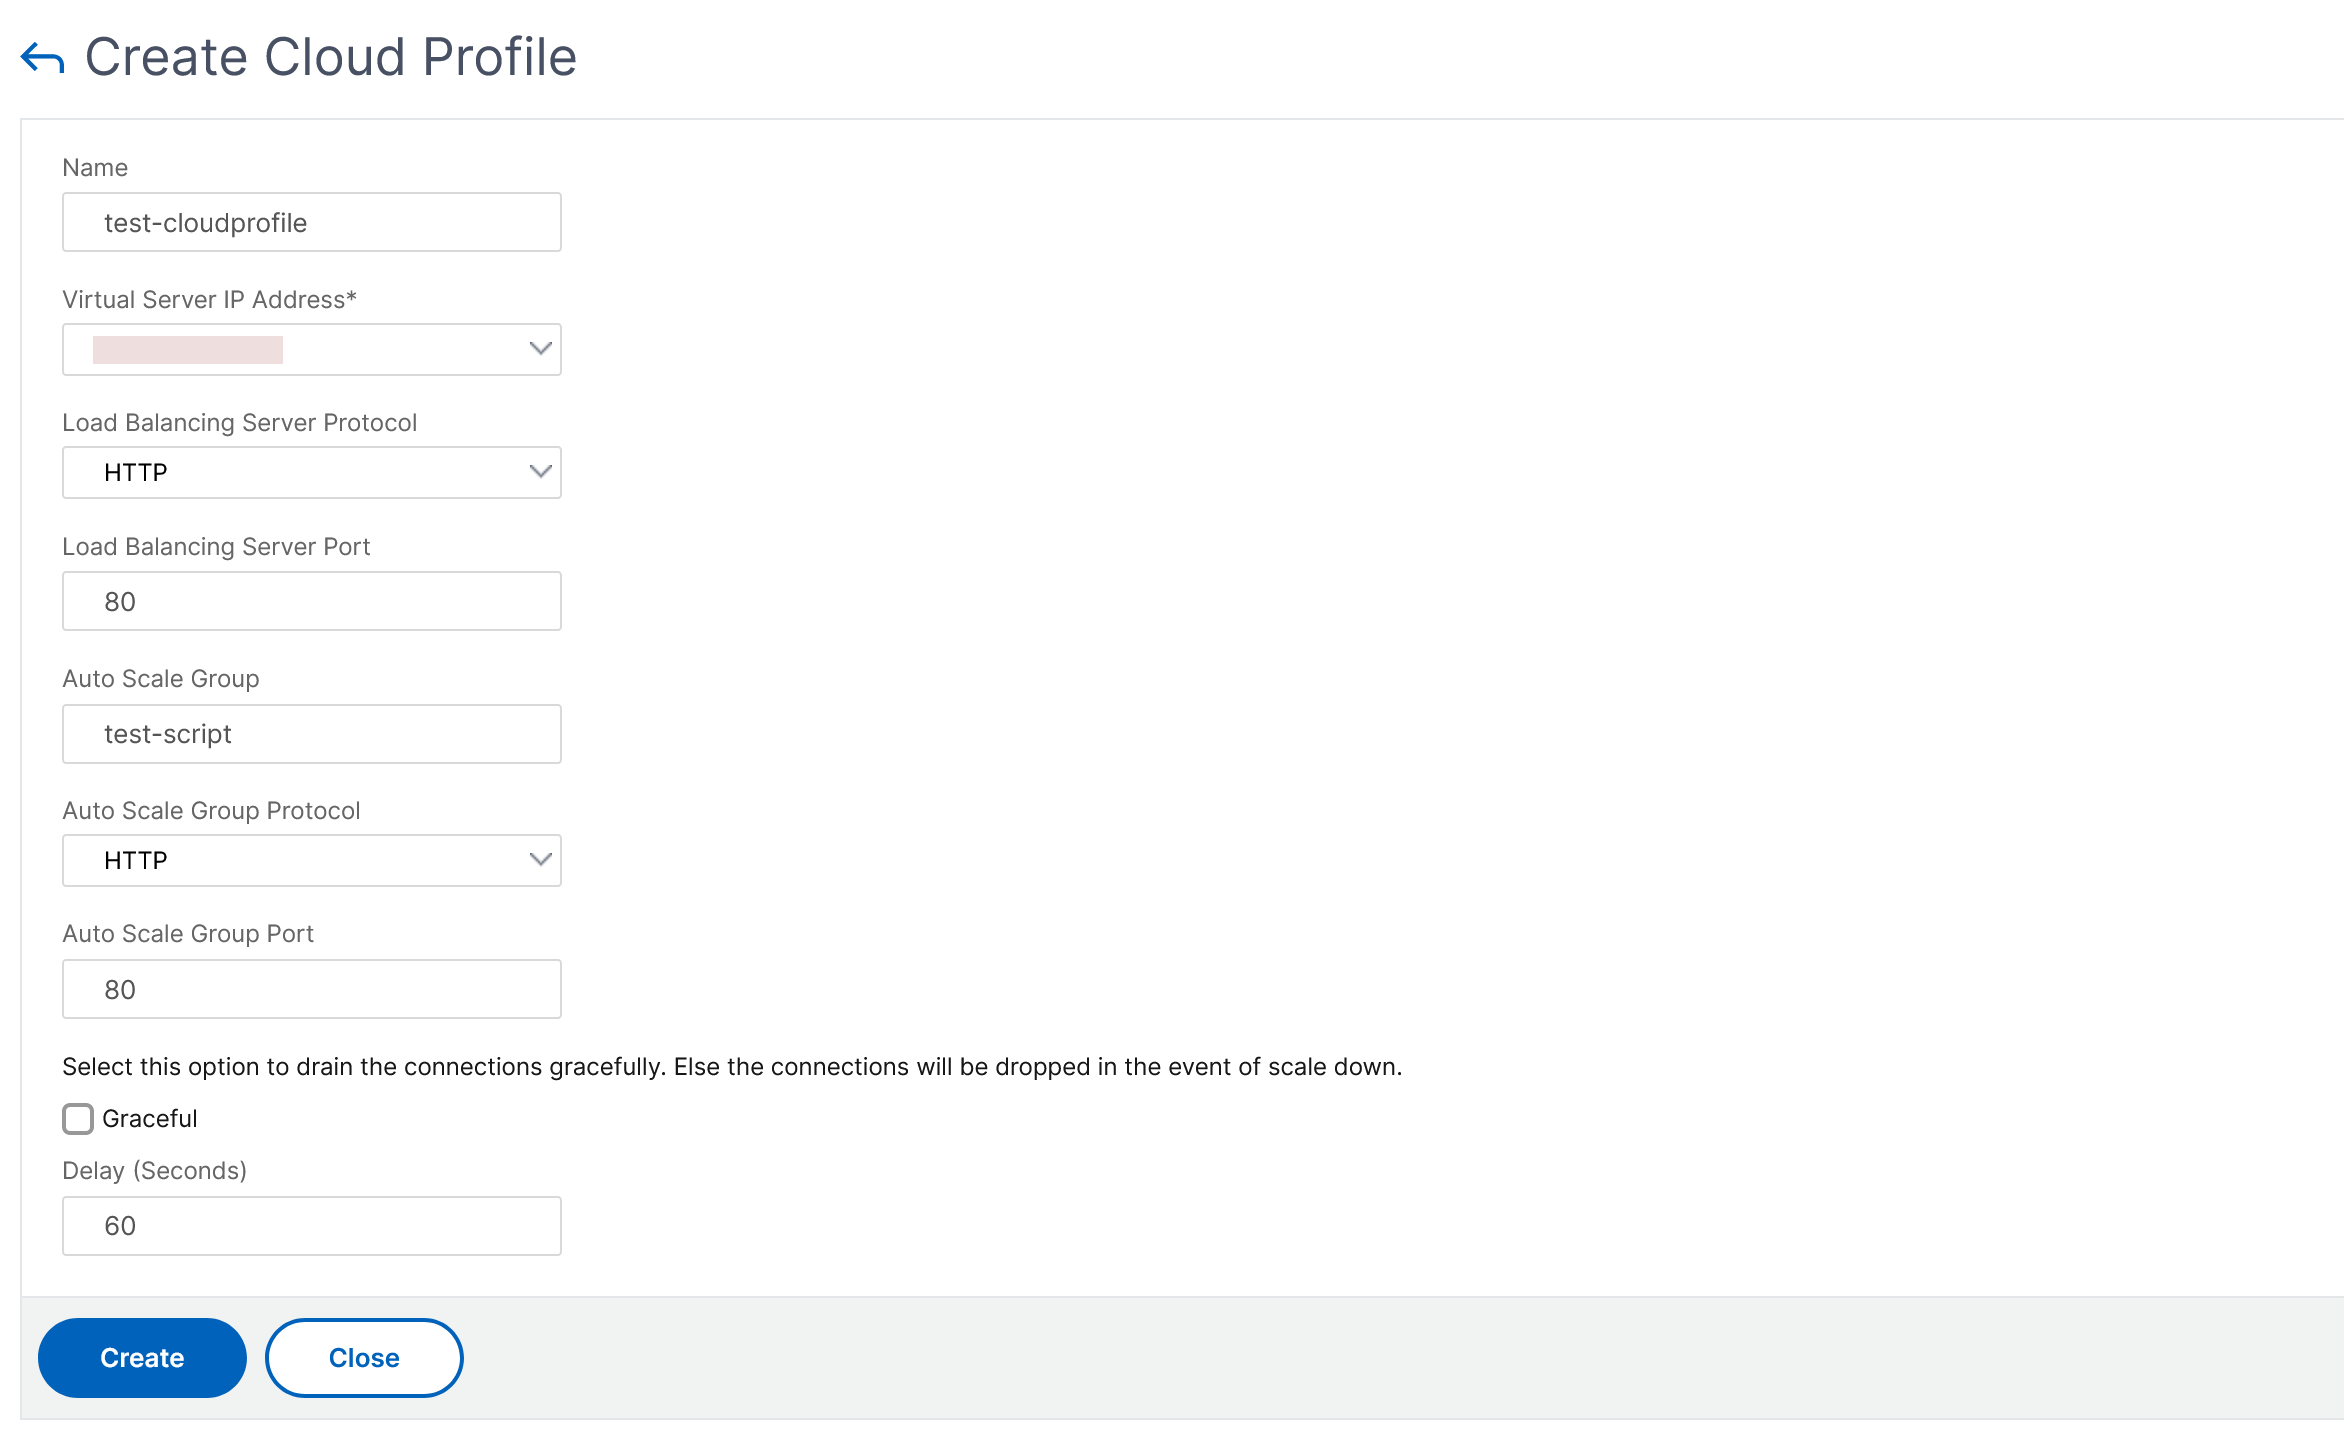
Points to note while creating a cloud profile:
- The virtual server IP address is auto populated from the free IP address available to the VPX instance. For more information, see Manage Multiple IP address.
- Type the exact name of the Autoscale group that you configured on your AWS account. For more information, see AWS Auto Scaling groups.
- While selecting the Autoscaling group protocol and port, ensure that your servers listen on those protocols and ports, and you bind the correct monitor in the service group. By default, the TCP monitor is used.
- For SSL Protocol type Autoscaling, after you create the cloud profile, the load balancing virtual server or service group appears to be down because of a missing certificate. You can bind the certificate to the virtual server or service group manually.
-
Select Graceful and specify a timeout value in the Delay field to remove the Autoscale servers gracefully. This option initiates a scale-down event. The VPX instance does not remove the server immediately but marks one of the servers for graceful deletion. During this period, the VPX instance does not allow new connections to this server. Existing connections are served until the timeout occurs. After the timeout, the VPX instance removes the server.
If you do not select the Graceful option, the server in the Autoscale group is removed immediately after the load goes down. This might cause service interruption for the existing connected clients.
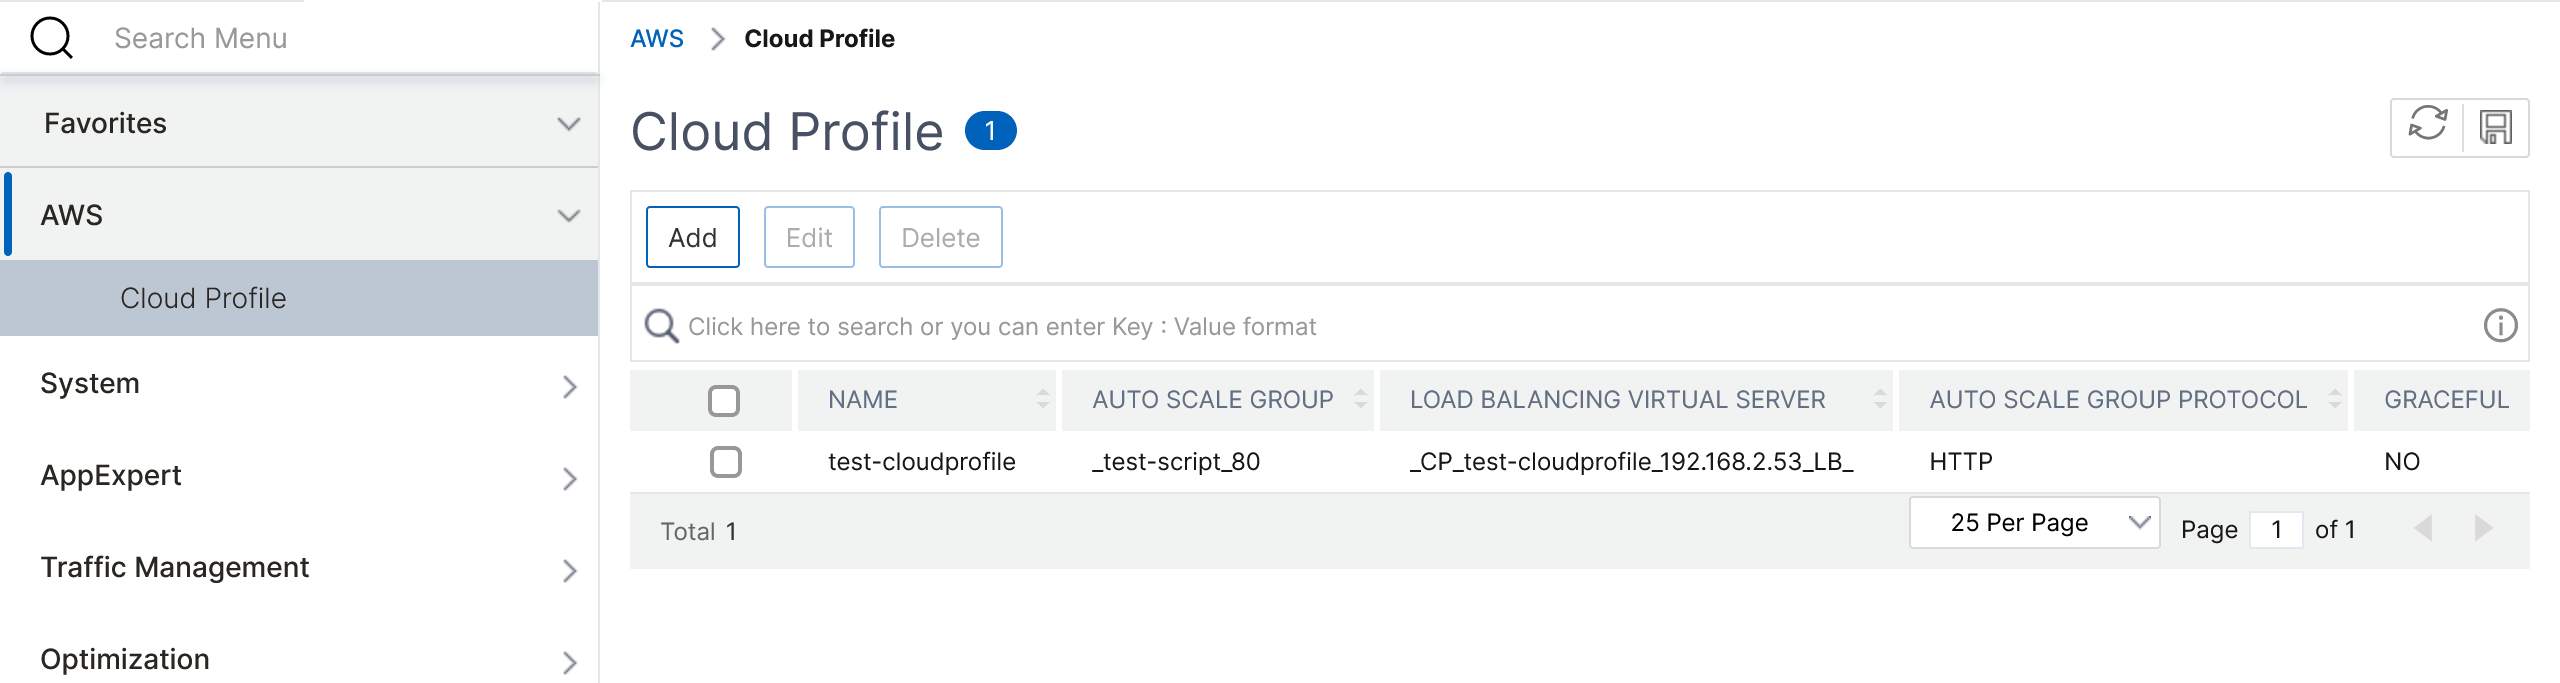
After you create the cloud profile, a NetScaler load balancing virtual server and a service group with members as the servers of the Autoscaling group is created. Your back-end servers must be reachable through the SNIP configured on the VPX instance.
Note:
- To view Autoscale-related information in the AWS console, go to EC2 > Dashboard > Auto Scaling > Auto Scaling Group.
- You can create different cloud profiles for different services (using different ports) with the same Autoscaling Group (ASG) in AWS. Thus, the NetScaler VPX instance supports multiple services with the same Autoscaling group in the public cloud.