Optimize NetScaler VPX performance on VMware ESX, Linux KVM, and Citrix Hypervisors
The NetScaler VPX performance greatly varies depending on the hypervisor, allocated system resources, and the host configurations. To achieve the desired performance, first follow the recommendations in the VPX data sheet, and then further optimize it using the best practices provided in this document.
NetScaler VPX instance on VMware ESX hypervisors
This section contains details of configurable options and settings, and other suggestions that help you achieve optimal performance of NetScaler VPX instance on VMware ESX hypervisors.
- Recommended configuration on ESX hosts
- NetScaler VPX with E1000 network interfaces
- NetScaler VPX with VMXNET3 network interfaces
- NetScaler VPX with SR-IOV and PCI passthrough network interfaces
Recommended configuration on ESX hosts
To achieve high performance for VPX with E1000, VMXNET3, SR-IOV, and PCI passthrough network interfaces, follow these recommendations:
- The total number of virtual CPUs (vCPUs) provisioned on the ESX host must be less than or equal to the total number of physical CPUs (pCPUs) on the ESX host.
-
Non-uniform Memory Access (NUMA) affinity and CPU affinity must be set for the ESX host to achieve good results.
– To find the NUMA affinity of a Vmnic, log in to the host locally or remotely, and type:
#vsish -e get /net/pNics/vmnic7/properties | grep NUMA Device NUMA Node: 0 <!--NeedCopy-->- To set NUMA and vCPU affinity for a VM, see VMware documentation.
NetScaler VPX with E1000 network interfaces
Perform the following settings on the VMware ESX host:
- On the VMware ESX host, create two vNICs from one pNIC vSwitch. Multiple vNICs create multiple Receive (Rx) threads in the ESX host. This increases the Rx throughput of the pNIC interface.
- Enable VLANs on the vSwitch port group level for each vNIC that you have created.
- To increase vNIC transmit (Tx) throughput, use a separate Tx thread in the ESX host per vNIC. Use the following ESX command:
-
For ESX version 5.5:
esxcli system settings advanced set –o /Net/NetTxWorldlet –i <!--NeedCopy--> -
For ESX version 6.0 onwards:
 esxcli system settings advanced set -o /Net/NetVMTxType –i 1
 <!--NeedCopy-->
-
-
To further increase the vNIC Tx throughput, use a separate Tx completion thread and Rx threads per device (NIC) queue. Use the following ESX command:
 esxcli system settings advanced set -o /Net/NetNetqRxQueueFeatPairEnable -i 0
 <!--NeedCopy-->
Note:
Make sure that you reboot the VMware ESX host to apply the updated settings.
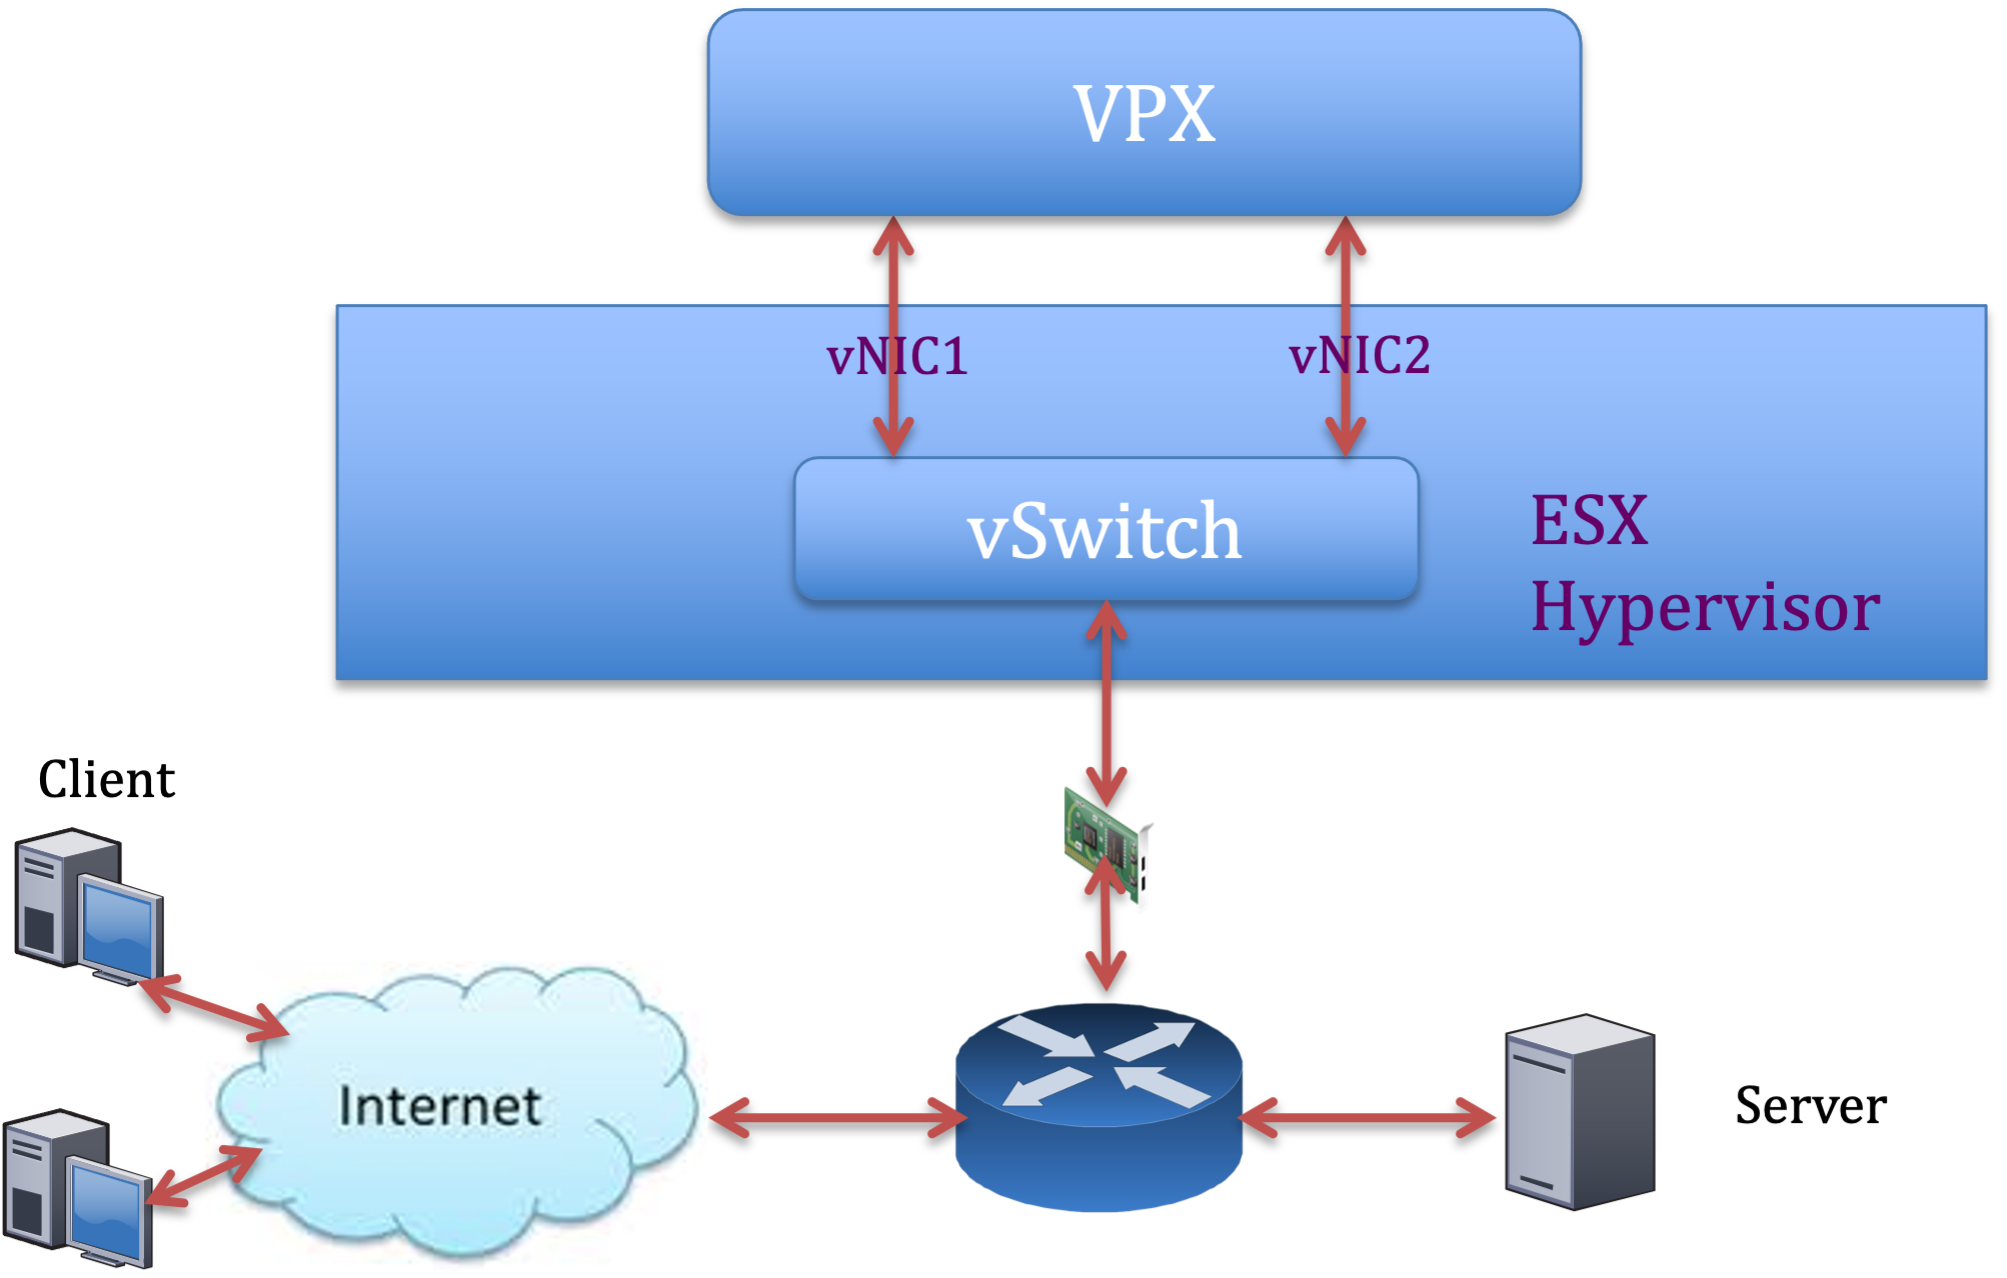
Two vNICs per pNIC deployment
The following is a sample topology and configuration commands for the Two vNICs per pNIC model of deployment that delivers better network performance.
NetScaler VPX sample configuration:
To achieve the deployment shown in the preceding sample topology, perform the following configuration on the NetScaler VPX instance:
-
On the client side, bind the SNIP (1.1.1.2) to network interface 1/1 and enable the VLAN tag mode.
bind vlan 2 -ifnum 1/1 –tagged bind vlan 2 -IPAddress 1.1.1.2 255.255.255.0 <!--NeedCopy--> -
On the server side, bind the SNIP (2.2.2.2) to network interface 1/1 and enable the VLAN tag mode.
bind vlan 3 -ifnum 1/2 –tagged bind vlan 3 -IPAddress 2.2.2.2 255.255.255.0 <!--NeedCopy--> -
Add an HTTP virtual server (1.1.1.100) and bind it to a service (2.2.2.100).
 add lb vserver v1 HTTP 1.1.1.100 80 -persistenceType NONE -Listenpolicy None -cltTimeout 180
 add service s1 2.2.2.100 HTTP 80 -gslb NONE -maxClient 0 -maxReq 0 -cip DISABLED -usip NO -useproxyport YES -sp ON -cltTimeout 180 -svrTimeout 360 -CKA NO -TCPB NO -CMP NO
 bind lb vserver v1 s1
 <!--NeedCopy-->
Note:
Make sure that you include the following two entries in the route table:
- 1.1.1.0/24 subnet with gateway pointing to SNIP 1.1.1.2
- 2.2.2.0/24 subnet with gateway pointing to SNIP 2.2.2.2
NetScaler VPX with VMXNET3 network interfaces
To achieve high performance for VPX with VMXNET3 network interfaces, do the following settings on the VMware ESX host:
- Create two vNICs from one pNIC vSwitch. Multiple vNICs create multiple Rx threads in the ESX host. This increases the Rx throughput of the pNIC interface.
- Enable VLANs on the vSwitch port group level for each vNIC that you have created.
- To increase vNIC transmit (Tx) throughput, use a separate Tx thread in the ESX host per vNIC. Use the following ESX commands:
- For ESX version 5.5:
esxcli system settings advanced set –o /Net/NetTxWorldlet –i <!--NeedCopy-->- For ESX version 6.0 onwards:
  esxcli system settings advanced set -o /Net/NetVMTxType –i 1
  <!--NeedCopy-->
On the VMware ESX host, perform the following configuration:
- On the VMware ESX host, create two vNICs from 1 pNIC vSwitch. Multiple vNICs create multiple Tx and Rx threads in the ESX host. This increases the Tx and Rx throughput of the pNIC interface.
- Enable VLANs on the vSwitch port group level for each vNIC that you have created.
-
To increase Tx throughput of a vNIC, use a separate Tx completion thread and Rx threads per device (NIC) queue. Use the following command:
esxcli system settings advanced set -o /Net/NetNetqRxQueueFeatPairEnable -i 0 <!--NeedCopy--> -
Configure a VM to use one transmit thread per vNIC, by adding the following setting to the VM’s configuration:
ethernetX.ctxPerDev = "1" <!--NeedCopy--> -
Configure a VM to use up to 8 transmit thread per vNIC, by adding the following setting to the VM’s configuration:
 ethernetX.ctxPerDev = "3"
 <!--NeedCopy-->
Note:
Increasing the transmit threads per vNIC requires more CPU resources (up to 8) on the ESX host. Ensure that sufficient CPU resources are available before making the preceding settings.
Note:
Make sure that you reboot the VMware ESX host to apply the updated settings.
You can configure VMXNET3 as a Two vNICs per pNIC deployment. For more information, see Two vNICs per pNIC deployment.
Configure multi-queue and RSS support on VMware ESX for VMXNET3 devices
By default, the VMXNET3 device supports only 8 Rx and Tx queues. When the number of vCPUs on the VPX goes beyond 8, the number of Rx and Tx queues configured for a VMXNET3 interface switches to 1 by default. You can configure up to 19 Rx and Tx queues for VMXNET3 devices by changing certain configurations on ESX. This option increases the performance and uniform distribution of packets across the vCPUs of the VPX instance.
Note:
Starting from NetScaler release 13.1 build 48.x, the NetScaler VPX supports up to 19 Rx and Tx queues on ESX for VMXNET3 devices.
Prerequisites:
To configure up to 19 Rx and Tx queues on ESX for VMXNET3 devices, make sure that the following prerequisites are met:
- NetScaler VPX version is 13.1 build 48.X and later.
- NetScaler VPX is configured with a virtual machine of hardware version 17 and later, which is supported by VMware ESX 7.0 and later.
Configure VMXNET3 interfaces to support more than 8 Rx and Tx queues:
- Open the virtual machine configuration file (.vmx) file.
-
Specify the number of Rx and TX queues by configuring the
ethernetX.maxTxQueuesandethernetX.maxRxQueuesvalues (where X is the number of the virtual NICs to configure). The maximum number of queues configured must not be greater than the number of vCPUs in the virtual machine.Note:
Increasing the number of queues also increases the processor overhead on the ESX host. Therefore, ensure that sufficient CPU resources are available in the ESX host before increasing the queues. You can increase the maximum number of queues supported, in scenarios, where the number of queues are identified as a bottleneck for performance. In these situations, we recommend increasing the number of queues gradually. For example, from 8 to 12, then to 16, then to 20, and so on. Evaluate the performance at each setting, rather than increasing directly to the maximum limit.
NetScaler VPX with SR-IOV and PCI passthrough network interfaces
To achieve high performance for NetScaler VPX with SR-IOV and PCI passthrough network interfaces, see Recommended configuration on ESX hosts.
Usage guidelines for VMware ESXi hypervisor
-
We recommend you deploy a NetScaler VPX instance on local disks of the server or SAN-based storage volumes.
See the VMware ESXi CPU Considerations section in the Performance Best Practices for VMware vSphere 6.5 document. Here’s an extract:
-
It isn’t recommended to deploy virtual machines with high CPU or memory demand on a overcommitted host or cluster.
-
In most environments, ESXi allows significant levels of CPU overcommitment without impacting virtual machine performance. On a host, you can run more vCPUs than the total number of physical processor cores in that host.
-
If an ESXi host becomes CPU saturated, that is, the virtual machines and other loads on the host demand all the CPU resources the host has, latency-sensitive workloads might not perform well. In this case, reduce the CPU load for example, by powering off some virtual machines or migrating them to a different host (or allowing DRS to migrate them automatically).
-
NetScaler recommends using the latest hardware compatibility version to avail the latest feature sets of the ESXi hypervisor for the virtual machine. For more information about the hardware and ESXi version compatibility, see the VMware documentation.
-
The NetScaler VPX is a latency-sensitive, high-performance virtual appliance. To deliver its expected performance, the appliance requires vCPU reservation, memory reservation, and vCPU pinning on the host. Also, hyper threading must be disabled on the host. If the host does not meet these requirements, the following issues might occur:
- High-availability failover
- CPU spike within the VPX instance
- Sluggishness in accessing the VPX CLI
- Pit boss daemon crash
- Packet drops
- Low throughput
-
A hypervisor is considered over-provisioned if one of the following two conditions is met:
-
The total number of virtual cores (vCPU) provisioned on the host is greater than the total number of physical cores (pCPUs).
-
The total number of provisioned VMs consume more vCPUs than the total number of pCPUs.
If an instance is over-provisioned, the hypervisor might not guarantee the resources reserved (such as CPU, memory, and others) for the instance due to hypervisor scheduling over-heads, bugs, or limitations with the hypervisor. This behavior can cause lack of CPU resources for NetScaler and might lead to the issues mentioned in the first point under Usage guidelines. We recommend that the administrators reduce the host’s tenancy so that the total number of vCPUs provisioned on the host is lesser or equal to the total number of pCPUs.
Example:
For ESX hypervisor, if the
%RDY%parameter of a VPX vCPU is greater than 0 in theesxtopcommand output, the ESX host is said to have scheduling overheads, which can cause latency related issues for the VPX instance.In such a situation, reduce the tenancy on the host so that
%RDY%returns to 0 always. Alternatively, contact the hypervisor vendor to triage the reason for not honoring the resource reservation.
-
Commands to control the packet engine CPU usage
You can use two commands (set ns vpxparam and show ns vpxparam) to control the packet engine (non-management) CPU usage behavior of VPX instances in hypervisor and cloud environments:
-
set ns vpxparam [-cpuyield (YES | NO | DEFAULT)] [-masterclockcpu1 (YES | NO)]Allow each VM to use the CPU resources allocated to another VM but are not being used.
Set ns vpxparamparameters:-cpuyield: Release or do not release of allocated but unused CPU resources.
-
YES: Allow allocated but unused CPU resources to be used by another VM.
-
NO: Reserve all CPU resources for the VM to which they’ve been allocated. This option shows a higher percentage in hypervisor and cloud environments for VPX CPU usage.
-
DEFAULT: No.
Note:
On all the NetScaler VPX platforms, the vCPU usage on the host system is 100 percent. Use the
set ns vpxparam –cpuyield YEScommand to override this usage.If you want to set the cluster nodes to “yield”, you must perform the following extra configurations on CCO:
- If a cluster is formed, all the nodes are set to “yield=DEFAULT”.
- If a cluster is formed using the nodes that are already set to “yield=YES”, then the nodes are added to cluster using the “DEFAULT” yield.
Note:
If you want to set the cluster nodes to “yield=YES”, you can configure only after forming the cluster but not before the cluster is formed.
-masterclockcpu1: You can move the main clock source from CPU0 (management CPU) to CPU1. This parameter has the following options:
-
YES: Allow the VM to move the main clock source from CPU0 to CPU1.
-
NO: VM uses CPU0 for the main clock source. By default, CPU0 is the main clock source.
-
-
show ns vpxparamThis command displays the current
vpxparamsettings.
NetScaler VPX instance on Linux-KVM platform
This section contains details of configurable options and settings, and other suggestions that help you achieve optimal performance of NetScaler VPX instance on Linux-KVM platform.
- Performance settings for KVM
- NetScaler VPX with PV network interfaces
- NetScaler VPX with SR-IOV and Fortville PCIe passthrough network interfaces
Performance settings for KVM
Perform the following settings on the KVM host:
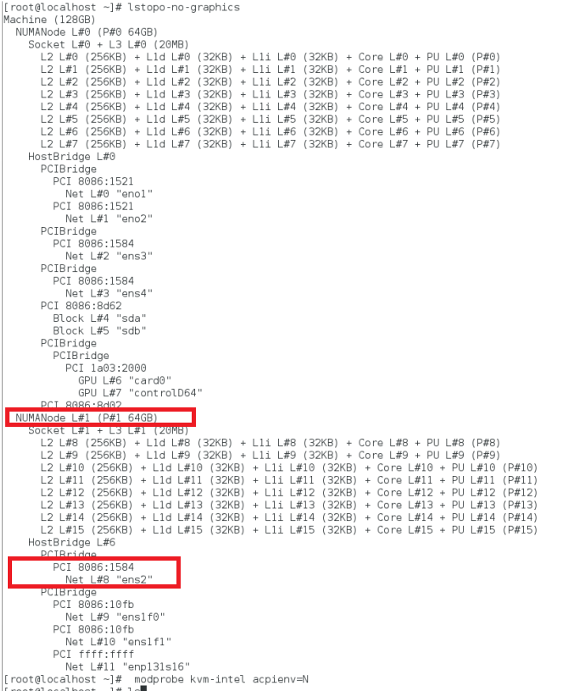
Find the NUMA domain of the NIC using the lstopo command:
Make sure that memory for the VPX and the CPU is pinned to the same location. In the following output, the 10G NIC “ens2” is tied to NUMA domain #1.
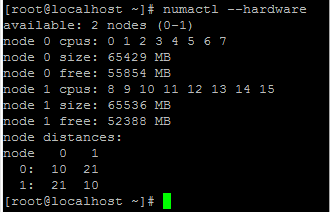
Allocate the VPX memory from the NUMA domain.
The numactl command indicates the NUMA domain from which the memory is allocated. In the following output, around 10 GB RAM is allocated from NUMA node #0.
To change the NUMA node mapping, follow these steps.
-
Edit the .xml of the VPX on the host.
/etc/libvirt/qemu/<VPX_name>.xml <!--NeedCopy--> -
Add the following tag:
<numatune> <memory mode="strict" nodeset="1"/> This is the NUMA domain name </numatune> <!--NeedCopy--> -
Shut down the VPX.
-
Run the following command:
virsh define /etc/libvirt/qemu/<VPX_name>.xml
<!--NeedCopy-->
This command updates the configuration information for the VM with the NUMA node mappings.
-
Power on the VPX. Then check the
numactl –hardwarecommand output on the host to see the updated memory allocations for the VPX.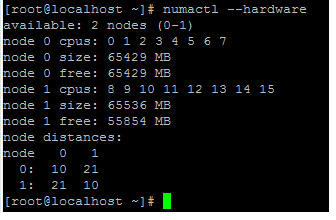
Pin vCPUs of VPX to physical cores.
-
To view the vCPU to pCPU mappings of a VPX, type the following command
 virsh vcpupin <VPX name>
 <!--NeedCopy-->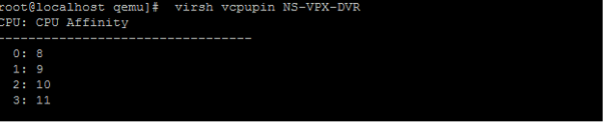
The vCPUs 0–4 are mapped to physical cores 8–11.
-
To view the current pCPU usage, type the following command:
 mpstat -P ALL 5
 <!--NeedCopy-->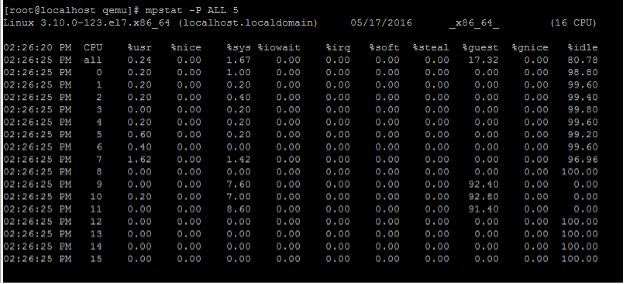
In this output, 8 is management CPU, and 9–11 are packet engines.
-
To change the vCPU to pCPU pinning, there are two options.
-
Change it at runtime after the VPX boots up using the following command:
virsh vcpupin <VPX name> <vCPU id> <pCPU number> virsh vcpupin NetScaler-VPX-XML 0 8 virsh vcpupin NetScaler-VPX-XML 1 9 virsh vcpupin NetScaler-VPX-XML 2 10 virsh vcpupin NetScaler-VPX-XML 3 11 <!--NeedCopy--> -
To make static changes to the VPX, edit the
.xmlfile as before with the following tags:-
Edit the .xml file of the VPX on the host
/etc/libvirt/qemu/<VPX_name>.xml <!--NeedCopy--> -
Add the following tag:
<vcpu placement='static' cpuset='8-11'>4</vcpu> <cputune> <vcpupin vcpu='0' cpuset='8'/> <vcpupin vcpu='1' cpuset='9'/> <vcpupin vcpu='2' cpuset='10'/> <vcpupin vcpu='3' cpuset='11'/> </cputune> <!--NeedCopy--> -
Shut down the VPX.
-
Update the configuration information for the VM with the NUMA node mappings using the following command:
virsh define /etc/libvirt/qemu/ <VPX_name>.xml <!--NeedCopy--> -
Power on the VPX. Then check the
virsh vcpupin <VPX name>command output on the host to see the updated CPU pinning.
-
-
Eliminate host interrupt overhead.
-
Detect VM_EXITS using the
kvm_statcommand.At the hypervisor level, host interrupts are mapped to the same pCPUs on which the vCPUs of the VPX are pinned. This might cause vCPUs on the VPX to get kicked out periodically.
To find the VM exits done by VMs running the host, use the
kvm_statcommand.[root@localhost ~]# kvm_stat -1 | grep EXTERNAL kvm_exit(EXTERNAL_INTERRUPT) 1728349 27738 [root@localhost ~]# <!--NeedCopy-->A higher value in the order of 1+M indicates an issue.
If a single VM is present, the expected value is 30–100 K. Anything more than that can indicate that there are one or more host interrupt vectors mapped to the same pCPU.
-
Detect host interrupts and migrate host interrupts.
When you run the
concatenatecommand for the “/proc/interrupts” file, it displays all the host interrupt mappings. If one or more active IRQs map to the same pCPU, its corresponding counter increments.Move any interrupts that overlap with your NetScaler VPX’s pCPUs to unused pCPUs:
echo 0000000f > /proc/irq/55/smp_affinity 0000000f - - > it is a bitmap, LSBs indicates that IRQ 55 can only be scheduled on pCPUs 0 – 3 <!--NeedCopy--> -
Disable IRQ balance.
Disable IRQ balance daemon, so that no rescheduling happens on the fly.
 service irqbalance stop
 service irqbalance show - To check the status
 service irqbalance start - Enable if needed
 <!--NeedCopy-->
Make sure you run the
kvm_statcommand to ensure that there are not many counters.
NetScaler VPX with PV network interfaces
You can configure para-virtualization (PV), SR-IOV, and PCIe passthrough network interfaces as a Two vNICs per pNIC deployment. For more information, see Two vNICs per pNIC deployment.
For optimal performance of PV (virtio) interfaces, follow these steps:
- Identify the NUMA domain to which the PCIe slot/NIC belongs.
- The memory and vCPU for the VPX must be pinned to the same NUMA domain.
- Vhost thread must be bound to the CPUs in the same NUMA domain.
Bind the virtual host threads to the corresponding CPUs:
-
Once the traffic is started, run the
topcommand on the host.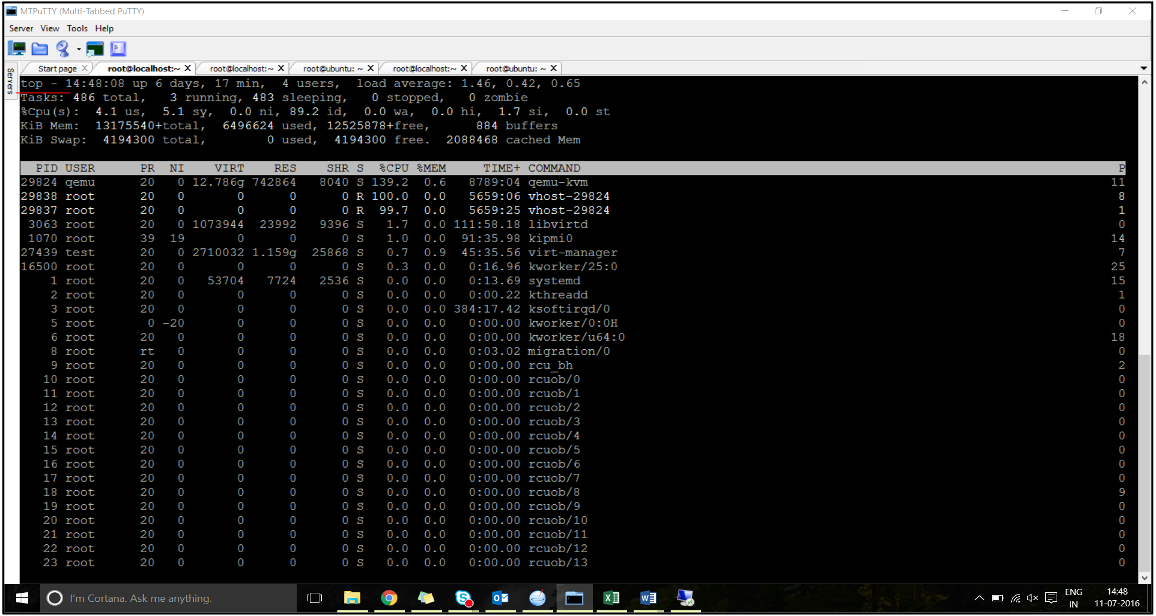
- Identify the virtual host process (named as
vhost-<pid-of-qemu>) affinity. -
Bind the vHost processes to the physical cores in the NUMA domain identified earlier using the following command:
taskset –pc <core-id> <process-id>
<!--NeedCopy-->
Example:
taskset –pc 12 29838 <!--NeedCopy--> -
The processor cores corresponding to the NUMA domain can be identified with the following command:
[root@localhost ~]# virsh capabilities | grep cpu
<cpu>
    </cpu>
        <cpus num='8'>
            <cpu id='0' socket_id='0' core_id='0' siblings='0'/>
            <cpu id='1' socket_id='0' core_id='1' siblings='1'/>
            <cpu id='2' socket_id='0' core_id='2' siblings='2'/>
            <cpu id='3' socket_id='0' core_id='3' siblings='3'/>
            <cpu id='4' socket_id='0' core_id='4' siblings='4'/>
            <cpu id='5' socket_id='0' core_id='5' siblings='5'/>
            <cpu id='6' socket_id='0' core_id='6' siblings='6'/>
            <cpu id='7' socket_id='0' core_id='7' siblings='7'/>
        </cpus>

        <cpus num='8'>
        <cpu id='8' socket_id='1' core_id='0' siblings='8'/>
        <cpu id='9' socket_id='1' core_id='1' siblings='9'/>
        <cpu id='10' socket_id='1' core_id='2' siblings='10'/>
        <cpu id='11' socket_id='1' core_id='3' siblings='11'/>
        <cpu id='12' socket_id='1' core_id='4' siblings='12'/>
        <cpu id='13' socket_id='1' core_id='5' siblings='13'/>
        <cpu id='14' socket_id='1' core_id='6' siblings='14'/>
        <cpu id='15' socket_id='1' core_id='7' siblings='15'/>
        </cpus>

    <cpuselection/>
    <cpuselection/>

<!--NeedCopy-->
Bind the QEMU process to the corresponding physical core:
- Identify the physical cores on which the QEMU process is running. For more information, see the preceding output.
-
Bind the QEMU process to the same physical cores to which you bind the vCPUs, using the following command:
taskset –pc 8-11 29824
<!--NeedCopy-->
NetScaler VPX with SR-IOV and Fortville PCIe passthrough network interfaces
For optimal performance of the SR-IOV and Fortville PCIe passthrough network interfaces, follow these steps:
- Identify the NUMA domain to which the PCIe slot/NIC belongs.
- The Memory and vCPU for NetScaler VPX must be pinned to the same NUMA domain.
Sample VPX XML file for vCPU and memory pinning for Linux KVM:
    <domain type='kvm'>
        <name>NetScaler-VPX</name>
        <uuid>138f7782-1cd3-484b-8b6d-7604f35b14f4</uuid>
        <memory unit='KiB'>8097152</memory>
        <currentMemory unit='KiB'>8097152</currentMemory>
        <vcpu placement='static'>4</vcpu>

    <cputune>
        <vcpupin vcpu='0' cpuset='8'/>
        <vcpupin vcpu='1' cpuset='9'/>
        <vcpupin vcpu='2' cpuset='10'/>
        <vcpupin vcpu='3' cpuset='11'/>
    </cputune>

    <numatune>
    <memory mode='strict' nodeset='1'/>
    </numatune>

    </domain>
<!--NeedCopy-->
NetScaler VPX instance on Citrix Hypervisors
This section contains details of configurable options and settings, and other suggestions that help you achieve optimal performance of NetScaler VPX instance on Citrix Hypervisors.
- Performance settings for Citrix Hypervisors
- NetScaler VPX with SR-IOV network interfaces
- NetScaler VPX with para-virtualized interfaces
Performance settings for Citrix Hypervisors
Find the NUMA domain of the NIC using the “xl” command:
xl info -n
<!--NeedCopy-->
Pin vCPUs of VPX to physical cores.
xl vcpu-pin <Netsclaer VM Name>  <vCPU id>  <physical CPU id>
<!--NeedCopy-->
Check binding of vCPUs.
xl vcpu-list
<!--NeedCopy-->
Allocate more than 8 vCPUs to NetScaler VMs.
For configuring more than 8 vCPUs, run the following commands from the Citrix Hypervisor™ console:
xe vm-param-set uuid=your_vms_uuid VCPUs-max=16
xe vm-param-set uuid=your_vms_uuid VCPUs-at-startup=16
<!--NeedCopy-->
NetScaler VPX with SR-IOV network interfaces
For optimal performance of the SR-IOV network interfaces, follow these steps:
- Identify the NUMA domain to which the PCIe slot or NIC is tied to.
- Pin the Memory and vCPU for the VPX to the same NUMA domain.
- Bind the Domain-0 vCPU to the remaining CPU.
NetScaler VPX with para-virtualized interfaces
For optimal performance, two vNICs per pNIC and one vNIC per pNIC configurations are advised, as in other PV environments.
To achieve optimal performance of para-virtualized (netfront) interfaces, follow these steps:
- Identify the NUMA domain to which the PCIe slot or NIC belongs.
- Pin the memory and vCPU for the VPX to the same NUMA domain.
- Bind the Domain-0 vCPU to the remaining CPU of the same NUMA domain.
- Pin host Rx/Tx threads of vNIC to Domain-0 vCPUs.
Pin host threads to Domain-0 vCPUs:
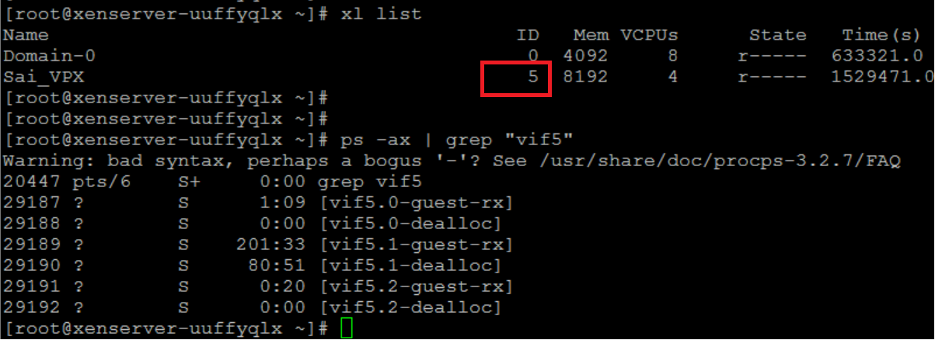
- Find Xen-ID of NetScaler VPX by using the
xl listcommand on the Citrix Hypervisor host shell. -
Identify host threads by using the following command:
ps -ax | grep vif <Xen-ID>
<!--NeedCopy-->
In the following example, these values indicate:
- vif5.0 - The threads for the first interface allocated to VPX in XenCenter (management interface).
- vif5.1 - The threads for the second interface assigned to VPX and so on.
-
Pin the threads to Domain-0 vCPUs using the following command:
taskset –pc <core-id> <process-id>
<!--NeedCopy-->
Example:
taskset -pc 1 29189
<!--NeedCopy-->