Secure management: Implement strict separation of Management and Data planes in NetScaler
The NetScaler® Secure Management feature is designed to significantly strengthen system security by fully isolating the management network from the data network. This enhancement provides a logical separation of all NetScaler functions into distinct Management and Data plane categories. When enabled, each plane operates with its own dedicated routing table, ensuring that management traffic is kept entirely separate and distinct from data traffic.
Note:
Starting with NetScaler release 14.1-72.x, the Secure Management feature is also supported on the NetScaler VPX on Linux platforms.
This feature provides the following key benefits:
- Minimizes the risk of unauthorized access and protects sensitive management functions by preventing intermingling of management and data traffic.
- Ensures a clear distinction between management and data paths, preventing unauthorized access and improving network clarity.
- By separating functionalities, it enhances both the security and operational efficiency of NetScaler.
- Allows users to customize traffic handling and routing according to their specific network security and operational needs.
- Enables the creation and control of separate management and Data plane routing tables, effectively mitigating various security threats.
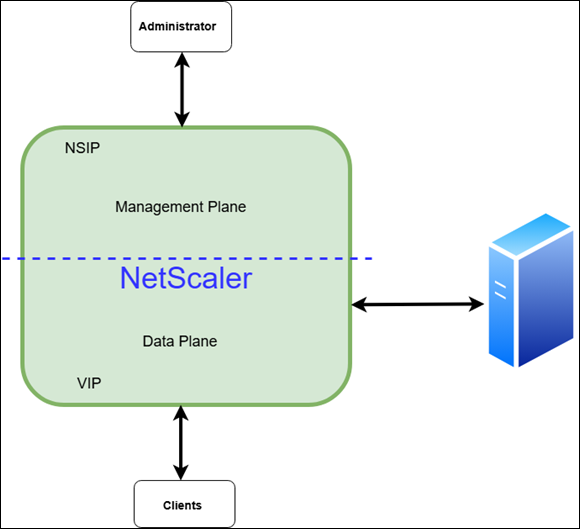
NetScaler topology: Separation of Management and Data Planes
The topology diagram visually represents how NetScaler separates the Management plane and Data plane to ensure efficient traffic handling and security. NetScaler automatically assigns features to the appropriate plane based on the peer device. The Management plane handles non-user traffic, such as API calls, CLI commands, GUI interactions, and logs. NetScaler IP (NSIP) is the dedicated IP for management access. The administrator connects to NSIP over SSH, GUI, or API. The Data plane handles actual application traffic flowing between clients and backend servers. Clients send requests to VIP on NetScaler. NetScaler forwards traffic to backend application servers using SNIPs.
Overview of Management and Data plane features in NetScaler
The Management and Data planes in NetScaler each provide distinct sets of features to ensure secure administration and efficient traffic handling.
Management plane features
The Management plane in NetScaler is responsible for the configuration, administration, and monitoring of the device, ensuring secure and efficient operations. Administrators can securely manage NetScaler through the NSIP using HTTPS for the GUI or NITRO API, SSH for CLI access, and SCP/FTP for transferring configuration files.
- SNMP
- System logging (syslog)
- Audit logging/NSLOG
- Web logging
- AppFlow®
- High Availability
- Clustering
- Network Time Protocol (NTP)
- Precision Time Protocol (PTP)
- DHCP
- Licensing
- Secure Virtual Machine (SVM)
- MASTools
- Console Advisory Connect
- Console Management and Monitoring
- Metric Export
- Management Log Export
- Events Export
Data plane features
Data plane features refer to all the features excluding those related to the Management plane.
Automatic role assignment between Management and Data plane features
Certain features can operate as both Management and Data plane features, depending on the peer device. NetScaler automatically determines this classification without the need for any user configuration.
Switch or override features between Management and Data planes
We provide the flexibility to seamlessly override Management plane features with Data plane features, and conversely. The available override options vary depending on the specific feature. Certain features require user configuration to enable or adjust the override. For more information, see Understanding default traffic plane behavior and override mechanisms.
Configure the Secure Management feature
The Secure Management feature is disabled by default. For enhanced security, this feature can only be configured through the CLI and not using the GUI.
Note:
Configuring the
NSVLANandifnumvalues is mandatory to enable the Secure Management feature. By default, theTDvalue is set to4094. If a different value is required, you can configure it accordingly.
To enable the feature, use the following command:
set ns config -secureManagementTraffic ENABLED -secureManagementTD <TD_value> -nsvlan <nsvlan-id> -ifnum <interface name> ...[-tagged (Yes | No)]
Example:
set ns config -secureManagementTraffic ENABLED -secureManagementTD 300
The following command parameters are used to enable the Secure Management feature:
- -secureManagementTraffic ENABLED: Enables the Secure Management feature.
-
-secureManagementTD
<TD_value>: Specifies the traffic domain value. -
-nsvlan
<nsvlan-id>: Specifies the NSVLAN ID. If NSVLAN is already configured, this feature uses the existing value, which can be modified if needed. -
-ifnum
<interface name>: Specifies the interface names. - -tagged (Yes/No): (Optional) Indicates whether the interface is tagged.
Note:
After enabling the Secure Management feature, make sure to save the configuration and reboot the system.
Two distinct routing tables
When Secure Management is enabled, NetScaler creates two separate planes, each with its own routing table: one for management and one for data. Management entities such as NSIP and SNIPs with management access are included in the management routing table. All other SNIPs and VIPs are included in the data routing table.
To manage routes in the data routing table, use the standard add route and rm route commands. To manage routes in the management routing table, use the same commands with the new -mgmt parameter.
add route 200.1.1.0 255.255.255.0 1.1.1.1 -mgmt
rm route 200.1.1.0 255.255.255.0 1.1.2.2 -mgmt
set route 200.1.1.0 255.255.255.0 1.1.1.2 -cost 30 -mgmt
unset route 200.1.1.0 255.255.255.0 1.1.1.1 -cost -mgmt
show route -mgmt
<!--NeedCopy-->
You can view the two separate routing tables created by this feature using the following commands:
> show route
    Network          Netmask          Gateway/OwnedIP  VLAN    State   Traffic Domain  Type
    -------          -------          ---------------  -----   -----   --------------  ----
    1)  127.0.0.0        255.0.0.0        127.0.0.1        0       UP      0              PERMANENT

> show route -mgmt
    Network          Netmask          Gateway/OwnedIP  VLAN    State   Traffic Domain  Type
    -------          -------          ---------------  -----   -----   --------------  ----
    1)  10.102.37.0      255.255.255.0    10.102.37.238    0       UP      4094           DIRECT
    2)  0.0.0.0          0.0.0.0          10.102.37.1      0       UP      4094           STATIC

<!--NeedCopy-->
To disable the Secure Management feature, run the following command:
unset ns config -secureManagementTraffic
<!--NeedCopy-->
After disabling, save the configuration and manually reboot NetScaler for the changes to take effect. After the reboot, the system reverts to a single routing table, with all entities reassigned to the Data plane’s routing table.
Verify Secure Management feature status
The status of the feature can be verified using the show ns config command.
Without the feature enabled, the command output shows the SecureManagement feature as DISABLED.
> show ns config

    NetScaler IP: 10.102.37.239  (mask: 255.255.255.0)
    Number of MappedIP(s): 0
    Node: Standalone
    SecureManagementTraffic:DISABLED SecureManagementTD:0
               System Time: Wed Jul 23 07:47:09 2025
          Last Config Changed Time: Tue Jul 22 05:42:28 2025
        Last Config Saved Time: Mon Jul 21 09:17:08 2025
    Config Changed since Last Saved Config: TRUE
 Done
<!--NeedCopy-->
When the feature is enabled, the command output shows the SecureManagement feature as ENABLED along with the NSVLAN and SecureManagementTD information.
> show ns config

    NetScaler IP: 10.102.37.238  (mask: 255.255.255.0)
    Number of MappedIP(s): 0
    Node: Standalone
    NetScaler IP Vlan: 4000 Tagged: NO Bound Ports: 1/1
    SecureManagementTraffic:ENABLED SecureManagementTD:4094
                   System Time: Wed Jul 23 07:42:32 2025
          Last Config Changed Time: Tue Jul 22 05:04:53 2025
            Last Config Saved Time: Tue Jul 22 08:04:53 2025
    Config Changed since Last Saved Config: FALSE
 Done
<!--NeedCopy-->
Important considerations when enabling or disabling Secure Management
- Carefully review and update configurations when enabling or disabling this feature to avoid disruptions.
- Enabling Secure Management separates the network into two distinct planes—a secure Management plane and a Data plane—following industry best practices. Assign functions to each plane according to your network design (for example, update NetProfiles for analytics traffic).
- Enabling this feature also configures NSVLAN. If using a tagged NSVLAN, ensure that upstream networks and routers are configured to maintain connectivity.
- Disabling the feature removes Management plane configuration settings, which cause conflicts in a single-plane environment.
- Disabling Secure Management also removes the NSVLAN, which can result in connectivity loss if upstream networks are not properly configured.
-
When enabling or disabling the feature, verify that all required default routes for connectivity exist in the appropriate planes.
Example: Default route configuration and routing table merge
Consider a scenario where you have configured separate default routes for each plane:
-
Data plane: Default route through gateway
192.168.1.1 -
Management plane: Default route through gateway
10.0.0.1
When the Secure Management feature is disabled, both default routes are merged into a single routing table:
- Default route through gateway
192.168.1.1 - Default route through gateway
10.0.0.1
Having multiple default routes in the same routing table can cause unpredictable routing behavior and connectivity issues. Always review and adjust your network configuration before enabling or disabling the Secure Management feature to prevent routing conflicts.
-
Data plane: Default route through gateway
- With Secure Management enabled, SNIPs with management access are permitted only on the Management plane.
-
In high availability (HA) deployments, enable Secure Management on each node individually before forming the HA pair. As with build upgrades, enable the feature first on the secondary node, then on the primary node.
Example: Configuring Sync VLAN for HA deployments
To configure Sync VLAN for HA deployments, the following configuration can be done assuming Management plane is TD=4094 and sync VLAN is 100:
add vlan 100 bind ns trafficdomain 4094 -vlan 100 set HA node -syncvlan 100 <!--NeedCopy--> - Entities intended for the Management plane, such as IP addresses, virtual servers, and network profiles must be configured within the Management traffic domain.
-
When configuring dynamic routing protocols, such as BGP or OSPF with Secure Management enabled, more filtering configurations are required at the vtysh level to maintain proper traffic plane separation.
BGP configuration requirements: Configure route-maps to ensure proper traffic isolation.
- Implement route-maps to prevent Data plane subnet traffic from routing through the management interface.
- Configure route-maps to block Management plane subnet traffic from routing through data interfaces.
OSPF configuration requirements: Configure access-lists to maintain traffic plane boundaries:
- Apply access-lists to prevent Data plane subnet traffic from being advertised or routed through the management interface.
- Implement access-lists to restrict Management plane subnet traffic from traversing Data plane interfaces.
These filtering mechanisms are essential to preserve the security boundaries established by the Secure Management feature when using dynamic routing protocols.
Upgrading and Downgrading with Secure Management
To upgrade from an older build to one that supports the Secure Management feature, follow the standard upgrade procedure. If Secure Management is already enabled on the device, ensure that all configurations are saved before starting the upgrade.
If you downgrade from a build with Secure Management enabled to an older build that does not support this feature, existing configurations might be disrupted. Review your setup and consider disabling the Secure Management feature before performing the downgrade.
Limitations
The following features are not supported when the Secure Management feature is enabled in NetScaler:
- Clustering
- Call Home
- Admin partition
- Traffic domains
- DHCP
Note:
The Secure Management feature is not supported in NetScaler BLX™ and NetScaler CPX™ platforms.