
Configuring Static Routes
You can create static routes manually to:
-
improve the performance of your network.
-
monitor static routes to avoid service disruptions.
You can assign weights to ECMP routes. You can create null routes to prevent routing loops.
Monitored Static Routes: If a manually created (static) route goes down, a backup route is not automatically activated. You must manually delete the inactive primary static route. However, if you configure the static route as a monitored route, the NetScaler appliance can automatically activate a backup route.
Static route monitoring can also be based on the accessibility of the subnet. A subnet is connected to a single interface, but it can be logically accessed through other interfaces. Subnets bound to a VLAN are accessible only if the VLAN is up. VLANs are logical interfaces through which NetScaler transmits and receives packets. A static route is marked as DOWN if the next hop resides on a subnet that is unreachable.
Note:
In a high availability (HA) setup, the default value for monitored state routes (MSRs) on the secondary node is UP. The value is set to avoid a state transition gap upon failover, which might result in dropping packets on those routes.
Consider the following simple topology, in which a NetScaler is load balancing traffic to a site across multiple servers.
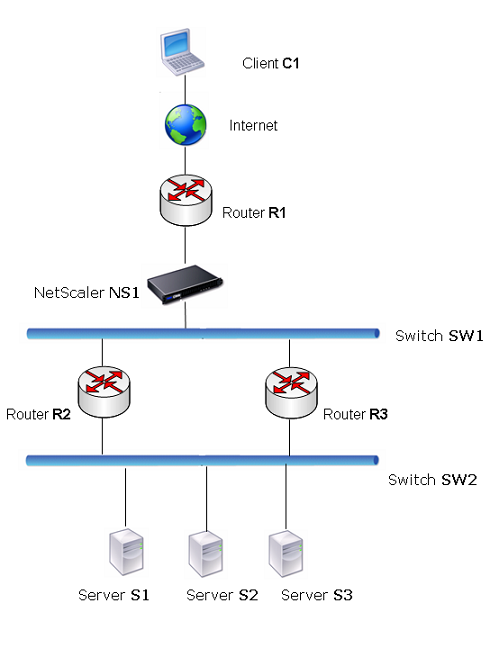
Router R1 moves traffic between the client and NetScaler. The appliance can reach servers S1 and S2 through routers R2 or R3. It has two static routes through which to reach the servers' subnet, one with R2 as the gateway and another with R3 as the gateway. Both these routes have monitoring enabled. The administrative distance of the static route with gateway R2 is lower than the administrative distance of the static route with gateway R3. Therefore, R2 is preferred over R3 to forward traffic to the servers. Also, the default route on the NetScaler points to R1 so that all Internet traffic exits properly.
If R2 fails while monitoring is enabled on the static route, which uses R2 as the gateway, NetScaler marks it as DOWN. NetScaler now uses the static route with R3 as the gateway and forwards the traffic to the servers through R3.
NetScaler supports monitoring of IPv4 and IPv6 static routes. You can configure NetScaler to monitor an IPv4 static route by:
-
Creating an ARP or PING monitor.
-
Using existing ARP or PING monitors.
You can configure NetScaler to monitor an IPv6 static route by:
-
Creating a neighbor discovery for IPv6 (ND6) or PING monitor.
-
Using the existing ND6 or PING monitors.
Weighted Static Routes: When NetScaler makes routing decisions involving routes with equal distance and cost, that is, Equal Cost Multi-Path (ECMP) routes, it balances the load between them by using a hashing mechanism based on the source and destination IP addresses. For an ECMP route, however, you can configure a weight value. NetScaler then uses both the weight and the hashed value for balancing the load.
Null Routes: If the route chosen in a routing decision is inactive, NetScaler chooses a backup route. If all the backup routes become inaccessible, the appliance might reroute the packet to the sender, which might result in a routing loop leading to network congestion. To prevent this situation, you can create a null route, which adds a null interface as a gateway. The null route is never the preferred route, because it has a higher administrative distance than the other static routes. But it is selected if the other static routes become inaccessible. In that case, the appliance drops the packet and prevents a routing loop.
Configuring IPv4 Static Routes
You can add a simple static route or a null route by setting a few parameters, or you can set more parameters to configure a monitored, or monitored and weighted static route. You can change the parameters of a static route. For example, you might want to assign a weight to an unweighted route, or you might want to disable monitoring on a monitored route.
Create a static route by using the CLI
At the command prompt, type:
-
add route <network> <netmask> <gateway>[-cost <positive_integer>] [-advertise (DISABLED | ENABLED)] -
show route [<network> <netmask> [<gateway>]] [<routeType>] [-detail]
Example:
> add route 5.5.5.0 255.255.255.0 10.102.37.5 -cost 2 -advertise ENABLED
  Done

 > sh route
         Network          Netmask          Gateway/OwnedIP  VLAN    State   Traff                                                                             ic Domain  Type
         -------          -------          ---------------  -----   -----   -----                                                                             ---------  ----
 1)      0.0.0.0          0.0.0.0          10.102.37.1      0       UP      0                                                                                           STATIC
 2)      127.0.0.0        255.0.0.0        127.0.0.1        0       UP      0                                                                                           PERMANENT
 3)      10.102.37.0      255.255.255.0    10.102.37.40     0       UP      0                                                                                           DIRECT
 4)      5.5.5.0          255.255.255.0    10.102.37.5      0       UP      0                                                                                           STATIC
 5)      6.6.6.0          255.255.255.0    10.102.37.6      0       UP      0                                                                                           STATIC
  Done
Create a monitored static route by using the CLI
At the command prompt, type the following commands to create a monitored static route and verify the configuration:
-
add route <network> <netmask> <gateway> [-distance <positive_integer>] [-weight <positive_integer>][-msr ( ENABLED | DISABLED) [-monitor <string>]] -
show route [<network> <netmask> [<gateway>]] [<routeType>] [-detail]
Example:
> add route 10.102.29.0 255.255.255.0 10.102.37.37 -distance 5 -weight 6 -msr ENBLED -monitor PING
  Done
 > sh route  10.102.29.0      255.255.255.0    10.102.37.37
         Network          Netmask          Gateway/OwnedIP  VLAN    State   Traffic Domain  Type
         -------          -------          ---------------  -----   -----   --------------  ----
 1)      10.102.29.0      255.255.255.0    10.102.37.37     0       UP      0              STATIC
     Distance:     5    Cost:     0    Weight:     6
     MSR: ENABLED    Monitor: ping
          Probes: 2                 Failed: [Total: 0 Current: 0]
          Last response: Success - ICMP echo reply received.

  Done
Create a null route by using the CLI
At the command prompt type:
-
add route <network> <netmask> null -
show route [<network> <netmask>]
Example:
> add route 10.102.29.0 255.255.255.0 null
  Done
 > sh route 10.102.29.0 255.255.255.0
     Network          Netmask          Gateway/OwnedIP  VLAN    State   Traffic Domain  Type
     -------          -------          ---------------  -----   -----   --------------  ----
 1)    10.102.29.0      255.255.255.0    null             0       UP      0              STATIC
Remove a static route by using the CLI
At the command prompt, type:
rm route <network> <netmask> <gateway>
Example:
> rm route 10.102.29.0 255.255.255.0 10.102.29.3
  Done
Configure a static route by using the GUI
Navigate to System > Network > Routes and, on the Basic tab, add a new static route, or edit an existing static route.
To remove a route by using the GUI:
Navigate to System > Network > Routes and, on the Basic tab, delete the static route.
Configuring IPv6 Static Routes
You can configure a maximum of six default IPv6 static routes. IPv6 routes are selected based on whether the MAC address of the destination device is reachable. Routes can be determined by using the IPv6 Neighbor Discovery feature. Routes are load balanced and only source or destination-based hash mechanisms are used. Therefore, route selection mechanisms such as round robin are not supported. The next hop address in the default route need not belong to the NSIP subnet.
Create an IPv6 route by using the CLI
At the command prompt, type the following commands to create an IPv6 route and verify the configuration:
-
add route6 <network> <gateway> [-vlan <positive_integer>] -
show route6 [<network> [<gateway>]
Example:
> add route6 3ffa::0/64 9004::b
  Done
 > add route6 3ffb::0/64 9004::c
  Done
 > sh route6

  Flags: S - Static, L - LB Route, C - Connected, R - RA Route, A - Active, O - OSPFV3, n - RIPng, B - BGP, i - ISIS, P - Permanent

    Network                      Gateway                      Vlan            Flags      Traffic Domain
    -------                      -------                      ----            -----      --------------
 1) ::1/128                      ::1                          1               PA         0

 2) 3ffa::/64                    9004::b                      0               SA         0

 3) 3ffb::/64                    9004::c                      0               SA         0

 4) 9004::/96                    9004::a                      0               CA         0

 5) fe80::/64                    fe80::3c03:2fff:fe9e:d5e1    1               CA         0

  Done
Create a monitored IPv6 static route by using the CLI
At the command prompt, type the following commands to create a monitored IPv6 static route and verify the configuration:
-
add route6 <network> <gateway> [-msr (ENABLED | DISABLED) [-monitor <string>] -
show route6 [<network> [<gateway>]
Example:
> add route6 ::/0 2004::1 -msr ENABLED -monitor PING
  Done
 > sh route6 ::/0 2004::1 -detail

  Flags: S - Static, L - LB Route, C - Connected, R - RA Route, A - Active, O - OSPFV3, n - RIPng, B - BGP, i - ISIS, P - Permanent

    Network                      Gateway                      Vlan            Flags      Traffic Domain
    -------                      -------                      ----            -----      --------------
 1) ::/0                         2004::1                      0               S          0
 Distance: 1    Cost: 1    Weight: 1
     MSR: ENABLED    Monitor: ping
          Probes: 3                 Failed: [Total: 3 Current: 3]
          Last response: Failure - Probe timed out.
Remove an IPv6 route by using the CLI
At the command prompt, type:
rm route6 <network> <gateway>
Example:
> rm route6 ::/0 2004::1
  Done
Configure an IPv6 route by using the GUI
Navigate to System > Network > Routes, and on the IPV6 tab, add an IPv6 route, or edit an existing IPv6 route.
Remove an IPv6 route by using the GUI
Navigate to System > Network > Routes, and on the IPV6 tab, delete the IPv6 route.