Initial configuration
Note:
This section does not apply to the MPX 9200 platform. For information specific to the MPX 9200 platform, see NetScaler MPX 9200.
After you have installed your appliance in a rack, you are ready to perform the initial configuration. Once the initial configuration is complete, refer to the specific configuration guides for the features you are using.
Initial configuration is the same for the multifunction NetScaler, NetScaler Gateway, and the dedicated NetScaler Web App Firewall appliances. You can use any of the following interfaces for the initial configuration of your appliance:
- First-time use wizard: If you use a web browser to connect to the appliance, you are prompted to enter the network configuration and licensing information, if it is not already specified.
- LCD keypad: You can specify the network settings, but you must use a different interface to upload your licenses.
- Serial console: After connecting to the serial console, you can use the NetScaler command line to specify the network settings and upload your licenses,
- Dynamic Host Configuration Protocol (DHCP): To configure an appliance from a remote network, use DHCP to assign each new appliance an IP address at which you can access the appliance for remote configuration. You can also use DHCP to install multiple NetScaler appliances and then configure them without using the console port.
For initial configuration, use the default password as both the administrative user name and the password. For subsequent access, use the password assigned during initial configuration.
After you complete the initial configuration of the appliance, you can configure secure access to your appliance. As a result, you are no longer prompted for a password when logging on. This configuration is especially helpful in environments for which you would otherwise have to keep track of many passwords.
Using the first-time setup wizard
To configure a NetScaler appliance (or NetScaler virtual appliance) for the first time, you need an administrative computer configured on the same network as the appliance.
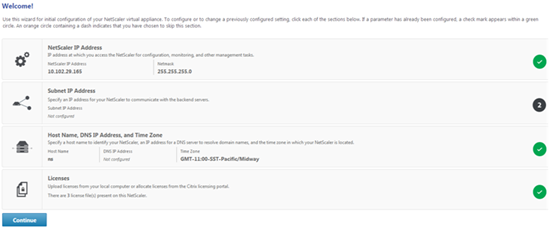
Assign a NetScaler IP (NSIP) address as the management IP address of your NetScaler appliance. You access the appliance for configuration, monitoring, and other management tasks at this address. Assign a subnet IP (SNIP) address for your NetScaler to communicate with the back-end servers. Specify a host name to identify your appliance, an IP address for a DNS server to resolve domain names, and the time zone in which your appliance is located.
The wizard automatically appears if any of the following conditions are met:
- The appliance is configured with the default IP address.
- A subnet IP address is not configured.
- Licenses are not present on the appliance.
Perform first-time configuration of your appliance
-
In a web browser, type:
http://192.168.100.1
<!--NeedCopy-->
Note: The NetScaler software is preconfigured with this default IP address. If you have already assigned as NSIP address, type that address in a web browser.
-
In User Name, type
nsroot. In Password, if the earlier default password does not work, try typing the serial number of the appliance. The serial number bar code is available at the back of the appliance. Citrix recommends that you change the password after the first logon. For information about changing the password, see Change the administrative password.The following screen appears.
-
To configure or to change a previously configured setting, click inside each section. When done, click Continue.
-
When prompted, select Reboot.
Using the LCD keypad
When you first install the appliance, you can configure the initial settings by using the LCD keypad on the front panel of the appliance. The keypad interacts with the LCD display module, which is also on the front panel of these appliances.
Note: You can use the LCD keypad for initial configuration on a new appliance with the default configuration. The configuration file (ns.conf) must contain the following command and default values.
set ns config -IPAddress 192.168.100.1 -netmask 255.255.0.0
<!--NeedCopy-->
The functions of the different keys are explained in the following table.
Table 1. LCD key functions
| Key | Function |
|---|---|
| < | Moves the cursor one digit to the left. |
|
|
Moves the cursor one digit to the right. |
| Increments the digit under the cursor. | |
| v | Decrements the digit under the cursor. |
| . | Processes the information, or terminates the configuration, if none of the values are changed. This key is also known as the ENTER key. |
To perform the initial configuration by using the LCD keypad press the “<” key.
You are prompted to enter the subnet mask, NetScaler IP address (NSIP), and gateway in that order respectively. The subnet mask is associated with both the NSIP and default gateway IP address. The NSIP is the IPv4 address of the NetScaler appliance. The default gateway is the IPv4 address for the router, which handles the external IP traffic that the appliance cannot otherwise route. The NSIP address and the default gateway must be on the same subnet.
If you enter a valid value for the subnet mask, such as 255.255.255.224, you are prompted to enter the IP address. Similarly, if you enter a valid value for the IP address, you are prompted to enter the gateway address. If the value you entered is invalid, the following error message appears for three seconds. Here xxx.xxx.xxx.xxx is the IP address you entered, followed by a request to reenter the value.
Invalid addr!
xxx.xxx.xxx.xxx
<!--NeedCopy-->
If you press the ENTER (.) key without changing any of the digits, the software interprets it as a user exit request. The following message is displayed for three seconds.
Exiting menu...
xxx.xxx.xxx.xxx
<!--NeedCopy-->
If all the values entered are valid, when you press the ENTER key, the following message appears.
Values accepted,
Rebooting...
<!--NeedCopy-->
The subnet mask, NSIP, and gateway values are saved in the configuration file.
Note:
For information about deploying a high availability (HA) pair, see High Availability.
Using the NetScaler serial console
When you first install the appliance, you can configure the initial settings by using the serial console. With the serial console, you can change the system IP address, create a subnet or mapped IP address, configure advanced network settings, and change the time zone.
Note: To locate the serial console port on your appliance, see the front panel illustration of your specific appliance.
Configure initial settings by using a serial console
- Connect the console cable into your appliance. For more information, see “Connecting the Console Cable” in “Installing the Hardware.
-
Run the vt100 terminal emulation program of your choice on your computer to connect to the appliance and configure the following settings: 9600 baud, 8 data bits, 1 stop bit, parity, and flow control set to NONE.
-
Press ENTER. The terminal screen displays the Logon prompt.
Note: You might have to press ENTER two or three times, depending on which terminal program you are using.
-
Log on to the appliance with the administrator credentials. In User Name, type
nsroot. In Password, if the earlier default password does not work, try typing the serial number of the appliance. The serial number bar code is available at the back of the appliance. Citrix recommends that you change the password after the first logon. For information about changing the password, see Change the administrative password. -
At the prompt, type
config nsto run the NetScaler configuration script. -
To complete the initial configuration of your appliance, follow the prompts.
Note: To prevent an attacker from breaching your ability to send packets to the appliance, choose a non-routable IP address on your organization’s LAN as your appliance IP address.
You can replace steps 5 and 6 with the following commands. At the NetScaler command prompt, type:
set ns config -ipaddress<IPAddress> -netmask<subnetMask>
add ns ip<IPAddress> <subnetMask> -type<type>
add route<network> <netmask> <gateway>
set system user <userName> -password
save ns config
reboot
<!--NeedCopy-->
Example:
set ns config -ipaddress 10.102.29.60 -netmask 255.255.255.0
add ns ip 10.102.29.61 255.255.255.0 -type snip
add route 0.0.0.0 0.0.0.0 10.102.29.1
set system user nsroot -password
Enter password: *****
Confirm password: *****
save ns config
reboot
<!--NeedCopy-->
You have now completed the initial configuration of your appliance.
Using DHCP for initial access
Note: The terms NetScaler appliance and appliance are used interchangeably.
For initial configuration of a NetScaler appliance, the Dynamic Host Configuration Protocol (DHCP) can eliminate dependency on the console. DHCP provides a subnet IP (SNIP) address at which you can access the appliance to configure it remotely. You can also use DHCP after initial configuration if, for example, you want to move an appliance to a different subnet.
To use DHCP, you must first specify the appliance vendor class identifier on a DHCP server. Optionally, you can also specify the pool of IP addresses from which your NetScaler appliance can acquire an IP address. If a pool is not specified, the address is acquired from the general pool.
A new NetScaler appliance does not have a configuration file. When you connect an appliance without a configuration file to the network, its DHCP client automatically polls the DHCP server for an IP address. If you have specified the appliance vendor class identifier on the DHCP server, the server returns an address. You can also enable the DHCP client on a previously configured appliance.
Prerequisites
To use DHCP, you must:
-
Note the system ID (
sysid) on the serial number sticker on the back panel of the appliance. On an older appliance, the system ID might not be available. In this case, use the MAC address instead of the system ID. -
Set up a DHCP server and configure it with the appliance vendor class identifier.
Configure a Linux/UNIX DHCP server for the NetScaler appliance
-
Specify
citrix-NSas the vendor class identifier for the NetScaler appliance by adding the following configuration to the server’s dhcpd.conf file. The subclass declaration must be inside the subnet declaration.option space auto; option auto.key code 1 = text; class "citrix-1" { match option vendor-class-identifier; } subclass "citrix-1" "citrix-NS"{ vendor-option-space auto; option auto.key "citrix-NS"; <!--NeedCopy-->Note:
The location of the dhcpd.conf file can be different in different versions and flavors of the Linux/UNIX-based operating system. For example, in FreeBSD 6.3 the file is present in the
/etcfolder. For the location, see thedhcpd manpageof the DHCP server. -
If you do not want NetScaler appliances to use IP addresses from the general pool, specify a pool of addresses for the appliance. Include this pool declaration inside the subnet declaration. For example, adding the following configuration to the dhcpd.conf file specifies a pool of IP addresses ranging from 192.168.2.120 to 192.168.2.127.
pool { allow members of "citrix-1"; range 192.168.2.120 192.168.2.127; option subnet-mask 255.255.255.0; } <!--NeedCopy--> -
Terminate the DHCP process and restart it to reflect the change to the configuration file. At the shell prompt, type:
killall dhcpd
dhcpd&
<!--NeedCopy-->
Sample DHCP configuration (dhcpd.conf)
option space auto;
option auto.key code 1 = text;

class "citrix-1" {
      match option vendor-class-identifier;
}

subnet 192.168.2.0 netmask 255.255.255.0 {
option routers10.217.242.1;
option domain-name"jeffbr.local";
option domain-name-servers8.8.8.8;
default-lease-time 21600;
max-lease-time 43200;
subclass "citrix-1" "citrix-NS" {
vendor-option-space auto;
option auto.key "citrix-NS";
}
pool {
allow members of "citrix-1";
range 192.168.2.120 192.168.2.127;
option subnet-mask 255.255.255.0;
}
}
<!--NeedCopy-->
Configure a Windows DHCP server for the NetScaler appliance
-
Open Server Manager and make sure DHCP service is running.
-
Open DHCP Manager, click DHCP and select IPv4.
-
To configure Vendor Class as
..citrix-Ns, right-click IPv4 and select Define Vendor Classes. Add a new class by specifying a display name, description, and..citrix-NSas the ASCII value or hex value01 09 63 69 74 72 69 78 2d 4e 53. Click OK. -
Create a scope to configure IP range, subnetwork, DNS server, WIN server, default Gateway, and excluded IP address range. To create a scope, in the IPv4 list, right-click Scope Options and enter a name and description. Click Next.
-
Click Scope Options and add
043 Vendor specific infoand add the ASCII value..citrix-NSor hex value01 09 63 69 74 72 69 78 2d 4e 53 -
Provide an IP address range and subnet mask corresponding to the interface IP address bound to the Server. Click Next.
-
To exclude an IP address, add it in Add Exclusion and Delay. Click Next.
-
Add a lease duration and click Next.
-
Select Yes, I want to configure these options now and click Next.
-
Optionally, provide a default gateway and click Next.
-
Optionally, provide a domain name and a DNS server, and click Next.
-
Optionally, provide a WINS server and click Next.
-
Activate scope by selecting Yes, I want to activate this scope now and click Next.
-
Click Finish. You can view the configured scope in the IPv4 tab.
Implementing an initial NetScaler configuration from a remote computer
When a new NetScaler appliance starts, it automatically polls the DHCP server for an IP address and provides the DHCP server with its sysid. This action is also true for any appliance that does not have a configuration file. The DHCP server selects one IP address from its pool and assigns it as a subnet IP (SNIP) address to the appliance. The DHCP server includes the sysid of the appliance and the IP address that it assigns to the appliance in the server’s dhcpd.leases file. To find the IP address of your appliance, look in the dhcpd.leases file for the last entry with the sysid of your appliance in the uid or client-hostname field. Verify that the binding state in this entry is active. If the binding state is not active but free, the IP address is not yet associated with the appliance.
You can use this address to connect to the appliance and remotely configure the initial settings. For example, you can change the IP address, subnet mask, and gateway settings that were fetched from the DHCP server. After completing the initial configuration, you can manually return the DHCP IP address to the server pool. Alternatively, restarting the appliance automatically releases the DHCP IP address back to the server pool.
You can find out the SNIP address assigned to the appliance from the NetScaler console or from the DHCP server.
Find the SNIP address from the NetScaler console
At the console prompt, type:
sh dhcpParams
DHCP Client on next reboot is ON
DHCP Client Current State: Active
DHCP Client Default route save: OFF
DHCP acquired IP:192.168.2.127
DHCP acquired Netmask:255.255.255.0
DHCP acquired Gateway:192.168.2.1
Done
<!--NeedCopy-->
Find the SNIP address from the DHCP server
Look in the dhcpd.leases file for the last entry with the sysid of your appliance in the uid or client-hostname field.
Example:
The following entry in a DHCP server’s dhcpd.leases file verifies the binding state of the appliance whose sysid is 45eae1a8157e89b9314f.
lease 192.168.2.127 {
  starts 3 2013/08/19 00:40:37;
  ends 3 2013/08/19 06:40:37;
  cltt 3 2013/08/19 00:40:37;
  binding state active;
  next binding state free;
  hardware ethernet 00:d0:68:11:f4:d6;
  uid "45eae1a8157e89b9314f";
  client-hostname "45eae1a8157e89b9314f";
<!--NeedCopy-->
In the preceding example, the binding state is ACTIVE and the IP address assigned to the appliance is 192.168.2.127.
The following table describes DHCP-related CLI commands that you might want to use when configuring a new NetScaler appliance.
Table 2. NetScaler CLI commands for using DHCP with a new NetScaler appliance
| Task | At the command prompt, type |
|---|---|
| To verify the DHCP fetched details, such as IP address, subnet mask, and gateway on the appliance |
|
| To release the DHCP IP address and return it to the IP address pool on the DHCP server when the NetScaler configuration is complete |
|
Using DHCP when a configuration file is present
If you need to move a NetScaler appliance to a different subnet, you can use DHCP to access an appliance that already has a configuration file. Before moving the appliance, enable its DHCP client and save the configuration. As a result, when the appliance restarts, it automatically polls the DHCP server for an IP address. Enable the DHCP client and save the configuration before shutting down the appliance. If you did not enable, you need to connect to the appliance through the console and dynamically run the DHCP client on the appliance. The DHCP server provides an IP address, a gateway, and a subnet mask. You can use the IP address to access the appliance and configure the other settings remotely.
If the DHCP client is enabled in the configuration file, disable it and then save the configuration file. If the DHCP client is enabled, the appliance polls the DHCP server again for an IP address when it restarts.
The CLI commands associated with each task are listed:
-
To dynamically run the DHCP client to fetch an IP address from the DHCP server
set dhcpParams dhcpClient on -
To configure the DHCP client to run when the appliance restarts
set dhcpParams dhcpClient onsave config -
To prevent the DHCP client from running when the appliance restarts
set dhcpParams dhcpClient offsave configNote: This command is required only if the ON setting was saved.
-
To save the DHCP acquired route so that it is available when the appliance restarts
> set dhcpParams -dhcpclient on -saveroute on> save config -
To prevent saving the DHCP acquired route (default behavior)
set dhcpParams -dhcpclient on -saveroute offsave configNote: This command is required only if the ON setting was saved.
Access a NetScaler appliance by using SSH keys and no password
If you administer many NetScaler appliances, storing and looking up passwords for logging on to individual appliances can be cumbersome. To avoid being prompted for passwords, you can set up secure shell access with public key encryption on each appliance.
NetScaler features can also use SSH key based authentication for internal communication when the internal user is disabled (by using the set ns param -internaluserlogin disabled command). In such cases, the key name must be set as ns_comm_key.
To set up access using SSH keys, you must generate the public-private key pair on a client and copy the public key to the remote NetScaler appliance.
Generate the keys and connect to a remote NetScaler appliance by using SSH keys
-
On a client (Linux client or a NetScaler) change the directory to
/root/.ssh.cd /root/.ssh -
Generate the public-private key pair.
ssh-keygen -t <key_type> -f <optional_key_file_name>Example:
To create an RSA key with default file name.
ssh-keygen -t rsa -
Press ENTER when prompted for a file name for the key pair.
Note:
- If you update the default file name for the key pair, use the new name instead of the default name in the rest of this procedure.
- If you want to disable the internal user login, use “ns_comm_key” as the file name for the public-private key pair.
-
Press ENTER two times when prompted for a passphrase.
Note: If the client is a NetScaler appliance, move the private key file to a persistent location such as the subdirectories of the /flash and /var directories.
-
Log on to the remote NetScaler appliance from the client by using FTP, and perform the following:
-
Change directory to /nsconfig/ssh. At the prompt, type:
cd /nsconfig/ssh -
Use the binary transfer mode to copy the public key to this directory.
binput id_rsa.pub
-
-
Open a connection to the remote NetScaler appliance by using an SSH client, such as PuTTY, and perform the following:
-
Log on to the remote appliance using the administrator credentials.</span>
-
Go to the NetScaler shell.
shell -
At the shell prompt, change the directory to /nsconfig/ssh.
root@ns# cd /nsconfig/ssh -
Append the public key to the authorized_keys file. At the shell prompt, type:</span>
root@ns# cat id_rsa.pub >> authorized_keysNote: If the authorized_keys file does not exist on the appliance, you must first create the file and then append the contents.
-
Change the permission of the
/flash,nsconfig, andsshdirectories to 755.root@ns# chmod 755 /flashroot@ns# chmod 755 /flash/nsconfigroot@ns# chmod 755 /flash/nsconfig/ssh -
Change the permission of the authorized_keys file to 744.
root@ns# chmod 744 authorized_keys -
Optionally, remove the public key.
root@ns# rm id_rsa.pub
-
-
On the client, verify that you can connect to the remote NetScaler appliance by using SSH, without entering the password.
If using the default file name for the public-private key pair.
ssh <user_name>@<CitrixADCIPAddress>If using “ns_comm_key” (when internal user is disabled) for the public-private key pair.
ssh –i /nsconfig/ssh/ns_comm_key <user_name>@<CitrixADCIPAddress>If using any other name for the public-private key pair.
ssh –i <path_to_client_private_key> <user_name>@<CitrixADCIPAddress>
Change the administrative password
The default user account is the administrative account, which provides complete access to all features of the NetScaler appliance. To preserve security, the administrative account must be used only when necessary. Only individuals whose duties require full access must know the password for the administrative account.
Note: Citrix® recommends changing the administrative password frequently.
Change the administrative password by using the GUI
- Log on to the appliance by using the administrative credentials.
- Navigate to System > User Administration > Users.
- In the Users pane, click the default user account, and then click Change Password.
- In the Change Password dialog box, in Password and Confirm Password, type the password of your choice.
- Click OK.
Change the administrative password by using the CLI
At the command prompt, type:
set system user <userName> -password
<!--NeedCopy-->
Example:
set system user nsroot -password
Enter password: *****
Confirm password: *****
Done
<!--NeedCopy-->