Upgrade jobs
Important:
File based licensing system (also referred to as manually managed entitlements), traditionally used for activating various on-premises components, will be End of Life (EOL) on April 15, 2026. License Activation Service (LAS) is the next generation technology for product activations across the suite of Citrix products. LAS will be the only way to activate and license NetScaler instances after April 15, 2026, supporting NetScaler Flexed licenses (CPL/UHMC), legacy NetScaler Pooled licenses, and NetScaler Fixed term Bandwidth licenses. To remain supported, your NetScaler and NetScaler Console deployments must be on a LAS compatible version.
The minimum required NetScaler® versions that are LAS compatible are:
NetScaler ADCs: 14.1 51.x, 13.1 60.x, 13.1 37.x (FIPS)
NetScaler SVM: 14.1 51.x, 13.1 60.x
NetScaler Console Service: will support LAS from early September.
All the other forms of legacy NetScaler licenses such as Pooled vCPU, CICO, perpetual will not be supported with LAS. NetScaler instances leveraging perpetual licenses without an active maintenance will become unlicensed upon upgrade to the above mentioned software versions.
LAS based licenses may not be available to customers where prohibited by law or regulations.
If you have questions or concerns, contact Customer Care. Citrix may limit or suspend your Citrix Maintenance for non-compliance with these requirements without liability in addition to any other remedies Citrix may have at law or equity. These requirements don’t apply where prohibited by law or regulation.
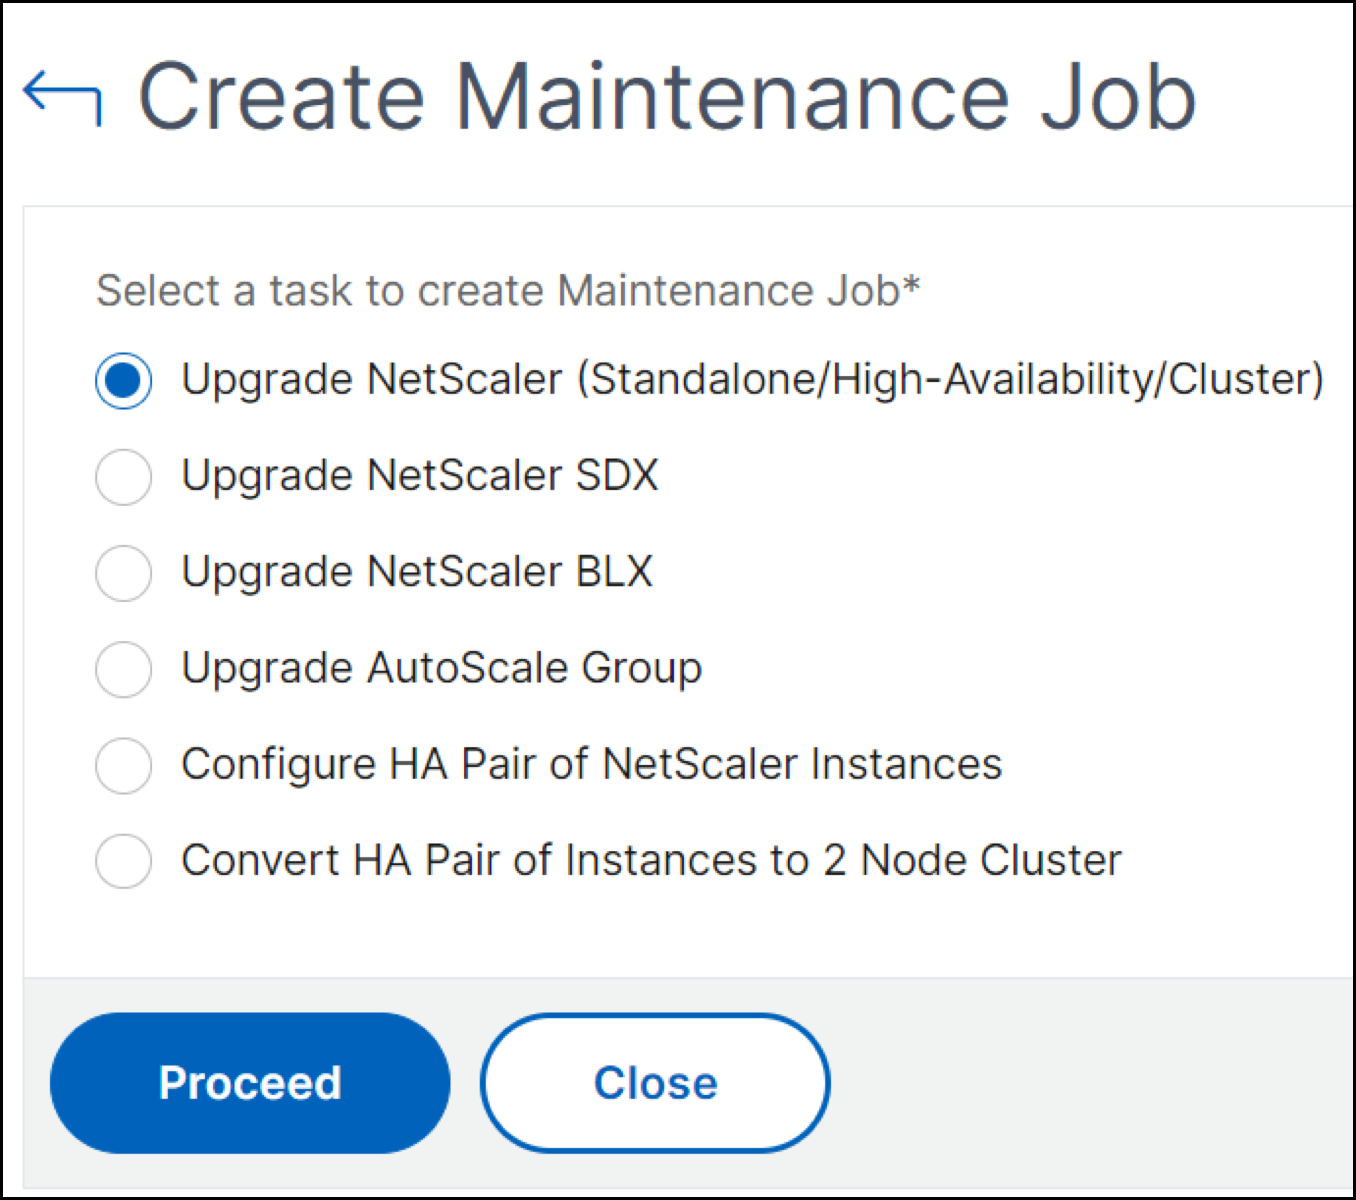
You can create the following maintenance tasks using NetScaler Console. You can then schedule the maintenance tasks at a specific date and time.
-
Upgrade NetScaler instances
-
Upgrade NetScaler SDX instances
-
Upgrade NetScaler BLX instances
-
Upgrade NetScaler instances in the Autoscale Group
-
Configure HA pair of NetScaler instances
-
Convert HA pair of instances to Cluster
Notes:
- If an upgrade job fails, NetScaler Console removes the build files and other extracted files to ensure that NetScaler instances have sufficient disk space for the next upgrade attempt.
- While you can select any number of NetScaler instances for upgrade, NetScaler Console on-prem supports a maximum of 10 concurrent upgrade threads. This means that only 10 instances can be upgraded simultaneously.
Schedule upgrading of NetScaler instances
-
Navigate to Infrastructure > Upgrade Jobs. Click Create Job.

-
In Create Maintenance Jobs, select Upgrade NetScaler (Standalone/High-Availability/Cluster) and click Proceed.

-
In Select Instance, type a name of your choice for Job Name.
-
Click Add Instances to add NetScaler instances that you want to upgrade.
-
To upgrade an HA pair, specify the IP address of a primary or secondary node. However, using the primary instance to upgrade the HA pair is recommended.
-
To upgrade a cluster, specify the cluster IP address.

-
-
Click Next to select the image. Select one of the following options from the Software Image list:
-
Local - Select the instance upgrade file from your local machine.
-
Appliance - Select the instance upgrade file from NetScaler Console file browser. The NetScaler Console GUI displays the instance files that are present at
/var/mps/mps_images.-
Skip image uploading to NetScaler if the selected image is already available - Select this option if the image is already present in the NetScaler instance.
-
Clean software image from NetScaler on successful upgrade - Select this option to clear the uploaded image in the NetScaler instance after the instance upgrade.
-
-
-
Click Next to start the pre-upgrade validation on the selected instances.
The Pre-upgrade validation tab displays the failed instances. Remove the failed instances and click Next.
Important
If you specify cluster IP address, NetScaler Console does pre-upgrade validation only on the specified instance not on the other cluster nodes.
-
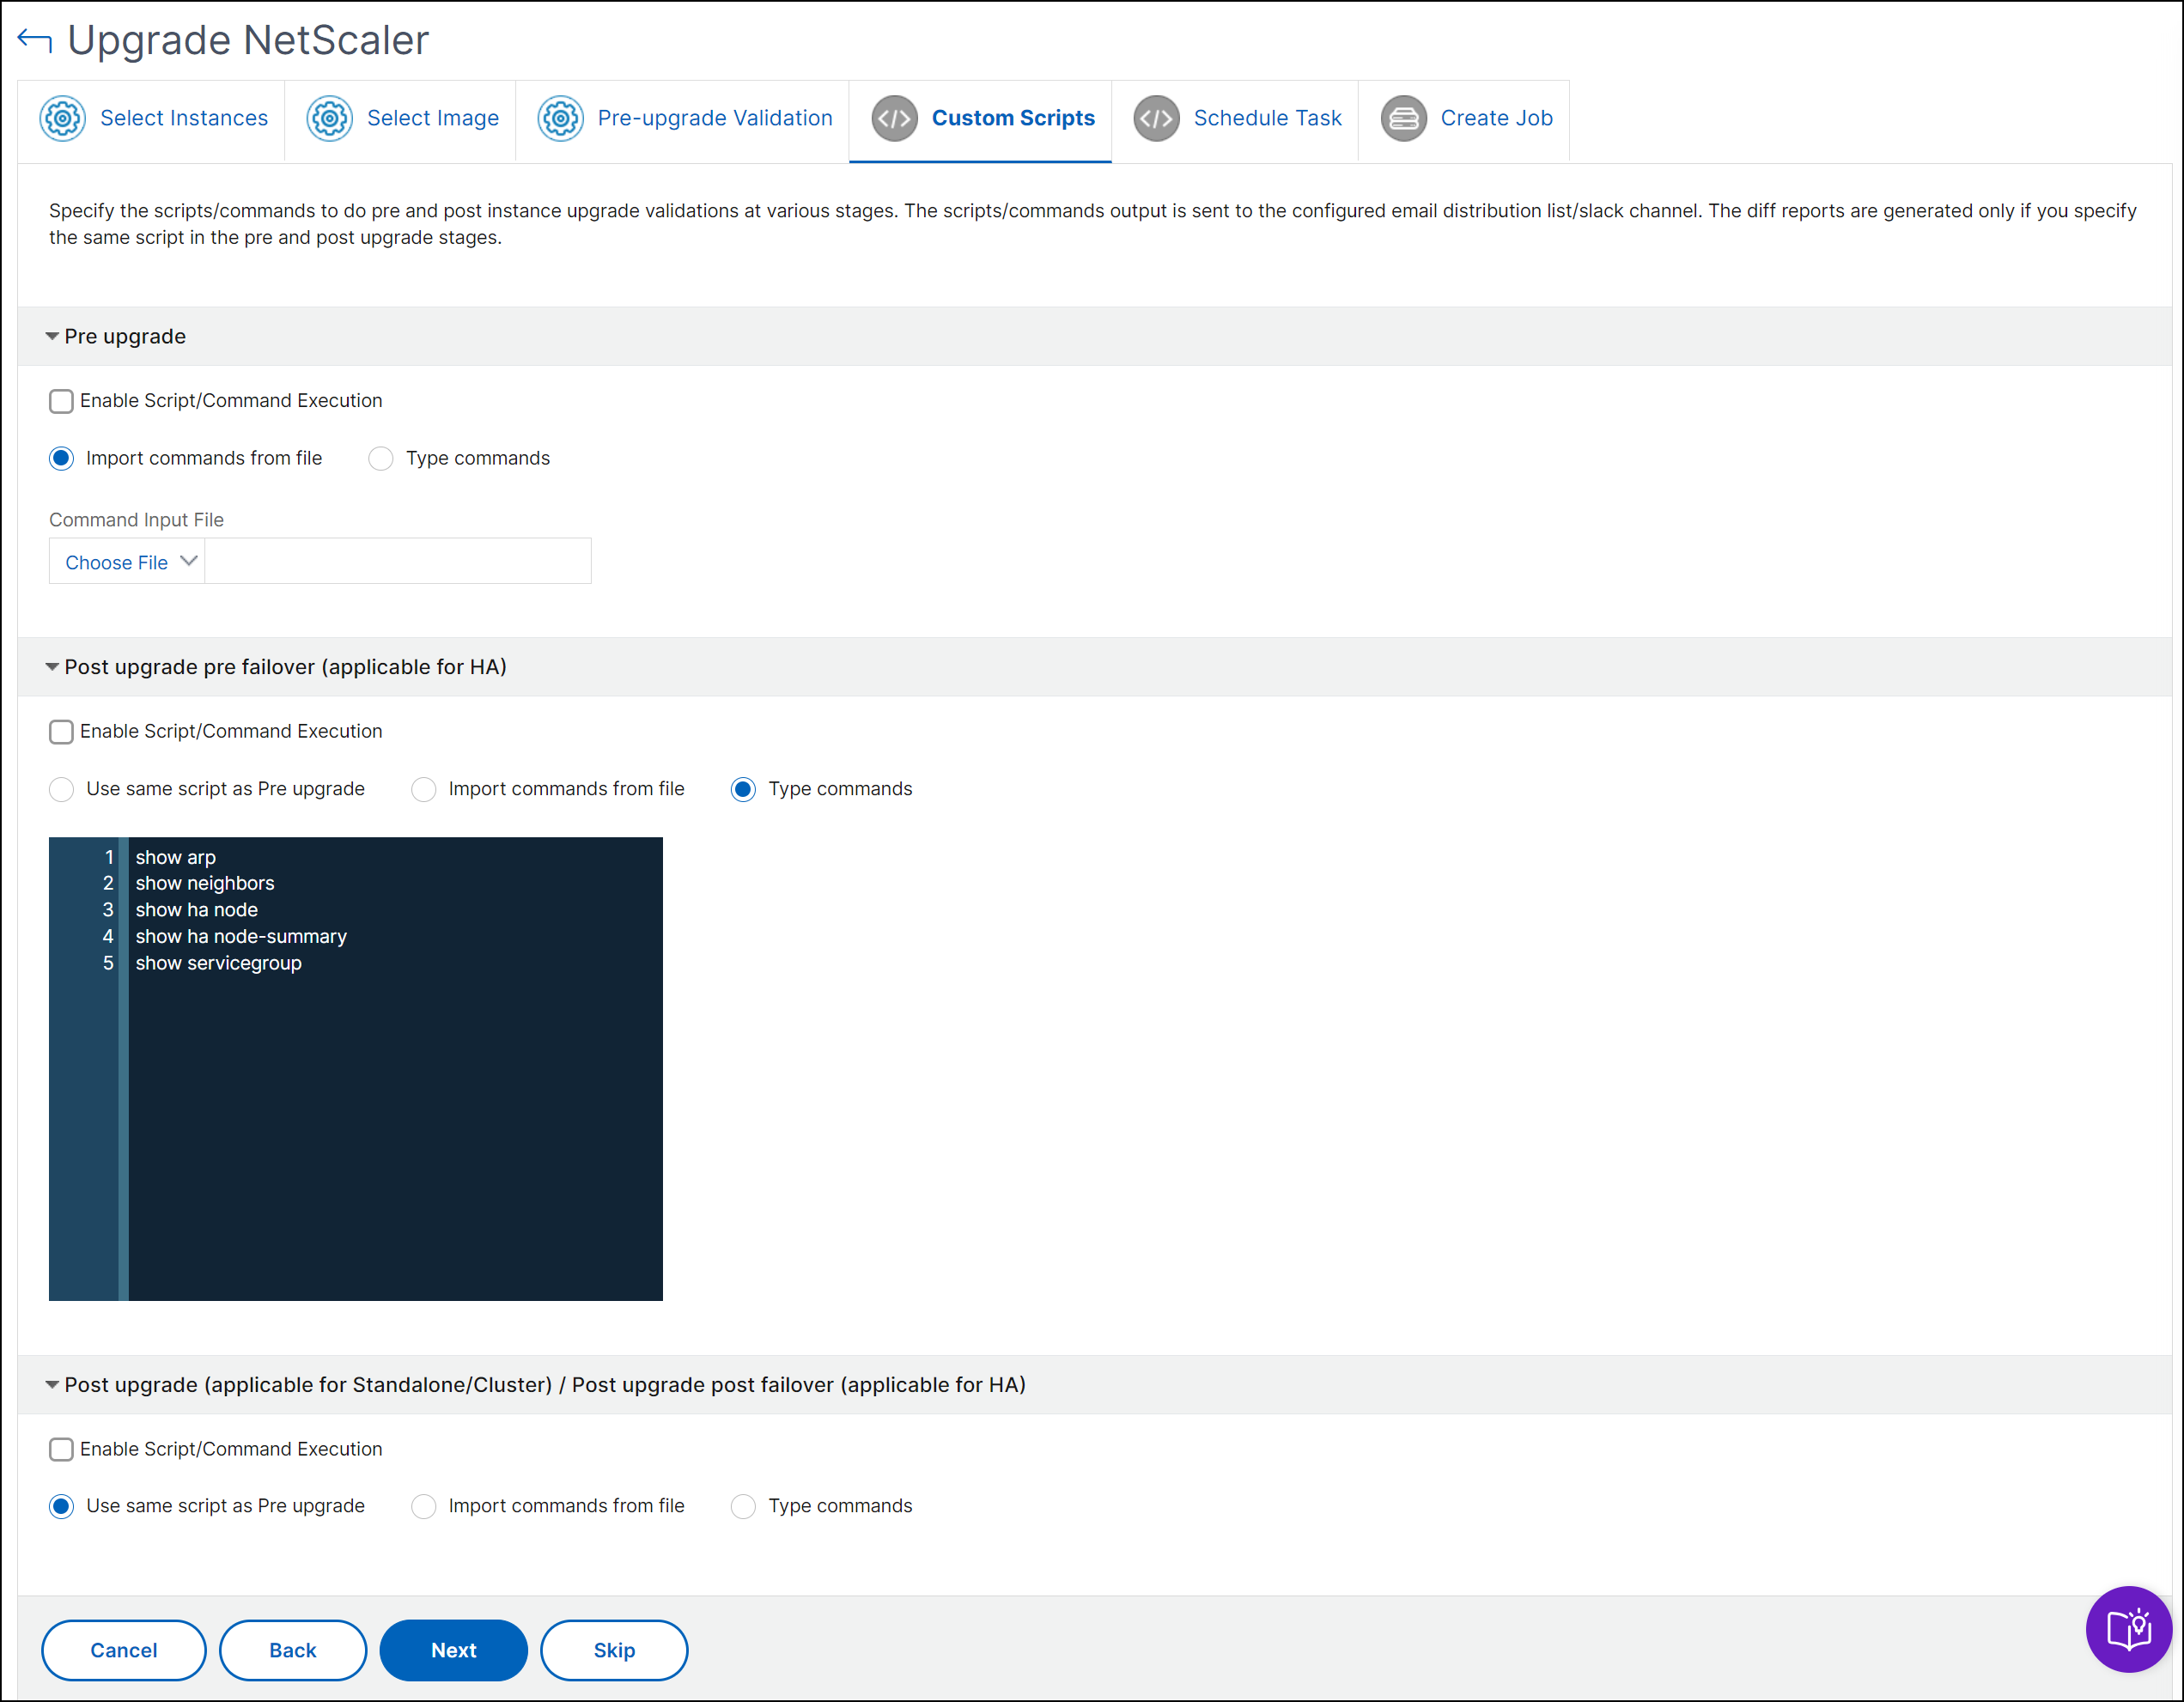
Optional, in Custom scripts, specify the scripts to run before and after an instance upgrade. Use one of the following ways to run the commands:
-
Import commands from file - Select the command input file from your local computer.
-
Type commands - Enter commands directly on the GUI.

You can use custom scripts to check the changes before and after an instance upgrade. For example:
-
The instance version before and after the upgrade.
-
The status of interfaces, high-availability nodes, virtual servers, and services before and after upgrade.
-
The statistics of virtual servers and services.
-
The dynamic routes.
-
-
Click Next. In Schedule Task, select one of the following options:
-
Upgrade now - The upgrade job runs immediately.
-
Schedule Later - Select this option to run this upgrade job later. Specify the Execution Date and Start Time when you want to upgrade the instances.
If you want to upgrade a NetScaler HA pair in two stages, select Perform two stage upgrade for nodes in HA.
Specify the Execution Date and Start Time when you want to upgrade another instance in the HA pair.
-
-
Click Next. In Create Job, specify the following details:
-
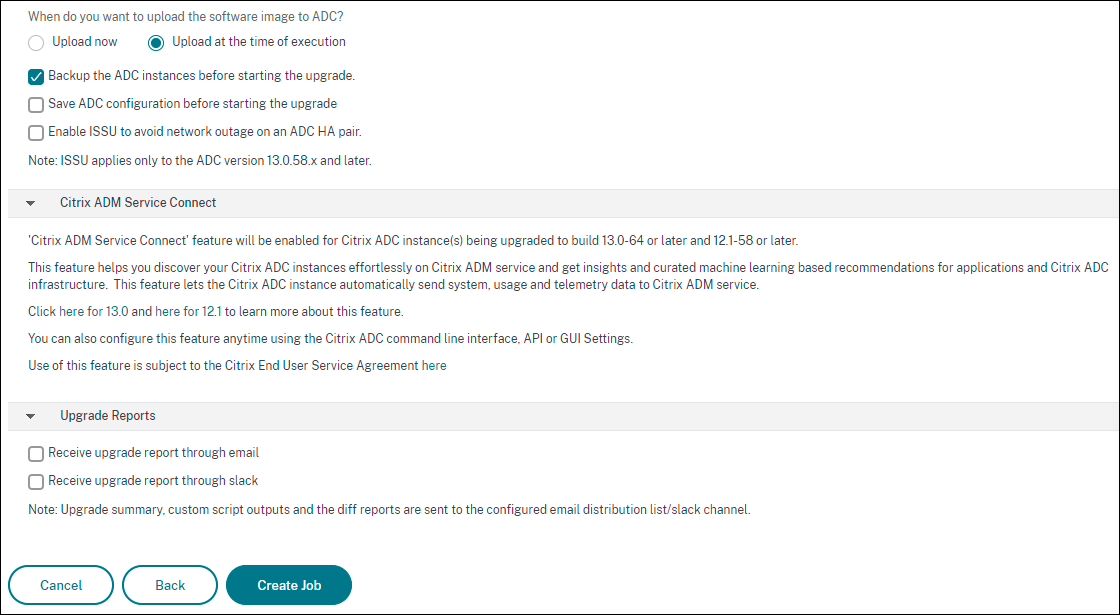
Specify when you want to upload the image to an instance:
-
Upload now - Select this option to upload the image immediately. However, the upgrade job runs at the scheduled time.
-
Upload at the time of execution - Select this option to upload the image at the time of upgrade job execution.
-
Backup the NetScaler instances before starting the upgrade. - Creates a backup of the selected NetScaler instances.
-
Saves NetScaler Configuration before starting the upgrade - Saves the configuration jobs that are configured on the instance before the upgrade.
-
Enable ISSU to avoid network outage on NetScaler HA pair - Enabling In-Service Software Upgrade (ISSU) allows you to upgrade a NetScaler high-availability (HA) pair without causing network downtime. ISSU ensures that the existing connections are honoured during the upgrade by migrating the active sessions seamlessly between the nodes. After enabling ISSU in the upgrade workflow, the system can also trigger ISSU migration completion after the delay time defined by the customer. NetScaler Console triggering a complete ISSU migration completion ensures that the upgrade completes even if connections persist. Specify the ISSU migration timeout in minutes to set the wait time before NetScaler Console completes the migration.
-
-
NetScaler Console Service Connect - If you are upgrading to build 13.0-64 or later and 12.1-58 or later, NetScaler Console Service Connect is enabled automatically. For more information, see Low-touch onboarding of NetScaler instances using NetScaler Console service connect.
-
Receive Execution Report through email - Sends the execution report in email. To add an email distribution list, see Create an email distribution list.
-
Receive Execution Report through slack - Sends the execution report in slack. To add a Slack profile, see Create a Slack profile.

-
-
Click Create Job.
Schedule upgrading of NetScaler SDX instances
-
Navigate to Infrastructure > Upgrade Jobs. Click Create Job.
-
Select Upgrade NetScaler SDX and click Proceed.
-
On the Upgrade NetScaler SDX page, in the Instance Selection tab:
-
Add a Task Name.
-
From the Software Image list, select either Local (your local machine) or Appliance (the build file must be present on NetScaler Console virtual appliance).
The upload process begins.
-
Add the NetScaler SDX instances on which you want to run the upgrade process.
-
Click Next.
-
-
On the Schedule Task tab, select Now from the Execution Mode list to upgrade a NetScaler SDX instance now, and click Finish.
-
To upgrade a NetScaler SDX instance later, select Later from the Execution Mode list. You can then choose the Execution Date and the Start Time for upgrading the NetScaler instance, and click Finish
-
You can also enable email and slack notifications to receive the execution report of the upgrading NetScaler SDX instance. Click the Receive Execution Report Through Email checkbox and Receive Execution Report through slack checkbox to enable the notifications.
For more information to configure email distribution list and slack channel, see step 8 in Schedule upgrading of NetScaler instances
Schedule upgrading of NetScaler BLX instances
-
Navigate to Infrastructure > Upgrade Jobs. Click Create Job.
-
In Create Maintenance Jobs, select Upgrade NetScaler BLX and click Proceed.
-
In Select Instance, type a name of your choice for Job Name.
-
Click Add Instances to add the BLX instances that you want to upgrade.
-
To upgrade an HA pair, specify the IP address of a primary or secondary node. However, using the primary instance to upgrade the HA pair is recommended.
-
To upgrade a cluster, specify the cluster IP address.
-
-
Click Next to select the image. elect one of the following options from the Software Image list:
-
Local - Select the instance upgrade file from your local machine.
-
Appliance - Select the instance upgrade file from NetScaler Console file browser. The NetScaler Console GUI displays the instance files that are present at
/var/mps/mps_images.-
Skip image uploading to NetScaler if the selected image is already available - Select this option if the image is already present in the NetScaler instance.
-
Clean software image from NetScaler on successful upgrade - Select this option to clear the uploaded image in the NetScaler instance after the instance upgrade.
-
-
-
Click Next to start the pre-upgrade validation on the selected instances.
The Pre-upgrade validation tab displays the failed instances. Remove the failed instances and click Next.
Important
If you specify cluster IP address, NetScaler Console does pre-upgrade validation only on the specified instance not on the other cluster nodes.
-
Optional, in Custom scripts, specify the scripts to run before and after an instance upgrade. Use one of the following ways to run the commands:
-
Import commands from file - Select the command input file from your local computer.
-
Type commands - Enter commands directly on the GUI.

You can use custom scripts to check the changes before and after an instance upgrade. For example:
-
The instance version before and after the upgrade.
-
The status of interfaces, high-availability nodes, virtual servers, and services before and after upgrade.
-
The statistics of virtual servers and services.
-
The dynamic routes.
-
-
Click Next. In Schedule Task, select one of the following options:
-
Upgrade now - The upgrade job runs immediately.
-
Schedule Later - Select this option to run this upgrade job later. Specify the Execution Date and Start Time when you want to upgrade the instances.
If you want to upgrade an HA pair in two stages, select Perform two stage upgrade for nodes in HA.
Specify the Execution Date and Start Time when you want to upgrade another instance in the HA pair.
-
-
Click Next. In Create Job, specify the following details:
-
Specify when you want to upload the image to an instance:
-
Upload now - Select this option to upload the image immediately. However, the upgrade job runs at the scheduled time.
-
Upload at the time of execution - Select this option to upload the image at the time of upgrade job execution.
-
Backup the NetScaler instances before starting the upgrade - Creates a backup of the selected NetScaler instances.
-
Save NetScaler Configuration before starting the upgrade - Saves the configuration jobs that are configured on the instance before the upgrade.
-
Enable ISSU to avoid network outage on NetScaler HA pair - Enabling In-Service Software Upgrade (ISSU) allows you to upgrade a NetScaler high-availability (HA) pair without causing network downtime. ISSU ensures that the existing connections are honoured during the upgrade by migrating the active sessions seamlessly between the nodes. After enabling ISSU in the upgrade workflow, the system can also trigger ISSU migration completion after the delay time defined by the customer. NetScaler Console triggering a complete ISSU migration completion ensures that the upgrade completes even if connections persist. Specify the ISSU migration timeout in minutes to set the wait time before NetScaler Console completes the migration.
-
-
NetScaler Console Service Connect - If you are upgrading to build 13.0-64 or later and 12.1-58 or later, NetScaler Console Service Connect is enabled automatically. For more information, see Low-touch onboarding of NetScaler instances using NetScaler Console service connect.
-
Receive Execution Report through email - Sends the execution report in email. To add an email distribution list, see Create an email distribution list.
-
Receive Execution Report through slack - Sends the execution report in slack. To add a Slack profile, see Create a Slack profile.

-
-
Click Create Job.
Schedule upgrading Autoscale™ group
Perform the following steps to upgrade all the instances in the cloud services that are part of the Autoscale group:
-
Navigate to Infrastructure > Upgrade Jobs. Click Create Job.
-
Select Upgrade Autoscale Group and click Proceed.
-
In the Upgrade Settings tab:
-
Select the Autoscale Group that you want to upgrade.
-
In Image, select the NetScaler version. This image is the existing version of NetScaler instances in the Autoscale group.
-
In NetScaler Image, browse the NetScaler version file to which you want to upgrade.
If you check Graceful Upgrade, the upgrade task waits until the specified drain connection period to expire.
-
Click Next.
-
-
In the Schedule Task tab:
-
Select one of the following from the Execution Mode list:
-
Now: To start the NetScaler instances upgrade immediately.
-
Later: To start the NetScaler instances upgrade at later time.
-
-
If you select the Later option, select the Execution Date and Start Time when you want to start the upgrade task.
You can also enable email and slack notifications to receive the execution report of the upgrading Autoscale group. Click the Receive Execution Report Through Email checkbox and Receive Execution Report through slack checkbox to enable the notifications.
-
-
Click Finish.
Schedule configuring HA pair of NetScaler instances
-
Navigate to Infrastructure > Upgrade Jobs. Click Create Job.
-
Select Configure HA Pair of NetScaler Instances and click Proceed.
-
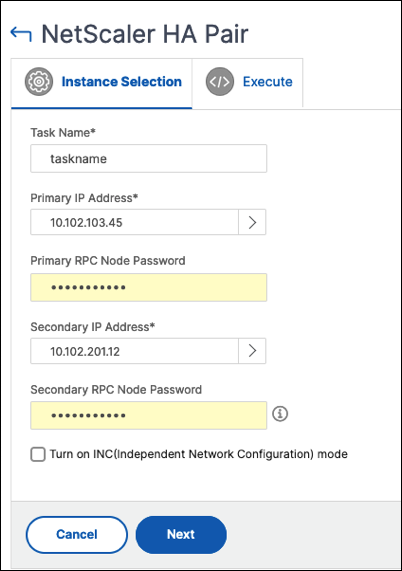
On the NetScaler HA Pair page, in the Instance Selection tab:
-
Add a Task Name.
-
Select the primary IP address. Click OK.
-
Enter the primary RPC node password.
-
Select the secondary IP address. Click OK.
Note:
The RPC node password fields are available in NetScaler release 14.1 and later.
-
Enter the secondary RPC node password.
-
Click to enable Turn on INC(Independent Network Configuration) mode if you have the HA pair instances in two subnets.
-
Click Next.

-
-
On the Schedule Task tab, select Now from the Execution Mode list to upgrade a NetScaler instance now, and click Finish.
-
To upgrade a NetScaler HA pair later, select Later from the Execution Mode list. You can then choose the Execution Date and the Start Time for upgrading the NetScaler instance, and click Finish.
-
You can also enable email and slack notifications to receive the execution report of creating the NetScaler HA pair. Click the Receive Execution Report Through Email checkbox and Receive Execution Report through slack checkbox to enable the notifications.
For more information to configure email distribution list and slack channel, see step 8 in Schedule upgrading of NetScaler instances
Schedule converting HA pair of instances to cluster
-
Navigate to Infrastructure > Upgrade Jobs. Click Create Job.
-
Select Convert HA Pair of Instances to 2 Node Cluster and click Proceed.
-
On the Migrate NetScaler HA to Cluster page, in the Instance Selection tab, add a Task Name. Specify the Primary IP address, Secondary IP address, Primary Node ID, Secondary Node ID, Cluster IP Address, Cluster ID, and Backplane, and then click Next.
-
On the Schedule Task tab, select Now from the Execution Mode list to upgrade a NetScaler instance now, and click Finish.
-
To upgrade later, select Later from the Execution Mode list. You can then choose the Execution Date and the Start Time for upgrading the NetScaler HA pair instance, and click Finish.
-
You can also enable email and slack notifications to receive the execution report of upgrading a NetScaler SDX instance. Click the Receive Execution Report Through Email checkbox and Receive Execution Report through slack checkbox to enable the notifications.
For more information to configure email distribution list and slack channel, see step 8 in Schedule upgrading of NetScaler instances.