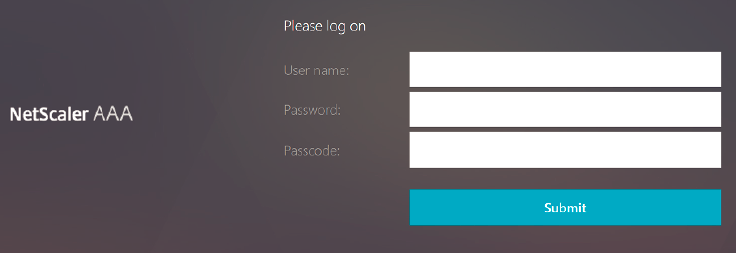
Native OTP support for authentication
NetScaler supports one-time passwords (OTPs) without having to use a third-party server. OTP is a highly secure method of authentication, as the generated passcodes are random. In the past, specialized companies like RSA provided OTPs through devices that generated random numbers.
In addition to reducing capital and operating expenses, this feature enhances the administrator's control by keeping the entire configuration on the NetScaler appliance.
Points to note:
-
The NetScaler administrator must configure an interface to manage and validate user devices because third-party servers are no longer needed.
-
The native OTP solution does not support the SAML logout feature.
User must be registered with a NetScaler virtual server to use the OTP solution. Registration is required only once per unique device, and can be restricted to certain environments. Configuring and validation of a registered user is similar to configuring an extra authentication policy.
Advantages of native OTP support
-
Reduces operating cost by eliminating the need to have an extra infrastructure on an authenticating server in addition to the Active Directory.
-
Consolidates configuration only to NetScaler appliance thus offering great control to administrators.
-
Eliminates the client's dependence on an extra authentication server for generating a number expected by clients.
Native OTP workflow
The native OTP solution is a two-fold process and the workflow is classified as the following:
-
Device registration
-
End user login
Important:
You can skip the registration process if you are using third-party solutions or managing other devices apart from the NetScaler appliance. The final string that you add must be in the NetScaler specified format.
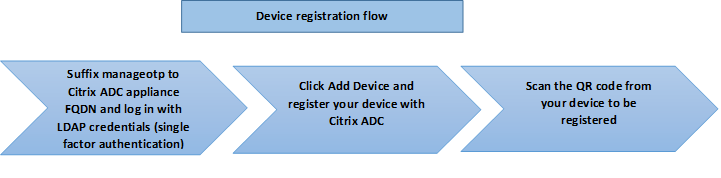
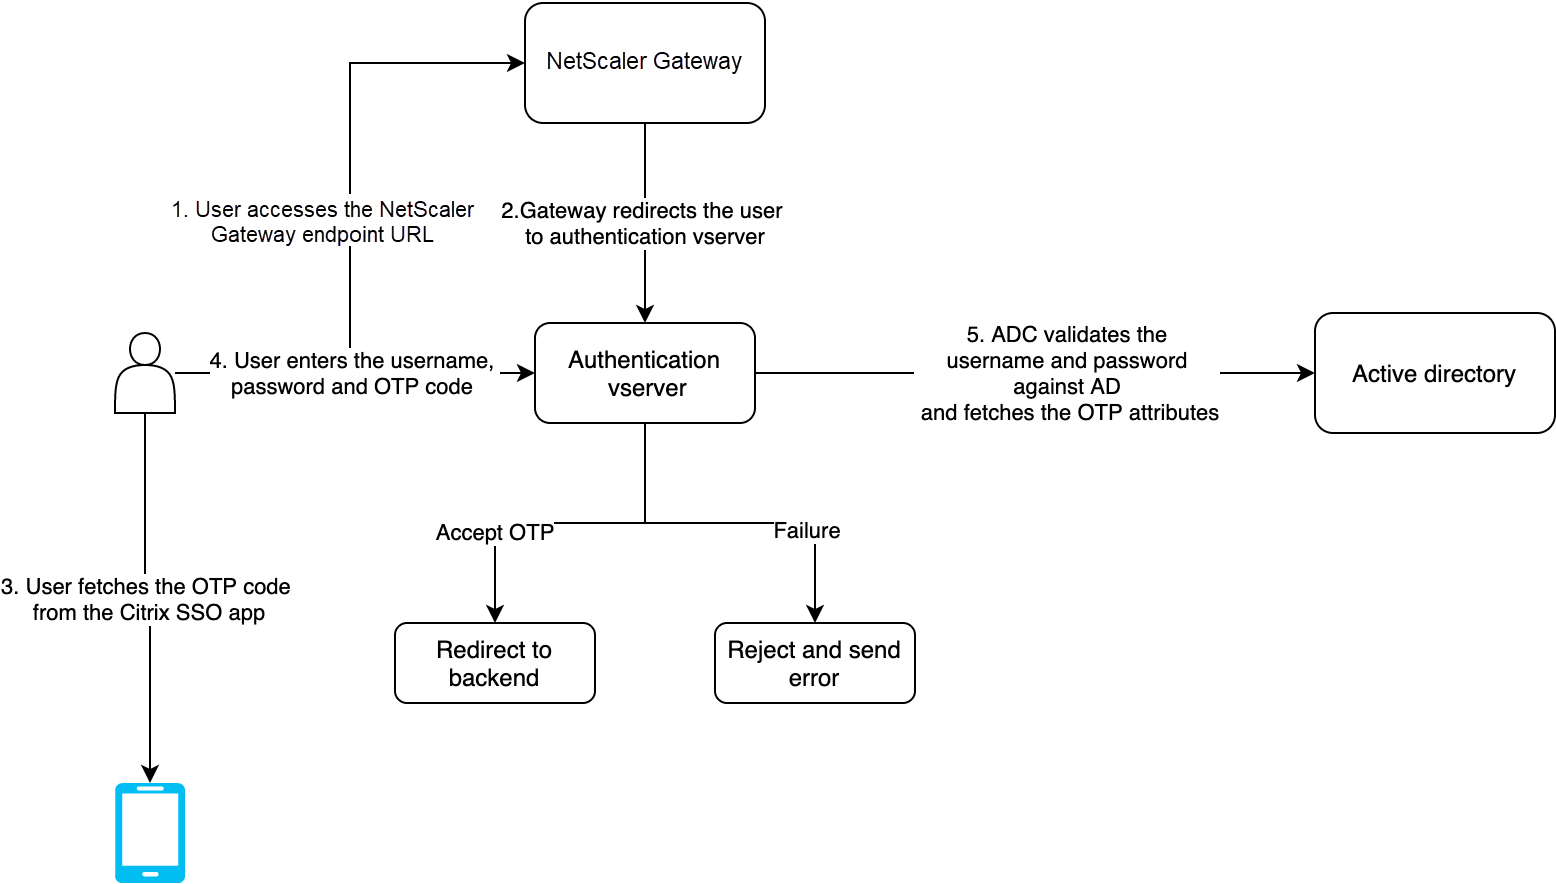
The following figure depicts the device registration flow to register a new device to receive OTP.
Note:
The device registration can be done using any number of factors. The single factor (as specified in the previous figure) is used as an example to explain the device registration process. For more details, see Recommended native OTP configurations for device registration.
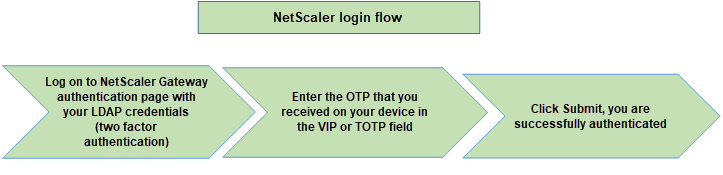
The following figure depicts the verification of OTP through the registered device.
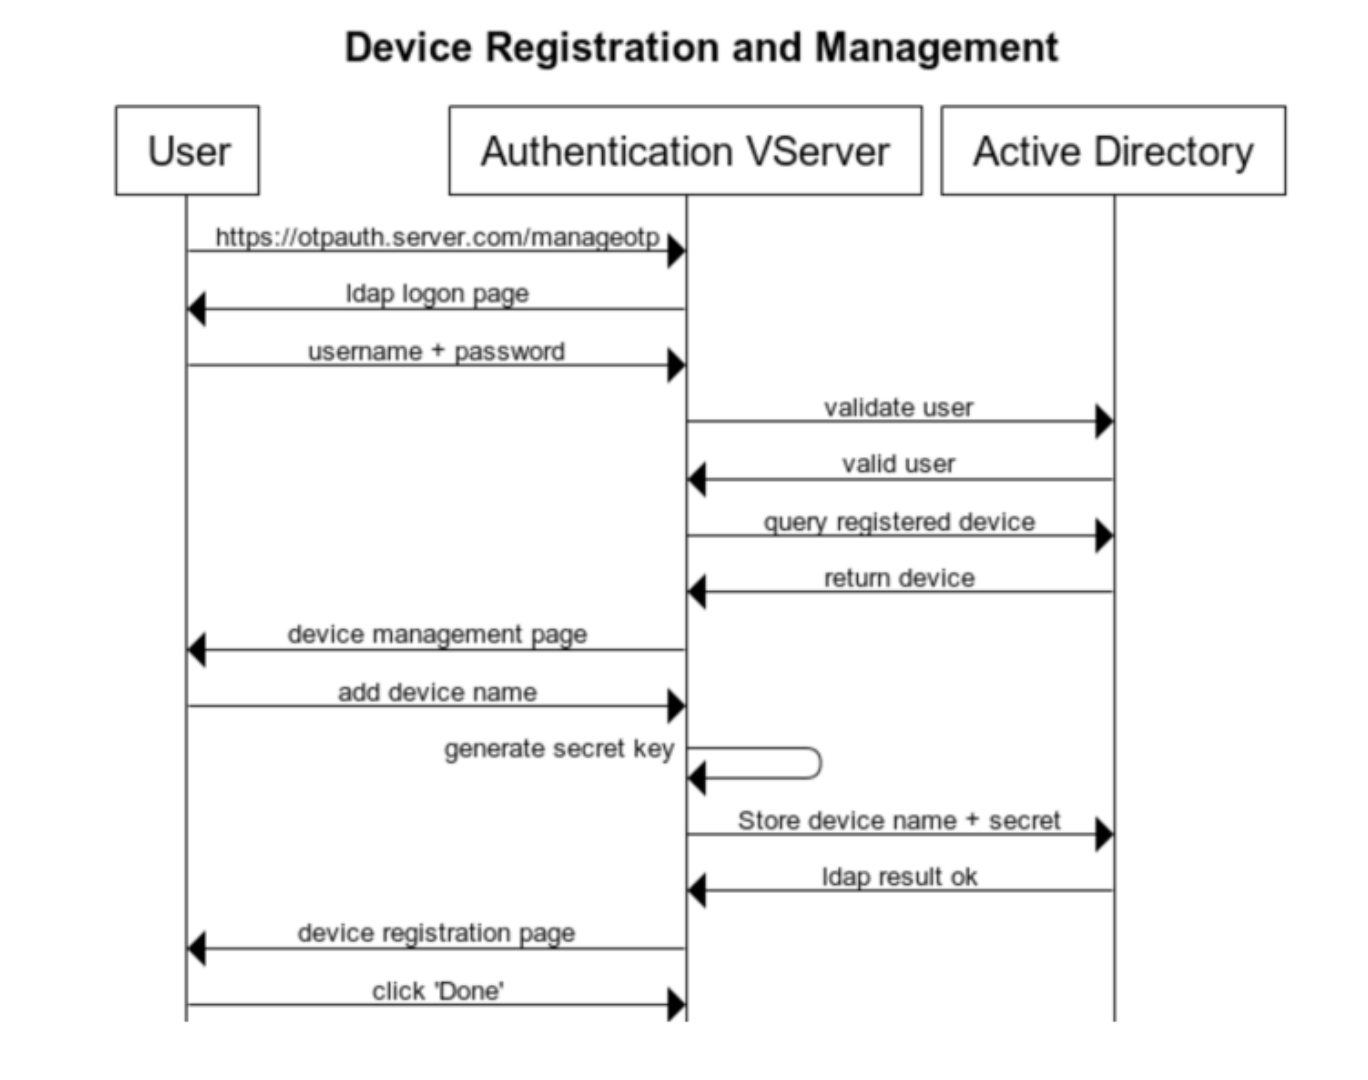
The following figure depicts the device registration and management flow.
The following figure depicts the end user flow for the Native OTP feature.
Prerequisites
To use the native OTP feature, make sure that the following prerequisites are met.
-
NetScaler feature release version is 12.0 build 51.24 and later.
-
Advanced or Premium edition license is installed on NetScaler Gateway.
-
NetScaler is configured with management IP and the management console is accessible both using a browser and command line.
-
NetScaler is configured with authentication, authorization, and auditing virtual server to authenticate users. For more information, see Authentication virtual server
-
NetScaler appliance is configured with Unified Gateway and the authentication, authorization, and auditing profile is assigned to the Gateway virtual server.
-
Native OTP solution is restricted to nFactor authentication flow. Advanced policies are required to configure the solution. For more details, see Configuring nFactor authentication.
Also ensure the following for Active Directory:
-
A minimum attribute length of 256 characters.
-
The attribute type must be 'DirectoryString' such as UserParameters. These attributes can hold string values.
-
Attribute string type must be Unicode, if the device name is in non-English characters.
-
NetScaler LDAP administrator must have write access to the selected AD attribute.
-
NetScaler appliance and client machine must be synced to a common Network Time Server.
Configure Native OTP using the GUI
The native OTP registration is not just a single factor authentication. The following sections help you to configure the single and second factor authentication.
Create Login Schema for the first factor
-
Navigate to Security > AAA-Application Traffic > Login Schema.
-
Go to Profiles and click Add.
-
On the Create Authentication Login Schema page, enter lschema_single_auth_manage_otp under the Name field and click the edit icon next to noschema.
-
Click the LoginSchema folder.
-
Scroll down to select SingleAuthManageOTP.xml and click Select.
-
Click Create.
-
Click Policies and Click Add.
-
On the Create Authentication Login Schema Policy screen, enter the following values.Name: lpol_single_auth_manage_otp_by_urlProfile: Select lschema_single_auth_manage_otp from the list.Rule:
HTTP.REQ.COOKIE.VALUE("NSC_TASS").EQ("manageotp")
Create login schema for second factor OTP
-
Navigate to Security > AAA-Application Traffic > Virtual Servers. Select the virtual server to be edited.
-
Scroll down and select 1 Login Schema.
-
Click Add Binding.
-
Under the Policy Binding section, click Add to add a policy.
-
On the Create Authentication Login Schema Policy page, enter the name of the policy, and click Add.
-
On the Create Authentication Login Schema page, enter the name of the login schema and click the pencil icon next to noschema.
-
Click the LoginSchema folder, select DualAuthManageOTP.xml, and then click Select.
-
Click More and scroll down.
-
In the Password Credential Index field, enter 1. This causes nFactor to save the user's password into authentication, authorization, and auditing Attribute #1, which can be used later in a Traffic Policy to single sign-on to StoreFront. If you don't do this, then NetScaler Gateway tries to use the Passcode to authenticate to StoreFront, which does not work.
-
Click Create.
-
In the Rule section, enter True. Click Create.
-
Click Bind.
-
Notice the two factors of authentication. Click Close and click Done.
Traffic Policy for single sign-on
-
Navigate to NetScaler Gateway > Policies > Traffic
-
On the Traffic Profiles tab, click Add.
-
Enter a name for the traffic profile.
-
Scroll down in the SSO Password Expression box, enter the following, and click Create. This is where we use the login schema password attribute specified for the second factor OTP.
AAA.USER.ATTRIBUTE(1) -
On the Traffic Policies tab, click Add.
-
In the Name field, enter a name for the traffic policy.
-
In the Request Profile field, select the traffic profile you created.
-
In the Expression box, enter True. If your NetScaler Gateway virtual server allows full VPN, change the expression to the following.
http.req.method.eq(post)||http.req.method.eq(get) && false -
Click Create.
-
Bind the traffic policy to a VPN virtual server.
-
Navigate to Security > AAA - Application Traffic > Authentication Profile.
-
Configure the authentication profile by selecting the NetScaler Gateway virtual server and then click OK.
-
Navigate to NetScaler Gateway > NetScaler Gateway Virtual Servers and select the NetScaler Gateway virtual server. The VPN Virtual Server page appears.
-
In the Policies section, click the + icon.
-
Select the policy type as Traffic and click Continue.
-
Select the traffic policy and click Bind.
-
Click Done.
-
Configure content switching policy for manage OTP
The following configurations are required if you are using Unified Gateway.
-
Navigate to Traffic Management > Content Switching > Policies. Select the content switching policy, right click, and select Edit.
-
Edit the expression to evaluate the following OR statement and click OK:
is_vpn_url || HTTP.REQ.URL.CONTAINS("manageotp")
Configure Native OTP using the CLI
You must have the following information to configure the OTP device management page:
-
IP assigned to authentication virtual server
-
FQDN corresponding to the assigned IP
-
Server certificate for authentication virtual server
Note:
Native OTP is a web-based solution only.
To configure the OTP device registration and management page
Create authentication virtual server
add authentication vserver authvs SSL 1.2.3.5 443

 bind authentication vserver authvs -portaltheme RFWebUI

 bind ssl vserver authvs -certkeyname otpauthcert
Note:
The authentication virtual server must be bound to the RFWebUI portal theme. Bind a server certificate to the server. The server IP '1.2.3.5' must have a corresponding FQDN that is, otpauth.server.com, for later use.
To create LDAP logon action
add authentication ldapAction <LDAP ACTION NAME> -serverIP <SERVER IP> - serverPort <SERVER PORT> -ldapBase <BASE> -ldapBindDn <AD USER> -ldapBindDnPassword <PASSWO> -ldapLoginName <USER FORMAT>
Example:
add authentication ldapAction ldap_logon_action -serverIP 1.2.3.4 -serverPort 636 -ldapBase "OU=Users,DC=server,DC=com" -ldapBindDn administrator@ctxnsdev.com -ldapBindDnPassword PASSWORD -ldapLoginName userprincipalname
To add authentication policy for LDAP Logon
add authentication Policy auth_pol_ldap_logon -rule true -action ldap_logon_action
To present UI via LoginSchema
Show the user name field and password field to users upon logon
add authentication loginSchema lschema_single_auth_manage_otp -authenticationSchema "/nsconfig/loginschema/LoginSchema/SingleAuthManageOTP.xml"
Display device registration and management page
We recommend two ways of displaying the device registration and management screen: URL or host name.
Note:
-
Currently, device registration and device management can be performed only using a browser.
-
For management OTP or native OTP device registration to function, the
loginschemawithmanageotpmust be configured as the last factor requiring user input.
-
Using URLWhen the URL contains '/manageotp'
-
add authentication loginSchemaPolicy lpol_single_auth_manage_otp_by_url -rule 'http.req.cookie.value("NSC_TASS").contains("manageotp")' -action lschema_single_auth_manage_otp -
bind authentication vserver authvs -policy lpol_single_auth_manage_otp_by_url -priority 10 -gotoPriorityExpression END
-
-
Using hostnameWhen the host name is 'alt.server.com'
-
add authentication loginSchemaPolicy lpol_single_auth_manage_otp_by_host -rule 'http.req.header("host").eq("alt.server.com")' -action lschema_single_auth_manage_otp -
bind authentication vserver authvs -policy lpol_single_auth_manage_otp_by_host -priority 20 -gotoPriorityExpression END
-
To configure the user login page using the CLI
You must have the following information to configure the User Logon page:
-
IP for a load balancing virtual server
-
Corresponding FQDN for the load balancing virtual server
-
Server certificate for the load balancing virtual server
bind ssl virtual server lbvs_https -certkeyname lbvs_server_cert
Back-end service in load balancing is represented as follows:
add service iis_backendsso_server_com 1.2.3.210 HTTP 80

 bind lb vserver lbvs_https iis_backendsso_server_com
To create OTP passcode validation action
add authentication ldapAction <LDAP ACTION NAME> -serverIP <SERVER IP> -serverPort <SERVER PORT> -ldapBase <BASE> -ldapBindDn <AD USER> -ldapBindDnPassword <PASSWORD> -ldapLoginName <USER FORMAT> -authentication DISABLED -OTPSecret <LDAP ATTRIBUTE>`
Example:
add authentication ldapAction ldap_otp_action -serverIP 1.2.3.4 -serverPort 636 -ldapBase "OU=Users,DC=server,DC=com" -ldapBindDn administrator@ctxnsdev.com -ldapBindDnPassword PASSWORD -ldapLoginName userprincipalname -authentication DISABLED -OTPSecret userParameters
Important:
The difference between the LDAP logon and OTP action is the need to disable the authentication and introduce a new parameter
OTPSecret. Do not use the AD attribute value.
To add authentication policy for OTP passcode validation
add authentication Policy auth_pol_otp_validation -rule true -action ldap_otp_action
To present the two-factor authentication through LoginSchema
Add the UI for two factor authentication.
add authentication loginSchema lscheme_dual_factor -authenticationSchema "/nsconfig/loginschema/LoginSchema/DualAuth.xml"
 add authentication loginSchemaPolicy lpol_dual_factor -rule true -action lscheme_dual_factor
To create passcode validation factor via the policy label
Create a manage OTP flow policy label for the next factor (the first factor is LDAP logon)
add authentication loginSchema lschema_noschema -authenticationSchema noschema
 add authentication policylabel manage_otp_flow_label -loginSchema lschema_noschema
To bind the OTP policy to the policy label
bind authentication policylabel manage_otp_flow_label -policyName auth_pol_otp_validation -priority 10 -gotoPriorityExpression NEXT
To bind the UI flow
Bind the LDAP logon followed by the OTP validation with the authentication virtual server.
bind authentication vserver authvs -policy auth_pol_ldap_logon -priority 10 -nextFactor  manage_otp_flow_label -gotoPriorityExpression NEXT
 bind authentication vserver authvs -policy lpol_dual_factor -priority 30 -gotoPriorityExpression END
To create a traffic policy for single sign-on and bind it to a VPN virtual server
add vpn trafficAction vpn_html_pol http -userExpression aaa.user.attribute(1) -passwdExpression aaa.user.attribute(2)

 add vpn trafficpolicy tf1 'http.req.method.eq(post)||http.req.method.eq(get) && false' vpn_html_pol

 bind vpn vserver vpn1 -policy tf1 -priority 10
Register your device with NetScaler
Note:
The device registration is supported using a browser.
-
On your browser, navigate to your NetScaler FQDN (first public facing IP), with a /manageotp suffix. For example,
<https://otpauth.server.com/manageotp>Login with user credentials. -
Click the + icon to add a device.

-
Enter a device name and press Go. A barcode appears on the screen.
-
Click Begin Setup and then click Scan Barcode.
-
Hover the device camera over the QR code. You can optionally enter the code.
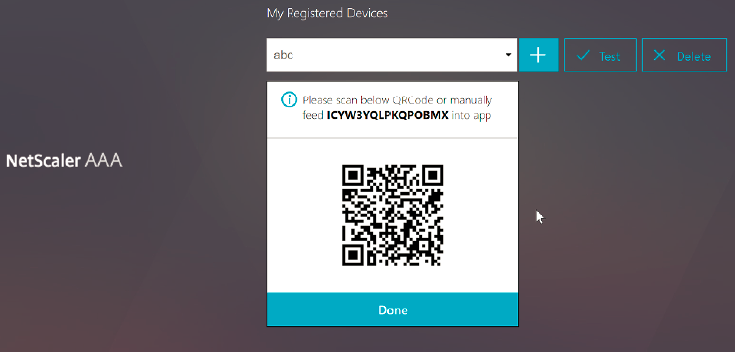 Note:The displayed QR code is valid for 3 minutes.
 -
Upon a successful scan, you are presented with a 6 digit time sensitive code that can be used to log in.

-
To test, click Done on the QR screen, then click the green check mark on the right.
-
Select your device from the drop-down menu and enter the code from Google Authenticator (must be blue, not red) and click Go.
-
Make sure to log out using the drop-down menu at the top right corner of the page.
Log in to NetScaler using the OTP
-
Navigate to your first public-facing URL and enter your OTP from Google Authenticator to log on.
-
Authenticate to the NetScaler splash page.