re-Captcha configuration for nFactor authentication
NetScaler Gateway supports a new first-class action captchaAction that simplifies re-Captcha configuration. As re-Captcha is a first-class action, it can be a factor of its own. You can inject re-Captcha anywhere in the nFactor flow.
Previously, you had to write custom WebAuth policies with changes to the RfWebUI as well. With the introduction of captchaAction, you do not have to modify the JavaScript.
Starting from NetScaler release 14.1 build 47.x, Google re-Captcha v3 is also supported in nFactor authentication in addition to re-Captcha v2 that was supported previously. Google re-Captcha v3 offers an advanced authentication method that assesses login requests without requiring user interaction. It assigns a score between 0.0 and 1.0 to each request, with higher scores suggesting safer requests. NetScaler can then use this score to determine whether to authenticate the user or not.
Starting from NetScaler release 14.1 build 51.x, Google re-Captcha v3 support is included for the Enterprise console. Previously, re-Captcha v3 support was limited to the Admin console, which has a fixed limit on the number of requests it can handle. In contrast, the Enterprise console allows for an increased request limit based on the subscription plan.
NetScaler currently supports the following re-Captcha configurations:
-
re-Captcha v2 for Admin console
-
re-Captcha v3 for Admin console
-
re-Captcha v3 for Enterprise console
Important:
If re-Captcha is used along with the user name or password fields in the schema, the Log On button is disabled until re-Captcha is met.
re-Captcha configuration
re-Captcha configuration involves two parts.
- Configuration on Google for registering re-Captcha.
- Configuration on NetScaler to use re-Captcha as part of the login flow.
re-Captcha configuration on Google
re-Captcha configuration for Admin Console (re-Captcha v2 and v3)
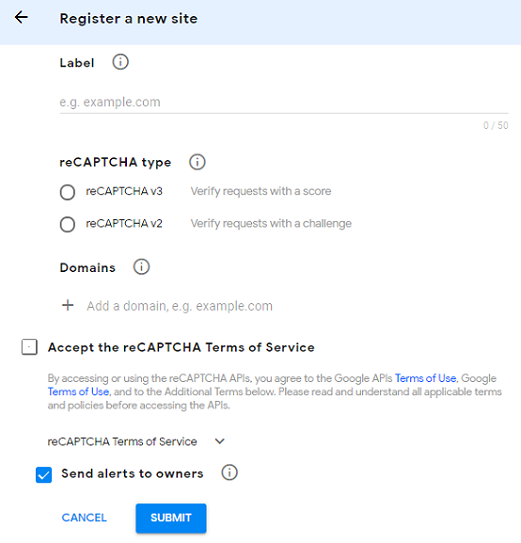
Register a domain for re-Captcha at https://www.google.com/recaptcha/admin#llist.
-
When you navigate to this page, the following screen appears.
Note
For NetScaler release 14.1 build 47.x and later, select either reCAPTCHA v2 or reCAPTCHA v3 as required. Previous releases support reCAPTCHA v2 only.
-
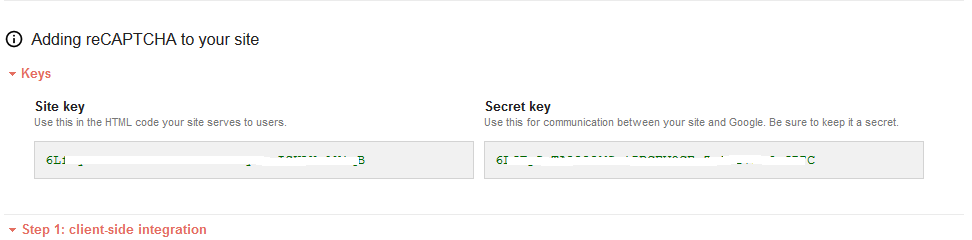
After a domain is registered, the “SiteKey” and “SecretKey” are displayed. Note the displayed “SiteKey” and “SecretKey”.
Note
The “SiteKey” and “SecretKey” are grayed out for security reasons. “SecretKey” must be kept safe.
re-Captcha configuration for Enterprise Console (re-Captcha v3)
-
Sign in to https://console.cloud.google.com/ by using a gmail account and create a project.
-
Go to https://console.cloud.google.com/security/recaptcha and create the site key. Note the created site key. For more information, see the Google re-Captcha document.
-
Go to https://console.cloud.google.com/apis/ and create an API key. Note the created API key. For more information, see the Google re-Captcha document.
-
Go to https://console.cloud.google.com/security/recaptcha and copy the server URL from the assessment API (copy till the term “assessments”). Save the copied server URL.
For example, if the assessment API is “https://recaptchaenterprise.googleapis.com/v1/projects/tactile-reason-455709-p6/assessments?key=API_KEY”, you must copy the portion up to “assessments”, which is “https://recaptchaenterprise.googleapis.com/v1/projects/tactile-reason-455709-p6/assessments”. This extracted URL is used as the server URL in the
captchaActioncommand.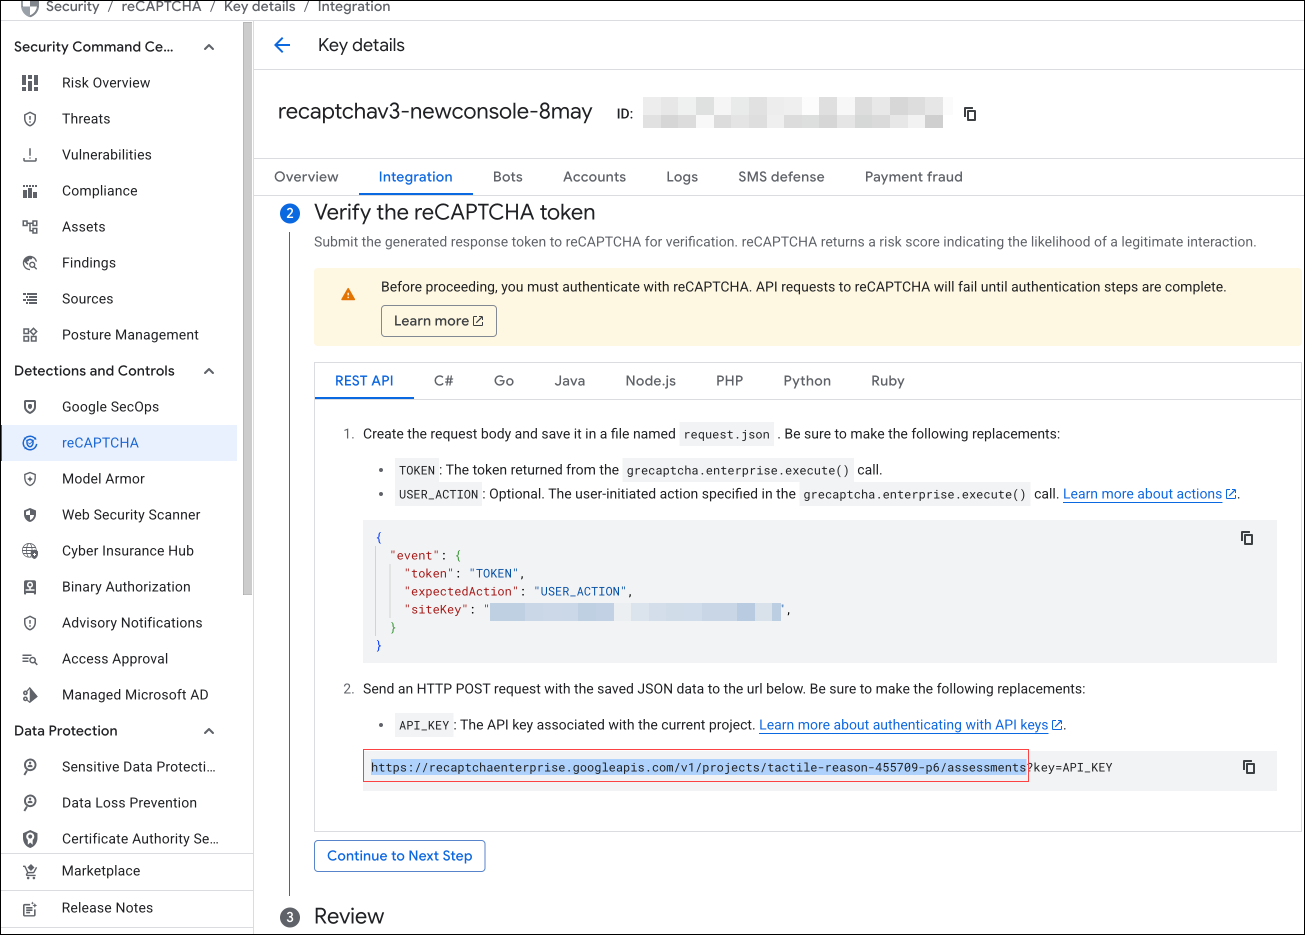
re-Captcha configuration on NetScaler
The re-Captcha configuration on NetScaler can be divided into three parts:
- Display re-Captcha screen
- Post the re-Captcha response to the Google server
- Configure LDAP as the second factor for user logon
Display re-Captcha screen
The login form customization is done through the following login schemas:
-
SingleAuthCaptcha.xmlfor re-Captcha v2 for Admin console -
SingleAuthCaptchav3.xmlfor re-Captcha v3 for Admin console -
SingleAuthReCaptchav3Enterprise.xmlfor re-Captcha v3 for Enterprise console
The customization is specified in the authentication virtual server and is sent to the UI for rendering the login form. The built-in login schema is in the /nsconfig/loginSchema/LoginSchema directory on NetScaler.
Important
- The login schema can be used when LDAP is configured as the second factor.
- You can customize the existing schema based on your use case. For example, you can modify it to include only the re-Captcha factor (without user name or password) or dual authentication with re-Captcha.
- If any custom modifications are done or the file is renamed, we recommend copying all the loginSchemas from the
/nsconfig/loginschema/LoginSchemadirectory to the parent directory,/nsconfig/loginschema.
To configure display of re-Captcha by using the CLI
re-Captcha v2:
add authentication loginSchema singleauthcaptcha -authenticationSchema /nsconfig/loginschema/SingleAuthCaptcha.xml

add authentication loginSchemaPolicy singleauthcaptcha -rule true -action singleauthcaptcha

add authentication vserver auth SSL <IP> <Port>

add ssl certkey vserver-cert -cert <path-to-cert-file> -key <path-to-key-file>

bind ssl vserver auth -certkey vserver-cert

bind authentication vserver auth -policy singleauthcaptcha -priority 5 -gotoPriorityExpression END
<!--NeedCopy-->
re-Captcha v3:
add authentication loginSchema singleauthcaptcha -authenticationSchema /nsconfig/loginschema/SingleAuthCaptchav3.xml

add authentication loginSchemaPolicy singleauthcaptcha -rule true -action singleauthcaptcha

add authentication vserver auth SSL <IP> <Port>

add ssl certkey vserver-cert -cert <path-to-cert-file> -key <path-to-key-file>

bind ssl vserver auth -certkey vserver-cert

bind authentication vserver auth -policy singleauthcaptcha -priority 5 -gotoPriorityExpression END
<!--NeedCopy-->
In the preceding command, use the following login schemas for <login_schema> parameter:
-
SingleAuthCaptcha.xmlfor re-Captcha v2 for Admin console -
SingleAuthCaptchav3.xmlfor re-Captcha v3 for Admin console -
SingleAuthReCaptchav3Enterprise.xmlfor re-Captcha v3 for Enterprise console
Post the re-Captcha response to the Google server
After you have configured the re-Captcha that must be displayed to the users, the admins add the configuration to the Google server to verify the re-Captcha response from the browser.
Prerequisites:
NetScaler contacts https://www.google.com/recaptcha/api/siteverify to validate the Captcha information. So, ensure that the site is reachable from NetScaler.
To verify if the Google site is reachable, run the following script:
curl -vvv https://www.google.com/recaptcha/api/siteverify
NetScaler contacts https://www.google.com/recaptcha/api/siteverify to validate the Captcha information.
To verify re-Captcha response from the browser for the Admin console
The “SiteKey” and “SecretKey” generated during registration of a domain in Google server must be used in the following CLI command.
re-Captcha v2:
add authentication captchaAction myrecaptcha -sitekey <sitekey-copied-from-google> -secretkey <secretkey-from-google>

add authentication policy myrecaptcha -rule true -action myrecaptcha

bind authentication vserver auth -policy myrecaptcha -priority 1
<!--NeedCopy-->
re-Captcha v3:
add authentication captchaAction -siteKey <sitekey> -secretKey <secretKey> -scoreThreshold <0 to 10>

add authentication policy myrecaptcha -rule true -action myrecaptcha

bind authentication vserver auth -policy myrecaptcha -priority 1
<!--NeedCopy-->
The default value of scoreThreshold is 5.
To verify re-Captcha response from the browser for the Enterprise console
The “site key”, “API key”, and “server URL” generated during registration of a domain in Google server must be used in the following CLI command:
add authentication captchaAction -siteKey <sitekey> -secretKey <APIkey> -scoreThreshold<0 - 10> -serverurl <serverURL>

add authentication policy myrecaptcha -rule true -action myrecaptcha

bind authentication vserver auth -policy myrecaptcha -priority 1
<!--NeedCopy-->
The default value of scoreThreshold is 5.
Configure LDAP as the second factor for user logon
Note:
If LDAP authentication is not required, customize the following login schemas to remove the user name and password labels:
SingleAuthCaptcha.xmlfor re-Captcha v2 for Admin console
SingleAuthCaptchav3.xmlfor re-Captcha v3 for Admin console
SingleAuthReCaptchav3Enterprise.xmlfor re-Captcha v3 for Enterprise console
The LDAP authentication happens after re-Captcha, if you add it as the second factor.
add authentication ldapAction ldap-new -serverIP x.x.x.x -serverPort 636 -ldapBase "cn=users,dc=aaatm,dc=com" -ldapBindDn adminuser@aaatm.com -ldapBindDnPassword <password> -encrypted -encryptmethod ENCMTHD_3 -ldapLoginName sAMAccountName -groupAttrName memberof -subAttributeName CN -secType SSL -passwdChange ENABLED -defaultAuthenticationGroup ldapGroup

add authenticationpolicy ldap-new -rule true -action ldap-new

add authentication policylabel second-factor

bind authentication policylabel second-factor -policy ldap-new -priority 10

bind authentication vserver auth -policy myrecaptcha -priority 1 -nextFactor second-factor
<!--NeedCopy-->
The administrator must add appropriate virtual servers depending on whether a load balancing virtual server or NetScaler Gateway is used for access. The administrator must configure the following command if a load balancing virtual server is required:
add lb vserver lbtest HTTP <IP> <Port> -authentication ON -authenticationHost nssp.aaatm.com
<!--NeedCopy-->
**nssp.aaatm.com** – Resolves to authentication virtual server.
User validation of re-Captcha
re-Captcha v2:
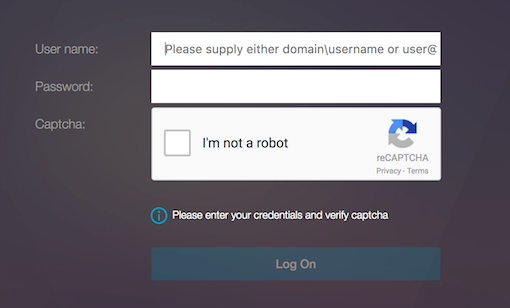
After configuring re-Captcha, you see the following UI.
-
Once the authentication virtual server loads the login page, the logon screen is displayed. Log On is disabled until re-Captcha is complete.
-
Select I’m not a robot. The re-Captcha widget is displayed.
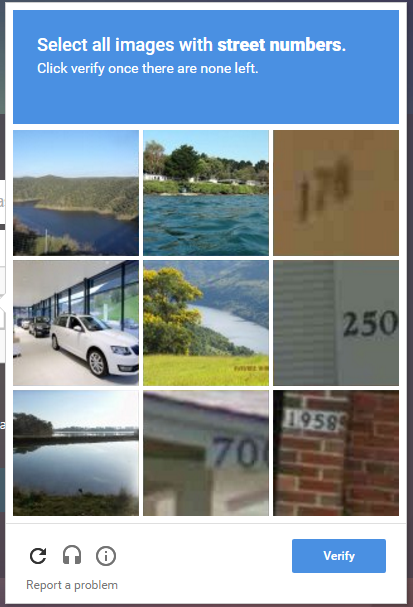
- You are navigated through a series of re-Captcha images, before the completion page is displayed.
-
Enter the AD credentials, select I’m not a robot, and click Log On. If authentication succeeds, you are redirected to the desired resource.
Notes:
- If re-Captcha is used with AD authentication, the Submit button for credentials is disabled until re-Captcha is complete.
- The re-Captcha happens in a factor of its own. Therefore, any subsequent validations like AD must happen in the
nextfactorof re-Captcha.
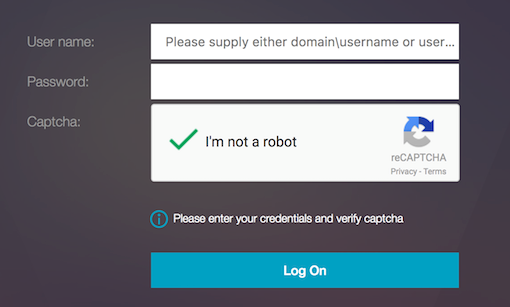
re-Captcha v3 (Admin console and Enterprise console):
After configuring re-Captcha v3, you see the following UI.
Note:
If re-Captcha v3 is configured, the Log On button is enabled when the captcha response is received from the Google server. When the user clicks the Log On button, the authentication is successful only if the score generated by the re-Captcha service is within the configured scoreThreshold parameter.