Configure SAML single sign-on
To provide single sign-on capabilities across applications that are hosted on the service provider, you can configure SAML single sign-on on the SAML SP.
Configuring SAML single sign-on by using the CLI
-
Configure the SAML SSO profile.
Example
In the following command, Example is the load balancing virtual server that has a web link from the SharePoint portal. Nssp.example.com is the Traffic Management virtual server that is load balancing the SharePoint server.
add tm samlSSOProfile tm-saml-sso -samlSigningCertName nssp -assertionConsumerServiceURL "https://nssp2.example.com/cgi/samlauth" -relaystateRule "\\"https://nssp2.example.com/samlsso.html\\"" -sendPassword ON -samlIssuerName nssp.example.com <!--NeedCopy--> -
Associate the SAML SSO profile with the traffic action.
Example
The following command enables SSO and binds the SAML SSO profile created above to a traffic action.
add tm trafficAction html_act -SSO ON -samlSSOProfile tm-saml-sso <!--NeedCopy--> -
Configure the traffic policy that specifies when the action must be run.
Example
The following command associates the traffic action with a traffic policy.
add tm trafficPolicy html_pol "HTTP.REQ.URL.CONTAINS(\\"abc.html\\")" html_act <!--NeedCopy--> -
Bind the traffic policy created previously to a traffic management virtual server (load balancing or content switching). Alternatively, the traffic policy can be associated globally.
Note:
-
This traffic management virtual server must be associated with the relevant authentication virtual server that is associated with the SAML action.
-
In an nFactor setup, an authentication virtual server, which is redirected by a load balancer, cannot act as the identity provider for the back-end application.
bind lb vserver lb1_ssl -policyName html_pol -priority 100 -gotoPriorityExpression END -type REQUEST <!--NeedCopy--> -
Configuring SAML single sign-on by using the GUI
To configure SAML single sign-on you need to define the SAML SSO profile, the traffic profile, and the traffic policy and bind the traffic policy to a traffic management virtual server or globally to the NetScaler appliance.
-
Navigate to Security > AAA-Application Traffic > Policies > Traffic > SAML SSO Profiles and click Add.
-
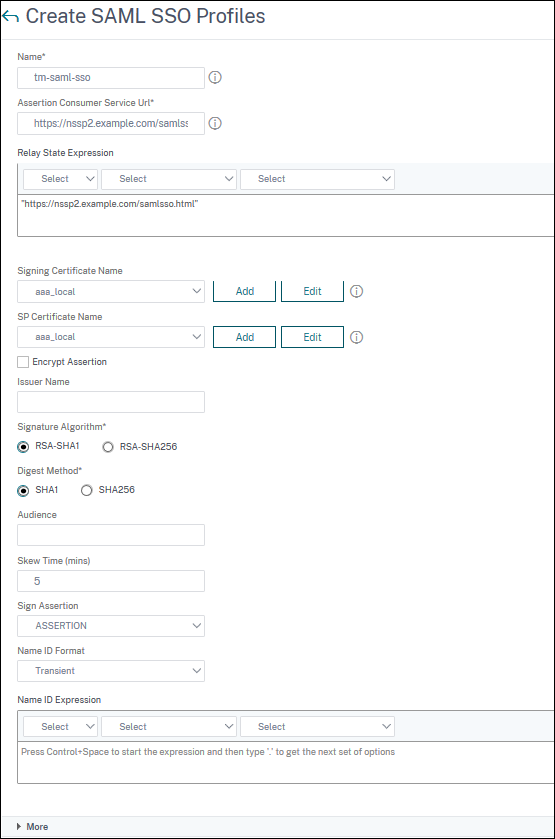
On the Create SAML SSO Profiles page, enter the values for the following fields and click Create.
-
Name: Name for the SAML SSO profile.
-
Assertion Consumer Service Url: URL to which the assertion must be sent.
-
Signing Certificate Name: Name of the SSL certificate that is used to sign assertion.
-
SP Certificate Name: Name of the SSL certificate of a peer or receiving party using which the assertion is encrypted.
-
Issuer Name: The name to be used in requests sent from NetScaler to IdP to uniquely identify NetScaler.
-
Signature Algorithm: Algorithm to be used to sign or verify SAML transactions.
-
Digest Method: Algorithm to be used to compute or verify digest for SAML transactions.
-
Audience: Audience for which an assertion sent by IdP is applicable. This is typically an entity name or url that represents a service provider.
-
Skew Time (mins): The number of minutes on either side of the current time that the assertion is valid.
-
Sign Assertion: Option to sign portions of assertion when NetScaler IdP sends one. Based on the user selection, either ASSERTION or RESPONSE or BOTH or NONE can be signed.
-
Name ID Format: Format of NameIdentifier sent in assertion.
-
Name ID Expression: Expression that is evaluated to obtain NameIdentifier to be sent in assertion.
-
-
Navigate to Security > AAA-Application Traffic > Policies > Traffic > Traffic Profiles and click Add.
-
On the Create Traffic Profile page, enter the values for the following fields, and click Create.
-
Name: Name for the traffic action.
-
AppTimeout (minutes): Time interval, in minutes, of user inactivity after which the connection is closed.
-
Single Sign-on: Select ON.
-
SAML SSO Profile: Select the created SAML SSO profile.
-
KCD Account: Kerberos constrained delegation account name.
-
SSO User Expression: Expression that is evaluated to obtain user name for SingleSignOn.
-
SSO Password Expression: Expression that is evaluated to obtain password for SingleSignOn

-
-
Navigate to Security > AAA-Application Traffic > Policies > Traffic > Traffic Policies and click Add.
-
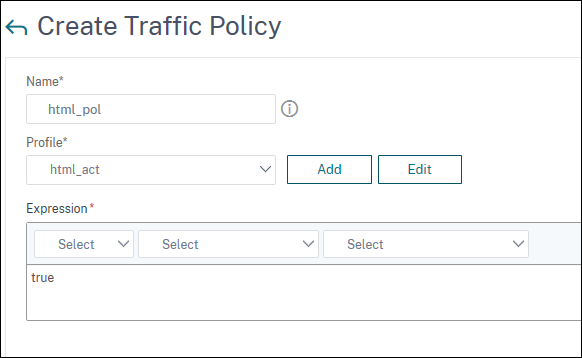
On the Create Traffic policy page, enter the values for the following, and click Create.
-
Name: Name of the traffic policy to be created.
-
Profile: Select the created traffic profile.
-
Expression: Advanced policy expression that the policy uses to respond to specific request. For example, true.
-
-
To bind the traffic policy to a traffic management virtual server, navigate to Traffic Management > Load Balancing > Virtual Servers, select a virtual server, and click Edit.
-
Under Advanced Settings, click Policies.
-
Select Traffic in the Choose Policy field, select Request in the Choose Type field, and click Continue.
-
Under Select Policy, click to select the created traffic.
-
Click Select.
-
Click Bind to bind the traffic policy to the virtual server.