Enable proxy support for user connections
User devices can connect through a proxy server for access to internal networks. NetScaler Gateway supports the HTTP, SSL, FTP, and SOCKS protocols. To enable proxy support for user connections, you specify the settings on NetScaler Gateway. You can specify the IP address and port used by the proxy server on NetScaler Gateway. The proxy server is used as a forward proxy for all further connections to the internal network.
Proxy settings
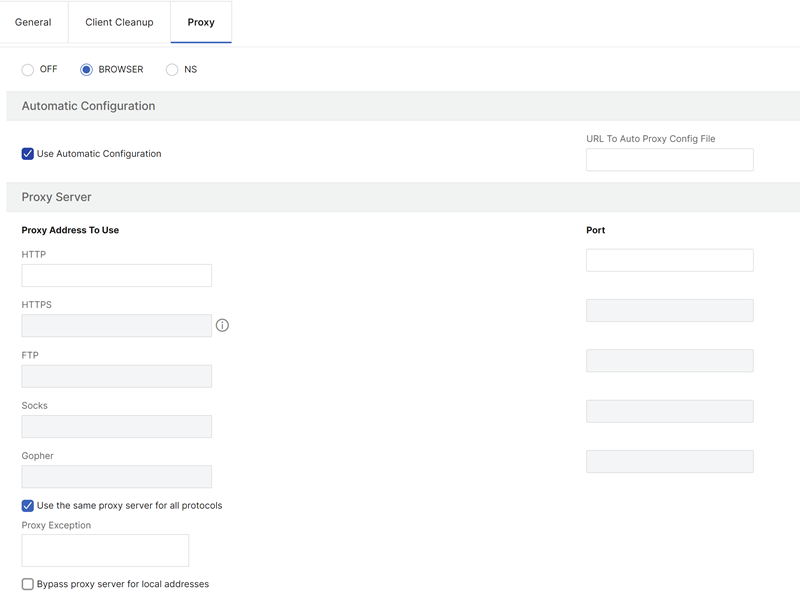
You can configure proxy settings on the browser or on the NetScaler appliance. To configure proxy settings on the browser or the appliance, navigate to NetScaler Gateway > Global Settings > Change Global NetScaler Gateway Settings > Client Experience tab > Advanced Settings > Proxy, and then select Browser or NS as applicable.
-
Browser: When you choose to configure proxy settings on the browser, you can use the automatic configuration option by providing a link to the auto proxy config file. Automatic configuration might overwrite the manual settings.
Also, when you select Browser, you can bypass the previously configured proxies by selecting the proxy exception option.
Note: Different types of clients have different capabilities regarding Browser proxy configuration. For details, see NetScaler Gateway VPN clients and supported features.
-
NS: You cannot use the automatic configuration option if you configure proxy settings on the NetScaler appliance. You cannot bypass the previously configured proxies when you configure the proxy settings on the appliance.
-
OFF: When this option is selected, NetScaler Gateway disables the proxy settings in the VPN plug-in.
To configure proxy support for user connections
- In the navigation pane, expand NetScaler Gateway and then click Global Settings.
- In the details pane, under Settings, click Change global settings.
- On the Client Experience tab, click Advanced Settings.
- On the Proxy tab, under Proxy Settings, select Browser.
- For the protocols, type the IP address and port number and then click OK.
Note:
If you select NS, you can configure proxy servers that support secure and unsecure HTTP connections only.
After you enable proxy support on NetScaler Gateway, you specify configuration details on the user device for the proxy server that corresponds to the protocol.
After you enable proxy support, NetScaler Gateway sends the proxy server details to the client Web browser and changes the proxy configuration on the browser.
- When the user device connects to NetScaler Gateway, the user device can communicate with the proxy server directly for connection to the user’s network.
- When the user device disconnects from NetScaler Gateway, the proxy settings are restored to the previous default settings, that was present before connecting to the VPN plug-in.
To configure one proxy server to use all protocols for NetScaler Gateway
You can configure one proxy server to support all the protocols that NetScaler Gateway uses. This setting provides one IP address and port combination for all the protocols.
- In the navigation pane, expand NetScaler Gateway and then click Global Settings.
- In the details pane, under Settings, click Change global settings.
- On the Client Experience tab, click Advanced Settings.
- On the Proxy tab, under Proxy Settings, select Browser.
- For the protocols, type the IP address and port number.
- Click Use the same proxy server for all protocols and then click OK.
When you disable split tunneling and set all proxy settings to On, proxy settings are propagated to user devices. If proxy settings are set to Appliance, the settings are not propagated to user devices.
NetScaler Gateway makes connections to the proxy server on behalf of the user device. The proxy settings are not propagated to the user’s browser, so no direct communication between the user device and the proxy server is possible.
To configure the NetScaler Gateway to be a proxy server
When you configure NetScaler Gateway as a proxy server, unsecure and secure HTTP is the only supported protocols.
- In the navigation pane, expand NetScaler Gateway and then click Global Settings.
- In the details pane, under Settings, click Change global settings.
- On the Client Experience tab, click Advanced Settings.
- On the Proxy tab, under Proxy Settings, select NS.
- For the protocols, type the IP address and port number and then click OK.