Configure Always On VPN before Windows Logon
This section captures the details to configure Always On VPN before Windows Logon by using an advanced policy.
Prerequisites
- NetScaler Gateway and VPN plug-in must be version 13.0.41.20 and later.
- NetScaler Advanced Edition and higher is required for the solution to work.
- You can configure the functionality only by using advanced policies.
- The VPN virtual server must be up and running.
High-level configuration steps
The Always On VPN before Windows Logon configuration involves the following high-level steps:
- Set up a machine level tunnel
- Set up a user level tunnel (optional)
- Enable user authentication
- Configure the VPN virtual server, install a CA certificate, and bind the certificate key to the virtual server.
- Create an authentication profile
- Create an authentication virtual server
- Create authentication policies
- Bind the policies to the authentication profile
Machine level tunnel
Machine level tunnel is established towards NetScaler Gateway using the device certificate as identity. Device certificate must be installed in the client machine under the machine store. This is applicable only for Always On before Windows Logon service.
For more details on device certificate, see Use device certificates for authentication.
Important:
If the VPN virtual server on the NetScaler Gateway appliance is configured on a nonstandard port (other than 443), the machine-level tunnel does not work as intended.
Set up machine level tunnel by using the device certificate
Device certificate based authentication configuration by using the GUI
- On the Configuration tab, navigate to NetScaler Gateway > Virtual Servers.
- On the NetScaler Gateway Virtual Servers page, select an existing virtual server and click Edit.
-
Under Certificate, click CA Certicicate.
-
On the CA Certificate Binding page, click Add next to the Select CA Certificate field, update the requires information, and click Install.
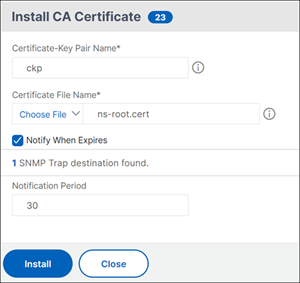
-
On the VPN Virtual Server page, click the edit icon.
-
In the Basic Settings section, click More.
-
Click Add next to the CA for Device Certificate section and click OK.
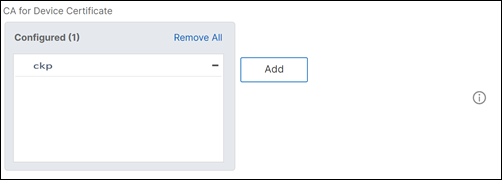
Note: Do not select the Enable Device Certificate checkbox.
-
For binding a CA certificate to the virtual server, click CA certificate under Certificate section. Click Add Binding under the SSL Virtual Server CA Certificate Binding page.
Note:
- The device certificate’s subject common name (CN) field must not be empty. If a device tries to log in with empty CN device certificates, its VPN session is created with the user name as “anonymous”. In IIP, if multiple sessions have the same user name, previous sessions are disconnected. So, when IIP is enabled, you notice the functionality impact because of an empty common name.
- All CA certificates (Root and Intermediate) that can potentially sign the Device Certificate issued to clients must be bound under the CA for Device Certificate section and also the CA Certificate binding section for virtual server in Steps 4 and 5. For more information on linking CA certificate with intermediate / subordinate, see Install, link, and update certificates.
- If multiple device certificates are configured, the certificate with the longest expiry date is tried for the VPN connection. If this certificate allows the EPA scan successfully, then the VPN connection is established. If this certificate fails in the scan process, the next certificate is used. This process continues until all the certificates are tried.
-
On the CA Certificate Binding page, select the certificate.
-
Click Bind.
- Create an authentication virtual server.
- On the VPN Virtual Servers page, navigate to Advanced Settings > Authentication Profile and click Add.
- On the Create Authentication Profile page, assign a name to the authentication profile, and click Create.
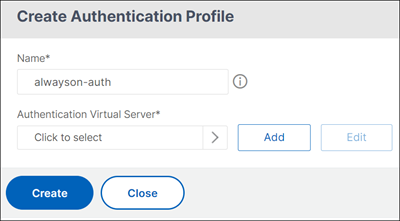
- On the Authentication Virtual Server page, assign a name to the authentication virtual server. Select the IP Address type as Non-Addressable, and click OK.
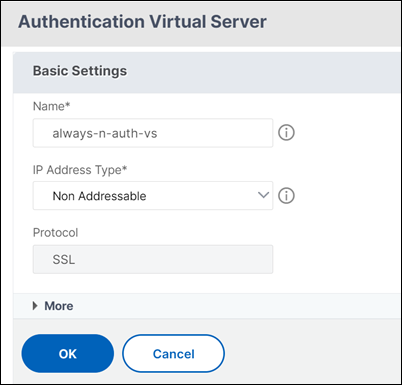
Note:
The authentication virtual server always remains in the DOWN state.
- Create an authentication policy.
- In the Advanced Authentication Policies section of the Security > AAA-Application Traffic > Authentication Virtual Servers page, select the authentication policy and click Add Binding.
- On the Policy Binding page, click Add next to the Select Policy field.
- On the Create Authentication Policy page;
- Assign a name to the advanced authentication policy.
- Select EPA from the Action Type list.
- Click Add next to Action.
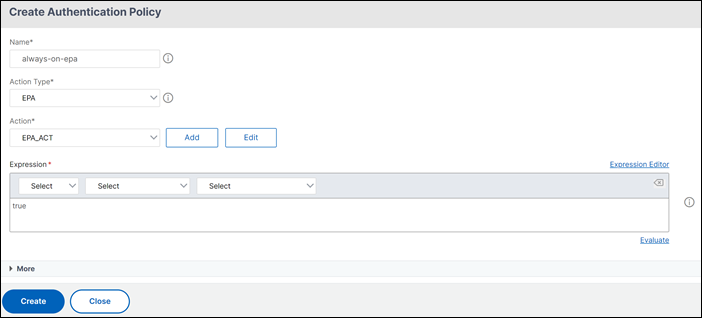
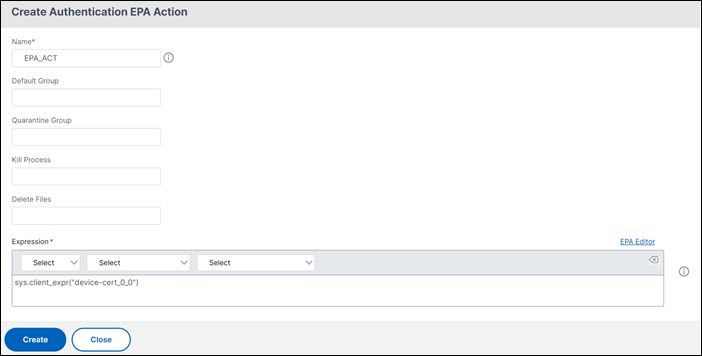
- On the Create Authentication EPA Action page;
- Assign a name to the EPA action.
- Enter
sys.client_expr("device-cert_0_0")in the Expression field. -
Click Create.
- On the Create Authentication Policy page;
- Assign a name to the authentication policy.
- Enter is_aoservice in the Expression field.
-
Click Create.

- On the Policy Binding page, enter 100 in Priority and click Bind.
Device certificate based authentication configuration by using the CLI
-
Install a CA certificate on a VPN virtual server.
add ssl certkey ckp -cert t_CA.cer <!--NeedCopy--> -
Bind the CA certificate to the VPN virtual server.
bind ssl vserver <vServerName> -certkeyName <string> -ocspCheck ( Mandatory | Optional )
<!--NeedCopy-->
Example
bind ssl vserver TestClient -CertkeyName ag51.xm.nsi.test.com -CA -ocspCheck Mandatory <!--NeedCopy--> -
Add an authentication virtual server.
add authentication authnProfile <name>  {-authnVsName <string>}
<!--NeedCopy-->
Example
add authentication authnProfile always_on -authnVsName always_on_auth_server <!--NeedCopy--> -
Create an authentication EPA action.
add authentication epaAction <name> -csecexpr <expression>
<!--NeedCopy-->
Example
add authentication epaAction epa-act -csecexpr `sys.client_expr("device-cert_0_0")` -defaultgroup epa_pass <!--NeedCopy--> -
Create an authentication policy
add authentication Policy <name> -rule <expression> -action <string>
<!--NeedCopy-->
Example:
add authentication Policy always_on_epa_auth -rule is_aoservice -action epa_auth
<!--NeedCopy-->
Important:
The machine-level tunnel configuration is now complete. To set up the user-level tunnel after the Windows Logon, see the section User Level Tunnel.
On the client machine, the device certificate is in the .pfx format. The .pfx certificate is installed on the Windows machine as Windows understand the .pfx format. This file has the certificate and key files. This certificate must be of the same domain which is bound to the virtual server. The .pfx and server certificates and keys can be generated by using the client certificate wizard. These certificates can be used with the certificate authority to generate the respective .pfx with server certificate and domain. The certificate .pfx is installed in the computer account in the personal folder. The
show aaa sessioncommand displays the device tunnel on the NetScaler appliance.
User Level Tunnel
Replace a machine-level tunnel with a user-level tunnel by using the GUI
Note: The expression is_aoservice.not is applicable from NetScaler Gateway version 13.0.41.20 and later.
- Configure a policy for user authentication.
- Navigate to NetScaler Gateway > Virtual Servers and select a virtual server.
- In Advanced Settings, click Authentication Profile.
- Configure the authentication profile.
- On the Configuration > Security > AAA-Application Traffic > Authentication Virtual Servers page, select the authentication policy.
-
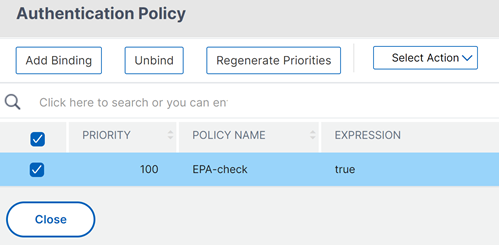
In Select Action, click Edit Binding and change GoTo Expression to NEXT instead of END for the policy bound.
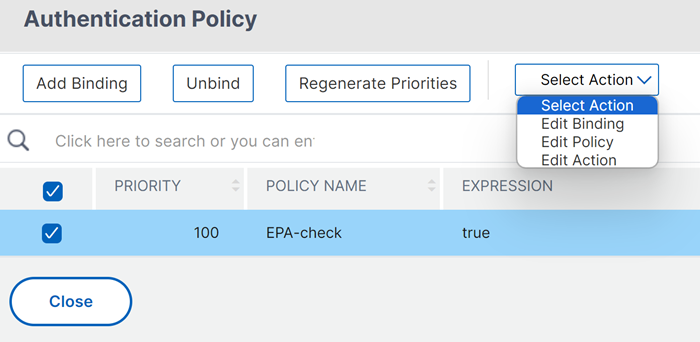
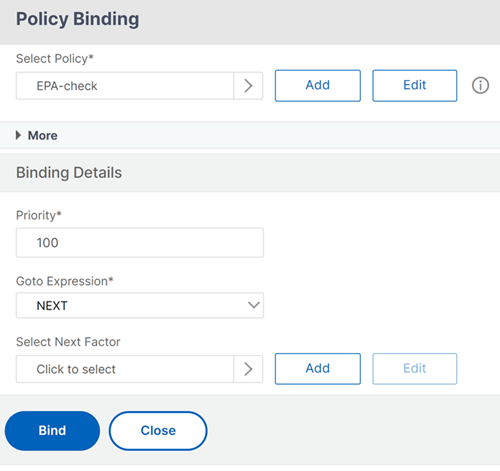
-
Click Bind and then in the Authentication Policy page, select the authentication policy and click Add binding.
-
On the Policy Binding page, click Add next to Select Policy.
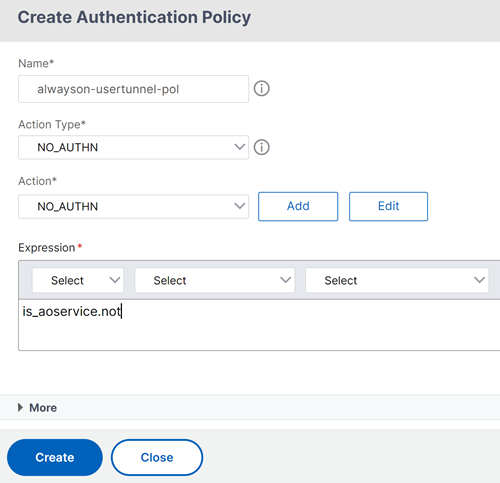
On the Create Authentication Policy page;
- Enter a name for the “no authentication” policy to be created.
- Select action type as No_AUTHN.
- Enter is_aoservice.not in the Expression field.
- Click Create.
-
In Select Action, click Edit Binding.

- On the Policy Binding page, enter 110 in Priority. Click Add next to Select Next Factor.
- On the Authentication Policy Label page, enter a descriptive name for the policy label, select the login schema, and click Continue.
- In Select Policy, click Add and create an LDAP authentication policy.
- Click Create, and then click Bind.
- Click Done, and then click Bind.
In the Authentication Policy page, the Next Factor column displays the configured next factor policy.

- You can configure LDAP policy as the next factor of authentication policy.
- On the Create Authentication Policy page, enter a name for the LDAP policy.
- Select Action Type as LDAP.
- Enter Action as configured LDAP action.
Note:
- For creating login schema XML file, see Login schema XML file.
- For creating policy labels, see Authenticate the policy label.
- For creating an LDAP authentication policy, see To configure LDAP authentication by using the configuration utility.
Replace a machine-level tunnel with a user-level tunnel by using the CLI
-
Bind a policy to the authentication virtual server
bind authentication vserver <name> -policy <name> -priority  <positive_integer> -gotoPriorityExpression <expression>
<!--NeedCopy-->
Example
bind authentication vserver alwayson-auth-vserver -policy alwayson-auth-pol -priority 100 -gotoPriorityExpression NEXT <!--NeedCopy--> -
Add an authentication policy with the action as
NO_AUTHand expressionis_aoservice.not,and bind it to the policy.add authentication Policy <name> -rule <expression> -action <string> bind authentication vserver <name> -policy <name> -priority <positive_integer> -gotoPriorityExpression <expression> <!--NeedCopy-->Example
add authentication Policy alwayson-usertunnel-pol -rule is_aoservice.not -action NO_AUTHN bind authentication vserver alwayson-auth-vserver -policy alwayson-usertunnel-pol -priority 110 <!--NeedCopy--> -
Add a next factor and bind the policy label to the next factor.
add authentication policylabel <labelName> -loginSchema <string>

bind authentication  policylabel <string>  -policyName <string>  -priority <positive_integer> -gotoPriorityExpression <expression> -nextFactor <string>
<!--NeedCopy-->
Example
add authentication policylabel user-tunnel-auth-label -loginSchema singleauth_alwayson bind authentication policylabel user -policyName alwayson-usertunnel-pol -priority 100 <!--NeedCopy--> -
Configure an LDAP policy and bind it to the user tunnel policy label.
add authentication policy <name>  -rule <expression>  -action <string>

bind authentication vserver <vserver_name> -policy <string>  -priorit < positive integer>  gotoPriorityExpression <string>
<!--NeedCopy-->
Example
add authentication Policy LDAP_new -rule true -action LDAP_new

bind authentication policylabel user-tunnel-auth-label -policyName LDAP_new -priority 100 -gotoPriorityExpression NEXT
<!--NeedCopy-->
Client side configuration
The AlwaysOn, locationDetection, and suffixList registries are optional and only required if the location detection functionality is needed.
To access registry key entries, navigate to the following path: Computer>HKEY_LOCAL_MACHINE>SOFTWARE>Citrix®>Secure Access Client
| Registry key | Registry type | Values and description |
|---|---|---|
| AlwaysOnService | REG_DWORD | 1 => Establish machine level tunnel but not user level tunnel; 2 => Establish machine level tunnel and user level tunnel |
| AlwaysOnURL | REG SZ | URL of the NetScaler Gateway virtual server the user wants to connect to. Example: https://xyz.companyDomain.com Important: Only one URL is responsible for machine level tunnel and user-level tunnel. The AlwaysOnURL registry helps both the service and user-level component to work and connect a separate tunnel, that is, machine-level tunnel and user-level tunnel based on the design |
| AlwaysOn | REG_DWORD | 1 => Allow network access on VPN failure; 2=> Block network access on VPN failure |
| AlwaysOnAllowlist | REG_SZ | Semi-colon separated list of IP addresses or FQDNs which must be whitelisted while the machine is running under the strict mode. Example: 8.8.8.8;linkedin.com
|
| UserCertCAList | REG_SZ | Comma or semi-colon separated list of root CA names, that is the issuer name of the certificate. Used in the context of an Always On service where a customer can specify the list of CAs to choose the client certificate from. Example: example.net;xyz.gov.in
|
| locationDetection | REG_DWORD | 1 => To enable the location detection; 0 => To disable the location detection |
| suffixList | REG SZ | Semicolon separated list of domains and is responsible for checking if the machine is in intranet or not at any given time when location-detection is enabled. Example: citrite.net,example.net
|
For more information about these registry entries, see Always On.
Note:
When the Always On service is configured, the Always On profile configured on the NetScaler Gateway virtual server or on NetScaler is ignored on the client side. Therefore, ensure that you also enable the
locationDetectionandAlwaysOnVPN registries when configuring the Always On service.The
ClientControlregistry configuration is only supported in Always On mode and not in Always On service mode. As a result, the Log off option is not supported when Always On service mode is enabled.