Provisioning Citrix® ADC instances
Note
The Citrix ADM service connect is enabled by default, after you install or upgrade the NetScaler SDX appliance to release 12.1 build 58.xx and above. For more details, see Data governance and Citrix ADM service connect.
You can provision one or more Citrix ADC instances on the SDX appliance by using the Management Service. The number of instances that you can install depends on the license you have purchased. If the number of instances added is equal to the number specified in the license, the Management Service does not allow provisioning more Citrix ADC instances.
Provisioning a NetScaler VPX instance on the SDX appliance comprises the following steps.
- Define an admin profile to attach to the Citrix ADC instance. This profile specifies the user credentials that are used by the Management Service to provision the Citrix ADC instance and later, to communicate with the instance to retrieve configuration data. You can also use the default admin profile.
- Upload the .xva image file to the Management Service.
- Add a Citrix ADC instance using the Provision Citrix ADC wizard in the Management Service. The Management Service implicitly deploys the Citrix ADC instance on the SDX appliance and then downloads configuration details of the instance.
Warning
Make sure that you modify the provisioned network interfaces or VLANS of an instance using the Management Service instead of performing the modifications directly on the instance.
Create an admin profile
Admin profiles specify the user credentials that are used by the Management Service when provisioning the Citrix ADC instances, and later when communicating with the instances to retrieve configuration data. The user credentials specified in an admin profile are also used by the client when logging on to the Citrix ADC instances through the CLI or the configuration utility.
Admin profiles also enable you to specify that the Management Service and a VPX instance must communicate with each other only over a secure channel or using HTTP.
The default admin profile for an instance specifies a user name of nsroot. This profile cannot be modified or deleted. However, you must override the default profile by creating a user-defined admin profile and attaching it to the instance when you provision the instance. The Management Service administrator can delete a user-defined admin profile if it is not attached to any Citrix ADC instance.
Important: Do not change the password directly on the VPX instance. If you do so, the instance becomes unreachable from the Management Service. To change a password, first create an admin profile, and then modify the Citrix ADC instance, selecting this profile from the Admin Profile list.
To change the password of Citrix ADC instances in a high availability setup, first change the password on the instance designated as the secondary node, and then change the password on the instance designated as the primary node. Remember to change the passwords only by using the Management Service.
To create an admin profile
-
On the Configuration tab, in the navigation pane, expand Citrix ADC Configuration, and then click Admin Profiles.
-
In the Admin Profiles pane, click Add.
-
The Create Admin Profile dialog box appears.
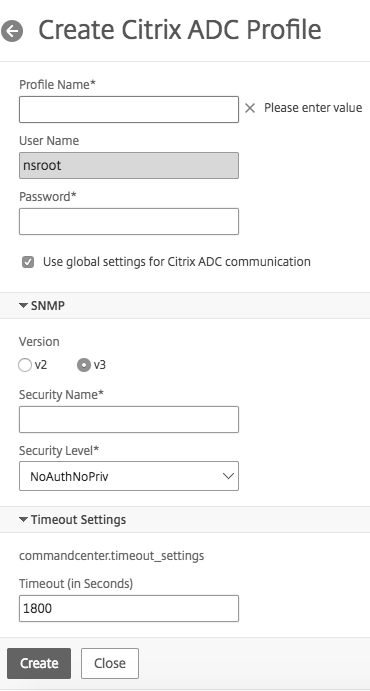
Set the following parameters:
- Profile Name: name of the admin profile. The default profile name is
nsroot. You can create user-defined profile names. - Password: the password used to log on to the Citrix ADC instance. Maximum length: 31 characters.
- SSH Port: set the SSH port. The default port is 22.
-
Select Use global settings for Citrix ADC communication check box, if you want the setting to be defined in the System Settings for the communication between the Management Service and the Citrix ADC instance. You can clear this box and change the protocol to HTTP or HTTPS.
- Select http option to use HTTP protocol for the communication between the Management Service and the Citrix ADC instance.
- Select https option to use secure channel for the communication between the Management Service and the Citrix ADC instance
4. Under SNMP, select the version. If you select v2, go to step 5. If you select v3, go to step 6.
5. Under SNMP v2, add the SNMP Community name.
6. Under SNMP v3, add Security Name and Security Level.
7. Under Timeout Settings, specify the value.
8. Click Create, and then click Close. The admin profile that you created appears in the Admin Profiles pane.
If the value in the Default column is true the default profile is the admin profile. If the value is false, a user-defined profile is the admin profile.
If you do not want to use a user-defined admin profile, you can remove it from the Management Service. To remove a user-defined admin profile, in the Admin Profiles pane, select the profile you want to remove, and then click Delete.
Upload a Citrix ADC .xva image
A .xva file is required for adding a NetScaler VPX instance.
Upload the Citrix ADC SDA .xva files to the SDX appliance before provisioning the VPX instances. You can also download a .xva image file to a local computer as a backup. The .xva image file format is: NSVPX-XEN-ReleaseNumber-BuildNumber_nc.xva
Note: By default, a .xva image file based on the Citrix ADC 9.3 release is available on the SDX appliance.
In the Citrix ADC XVA Files pane, you can view the following details.
-
Name
Name of the .xva image file. The file name contains the release and the build number. For example, the file name NSVPX-XEN-9.3-25_nc.xva refers to release 9.3 build 25.
-
Last Modified
Date when the .xva image file was last modified.
-
Size
Size, in MB, of the .xva image file.
To upload a Citrix ADC .xva file
- On the Configuration tab, in the navigation pane, expand Citrix ADC Configuration, and then click XVA Files.
- In the Citrix ADC XVA Files pane, click Upload.
- In the Upload Citrix ADC instance XVA dialog box, click Browse and select the XVA image file that you want to upload.
- Click Upload. The XVA image file appears in the Citrix ADC XVA Files pane after it is uploaded.
To create a backup by downloading a Citrix ADC .xva file
- In the Citrix ADC Build Files pane, select the file that you want to download, and then click Download.
- In the File Download message box, click Save.
- In the Save As message box, browse to the location where you want to save the file, and then click Save.
Add a Citrix ADC instance
When you add Citrix ADC instances from the Management Service, you need to provide values for some parameters, and the Management Service implicitly configures these settings on the Citrix ADC instances.
Name: Assign a name to the Citrix ADC instance.
Next, select an IPv4 or IPv6 address or both IPv4 and IPv6 addresses to access the NetScaler VPX instance for the management purpose. A Citrix ADC instance can have only one management IP (also called NSIP). You cannot remove an NSIP address.
Assign a netmask, default gateway, and next hop to Management Service for the IP address.
Next, add the XVA file, Admin Profile, and a description for the instance.
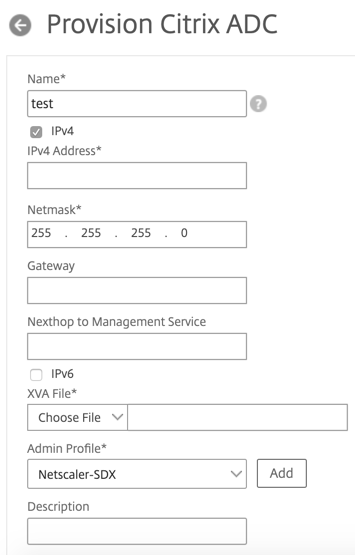
Note: For a high availability setup (active-active or active-standby), Citrix recommends that you configure the two NetScaler VPX instances on different SDX appliances. Make sure that the instances in the setup have identical resources, such as CPU, memory, interfaces, packets per second (PPS), and throughput.
License allocation
In this section, specify the license you have procured for the Citrix ADC. The license can be Standard, Enterprise, and Platinum or Secure Web Gateway.
Note: * indicates required fields.
Note
Buy a separate license (SDX 2-Instance Add-On Pack for Secure Web Gateway) for Citrix Secure Web Gateway™ (SWG) instances on SDX appliances. This instance pack is different from the SDX platform license or SDX instance pack.
For more information about deploying a Citrix SWG instance on an SDX appliance, see Deploying a Citrix Secure Web Gateway Instance on an SDX Appliance.

If you need bandwidth bursting ability, select Burstable under Allocation Mode. For more information, see Bandwidth Metering in SDX.
Crypto allocation
Starting with release 12.1 48.13, the interface to manage crypto capacity has changed. For more information, see Manage crypto capacity.
Resource allocation
Under resource allocation, assign total memory, packets per second, and CPU.
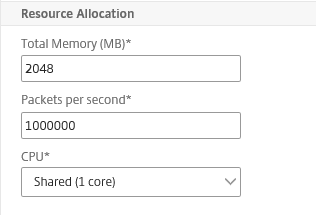 .
.
CPU: Assign a dedicated core or cores to the instance, or the instance shares a core with other instances. If you select shared, then one core is assigned to the instance but the core might be shared with other instances if there is a shortage of resources. Reboot affected Instances if CPU cores are reassigned. Restart the instances on which CPU cores are reassigned to avoid any performance degradation.
From SDX release 11.1.x.x (MR4), if you are using the SDX 25000xx platform, you can assign a maximum of 16 cores to an instance. Also, if you are using the SDX 2500xxx platform, you can assign a maximum of 11 cores to an instance.
Note: For an instance, the maximum throughput that you configure is 180 Gbps.
The following table lists the supported VPX, Single bungle image version, and the number of cores you can assign to an instance:
| Platform | Total cores | Total cores available for provisioning VPX instances | Maximum cores that can be assigned to a single instance |
|---|---|---|---|
| SDX 8015, SDX 8400, and SDX 8600 | 4 | 3 | 3 |
| SDX 8900 | 8 | 7 | 7 |
| SDX 11500, SDX 13500, SDX 14500, SDX 16500, SDX 18500, and SDX 20500 | 12 | 10 | 5 |
| SDX 11515, SDX 11520, SDX 11530, SDX 11540, and SDX 11542 | 12 | 10 | 5 |
| SDX 17500, SDX 19500, and SDX 21500 | 12 | 10 | 5 |
| SDX 17550, SDX 19550, SDX 20550, and SDX 21550 | 12 | 10 | 5 |
| SDX 14020, SDX 14030, SDX 14040, SDX 14060, SDX 14080 and SDX 14100 | 12 | 10 | 5 |
| SDX 22040, SDX 22060, SDX 22080, SDX 22100, and SDX 22120 | 16 | 14 | 7 |
| SDX 24100 and SDX 24150 | 16 | 14 | 7 |
| SDX 14020 40G, SDX 14030 40G, SDX 14040 40G, SDX 14060 40G, SDX 14080 40G and SDX 14100 40G | 12 | 10 | 10 |
| SDX 14020 FIPS, SDX 14030 FIPS, SDX 14040 FIPS, SDX 14060 FIPS, SDX 14080 FIPS and SDX 14100 FIPS | 12 | 10 | 10 |
| SDX 14040 40S, SDX 14060 40S, SDX 14080 40S, and SDX 14100 40S | 12 | 10 | 10 |
| SDX 25100A, 25160A, 25200A | 20 | 18 | 9 |
| SDX 25100-40G, 25160-40G, 25200-40G | 20 | 18 | 16 (if version is 11.1-51.x or higher); 9 (if version is 11.1-50.x or lower; all versions of 11.0 and 10.5) |
| SDX 26100, 26160, 26200, 26250 | 28 | 26 | 16 |
| SDX 26100-50S, 26160-50S, 26200-50S, 26250-50S | 28 | 26 | 16 |
| SDX 26100-100G, 26160-100G, 26200-100G, 26250-100G | 28 | 26 | 26 |
| 15000-50G | 16 | 14 | 14 |
Note
Dedicated cores map to the number of packet engines running on the instance. For a VPX instance created with dedicated cores, an extra CPU is assigned for management.
Instance administration
You can create an admin user for the VPX instance by selecting Add Instance Administration under Instance Administration.
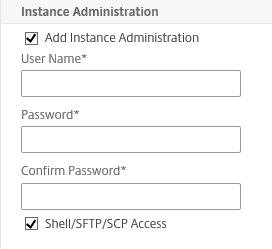
Add the following details:
User name: The user name for the Citrix ADC instance administrator. This user has superuser access but does not have access to networking commands to configure VLANs and interfaces.
Password: The password for the user name.
Shell/Sftp/Scp Access: The access allowed to the Citrix ADC instance administrator. This option is selected by default.
Network settings
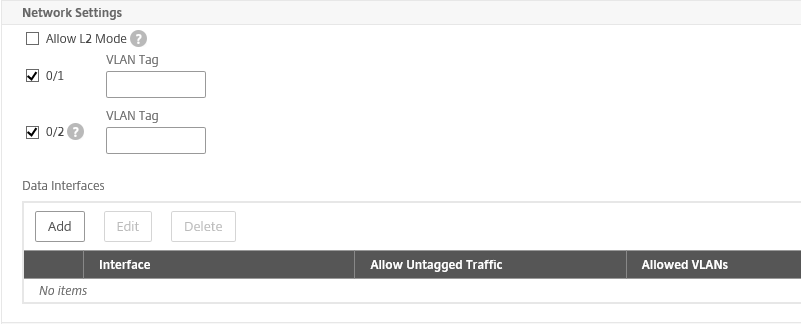
- Allow L2 Mode under network settings.
You can allow L2 mode on the Citrix ADC instance. Select Allow L2 Mode under Networking Settings. Before you log on to the instance and enable L2 mode. For more information, see Allowing L2 Mode on a Citrix ADC instance.
 .
.
Note: If you disable L2 mode for an instance from the Management Service, you must log on to the instance and disable L2 mode from that instance. Failure to do so might cause all the other Citrix ADC modes to be disabled after you restart the instance
By default interface 0/1 and 0/2 are selected for management LA.
VLAN tag: specify a VLAN ID for the management interface.
Next, add data interfaces.
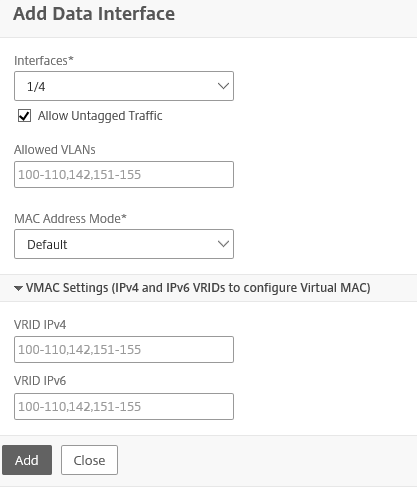
Note: The interface IDs of interfaces that you add to an instance do not necessarily correspond to the physical interface numbering on the SDX appliance. For example, if the first interface that you associate with instance 1 is SDX interface 1/4, it appears as interface 1/1 when you log on to the instance and view the interface settings, because it is the first interface that you associated with instance 1.
-
Allowed VLANs: Specify a list of VLAN IDs that can be associated with a Citrix ADC instance.
-
MAC Address Mode: Assign a MAC address. Select from one of the following options:
- Default: Citrix Hypervisor™ assigns a MAC address.
- Custom: Choose this mode to specify a MAC address that overrides the generated MAC address.
- Generated: Generate a MAC address by using the base MAC address set earlier. For information about setting a base MAC address, see Assigning a MAC Address to an Interface.
-
VMAC Settings (IPv4 and IPv6 VRIDs to configure Virtual MAC)
- VRID IPV4: The IPv4 VRID that identifies the VMAC. Possible values: 1–255. For more information, see Configuring VMACs on an Interface.
- VRID IPV6: The IPv6 VRID that identifies the VMAC. Possible values: 1–255. For more information, see Configuring VMACs on an Interface.
Management VLAN settings
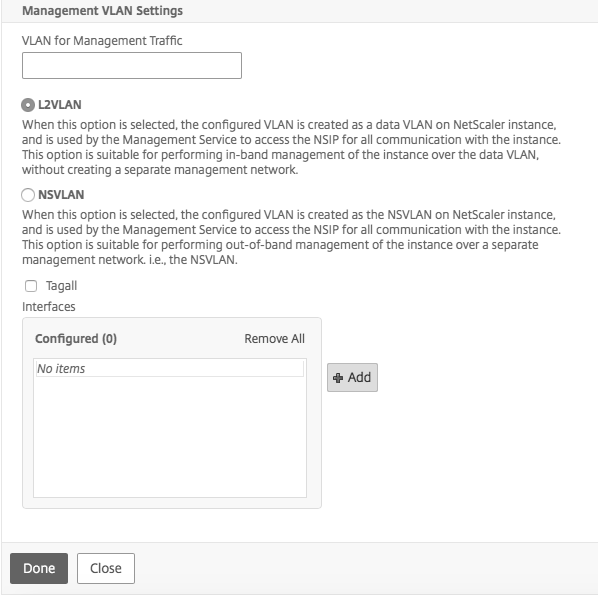
Typically, the Management Service and the management address (NSIP) of the VPX instance are in the same subnetwork, and communication is over a management interface. However, if the Management Service and the instance are in different subnetworks, you have to specify a VLAN ID at the time of provisioning a VPX instance, so that the instance can be reached over the network when it starts. If your deployment requires that the NSIP not be accessible through any interface other than the one selected at the time of provisioning the VPX instance, select the NSVLAN option.
Citrix recommends that you do not select NSVLAN. You cannot change this setting after you have provisioned the Citrix ADC instance.
Note:
- HA heartbeats are sent only on the interfaces that are part of the NSVLAN.
- You can configure an NSVLAN only from VPX XVA build 9.3–53.4 and later.
Important: If NSVLAN is not selected, running the “clear config full” command on the VPX instance deletes the VLAN configuration.
Click Done to provision the NetScaler VPX appliance.
Modify a Citrix ADC instance
To modify the values of the parameters of a provisioned Citrix ADC instance, in the Citrix ADC instances pane, select the instance that you want to modify, and then click Modify. In the Modify ADC Wizard, modify the parameters.
Note: If you modify the following parameters: number of SSL chips, interfaces, memory, and feature license, the Citrix ADC instance implicitly stops and restarts to bring these parameters into effect.
You cannot modify the Image and User Name parameters.
If you want to remove a Citrix ADC instance provisioned on the SDX appliance, in the Citrix ADC instances pane, select the instance that you want to remove, and then click Delete. In the Confirm message box, click Yes to remove the Citrix ADC instance.
Restrict VLANs to specific virtual interfaces
The SDX appliance administrator can enforce specific 802.1Q VLANs on the virtual interfaces associated with Citrix ADC instances. This capability is especially helpful in restricting the usage of 802.1Q VLANs by the instance administrators. If two instances belonging to two different companies are hosted on an SDX appliance, you can restrict the two companies from using the same VLAN ID, so that one company does not see the other company’s traffic. If an instance administrator, while provisioning or modifying a VPX instance, tries to assign an interface to an 802.1Q VLAN, a validation is performed to verify that the VLAN ID specified is part of the allowed list.
By default, any VLAN ID can be used on an interface. To restrict the tagged VLANs on an interface, specify the VLAN IDs in the Network Settings at the time of provisioning a Citrix ADC instance, or later by modifying the instance. To specify a range, separate the IDs with a hyphen (for example 10–12). If you initially specify some VLAN IDs but later delete all of them from the allowed list, you can use any VLAN ID on that interface. In effect, you have restored the default setting.
After creating a list of allowed VLANs, the SDX administrator does not have to log on to an instance to create the VLANs. The administrator can add and delete VLANs for specific instances from the Management Service.
Important
If L2 mode is enabled, the administrator must take care that the VLAN IDs on different Citrix ADC instances do not overlap.
To specify the permitted VLAN IDs
- In the Provision ADC Wizard or the Modify ADC Wizard, on the Network Settings page, in the Allowed VLANs text box, specify one or more VLAN IDs allowed on this interface. Use a hyphen to specify a range. For example, 2–4094.
- Follow the instructions in the wizard.
- Click Finish, and then click Close.
To configure VLANs for an instance from the Management Service
- On the Configuration tab, navigate to Citrix ADC > Instances.
- Select an instance, and then click VLAN.
- In the details pane, click Add.
- In the Create Citrix ADC VLAN dialog box, specify the following parameters:
- VLAN ID—An integer that uniquely identifies the VLAN to which a particular frame belongs. The Citrix ADC supports a maximum of 4094 VLANs. ID 1 is reserved for the default VLAN.
- IPV6 Dynamic Routing—Enable all IPv6 dynamic routing protocols on this VLAN. Note: For the ENABLED setting to work, you must log on to the instance and configure IPv6 dynamic routing protocols from the VTYSH command line.
- Select the interfaces that must be part of the VLAN.
- Click Create, and then click Close.