
Using NetScaler credentials stored in a Vault server for the NetScaler Ingress Controller
In most organizations, tier 1 NetScaler Ingress devices and Kubernetes clusters are managed by separate teams. Usually, network administrators manage tier 1 NetScaler Ingress devices, while developers manage Kubernetes clusters. The NetScaler Ingress Controller requires NetScaler credentials such as NetScaler user name and password to configure the NetScaler. You can specify NetScaler credentials as part of the NetScaler Ingress Controller specification and store the ADC credentials as Kubernetes secrets. However, you can also store NetScaler credentials in a Vault server and pass credentials to the NetScaler Ingress Controller to minimize any security risk. This topic provides information on how to use NetScaler credentials stored in a Vault server for the NetScaler Ingress Controller.
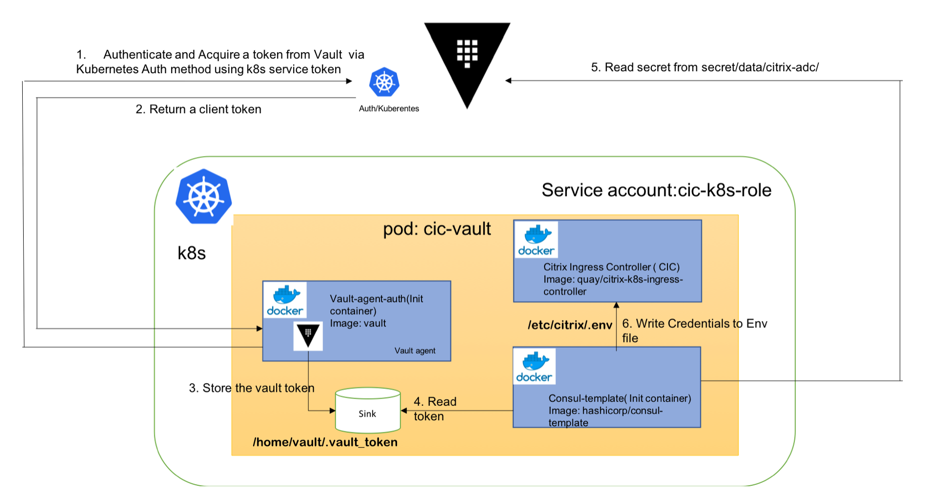
The following diagram explains the steps for using NetScaler credentials which are stored in a Vault server with the NetScaler Ingress Controller.
Prerequisites
Ensure that you have setup a Vault server and enabled key-value (KV) secret store. For more information, see Vault documentation.
Using NetScaler credentials from a Vault server for the NetScaler Ingress Controller
Perform the following tasks to use NetScaler credentials from a Vault server for the NetScaler Ingress Controller.
Create a service account for Kubernetes authentication
Create a service account for Kubernetes authentication by using the following steps:
-
Create a service account
cic-k8s-roleand provide the service account necessary permissions to access the Kubernetes TokenReview API by using the following command.$ kubectl apply -f cic-k8s-role-service-account.yml
serviceaccount/cic-k8s-role created
clusterrole.rbac.authorization.k8s.io/cic-k8s-role configured
clusterrolebinding.rbac.authorization.k8s.io/cic-k8s-role configured
clusterrolebinding.rbac.authorization.k8s.io/role-tokenreview-binding configuredFollowing is a part of the sample cic-k8s-role-service-account.yml file.apiVersion: rbac.authorization.k8s.io/v1
kind: ClusterRoleBinding
metadata:
name: role-tokenreview-binding
namespace: default
roleRef:
apiGroup: rbac.authorization.k8s.io
kind: ClusterRole
name: system:auth-delegator
subjects:
- kind: ServiceAccount
name: cic-k8s-role
namespace: default -
Set the
VAULT_SA_NAMEenvironment variable to the name of the service account you have already created.export VAULT_SA_NAME=$(kubectl get sa cic-k8s-role -o jsonpath="{.secrets[*]['name']}") -
Set the
SA_JWT_TOKENenvironment variable to the JWT of the service account that you used to access the TokenReview API.export SA_JWT_TOKEN=$(kubectl get secret $VAULT_SA_NAME -o jsonpath="{.data.token}" | base64 --decode; echo) -
Get a Kubernetes CA signed certificate to communicate with Kubernetes API.
export SA_CA_CRT=$(kubectl get secret $VAULT_SA_NAME -o jsonpath="{.data['ca\.crt']}" | base64 --decode; echo)
Create a key vault secret and setup Kubernetes authentication on the Vault server
Log in to the Vault server and perform the following steps to create a Key Vault secret and setup Kubernetes authentication.
-
Review the sample vault policy file citrix-adc-kv-ro.hcl and create a read-only policy,
citrix-adc-kv-roin Vault.$ tee citrix-adc-kv-ro.hcl <<EOF
# If working with K/V v1
path "secret/citrix-adc/*"
{
capabilities = ["read", "list"]
}
# If working with K/V v2
path "secret/data/citrix-adc/*"
{
capabilities = ["read", "list"]
}
EOF
# Create a policy named citrix-adc-kv-ro
$ vault policy write citrix-adc-kv-ro citrix-adc-kv-ro.hcl -
Create a KV secret with NetScaler credentials at the
secret/citrix-adc/path.vault kv put secret/citrix-adc/credential username='<ADC username>' \
password='<ADC password>' \
ttl='30m' -
Enable Kubernetes authentication at the default path (
auth/kubernetes).# $ vault auth enable kubernetes -
Specify how to communicate with the Kubernetes cluster.
$ vault write auth/kubernetes/config \
 token_reviewer_jwt="$SA_JWT_TOKEN" \
 kubernetes_host="https://<K8S_CLUSTER_URL>:<API_SERVER_PORT>" \
kubernetes_ca_cert="$SA_CA_CRT" -
Create a role to map the Kubernetes service account to Vault policies and the default token TTL. This role authorizes the
cic-k8s-roleservice account in the default namespace and maps the service account to thecitrix-adc-kv-ropolicy.$ vault write auth/kubernetes/role/cic-vault-example\
bound_service_account_names=cic-k8s-role \
bound_service_account_namespaces=default \
policies=citrix-adc-kv-ro \
ttl=24hNote:Authorization with Kubernetes authentication back-end is role based. Before a token is used for login, it must be configured as part of a role.
Leverage Vault agent auto-authentication for the NetScaler Ingress Controller
Perform the following steps to leverage Vault auto-authentication.
-
Review the provided Vault Agent configuration file,
vault-agent-config.hcl.exit_after_auth = true
pid_file = "/home/vault/pidfile"
auto_auth {
method "kubernetes" {
mount_path = "auth/kubernetes"
config = {
role = "cic-vault-example"
}
}
sink "file" {
config = {
path = "/home/vault/.vault-token"
}
}
}Note:The Vault agentAuto-Authis configured to use the Kubernetes authentication method enabled at theauth/kubernetespath on the Vault server. The Vault Agent uses thecic-vault-examplerole to authenticate. The sink block specifies the location on disk where to write tokens. Vault AgentAuto-Authsink can be configured multiple times if you want Vault Agent to place the token into multiple locations. In this example, the sink is set to/home/vault/.vault-token. -
Review the Consul template consul-template-config.hcl file.
    vault {
         renew_token = false
         vault_agent_token_file = "/home/vault/.vault-token"
         retry {
             backoff = "1s"
         }
     }

     template {
         destination = "/etc/citrix/.env"
         contents = <<EOH
         {{- with secret "secret/citrix-adc/credential" }}
         NS_USER={{ .Data.data.username }}
         NS_PASSWORD={{ .Data.data.password }}
         {{ end }}
         EOH
     }
This template reads secrets at thesecret/citrix-adc/credentialpath and sets the user name and password values. If you are using KV store version 1, use the following template.template {
destination = "/etc/citrix/.env"
contents = <<EOH
{{- with secret "secret/citrix-adc/credential" }}
NS_USER={{ .Data.username }}
NS_PASSWORD={{ .Data.password }}
{{ end }}
EOH
} -
Create a Kubernetes config-map from vault-agent-config.hcl and consul-template-config.hcl.
kubectl create configmap example-vault-agent-config --from-file=./vault-agent-config.hcl --form-file=./consul-template-config.hcl -
Create a NetScaler Ingress Controller pod with Vault and consul template as init container citrix-k8s-ingress-controller-vault.yaml. Vault fetches the token using the Kubernetes authentication method and pass it on to a consul template which creates the
.envfile on shared volume. This token is used by the NetScaler Ingress Controller for authentication with tier 1 NetScaler.kubectl apply citrix-k8s-ingress-controller-vault.yamlThecitrix-k8s-ingress-controller-vault.yamlfile is as follows:apiVersion: v1
kind: Pod
metadata:
annotations:
name: cic-vault
namespace: default
spec:
containers:
- args:
- --ingress-classes tier-1-vpx
- --feature-node-watch true
env:
- name: NS_IP
value: <Tier 1 ADC IP-ADDRESS>
- name: EULA
value: "yes"
image: in-docker-reg.eng.citrite.net/cpx-dev/kumar-cic:latest
imagePullPolicy: Always
name: cic-k8s-ingress-controller
volumeMounts:
- mountPath: /etc/citrix
name: shared-data
initContainers:
- args:
- agent
- -config=/etc/vault/vault-agent-config.hcl
- -log-level=debug
env:
- name: VAULT_ADDR
value: <VAULT URL>
image: vault
imagePullPolicy: Always
name: vault-agent-auth
volumeMounts:
- mountPath: /etc/vault
name: config
- mountPath: /home/vault
name: vault-token
- args:
- -config=/etc/consul-template/consul-template-config.hcl
- -log-level=debug
- -once
env:
- name: HOME
value: /home/vault
- name: VAULT_ADDR
value: <VAULT_URL>
image: hashicorp/consul-template:alpine
imagePullPolicy: Always
name: consul-template
volumeMounts:
- mountPath: /home/vault
name: vault-token
- mountPath: /etc/consul-template
name: config
- mountPath: /etc/citrix
name: shared-data
serviceAccountName: vault-auth
volumes:
- emptyDir:
medium: Memory
name: vault-token
- configMap:
defaultMode: 420
items:
- key: vault-agent-config.hcl
path: vault-agent-config.hcl
- key: consul-template-config.hcl
name: example-vault-agent-config
name: config
- emptyDir:
medium: Memory
name: shared-data
If the configuration is successful, the Vault server fetches a token and passes it on to a Consul template container. The Consul template uses the token to read NetScaler credentials and write it as an environment variable in the path
/etc/citrix/.env. The NetScaler Ingress Controller uses these credentials for communicating with the tier 1 NetScaler.
Verify that the NetScaler Ingress Controller is running successfully using credentials fetched from the Vault server.