This content has been machine translated dynamically.
Dieser Inhalt ist eine maschinelle Übersetzung, die dynamisch erstellt wurde. (Haftungsausschluss)
Cet article a été traduit automatiquement de manière dynamique. (Clause de non responsabilité)
Este artículo lo ha traducido una máquina de forma dinámica. (Aviso legal)
此内容已经过机器动态翻译。 放弃
このコンテンツは動的に機械翻訳されています。免責事項
이 콘텐츠는 동적으로 기계 번역되었습니다. 책임 부인
Este texto foi traduzido automaticamente. (Aviso legal)
Questo contenuto è stato tradotto dinamicamente con traduzione automatica.(Esclusione di responsabilità))
This article has been machine translated.
Dieser Artikel wurde maschinell übersetzt. (Haftungsausschluss)
Ce article a été traduit automatiquement. (Clause de non responsabilité)
Este artículo ha sido traducido automáticamente. (Aviso legal)
この記事は機械翻訳されています.免責事項
이 기사는 기계 번역되었습니다.책임 부인
Este artigo foi traduzido automaticamente.(Aviso legal)
这篇文章已经过机器翻译.放弃
Questo articolo è stato tradotto automaticamente.(Esclusione di responsabilità))
Translation failed!
跨不同 AWS 区域部署具有弹性 IP 地址的 VPX 高可用性对
可以在 INC 模式下使用弹性 IP 地址在两个不同的子网或两个不同的 AWS 可用性区域中配置两个 Citrix ADC VPX 实例。
有关高可用性的更多信息,请参阅 高可用性。有关 INC 的更多信息,请参阅 在不同子网中配置高可用性节点。
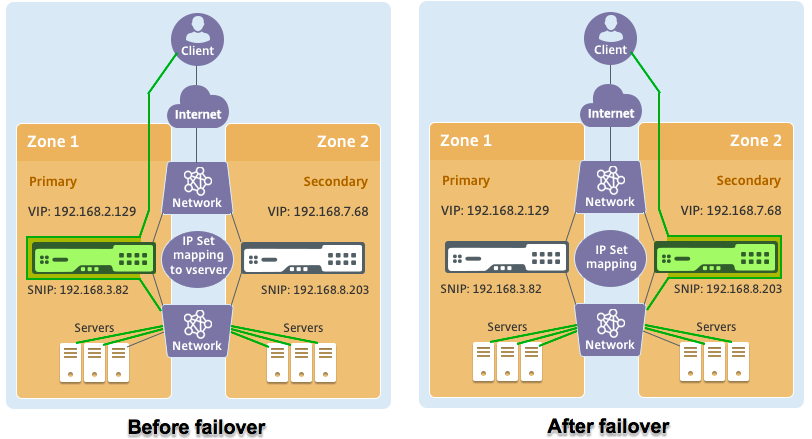
具有不同 AWS 区域的 EIP 地址的 HA 的工作原理
故障转移时,主实例的 VIP 的 EIP 将迁移到辅助实例,后者作为新的主实例接管。在故障转移过程中,AWS API:
- 检查连接了
IPSets的虚拟服务器。 - 从虚拟服务器正在侦听的两个 IP 地址中查找具有关联公用 IP 的 IP 地址。一个直接连接到虚拟服务器,另一个通过 IP 集连接。
- 将公用 IP (EIP) 重新关联到属于新的主 VIP 的专用 IP。
注意
为了保护您的网络免受拒绝服务 (DoS) 等攻击,在使用 EIP 时,可以在 AWS 中创建安全组来限制 IP 访问。为了实现高可用性,可以根据您的部署要求从 EIP 切换到专用 IP 移动解决方案。
如何跨不同 AWS 区域部署具有弹性 IP 地址的 VPX 高可用性对
下面是在两个不同的子网或两个不同的 AWS 可用性区域中部署 VPX 对的步骤摘要。
- 创建 Amazon 虚拟私有云。
- 将两个 VPX 实例部署在两个不同的可用性区域中或同一个区域但不同的子网中。
- 配置高可用性
- 在两个实例中在 INC 模式下设置高可用性。
- 在两个实例 中添加 IP 集 。
- 将两个实例中的 IP 集绑定到 VIP。
- 在主实例中添加虚拟服务器。
对于步骤 1 和 2,请使用 AWS 控制台。对于步骤 3,请使用 Citrix ADC VPX GUI 或 CLI。
步骤 1. 创建 Amazon 虚拟私有云 (VPC)。
步骤 2. 在两个不同的可用性区域中或同一个区域但不同的子网中部署两个 VPX 实例。将 EIP 附加到主 VPX 的 VIP。
有关如何在 AWS 上创建 VPC 和部署 VPX 实例的更多信息,请参阅在 AWS 上 部署 Citrix ADC VPX 独立实例 和 场景:独立实例
步骤 3. 配置高可用性。可以使用 Citrix ADC VPX CLI 或 GUI 设置高可用性。
使用 CLI 配置高可用性
-
在两个实例中在 INC 模式下设置高可用性。
在主节点上:
add ha node 1 <sec_ip> -inc ENABLED在辅助节点上:
add ha node 1 <prim_ip> -inc ENABLED<sec_ip>是指辅助节点的管理 NIC 的专用 IP 地址。<prim_ip>是指主节点的管理 NIC 的专用 IP 地址。 -
在两个实例中添加 IP 集。
在两个实例上键入以下命令。
add ipset <ipsetname> -
将 IP 集绑定到两个实例上的 VIP 集。
在两个实例上键入以下命令:
add ns ip <secondary vip> <subnet> -type VIPbind ipset <ipsetname> <secondary VIP>注意
可以将 IP 集绑定到主 VIP 或二级 VIP。但是,如果将 IP 集绑定到主 VIP,请使用二级 VIP 添加到虚拟服务器,反之亦然。
-
在主实例上添加一个虚拟服务器。
键入以下命令:
add <server_type> vserver <vserver_name> <protocol> <primary_vip> <port> -ipset \<ipset_name>
使用 GUI 配置高可用性
-
在两个实例上在 INC 模式下设置高可用性。
-
使用用户名
nsroot和实例 ID 作为密码登录主节点。 -
在 GUI 中,转到 配置 > 系统 > 高可用性。单击添加。
-
在 远程节点 IP 地址 字段中,添加辅助节点的管理 NIC 的专用 IP 地址。
-
选择在自助节点上打开 NIC(Independent Network Configuration, 独立网络配置)模式。
-
在 Remote System Login Credential(远程系统登录凭据)下,添加辅助节点的用户名和密码,然后单击 Create(创建)。
-
在辅助节点中重复这些步骤。
-
在两个实例上添加 IP 集并将 IP 集绑定到 VIP 集。
-
在 GUI 中,导航到 “ 系统 ” > “ 网络 ” > “ IP ” > “ 添加”。
-
添加 IP 地址、子网掩码、IP 类型(虚拟 IP)所需的值,然后单击 创建。
-
导航到 “ 系统 ” > “ 网络 ” > “ IP 集” > “添加”。添加 IP 集名称,然后单击Insert(插入)。
-
在 IPv4s 页面中,选择虚拟 IP,然后单击 插入。单击 Create(创建)以创建 IP 集。
-
在主实例中添加虚拟服务器
在 GUI 中,转到 Configuration(配置)> Traffic Management(流量管理)> Virtual Servers(虚拟服务器)> Add(添加)。

场景
在这种情况下,将创建一个 VPC。在该 VPC 中,在两个可用性区域中创建了两个 VPX 实例。每个实例都有三个子网 - 一个用于管理,一个用于客户端,一个用于后端服务器。EIP 附加到主节点的 VIP。
图:此图说明了 AWS 上在 INC 模式下的 Citrix ADC VPX 高可用性设置

对于这种情况,请使用 CLI 配置高可用性。
-
在两个实例上以 INC 模式设置高可用性。
在主节点和辅助节点上键入以下命令。
在主节点上:
add ha node 1 192.168.6.82 -inc enabled此处,192.168.6.82 是指辅助节点的管理 NIC 的专用 IP 地址。
在辅助节点上:
add ha node 1 192.168.1.108 -inc enabled此处,192.168.1.108 是指主节点的管理 NIC 的专用 IP 地址。
-
在两个实例上添加 IP 集并将 IP 集绑定到 VIP
在主节点上:
add ipset ipset123add ns ip 192.168.7.68 255.255.255.0 -type VIPbindipset ipset123 192.168.7.68在辅助节点上:
add ipset ipset123add ns ip 192.168.7.68 255.255.255.0 -type VIPbind ipset ipset123 192.168.7.68 -
在主实例上添加一个虚拟服务器。
以下命令:
add lbvserver vserver1 http 192.168.2.129 80 -ipset ipset123 -
保存配置。

-
执行强制故障转移后,辅助节点将成为新的主节点。

共享
共享
This Preview product documentation is Cloud Software Group Confidential.
You agree to hold this documentation confidential pursuant to the terms of your Cloud Software Group Beta/Tech Preview Agreement.
The development, release and timing of any features or functionality described in the Preview documentation remains at our sole discretion and are subject to change without notice or consultation.
The documentation is for informational purposes only and is not a commitment, promise or legal obligation to deliver any material, code or functionality and should not be relied upon in making Cloud Software Group product purchase decisions.
If you do not agree, select I DO NOT AGREE to exit.