-
-
Advanced Policy Expressions: Working with Dates, Times, and Numbers
-
Advanced Policy Expressions: Parsing HTTP, TCP, and UDP Data
-
Advanced Policy Expressions: IP and MAC Addresses, Throughput, VLAN IDs
-
-
This content has been machine translated dynamically.
Dieser Inhalt ist eine maschinelle Übersetzung, die dynamisch erstellt wurde. (Haftungsausschluss)
Cet article a été traduit automatiquement de manière dynamique. (Clause de non responsabilité)
Este artículo lo ha traducido una máquina de forma dinámica. (Aviso legal)
此内容已经过机器动态翻译。 放弃
このコンテンツは動的に機械翻訳されています。免責事項
이 콘텐츠는 동적으로 기계 번역되었습니다. 책임 부인
Este texto foi traduzido automaticamente. (Aviso legal)
Questo contenuto è stato tradotto dinamicamente con traduzione automatica.(Esclusione di responsabilità))
This article has been machine translated.
Dieser Artikel wurde maschinell übersetzt. (Haftungsausschluss)
Ce article a été traduit automatiquement. (Clause de non responsabilité)
Este artículo ha sido traducido automáticamente. (Aviso legal)
この記事は機械翻訳されています.免責事項
이 기사는 기계 번역되었습니다.책임 부인
Este artigo foi traduzido automaticamente.(Aviso legal)
这篇文章已经过机器翻译.放弃
Questo articolo è stato tradotto automaticamente.(Esclusione di responsabilità))
Translation failed!
How to redirect HTTP request to HTTPS using responder
This article explains how to configure the responder feature with a load balancing virtual server IP addresses and redirect client requests from HTTP to HTTPS.
Consider a scenario where a user might attempt to access a secure website by sending an HTTP request. Instead of dropping the request, you might want to redirect the request to a secure website. You can use the responder feature to redirect the request to the secure website without changing the path and the URL query, which the user attempts to access.
How NetScaler responder redirects a request from HTTP to HTTPS
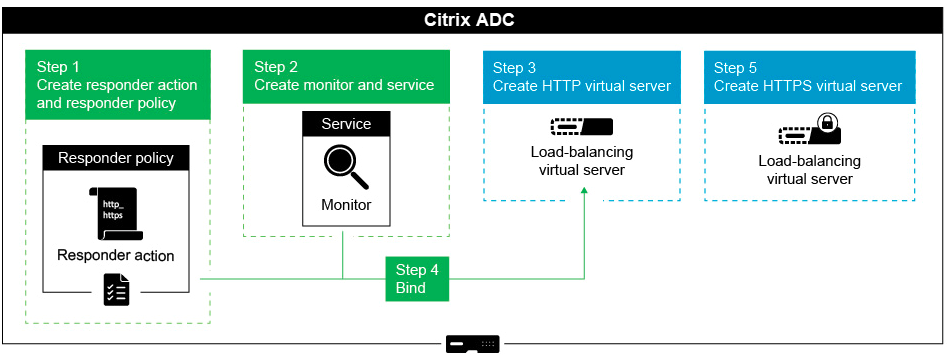
The following illustration shows a step by step flow of how the appliance redirects a request.

To configure the Responder feature with the Load Balancing VIP addresses of a NetScaler® appliance, follow these steps. This setup redirects client requests from HTTP to HTTPS.
Enable the responder feature on the appliance
To enable the responder feature on the appliance, navigate to System > Settings > Configure Advanced Features and select Responder.
Create a responder action
To create a responder action, perform the following steps:
- Navigate to AppExpert > Responder > Actions and click Add.
- Specify an appropriate name, such as http_to_https_actn, in the Name field.
- Select Redirect as Type.
-
In the Expression field, type the following expression:
"https://" + HTTP.REQ.HOSTNAME.HTTP_URL_SAFE + HTTP.REQ.URL.PATH_AND_QUERY.HTTP_URL_SAFE. - Click Create.
Create responder policy
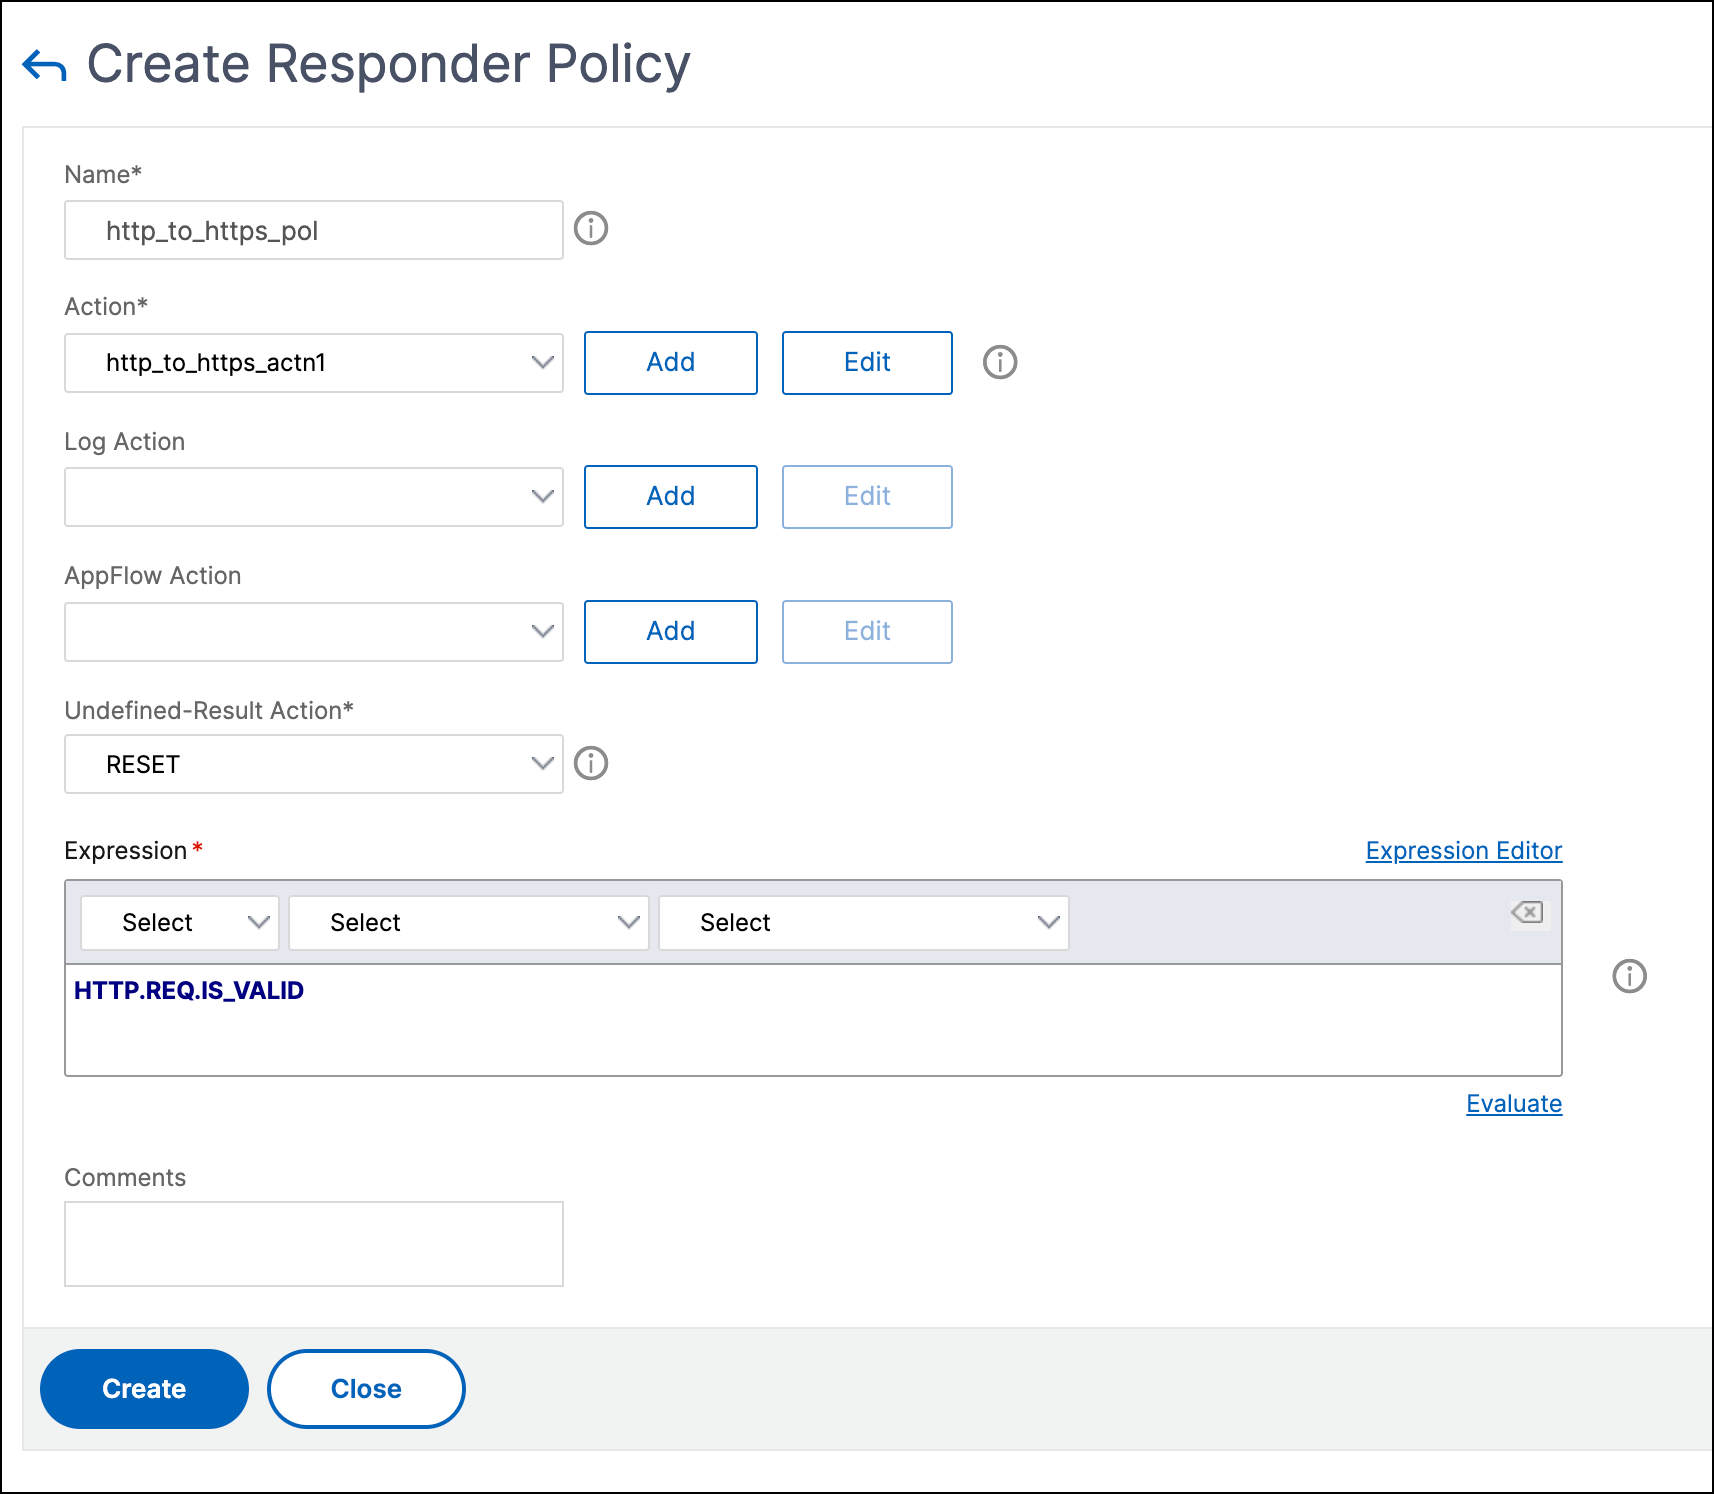
To create a responder policy, perform the following steps:
- Navigate to AppExpert > Responder > Policies and click Add.
- Specify an appropriate name, such as http_to_https_pol, in the Name field.
- From the Action list, select the action name that you have created.
- From the Undefined Action list, select RESET.
- Type the HTTP.REQ.IS_VALID expression in the Expression field as shown in the following screenshot.

Create a service
To create a service, perform the following steps:
- Navigate to Load Balancing > Services and click Add.
- Specify an appropriate name, such as Always_UP_service, in the Name field.
- Specify a non-existent IP address in the Server field.
- Specify 80 in the Port field.
Create a Load Balancing Virtual Server
- Navigate to Load Balancing > Services and then click Add.
- Specify an appropriate name in the Name field.
- Specify the IP address of the website in the IP Address field.
- Select HTTP from the Protocol list.
- Type 80 in the Port field.
- Click the Policies tab.
- Bind the Responder policy that you created to the HTTP Load Balancing VIP address of the website.
- Create a secure Load Balancing virtual server that has the IP address of the website and port as 443.
To create a configuration similar to the preceding procedure from the command line interface of the appliance, run the following commands:
enable ns feature responder
add responder action http_to_https_actn redirect "\"https://\" + http.req.hostname.HTTP_URL_SAFE + http.REQ.URL.PATH_AND_QUERY.HTTP_URL_SAFE"
add responder policy http_to_https_pol HTTP.REQ.IS_VALID http_to_https_actn RESET
add service Always_UP_service 1.2.3.4 HTTP 80 -gslb NONE -maxClient 0 -maxReq 0 -cip ENABLED dummy -usip NO -sp OFF -cltTimeout 180 -svrTimeout 360 -CKA NO -TCPB NO -CMP YES
add lb vserver http_site.com HTTP 10.217.96.238 80 -persistenceType COOKIEINSERT -timeout 0 -cltTimeout 180
bind lb vserver http_site.com Always_UP_service
bind lb vserver http_site.com -policyName http_to_https_pol -priority 1 -gotoPriorityExpression END
<!--NeedCopy-->
Notes:
- The status of the port 80 Load Balancing Redirect virtual server must be UP for the redirect to work.
- Web browsers might not redirect correctly if the HTTPS virtual server is not active.
- This redirect setup allows for situations where multiple domains are bound to the same IP address.
- If the client sends an invalid HTTP request to the redirect virtual server, then the appliance sends a RESET message code.
Share
Share
This Preview product documentation is Cloud Software Group Confidential.
You agree to hold this documentation confidential pursuant to the terms of your Cloud Software Group Beta/Tech Preview Agreement.
The development, release and timing of any features or functionality described in the Preview documentation remains at our sole discretion and are subject to change without notice or consultation.
The documentation is for informational purposes only and is not a commitment, promise or legal obligation to deliver any material, code or functionality and should not be relied upon in making Cloud Software Group product purchase decisions.
If you do not agree, select I DO NOT AGREE to exit.