LDAP authentication
You can use Lightweight Directory Access Protocol (LDAP) to authenticate users against Active Directory or other LDAP directories.
As with other types of authentication policies, a Lightweight Directory Access Protocol (LDAP) authentication policy comprises an expression and an action. After creating an authentication policy, bind it to an Authentication Virtual Server with a priority. Then add that Virtual Server to an Authentication Profile.
Note:
Basic LDAP policies are deprecated may not work when used from a VPN Virtual Server. Instead, follow the instructions below to create an advanced policy, along with an Authentication Virtual Server and Authentication Profile. Then add the Authentication Profile to the VPN virtual server.
Create an LDAP Authentication Action using the GUI
- Navigate to Security > AAA - Application Traffic > Policies > Authentication > Advanced Policies > Actions > LDAP.
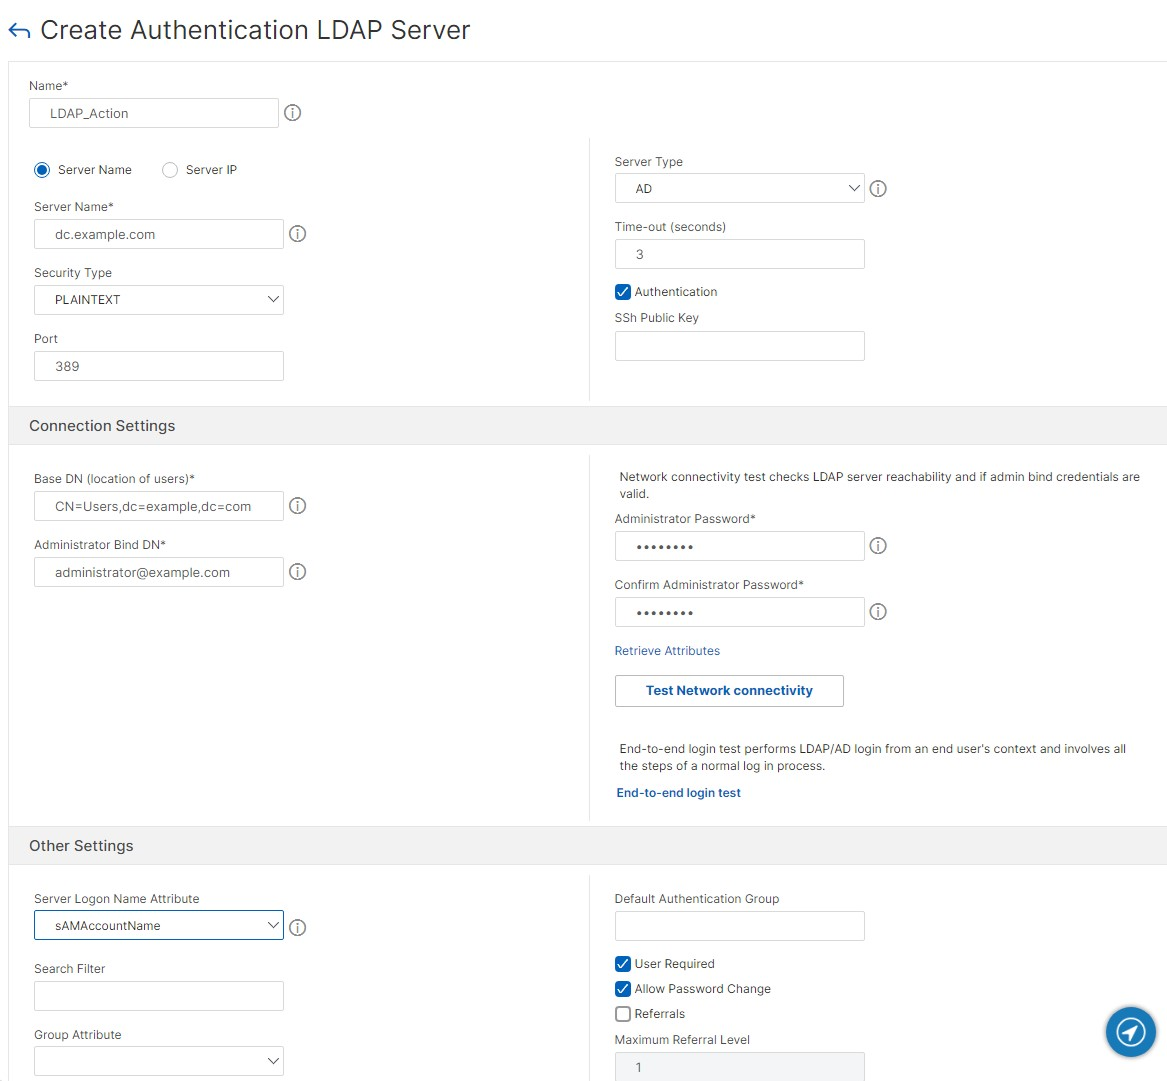
- Click Add. The Create Authentication LDAP Server screen is displayed.
- Enter a name.
- Update the parameter details. For more details, see LDAP parameters.
- Click Test network connectivity to verify the entered details. See also Testing LDAP authentication.
- Click Create.
Create an LDAP Authentication Action using the CLI
Use the command add authentication ldapAction. For more information, see add authentication ldapAction.
Example:
add authentication ldapAction ldap_server -serverip 1.1.1.1 -ldapBase "Cn=Users,dc=example,dc=com" -ldapBindDn admin@example.com -ldapBindDnPassword -ldapLoginName sAMAccountName

<!--NeedCopy-->
Edit an LDAP authentication action using the GUI
- Navigate to Security > AAA - Application Traffic > Policies > Authentication > Advanced Policies > Actions > LDAP.
- Click the action you wish to edit.
- Update the parameters. For more details, see LDAP parameters.
- Click Test network connectivity to verify the entered details. See also Testing LDAP authentication.
- Click OK to save.
Edit an LDAP authentication action using the CLI
Use the command set authentication ldapAction. For more information, see set authentication ldapAction.
Example:
set authentication ldapAction ldap_server -serverip 2.2.2.2

<!--NeedCopy-->
Create an LDAP authentication policy using the GUI
Once you have created your LDAP action, create an Authentication Policies:
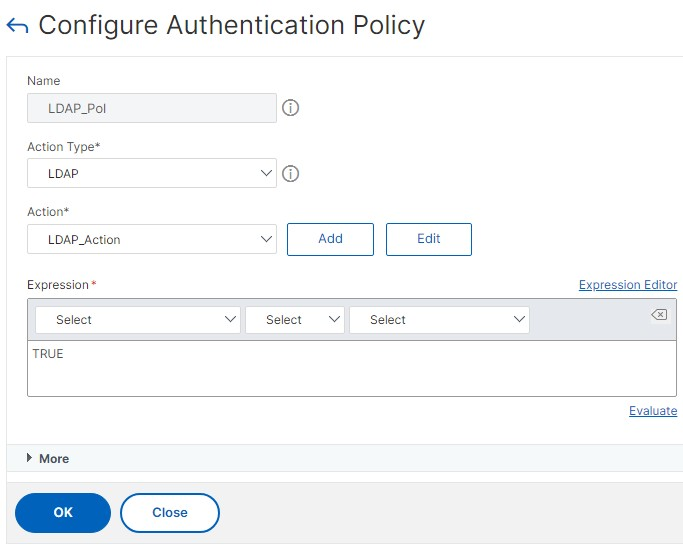
- Navigate to Security > AAA - Application Traffic > Advanced Policies > Policy.
- Click Add.
- Enter a Name.
- Choose Action Type of LDAP.
- Under Action specify the authentication server you created.
- Enter the Expression as TRUE.
- Click Create.
 Kv
Kv
Create an LDAP authentication policy using the CLI
Use the command add authentication ldappolicy. For more information, see add authentication ldappolicy.
Example:
add authentication Policy LDAP_Pol -rule TRUE -action ldap_server
<!--NeedCopy-->
LDAP parameters
Server name or Server IP
Normally you configure the NetScaler to use the IP address of the authentication server during authentication. With LDAP authentication servers, you can also configure the ADC to use the FQDN of the LDAP server instead of its IP address to authenticate users. Using an FQDN can simplify an otherwise much more complex authentication, authorization, and auditing configuration in environments where the authentication server might be at any of several IP addresses, but always uses a single FQDN. To configure authentication by using a server’s FQDN instead of its IP address, you follow the normal configuration process except when creating the authentication action. When creating the action, you use the serverName parameter instead of the serverIP parameter, and substitute the server’s FQDN for its IP address.
Before you decide whether to configure the ADC to use the IP or the FQDN of your LDAP server to authenticate users, consider that configuring authentication, authorization, and auditing to authenticate to an FQDN instead of an IP address adds an extra step to the authentication process. Each time the ADC authenticates a user, it must resolve the FQDN. If a great many users attempt to authenticate simultaneously, the resulting DNS lookups might slow the authentication process.
Instead of adding a single server, you can set up a load balancer in front of multiple LDAP servers and add this load balancer to the LDAP action. For example in Active Directory domain you could create a load balancer in front of multiple domain controllers.
Security type
Choose whether to use plain text, SSL or TLS.
It is recommended that you configure your LDAP servers for TLS to ensure that all data is encrypted.
Port
The typical port numbers for LDAP connections are:
- 389 for unsecured LDAP connections (for plain text LDAP)
- 636 for secure LDAP connections (for SSL LDAP)
- 3268 for Microsoft unsecure LDAP connections (for plain text Global Catalog Server)
- 3269 for Microsoft secure LDAP connections (for SSL Global Catalog Server)
Authenticate
Enable authentication to validate users’ passwords. If you disable authentication then the user’s password is not validated.
From the GUI, tick Authentication.
From the CLI, use parameter authentication.
Server Logon Name Attribute
Choose which LDAP field contain the username.
The following table contains examples of user attribute fields for common LDAP servers:
| LDAP server | User attribute | Case sensitive |
|---|---|---|
| Microsoft Active Directory Server | userPrincipalName or sAMAccountName | No |
| Novell eDirectory | ou | Yes |
| IBM Directory Server | uid | Yes |
| Lotus Domino | CN | Yes |
| Sun ONE directory (formerly iPlanet) | uid or cn | Yes |
Server type
If you are using Active Directory (AD) or Novell Directory Services (NDS) then choose the appropriate type.
Base DN
The Base DN specifics the section of directory in which the server will search for users.
This table contains examples of the base DN:
| LDAP server type | Example |
|---|---|
| Microsoft Active Directory Server | CN=Users,dc=example,dc=com |
| Novell eDirectory | ou=users,ou=dev |
| IBM Directory Server | cn=users |
| Lotus Domino | OU=City,O=Citrix, C=US |
| Sun ONE directory (formerly iPlanet) | ou=People,dc=citrix,dc=com |
Bind DN
The Bind DN specifies the user that is used to query the LDAP directory and validate the credentials.
The following table contains examples of bind DN:
| LDAP server | Bind DN |
|---|---|
| Microsoft Active Directory Server | CN=Administrator, CN=Users, DC=citrix, DC=local |
| Novell eDirectory | cn=admin, o=citrix
|
| IBM Directory Server | LDAP_dn |
| Lotus Domino | CN=Notes Administrator, O=Citrix, C=US |
| Sun ONE directory (formerly iPlanet) | uid=admin,ou=Administrators, ou=TopologyManagement,o=NetscapeRoot |
For more information about setting up authentication policies in general, see Authentication Policies. For more information about NetScaler expressions, which are used in the policy rule, see Policies and Expressions.
Administrator password
Enter the Administrator Password corresponding to the Bind DN. Enter it again in the Confirm Administrator Password field.
Referral
In addition to standard authentication functions, LDAP can search other active directory (AD) servers for user accounts for users that do not exist locally. This function is called referral support or referral chasing.
LDAP referral support is disabled by default and cannot be enabled globally. It must be explicitly enabled for each LDAP action. Make sure that the AD server accepts the same binddn credentials that are used with the referring (GC) server. To enable referral support, you configure an LDAP action to follow referrals, and specify the maximum number of referrals to follow.
If referral support is enabled, and the NetScaler receives an LDAP_REFERRAL response to a request, authentication, authorization, and auditing follows the referral to the active directory (AD) server contained in the referral and performs the update on that server. First, authentication, authorization, and auditing looks up the referral server in DNS, and connects to that server. If the referral policy requires SSL/TLS, it connects via SSL/TLS. It then binds to the new server with the binddn credentials that it used with the previous server, and performs the operation which generated the referral. This feature is transparent to the user.
To enable LDAP referral support type the following commands:
set authentication ldapAction <name> -followReferrals ON
set authentication ldapAction <name> -maxLDAPReferrals <integer>
<!--NeedCopy-->
Key-based authentication
With key-based authentication, you can fetch the list of public keys that are stored on the user object in the LDAP server through SSH. The NetScaler appliance during the role-based authentication (RBA) process must extract public SSH keys from the LDAP server. The retrieved public key, which is compatible with SSH, must allow you to log in through the RBA method. This has the following benefits:
- Can store the retrieved public key, and the LDAP action uses this attribute to retrieve SSH key information from the LDAP server.
- Can extract attribute names of up to 24 KB.
Note
The external authentication server, such as LDAP is used only to retrieve SSH key information. It is not used for the authentication purpose.
Following is an example of the flow of events through SSH:
- SSH daemon sends an AAA_AUTHENTICATE request with password field empty to authentication, authorization, and auditing daemon port.
- If LDAP is configured to store the SSH public key, authentication, authorization, and auditing responds with the “sshPublicKey” attribute along with other attributes.
- SSH daemon verifies these keys with the client keys.
- SSH daemon passes the user name in the request payload, and authentication, authorization, and auditing returns the keys specific to this user along with generic keys.
In the GUI you can enter the SSh Public Key.
From the CLI, you can configure key based authentication by using the sshPublicKey parameter. For example:
set authentication ldapAction LDAP_Action -sshPublicKey AD89E46324345
<!--NeedCopy-->
Name-value attributes
You can configure the attributes of LDAP authentication with a unique name along with values. The names are configured in the LDAP action parameter and the values are obtained by querying for the name. This feature has the following benefits:
- Minimizes the effort for administrators by remembering the attribute by name (not just by value)
- Enhances the search to query the attribute value associated with a name
- Provides an option to extract multiple attributes
From the GUI, click More and in the Attributes field enter a comma separated list of attributes to fetch from the LDAP server.
From the CLI, use the attributes parameter.
For example:
set authentication ldapAction ldapAct1 -attributes "company, mail"
<!--NeedCopy-->
Cloud attributes settings
When you enable the Cloud Attributes parameter, NetScaler extracts (from the LDAP Active Directory) the attributes required for Citrix Cloud operations. For more information about the prerequisites for the cloud attributes, see Connect an on-premises Citrix Gateway as an identity provider to Citrix Cloud.
From the GUI, set Cloud Attributes to Enabled or Disabled.
From the CLI, use the parameter CloudAttributes
For example:
set authentication ldapAction LDAP_Action  -CloudAttributes ENABLED
<!--NeedCopy-->
Testing LDAP authentication
The NetScaler appliance can validate end-to-end LDAP authentication through the GUI. This helps you check you’ve correctly configured the LDAP action and troubleshoot issues.
- Navigate to Security > AAA - Application Traffic > Policies > Authentication > Advanced Policies > Actions > LDAP.
- Select the available LDAP action from the list.
- On the Configure Authentication LDAP Server page, scroll down to the Connections Settings section.
-
Click Test Network connectivity to check the LDAP server connection. You can view a pop-up message of successful connection to the LDAP server with TCP port details and authenticity of valid credentials.

- To view the end-to-end LDAP authentication, click End-to-end login test link.
- In the End-to-end login test page, click Test.
- On the authentication page, enter the valid credentials to log in. The success screen is displayed.

- If the authentication fails, the error screen is displayed.
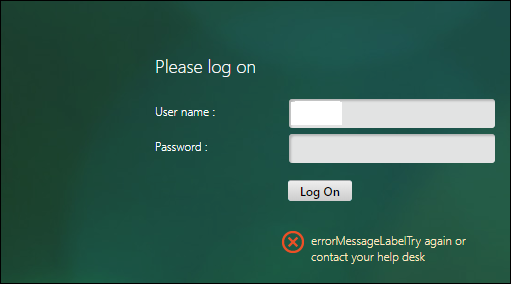
You can also reach the Configure Authentication LDAP Server screen by navigating to Authentication > Dashboard
Password expiry notification for LDAP authentication
The NetScaler appliance supports password expiry notification for LDAP based authentication. By using this feature, administrators can notify the end users about the password expiry threshold time in days.
Note
Expiry notification can be configured for clientless VPN and Full VPN use cases and not for ICA® Proxy.
Advantages of password expiry notification
- Permit users to reset their passwords on their own and provide administrators a flexible way to notify the end user about their password expiry in days.
- Eliminates end user dependence to track their password expiration days.
- Sends notifications to the VPN portal page to the users (based on the number of days) to change their password before expiry.
Note
This feature is applicable only for LDAP based authentication schemes, not for RADIUS or TACACS.
Understanding the password expiry notification
The NetScaler appliance fetches two attributes (Max-Pwd-Age and Pwd-Last-Set) from the LDAP authentication server.
- Max-Pwd-Age. This attribute denotes the maximum amount of time, in 100-nanosecond intervals, until the password is valid. The value is stored as a large integer that represents the number of 100-nanosecond intervals from the time the password was set before the password expires.
- Pwd-Last-Set. This attribute determines the date and time at which the password for an account was last changed.
By fetching the two attributes from the LDAP authentication server, the NetScaler appliance determines the time left for the password to expire for a particular user. This information is collected when any user credentials are validated on the authentication server and a notification is sent back to the user.
Use the parameter pwdExpiryNotification in the set aaa parametercommand. By using this parameter, an administrator can keep track the number of days left for password expiry. The NetScaler appliance can now start notifying the end user about their password expiry.
Note
Currently, this feature works only for authentication servers having Microsoft AD servers with LDAP implementation. Support for OpenLDAP based servers is not currently availabile.
Following is an example of the flow of events for setting a password expiry notification:
- An administrator, by using the NetScaler appliance, sets a time (e.g. 14-days) for password expiration.
- The user sends an HTTP or HTTPS request to access a resource on the back-end server.
- Before providing access, the NetScaler appliance validates the user credentials with what is configured on the LDAP authentication server.
- Along with this query to the authentication server, the NetScaler appliance carries the request to fetch the details of the two attributes (
Max-Pwd-Age and Pwd-Last-Set). - Based on the time left for the password to expire, an expiry notification is displayed.
- The user then takes appropriate action to update the password.
Configure password expiry notification
To configure expiry notification by using GUI:
- Navigate to Security > AAA - Application Traffic > Authentication Settings.
- Click Change authentication AAA settings.
-
On the Configure AAA Parameter page, specify the days in the Password Expiry Notification(days) field. The maximum value is 255 days.

- Click OK.
To configure password expiry using the CLI use command:
set aaa parameter –pwdExpiryNotificationDays <positive_integer>

show aaa parameter
<!--NeedCopy-->
The maximum value is 255 days.
For example:
> set aaa parameter -pwdExpiryNotificationDays 14
Done
> show aaa parameter                          Configured AAA parameters  EnableStaticPageCaching: YES  EnableEnhancedAuthFeedback: NO  DefaultAuthType: LOCAL MaxAAAUsers:           Unlimited                                       AAAD nat ip: None            EnableSessionStickiness : NO  aaaSessionLoglevel : INFORMATIONAL               AAAD Log Level : INFORMATIONAL                 Dynamic address: OFF
    GUI mode: ON
    Max Saml Deflate Size: 1024              Password Expiry Notification Days: 14
<!--NeedCopy-->
Display of notifications
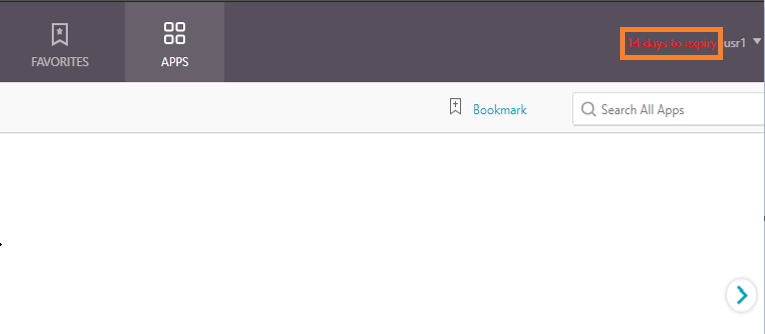
When a user logs in whose password is about to expire, a notification appears on the top right corner of the VPN portal page.
LDAP authentication with nested group extraction
Nested group extraction is the process of retrieving not only the groups that a user is directly a member of but also the child groups of those groups.
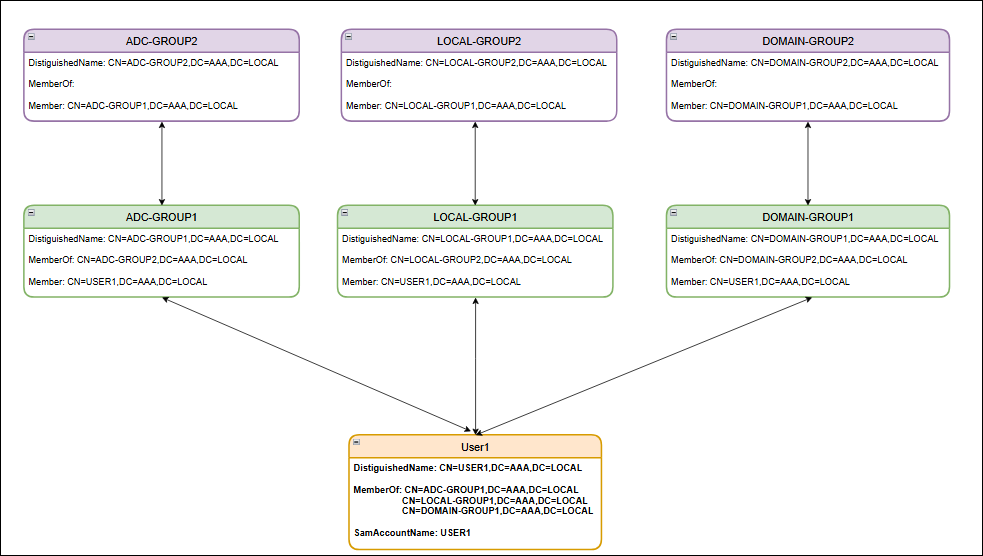
For example, the User1 object within the Active Directory is a direct member of 3 group objects: ADC-GROUP1, LOCAL-GROUP1, and DOMAIN-GROUP1. These 3 group objects are also members of other group objects, creating a nested group structure:
-
ADC-GROUP1 is a member of ADC-GROUP2.
-
LOCAL-GROUP1 is a member of LOCAL-GROUP2.
-
DOMAIN-GROUP1 is a member of DOMAIN-GROUP2.
A user object’s memberOf attribute lists its groups, while a group’s member attribute lists its members. For the preceding example:
-
User1 object’s
memberOfattribute references ADC-GROUP1. -
ADC-GROUP1 object’s
memberattribute references User1.
This bidirectional relationship allows for the extraction of both direct and nested group memberships. The following diagram illustrates the Active Directory objects and their attributes.
To configure LDAP authentication with nested group extraction using the CLI
At the command prompt, type:
add authentication ldapAction <name> {-serverIP <ip_addr|ipv6_addr|*> | {-serverName <string>}} [-serverPort <port>] [-authTimeout <positive_integer>] [-ldapBase <string>] [-ldapBindDn <string>] {-ldapBindDnPassword } [-ldapLoginName <string>] [-searchFilter <string>] [-groupAttrName <string>] [-subAttributeName <string>] [-secType <PLAINTEXT | TLS | SSL>] [-svrType ( AD | NDS )][-ssoNameAttribute <string>] [-authentication ( ENABLED | DISABLED )] [-requireUser ( YES | NO )] [-passwdChange ( ENABLED | DISABLED )] [-nestedGroupExtraction ( ON | OFF ) [-maxNestingLevel <positive_integer>]  [-groupSearchSubAttribute <string>]  [-groupSearchFilter <string>]] [-followReferrals ( ON | OFF )  [-maxLDAPReferrals <positive_integer>]][-referralDNSLookup <A-REC | SRV-REC | MSSRV-REC>  [-msSRVRecordlocation <string>]] [-validateServerCert ( YES | NO )] [-ldapHostname <string>] [-groupNameIdentifier <string>][-groupSearchAttribute <string>] [-defaultAuthenticationGroup <string>] [-Attribute1 <string>] [-Attribute2 <string>] [-Attribute3 <string>] [-Attribute4 <string>] [-Attribute5 <string>][-Attribute6 <string>] [-Attribute7 <string>] [-Attribute8 <string>] [-Attribute9 <string>] [-Attribute10 <string>] [-Attribute11 <string>] [-Attribute12 <string>] [-Attribute13 <string>][-Attribute14 <string>] [-Attribute15 <string>] [-Attribute16 <string>] [-Attributes <string>] [-sshPublicKey <string>] [-pushService <string>] [-OTPSecret <string>] [-email <string>][-KBAttribute <string>] [-alternateEmailAttr <string>] [-CloudAttributes ( ENABLED | DISABLED )]
<!--NeedCopy-->
Following are the mandatory parameters in the preceding command:
-
serverIP: IP address assigned to the LDAP server.
-
serverName: LDAP server name as an FQDN, which is mutually exclusive with LDAP IP address. Maximum length: 127.
-
serverPort: Port on which the LDAP server accepts connections. Default value:
389. Minimum value:1. -
ldapBase: Base (node) from which to start LDAP searches. If the LDAP server is running locally, the default value of base is
dc=netscaler, dc=com. Maximum length: 127. -
ldapBindDn: Full distinguished name (DN) that is used to bind to the LDAP server. Default:
cn=Manager,dc=netscaler,dc=com. Maximum length: 127. -
ldapLoginName: LDAP login name attribute. NetScaler uses the LDAP login name to query external LDAP servers or Active Directories. Maximum length: 127.
-
searchFilter: String to be combined with the default LDAP user search string to form the search value. For example, if the search filter
"vpnallowed=true"is combined with the LDAP login name"samaccount"and the user-supplied user name is “bob”, the result is the LDAP search string""&(vpnallowed=true)(samaccount=bob)"". Maximum length: 255.Note:
Enclose the search string in two sets of double quotation marks.
The following parameters are required to configure the GroupSearch:
-
groupAttrName: LDAP group attribute name. This parameter is used for group extraction on the LDAP server. Maximum length: 31.
Note:
If the
groupSearchFilterparameter is included in the command, then do not use this parameter. In other scenarios, use thegroupAttrNameparameter for group search operation. -
subAttributeName: LDAP group sub-attribute name. This parameter is applied on group attribute value, which is extracted from
groupAttrNameparameter. Maximum length: 31. -
nestedGroupExtraction: Allow nested group extraction, in which NetScaler queries external LDAP servers to determine whether a group is part of another group. Possible values:
ON,OFF. Default value:OFF. -
maxNestingLevel: If nested group extraction is
ON, this parameter specifies the number of levels up to which group extraction is performed. Default value:2. Minimum value:2. Maximum Value:255. -
groupSearchSubAttribute: LDAP group search subattribute that is used to determine to which groups a specific group belongs. This parameter is applied on group attribute value when the nested group extraction process happens. Maximum length: 31.
-
groupSearchFilter: String to be combined with the default LDAP group search string to form the search value. For example, the group search filter
""vpnallowed=true""when combined with the group identifier""samaccount""and the group name""g1""yields the LDAP search string""(&(vpnallowed=true)(samaccount=g1)"". IfnestedGroupExtractionisENABLED, the filter is applied on the first level group search as well, otherwise first level groups (which user is a direct member of) are fetched without applying this filter. Maximum length: 127.Note:
Enclose the search string in two sets of double quotation marks.
-
groupNameIdentifier: Name that uniquely identifies a group in LDAP or Active Directory. Maximum length: 127.
-
groupSearchAttribute: LDAP group search attribute used to determine the groups to which a specific group belongs. Maximum length: 31.
Different use cases for search filter
Based on the LDAP configuration, NetScaler generates the search filter and attribute list, sends the query to the LDAP server, and retrieves the user information. This process ensures that NetScaler can efficiently locate and retrieve user objects and their attributes for authentication and authorization purposes.
Use case 1: Basic user search
Example 1:
User input: user1
LDAP configuration: -ldapLoginName samAccountName
Here, the samAccountName attribute corresponds to the user input user1.
Generated search filter: (&(samAccountName=user1)(objectClass=*))
Example 2:
User input: user1@aaa.local
LDAP configuration: add authentication ldapAction <name> -ldapLoginName userPrincipalName
Here, the userPrincipalName attribute corresponds to the user input user1@aaa.local.
Generated search filter: (&(userPrincipalName=user1@aaa.local)(objectClass=*))
Use case 2: User search with additional filter
User input: user1
To limit the user search to objects with the vpnallowed attribute set to true, use the following LDAP configuration.
add authentication ldapAction <name> -ldapLoginName samAccountName -searchFilter "(vpnallowed=true)"
Here, the samAccountName attribute corresponds to the user input user1.
Generated search filter: (&(samAccountName=user1)(vpnallowed=true))
Use case 3: User search with group extraction
User input: user1
Use the following LDAP configuration to retrieve groups directly associated with the user object.
add authentication ldapAction <name> -ldapLoginName samAccountName -groupAttrName memberOf
Here, the samAccountName attribute corresponds to the user input user1.
Generated search filter: (&(samAccountName=user1)(objectClass=*))
Attributes associated with user object: memberOf
In this article
- Create an LDAP Authentication Action using the GUI
- Create an LDAP Authentication Action using the CLI
- Edit an LDAP authentication action using the GUI
- Edit an LDAP authentication action using the CLI
- Create an LDAP authentication policy using the GUI
- Create an LDAP authentication policy using the CLI
- LDAP parameters
- Testing LDAP authentication
- Password expiry notification for LDAP authentication
- LDAP authentication with nested group extraction