Instance roles
StyleBooks supports the following configurations on NetScaler instances:
- Symmetric configuration - When a configuration pack is applied on multiple NetScaler instances and the configurations deployed on all the instances are the same.
- Asymmetric configuration - When a configuration pack is applied on multiple NetScaler instances and the configurations deployed on all the instances are different. For example, in the default Microsoft Skype for Business StyleBook, a different configuration has to be deployed on each NetScaler instance.
The “instance roles” feature of StyleBooks helps you to create an asymmetric configuration. Here, each NetScaler instance in the configuration pack can be assigned a different role. The role determines the configuration objects of the configuration pack that the NetScaler instance receives.
Points to note:
- The set of instance roles in a StyleBook are defined while creating the StyleBook.
- The roles are assigned to a specific NetScaler instance when creating or updating the configuration pack.
Target-roles section
The “target-roles” is typically placed after the “import-StyleBooks” section and before the “parameters” section in a StyleBook. All the roles supported by the StyleBook are declared in the “target-roles” section.
In the following StyleBook example, two roles are defined within the “target-roles” section - A and B.
target-roles:

  -
   name: A
   name: B
     min-targets: 2
     max-targets: 5
<!--NeedCopy-->
You can see that role B also defines two optional subproperties, min-targets and max-targets.
min-targets specify the minimum mandatory number of NetScaler instances to assign this role when creating a configuration pack from this StyleBook. max-targets specify the maximum number of NetScaler instances that can be assigned this role when creating a configuration pack from this StyleBook.
If these subproperties are not specified, then there is no limit to the number of NetScaler instances that can be configured for that role. For min-targets = 0, the configuration associated with the role is optional. For min-targets = 1, the configuration is mandatory and at least one NetScaler instance must be configured for the role.
Role “default”
In addition to explicitly defined roles, there’s an implicit role that all StyleBooks have. This implicit role is called the default role and is used like any other role in a StyleBook. When creating a configuration pack, if an NetScaler instance is not assigned with a specific role, the instance gets implicitly assigned to the “default” role. The instance then receives any configuration objects generated by components that have the “default” role.
Components with roles
After the roles that a StyleBook can support (including the role “default”) are defined, the roles can be used in the components section of a StyleBook. If you want a component to be deployed only on NetScaler instances that play a certain role, then you can specify the roles attribute as part of the component, as illustrated in the following example of a component:
  -
    name: C1
    type: ns::lbvserver
    roles:
      - A
    properties:
      name: lb1
      servicetype: HTTP
      ipv46: 1.1.1.1
      port: 80
<!--NeedCopy-->
In this example, the component generates an lbvserver is deployed on instances playing the role A. The roles attribute of a component is a list, and the component can be assigned multiple roles. These roles would have been declared in the target-roles section of the StyleBook.
Note
If a component in a StyleBook doesn’t specify a role attribute, then the configuration objects generated by the component are created on all NetScaler instances, irrespective of the roles. You can use this feature effectively to create configuration objects that can be applied to all instances of a configuration pack.
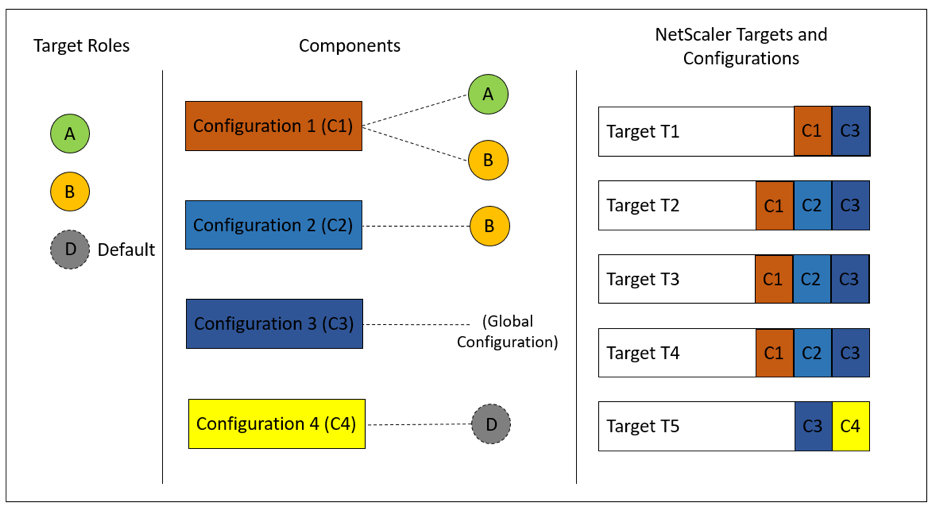
Consider a StyleBook with two roles and four components.
- Component C1 has the roles A and B
- Component C2 has the role B
- Component C3 doesn’t have any roles defined
- Component C4 has the role “default”
The components section of this StyleBook is as follows:
components:
  -
    name: C1
    type: ns::lbvserver
    roles:
      - A
      - B
    properties:
      name: lb1
      servicetype: HTTP
      ipv46: 1.1.1.1
      port: 80
  -
    name: C2
    type: ns::lbvserver
    roles:
      - B
    properties:
      name: lb2
      servicetype: HTTP
      ipv46: 12.12.12.12
      port: 80
  -
    name: C3
    type: ns::lbvserver
    properties:
      name: lb3
      servicetype: HTTP
      ipv46: 13.13.13.13
      port: 80
  -
    name: C4
    type: ns::lbvserver
    roles:
      - default
    properties:
      name: lb4
      servicetype: HTTP
      ipv46: 14.14.14.14
      port: 80
<!--NeedCopy-->
The component C3 doesn’t have a role defined, which means the component is deployed on all instances regardless of their role. On the other hand, component C4 has the role “default”, which means it is applied to any instance that doesn’t have an explicit role assigned to it.
Now, consider that you want to create a configuration pack using this StyleBook, and deploy it on five NetScaler instances. You can assign the roles to the instances in the following manner:
- Role A is assigned to Instances T1, T2, T3, and T4
- Role B is assigned to Instances T2, T3, and T4
- Instance T5 isn’t assigned any role
The following image summarizes the role assignments, and shows the resulting configuration that each NetScaler instance receives:

The component C3 is deployed on all instances regardless of role, since this component had no roles attribute.
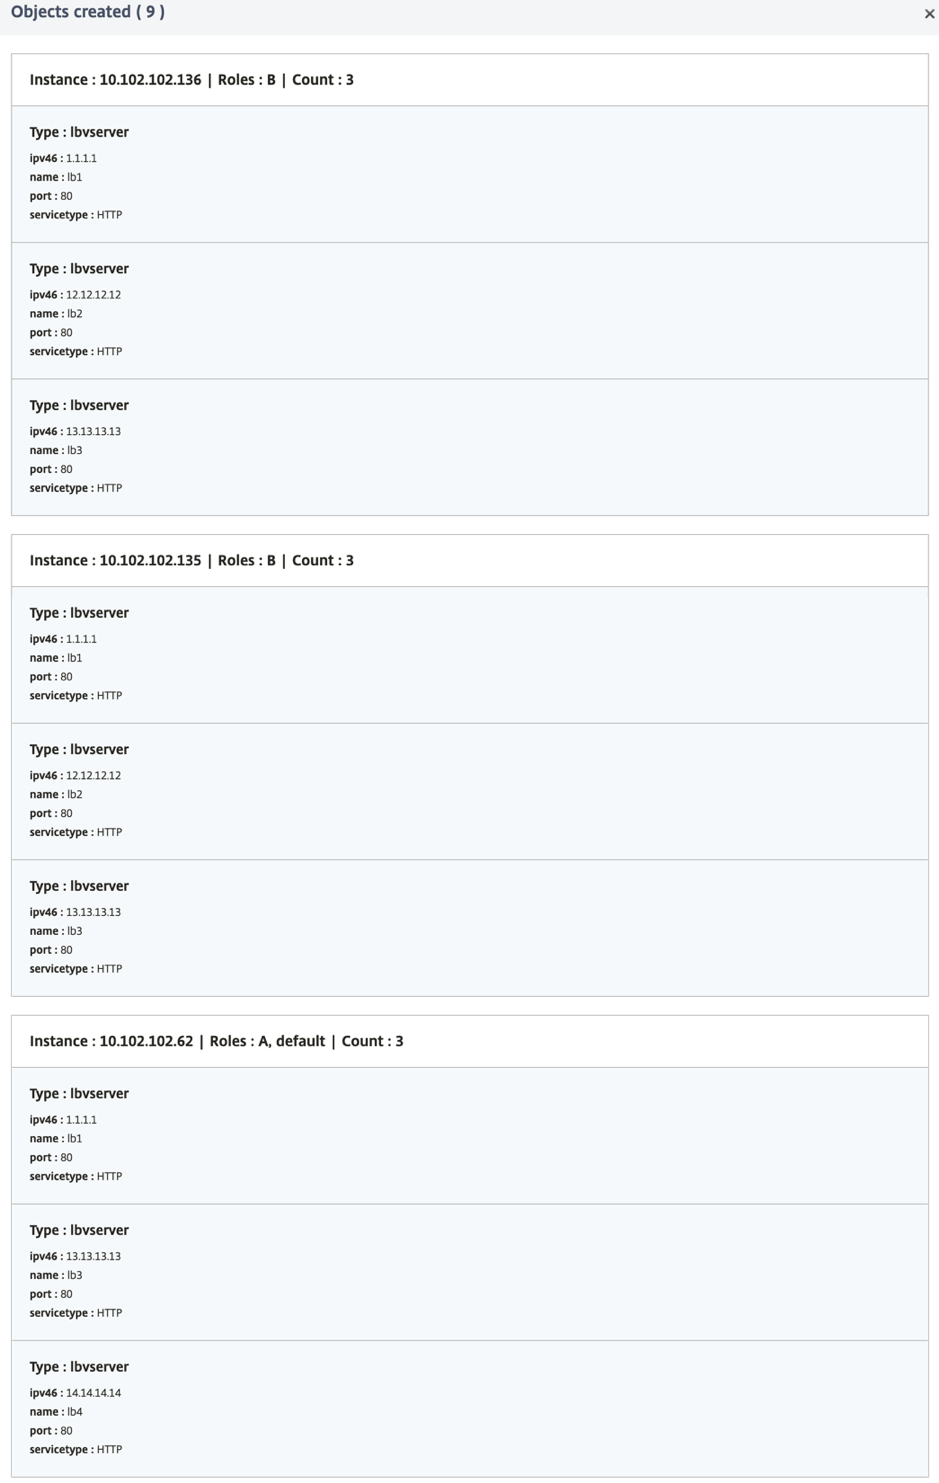
Use the “Dry Run” feature to view and verify:
- The assignment of roles
- The configuration objects created on each NetScaler instance
Build your StyleBook
The full content of the StyleBook “demo-target-roles” is as follows:
---
name: demo-target-roles
namespace: com.example.stylebooks
version: "1.2"
schema-version: "1.0"
import-stylebooks:
  -
    namespace: netscaler.nitro.config
    prefix: ns
    version: "10.5"
parameters:
  -
    name: appname
    type: string
    required: true
    key: true
target-roles:
  -
    name: A
  -
    name: B
    min-targets: 2
    max-targets: 5
components:
  -
    name: C1
    type: ns::lbvserver
    roles:
      - A
      - B
    properties:
      name: lb1
      servicetype: HTTP
      ipv46: 1.1.1.1
      port: 80
  -
    name: C2
    type: ns::lbvserver
    roles:
      - B
    properties:
      name: lb2
      servicetype: HTTP
      ipv46: 12.12.12.12
      port: 80
  -
    name: C3
    type: ns::lbvserver
    properties:
      name: lb3
      servicetype: HTTP
      ipv46: 13.13.13.13
      port: 80
  -
    name: C4
    type: ns::lbvserver
    roles:
      - default
    properties:
      name: lb4
      servicetype: HTTP
      ipv46: 14.14.14.14
      port: 80
<!--NeedCopy-->
The following image shows the objects created for a sample configuration pack:

Using APIs
When using the REST API, you can specify roles for each NetScaler instance when creating or updating the configuration pack as follows. In the “targets” block, specify the UUID of the specific NetScaler instance on which you want to deploy the individual components.
"targets": [
            {
             "id": "<ADC-UUID>",
             "roles": ["A"]
            },
           ]
<!--NeedCopy-->
A complete sample REST API is provided for your reference.
POST /<IP>/stylebook/nitro/v1/config/stylebooks/com.example.stylebooks/1.2/demo-target-roles/configpacks
{
  "configpack": {
     "parameters": {
     "appname": "app1"
    },
     "targets": [
        {
          "id": "f53c35c3-a6bc-4619-b4b4-ad7ab6a94ddb",
        "roles": ["A"]
        },
        {
          "id": "c08caa1c-1011-48aa-b8c7-9aed1cd38ed0",
          "roles": ["A", "B"]
        },
        {
          "id": "88ac90cb-a5cb-445b-8617-f83d0ef6174e",
          "roles": ["A", "B"]
        },
        {
          "id": "bf7b0f74-7a83-4856-86f4-dcc951d3141e",
          "roles": ["A", "B"]
        },
        {
          "id": "fa5d97ab-ca29-4adf-b451-06e7a234e3da",
          "roles": ["default"]
        }
      ]
    }
}
<!--NeedCopy-->