Office 365 acceleration
Citrix SD-WAN WANOP optimizes WAN to provide consistent user experience for business applications across branch offices and remote sites.
Microsoft Office 365 is a software-as-a-service (SaaS) application, which provides the Microsoft’s Office suite of enterprise-grade productivity applications. This application is hosted on the cloud and is delivered on demand to users.
The Office 365 acceleration feature allows the branch offices to gain the optimization benefits that Citrix SD-WAN WANOP provides for Microsoft Office 365 application.
Use case
When the WAN segment is considerably slower than the internet segment, and Microsoft’s Office 365 servers are closer to the larger office than the branch-office.
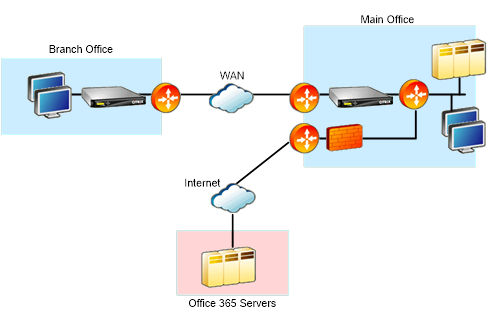
Topology
The branch-office Office 365 traffic is sent over the WAN to the main office, and then forwarded to Office 365 servers through the Internet. The segment between the branch office and main office is accelerated.
Note
The segment between the main office and Microsoft Office 365 servers is not accelerated. It is advised that the main office connects to the closest Office 365 server.
How it works?
Citrix SD-WAN WANOP SSL acceleration can decrypt and accelerate Office 365 traffic, providing compression. In short, Office 365 branch-office acceleration can be thought of as a special case of RPC-over-HTTPS acceleration.
Procedure
-
Create secure peering between the branch and main office Citrix SD-WAN WANOP appliances.
-
Generate proxy certificates / private key in domain certification authority (CA).
-
Add all required CA’s in Citrix SD-WAN WANOP.
-
CA, Intermediate CA’s, root CA of the Microsoft certificates.
-
Proxy certificates/Private keys generated for office 365 URL’s.
Note
To avoid security alerts on your browsers, the proxy certificates must be signed by your Windows domain’s CA server, which makes it acceptable to any domain user.
-
-
Create SSL split proxy profile and bind the split proxy to service class (web (internet- secure)).
-
Initiate the office 365 connection and check the Accelerated connections.
Warning
Branch office devices that are not part of the domain will display security warnings unless you install the certificates manually. Firefox users also have to install the certificates manually, since Firefox does not honor the device’s certificate store.
Configure Office 365 acceleration
To configure office 365 acceleration:
-
Set up a secure peering relationship between the two Citrix SD-WAN WANOP appliances, as described in Secure Peering
-
Create a new certificate.
Note
The server-side Citrix SD-WAN WANOP appliance serves as an intermediary between Office 365 and the clients, so these certificates will be signed by the server-side domain controller but it refers to the Office 356 domains.
-
Log on to the Certificate Authority Server for your Windows domain.
-
If necessary, add the snap-ins for Certification Authority, Certificate Template and Certificates.
-
Navigate to Certificate Templates > Web Server Properties > Security and select all the options.
-
Navigate to Certificates > Personal > Certificates (Computer) > All Tasks > Request New Certificate.
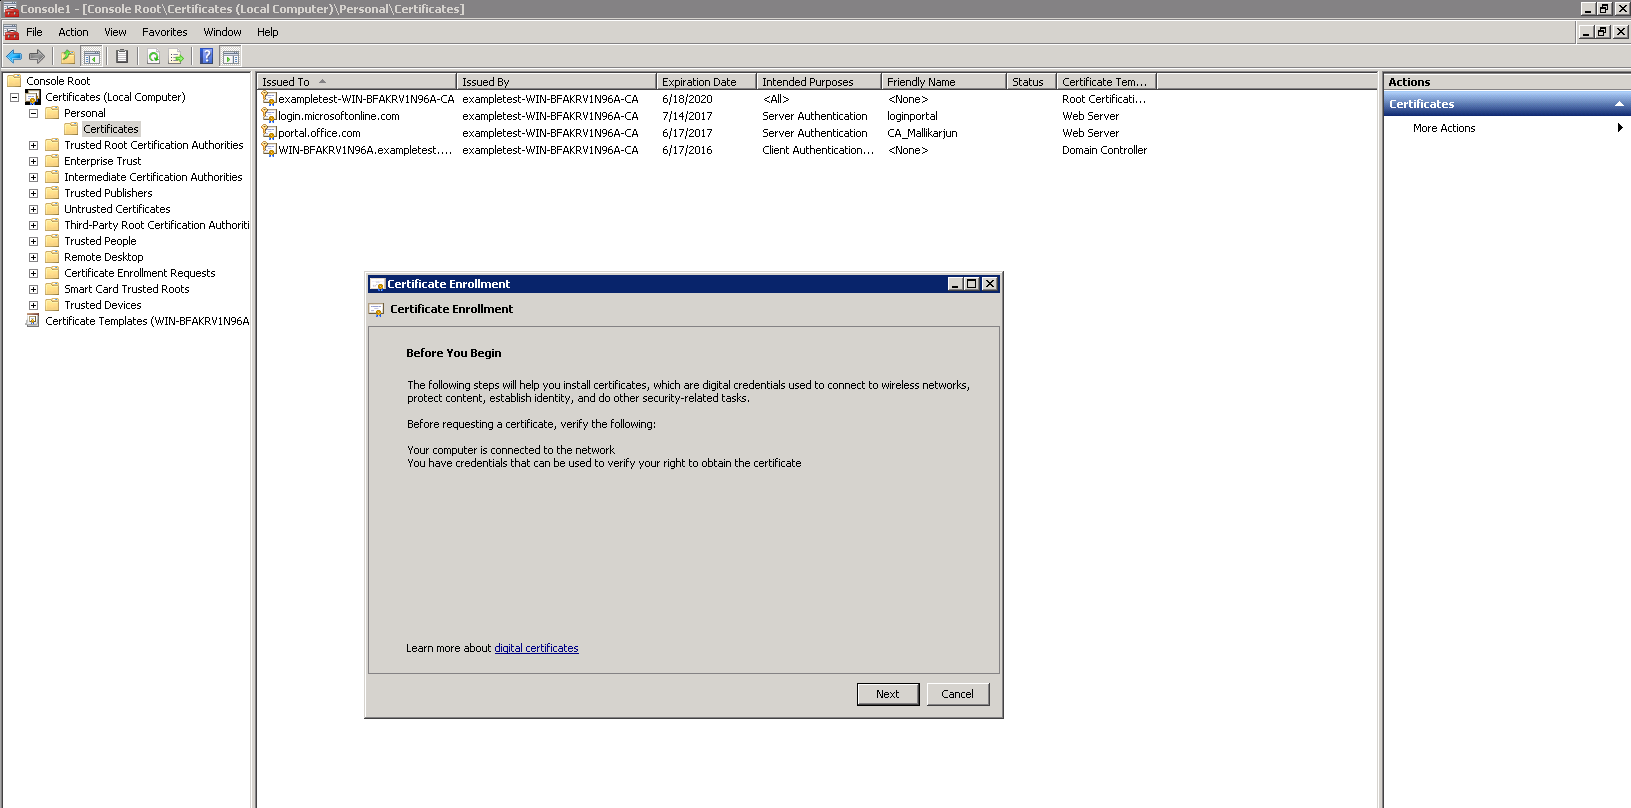
-
In the Certificate Enrolment window, click Next.
-
In the Select Certificate Enrolment Policy window, select Active directory enrolment policy.
-
In the Active Directory Enrolment Policy window, select Web Server > Details > Properties.

-
-
Copy information from Office365 certificates into your new certificates. You will end up with a single certificate from three Office365 certificates. Proceed as follows:
-
In a browser, such as Chrome, enter the url - https://login.microsoftonline.com.
Note
Do not log in.
-
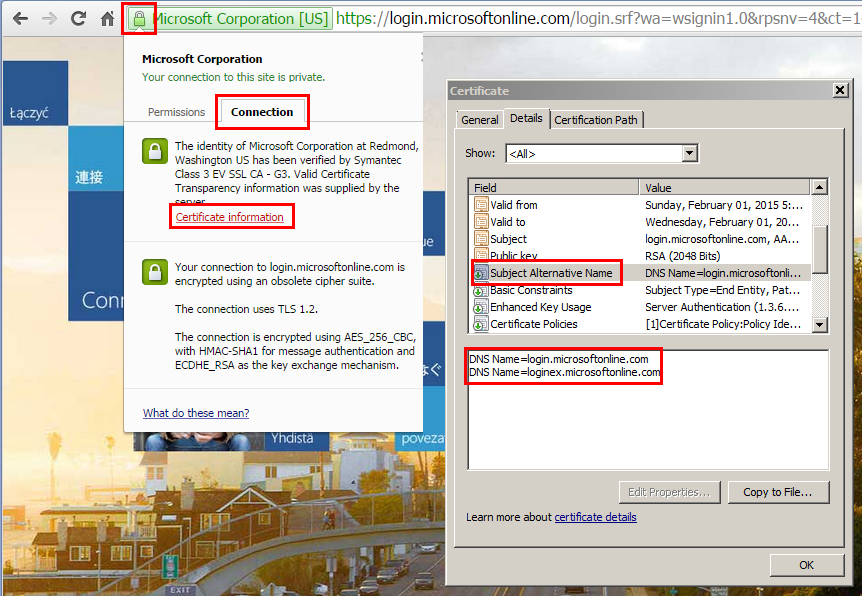
Click the padlock icon on the URL bar and select Connection > Certificate Information > Details.
Note
These instructions are for the Chrome browser; the procedure is the same for other browsers also.
-
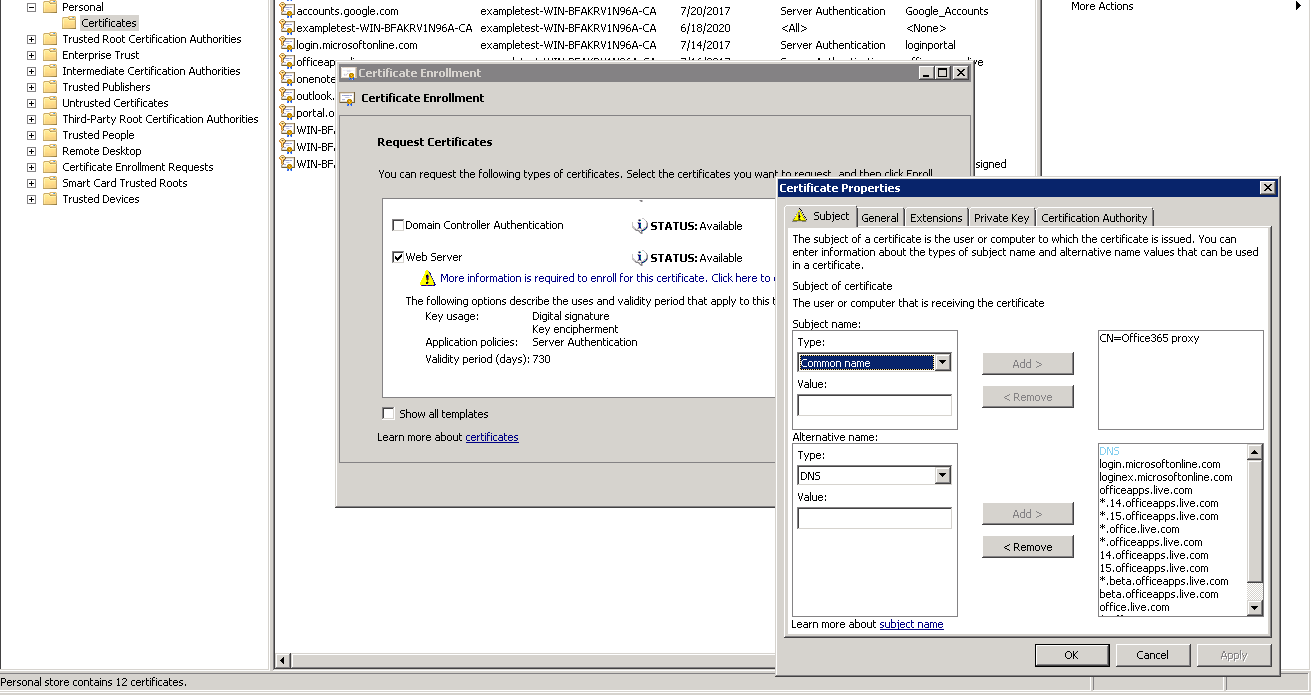
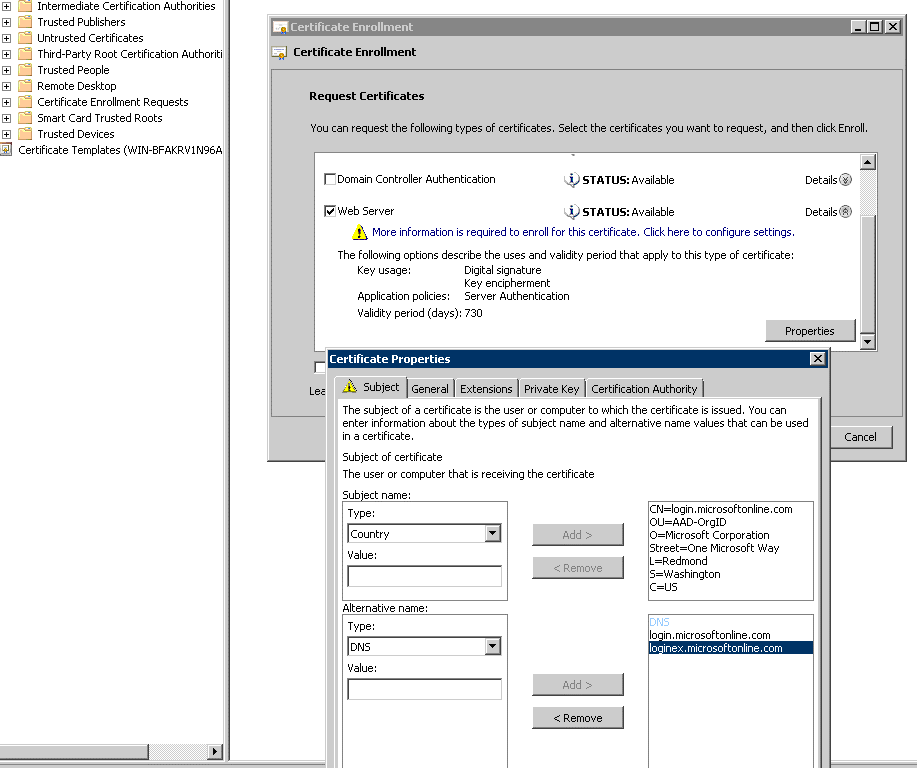
Click Subject Alternative Name, this will reveal a list of DNS names such as “login.microsoftonline.com.” Copy the information in the text box below it.
-
Return to your new certificate’s Certificates Properties window. Add the alternative names in the Value field with Type as DNS to match each alternative name in the Microsoft certificate.
-
Repeat the process of discovering Subject Alternate Names and adding them to your certificate for https://outlook.office365.com, https://portal.office.com, https://office.live.com, and https://sharepoint.com (the SharePoint URL is customer-specific).
-
Create a Common Name for your new certificate. The example above shows a common name as “Office365 proxy.”
-
In the Private Key tab, select Make private key exportable.
-
Click OK, Enroll, and Finish.
-
-
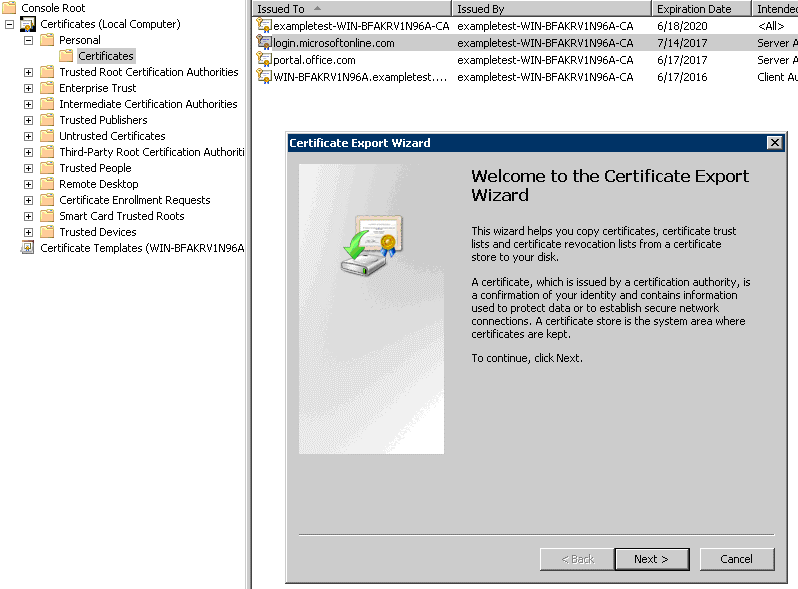
Export the certificate.
-
Under Certificates > Personal > Certificates, select the above created proxy certificate, and then select All Tasks > Export.
-
The Certificate Export Wizard appears. Click Next.
-
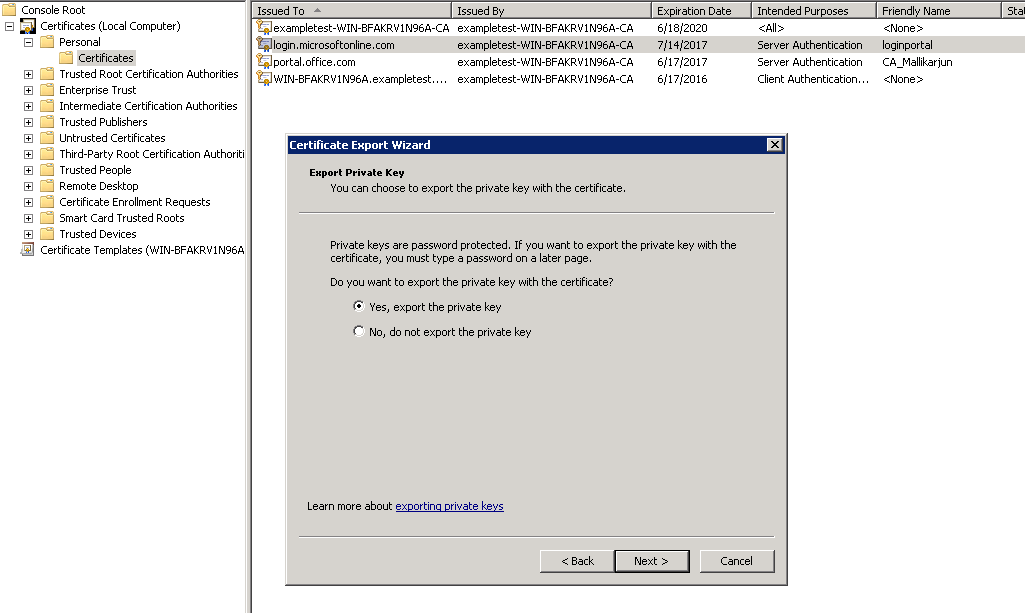
In Export Private Key, select the option Yes, export the private key and click Next.
-
Retain the default values for the export file format.
-
Type and confirm the password, export the private key, and save the certificate as loginportal.pfx.
-
-
Export your certificates.
-
In the Certificate Export Wizard, click Next. In Export Private Key, select the option No, do not export the private key. Click Next.
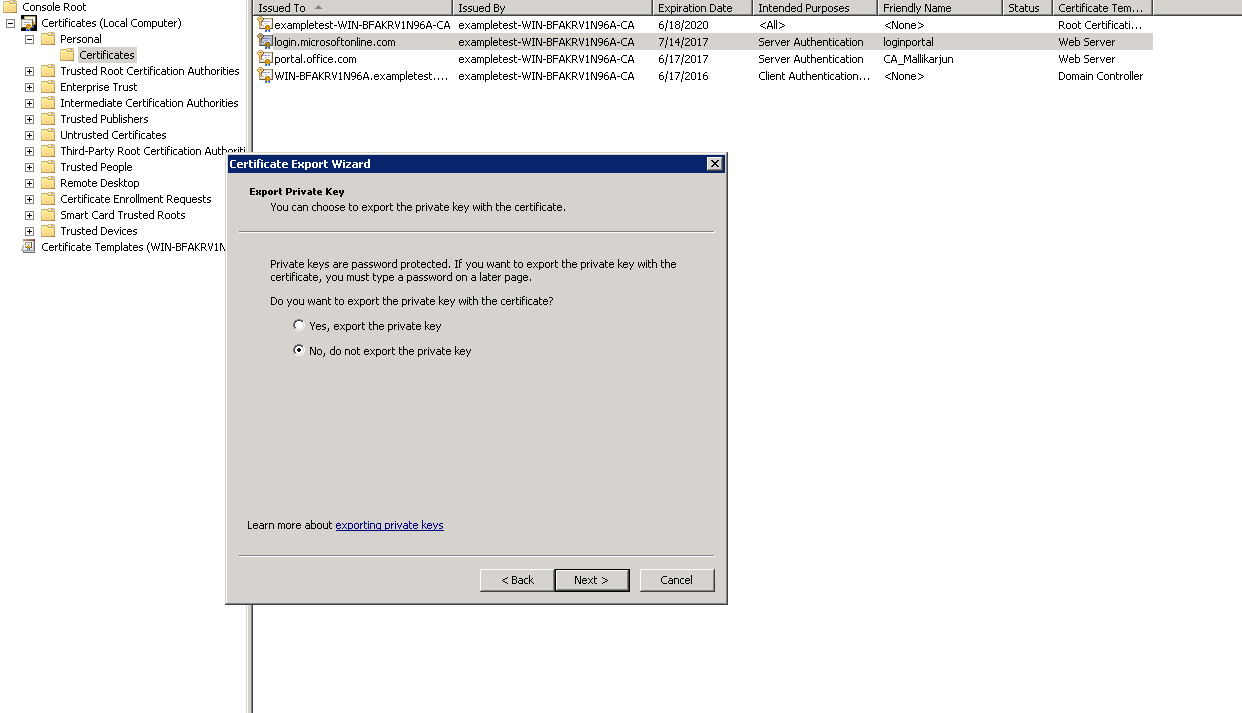
-
Retain the default values for the export file format.
-
Type and confirm the password, and export the private key and certificate, saving the file to a file to a file name such as office365_keys.pfx.
-
-
Download the public keys of the root CA and Intermediate CAs of the Microsoft certificates.
-
From the browser, navigate to https://login.microsoftonline.com. Click the padlock icon in the browser. Navigate to Connection > Certificate Information > Certification Path.
-
Select the root certificate (the one at the top of the list), and then click View Certificate > Details > Copy to File. The Certificate Export Wizard appears. Click Next.
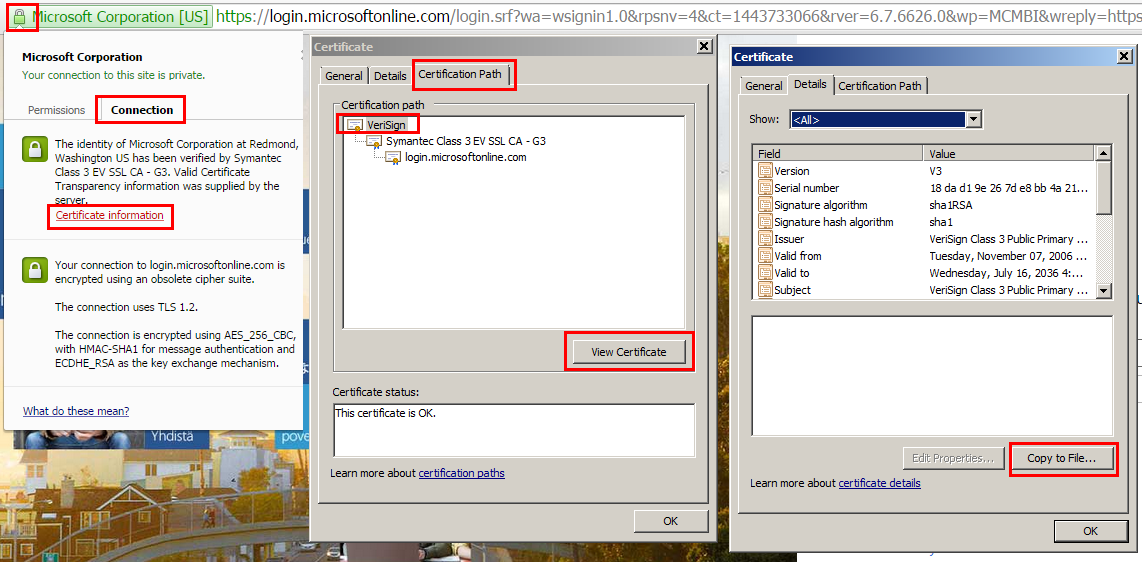
-
Enter the file name and save the file.
Note
Alternatively, you can use Wireshark or OpenSSL to get the root and intermediate CA names and get the certificates from ‘AUTHENTIC’ source (for example, Windows SSL store).
-
Repeat step 6 to save the root and intermediate CA’s of the following domains:
-
login.microsoftonline.com
-
portal.office.com
-
outlook.office356.com
-
*.sharepoint.com
-
office.live.com
-
-
-
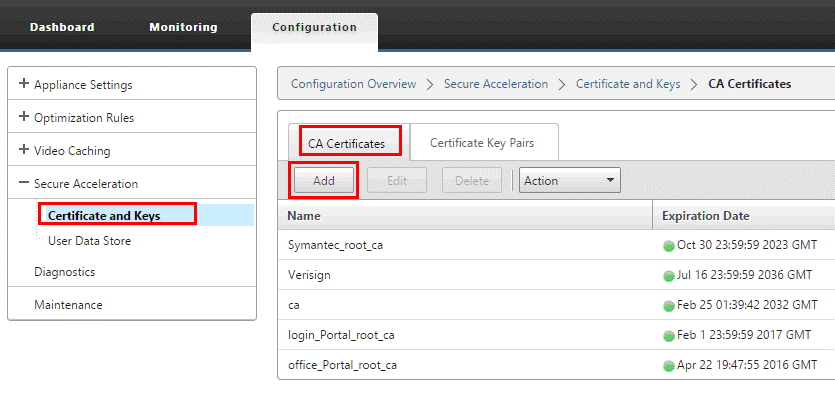
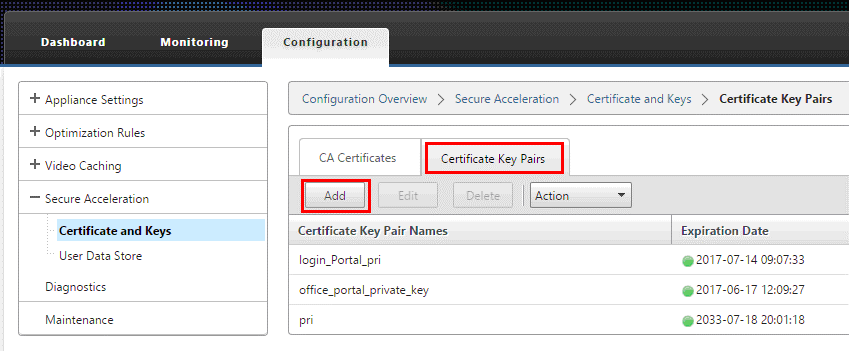
Add all the Office 365 server CA’s, proxy certificate/key pairs, and private keys to the server-side Citrix SD-WAN WANOP appliance. The CA’s are added using the CA Certificates tab on the Certificates and Keys page. Certificates and certificate/key pairs are added on the Certificate/Key Pairs tab.
-
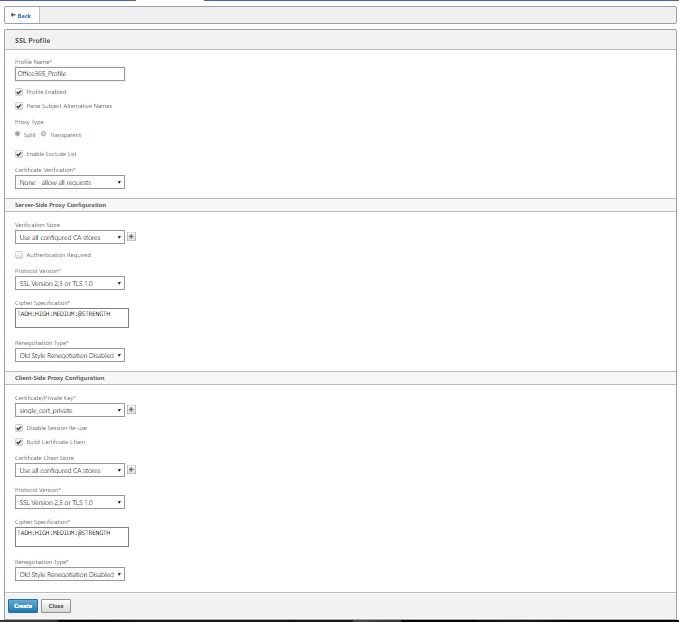
Create an SSL split-proxy profile and bind the split proxy to the Web (Internet-Secure) service class.
-
Navigate to Configuration > Secure Acceleration > SSL Profile > Add Profile.
-
Enter the profile name of your choice. Select Profile Enabled, Parse Subject Alternative Names, and Split Proxy.
-
Under Server-Side Proxy Configuration > Verification Store, select Use all configured CA stores.
-
Under Client-side Proxy Configuration > Certificate/Private Key, select the cert/private key pair you created and exported previously (the one shown in the example as loginportal.pfx). Select Build Certificate Chain. Select the CA associated with the certificate/key pair under Certificate Chain Store.
-
-
Bind the created SSL profile to the Internet (Web-Secure) service class. Navigating to Configure > Optimization Rules > Service Classes and add the SSL profile to the SSL profile list.
-
Enable acceleration and disk-based compression for the Internet (Web-Secure) service class.
-
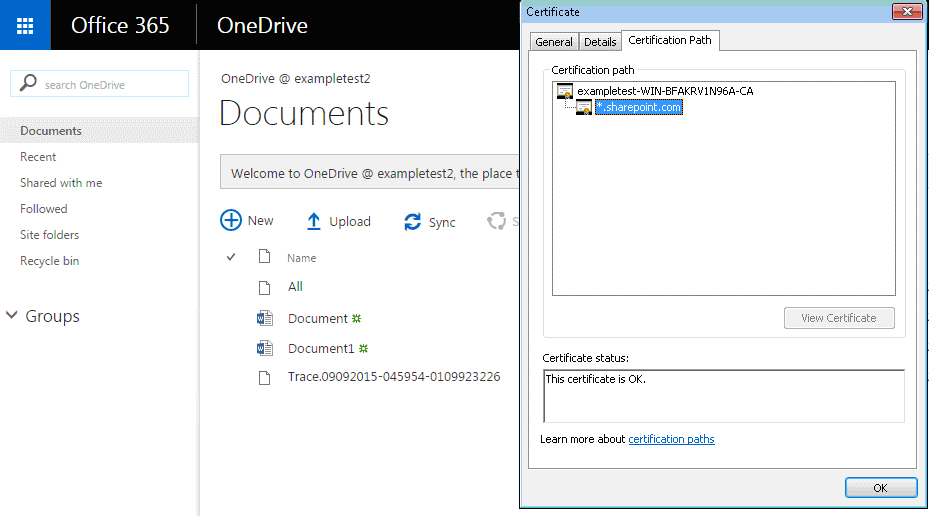
Initiate an Office 365 session from your browser.
The connection is accelerated. In the browser, the certificate should display your root CA, not the actual Office 365 certificate, as the server-side appliance’s CA certificate.
-
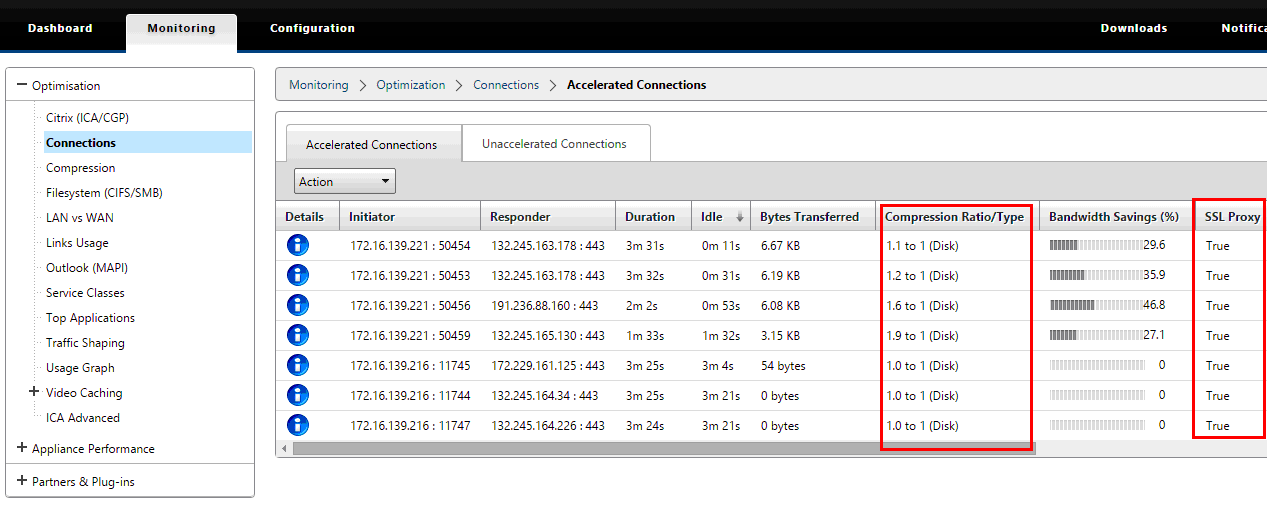
On the appliance Monitoring > Connections page, verify that the Office 365 connections are compressed and are receiving SSL acceleration.
Note
Firefox does not accept the device’s certificates by default, but has its own certificate store. Therefore, credentials accepted in the normal Windows domain behavior by other browsers, and by the device as a whole, must be installed manually into Firefox. To install certificates into Firefox, follow the procedure in the section, Installing certificates to Firefox.
Install the certificates to Firefox
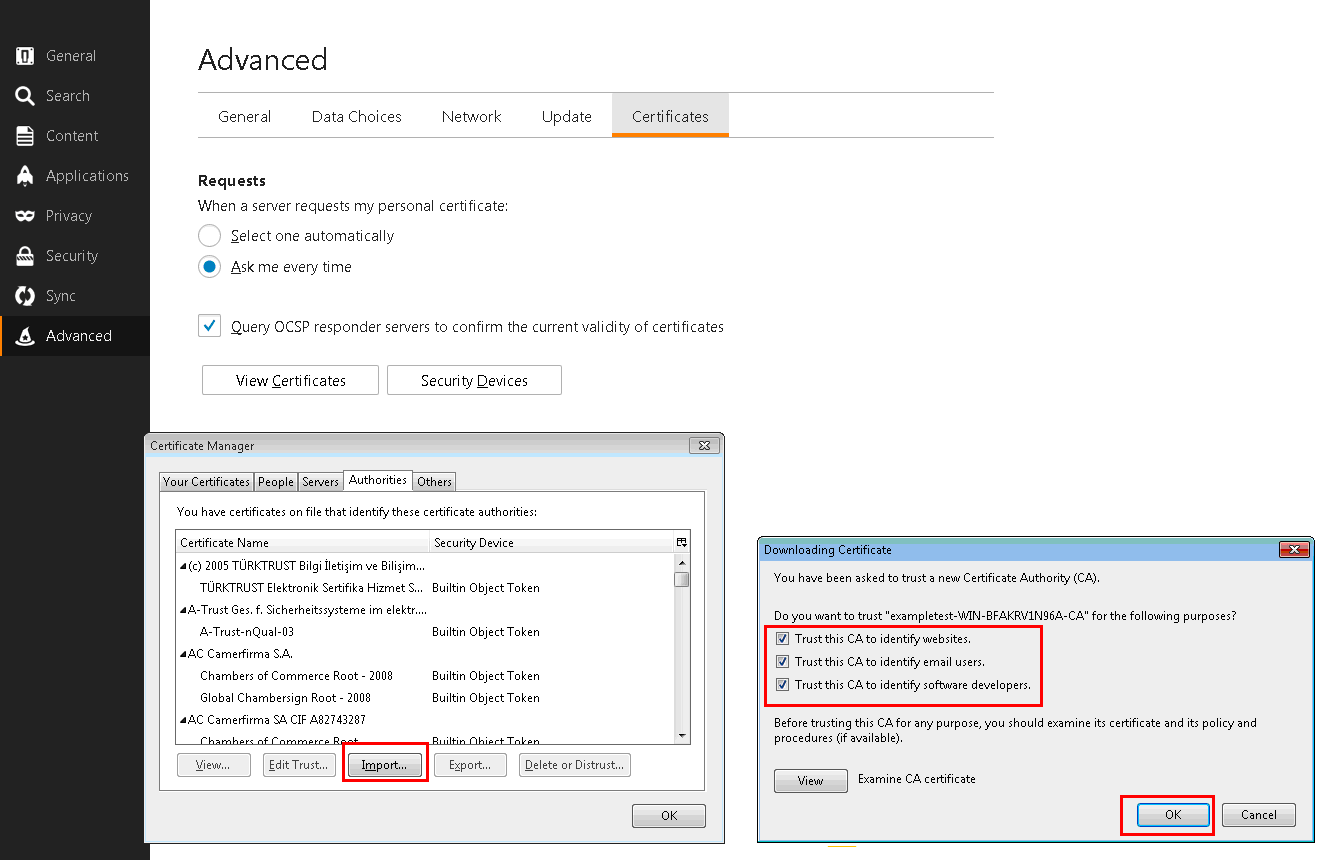
To Install the server-side appliance’s proxy certificate to the Firefox certificate store:
-
In the Firefox browser navigating to Options > Advanced > Certificate > View Certificates > Authorities > Import.
-
Upload the local CA proxy certificate, select all the options in the Downloading Certificate wizard and click OK.