-
Configuration guide for Citrix Virtual Apps and Desktops™ workloads
-
Citrix SD-WAN Orchestrator™ on-premises configuration on Citrix SD-WAN appliance
-
-
Inter-routing domain service
-
This content has been machine translated dynamically.
Dieser Inhalt ist eine maschinelle Übersetzung, die dynamisch erstellt wurde. (Haftungsausschluss)
Cet article a été traduit automatiquement de manière dynamique. (Clause de non responsabilité)
Este artículo lo ha traducido una máquina de forma dinámica. (Aviso legal)
此内容已经过机器动态翻译。 放弃
このコンテンツは動的に機械翻訳されています。免責事項
이 콘텐츠는 동적으로 기계 번역되었습니다. 책임 부인
Este texto foi traduzido automaticamente. (Aviso legal)
Questo contenuto è stato tradotto dinamicamente con traduzione automatica.(Esclusione di responsabilità))
This article has been machine translated.
Dieser Artikel wurde maschinell übersetzt. (Haftungsausschluss)
Ce article a été traduit automatiquement. (Clause de non responsabilité)
Este artículo ha sido traducido automáticamente. (Aviso legal)
この記事は機械翻訳されています.免責事項
이 기사는 기계 번역되었습니다.책임 부인
Este artigo foi traduzido automaticamente.(Aviso legal)
这篇文章已经过机器翻译.放弃
Questo articolo è stato tradotto automaticamente.(Esclusione di responsabilità))
Translation failed!
Inter-routing domain service
Citrix SD-WAN allows you to segment the network using Routing Domains, ensuring high security and easy management. With the use of the Routing Domain the traffic is isolated from each other in the overlay network. Each routing domain maintains its own routing table. For more information on Routing Domain, see Routing Domain.
However, sometimes we need to route the traffic between the Routing domains. For example if shared services such as printer, scanner, and mail server are provisioned as a separate Routing Domain. Inter-routing domain is required to enable users from different routing domains to access the shared services.
Citrix SD-WAN™ provides Static Inter-Routing Domain Service, enabling route leaking between Routing Domains within a site or between different sites. This eliminates the need for an edge router to handle route leaking. The Inter-routing domain service can further be used to set up routes, firewall policies, and NAT rules.
A new Firewall Zone, Inter_Routing_Domain_Zone is created by default and serves as the firewall zone for the Inter-Routing Domain Services for routing and filtering.
Note
Citrix SD-WAN PE appliances do not perform WAN optimization functionality on Inter-Routing Domain packets.
To configure Inter-routing Domain Service between two routing domains.
Consider an SD-WAN network with an MCN and 2 or more branches with at least two Routing Domains configured globally. By default, all the routing domains are enabled on the MCN. Selectively enable the required routing domains on the other sites. For information on configuring Routing Domain see, Configure Routing Domain.
-
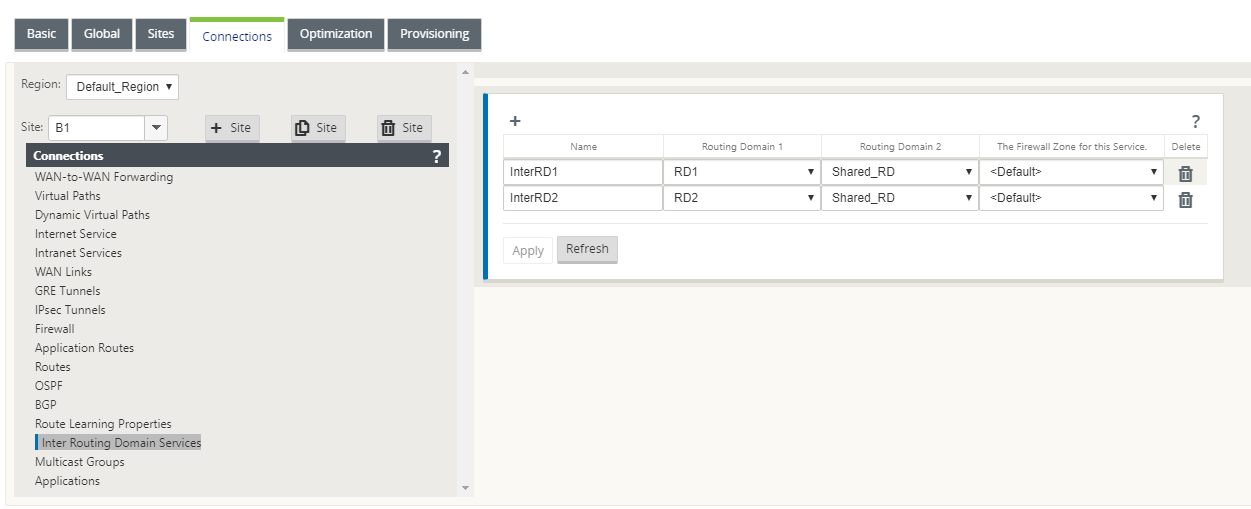
In the SD-WAN Configuration Editor, navigate to Connections > Select Site > Inter-Routing Domain Service.
-
Click + and enter values for the following parameters:
- Name: The name of the Inter-Routing Domain Service.
- Routing Domain 1: The first Routing Domain of the pair.
- Routing Domain 2: The second Routing Domain of the pair.
-
Firewall Zone: The Firewall Zone of the Service.
- Default: The Inter_Routing_Domain_Zone firewall zone is assigned.
- None: No zone is selected and the original zone of the packet is retained.
- All Zones configured in the network might be selected.
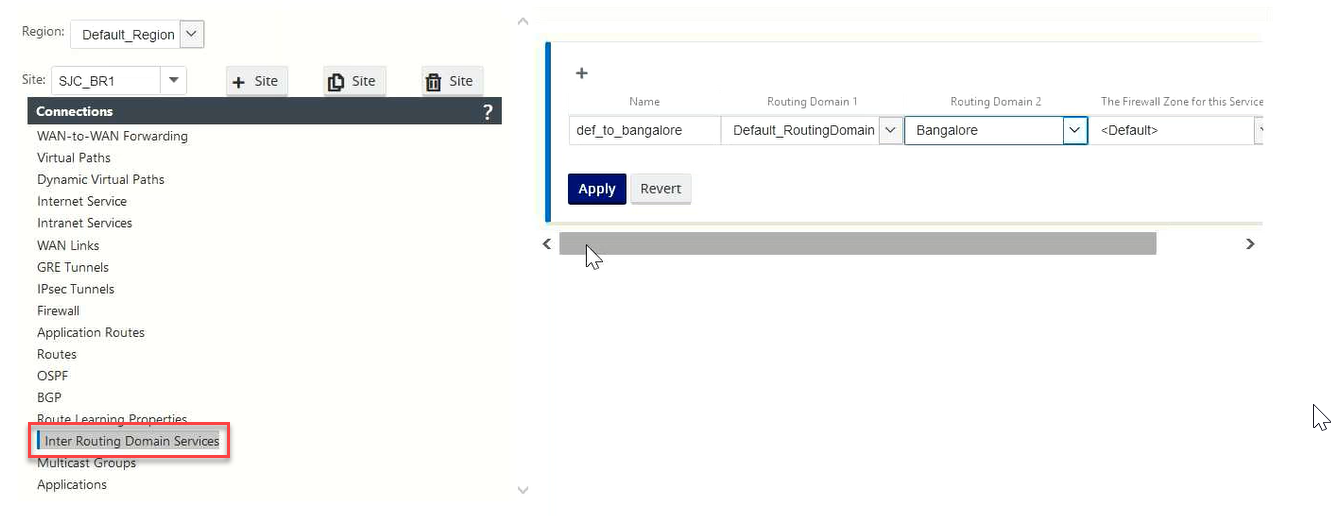
- Click Apply to create the Inter-routing domain service. The created service can be used to create routes, firewall policies, and NAT policies.
Note
You cannot configure an Inter-routing domain service, using routing domains that are not enabled on a site.
To create routes using the Inter-routing domain service, create a route with the Service type as Inter-Routing Domain Service and select the inter-routing domain service. For more information on configuring Routes, see How to Configure Routes.
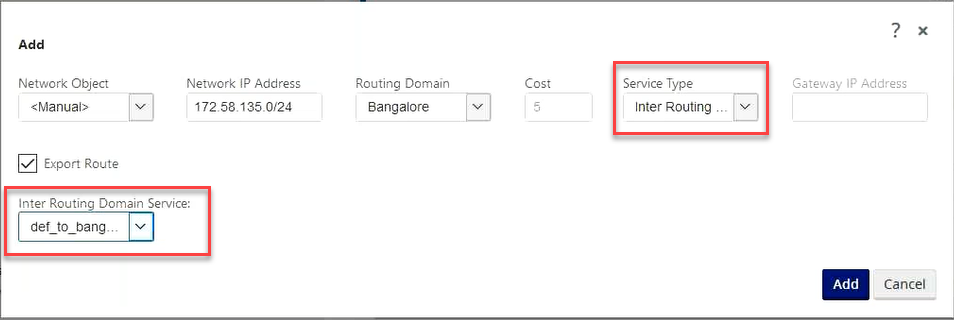
Also add a route from the other Routing Domain pair, to establish connection to and fro between the two routing domains.
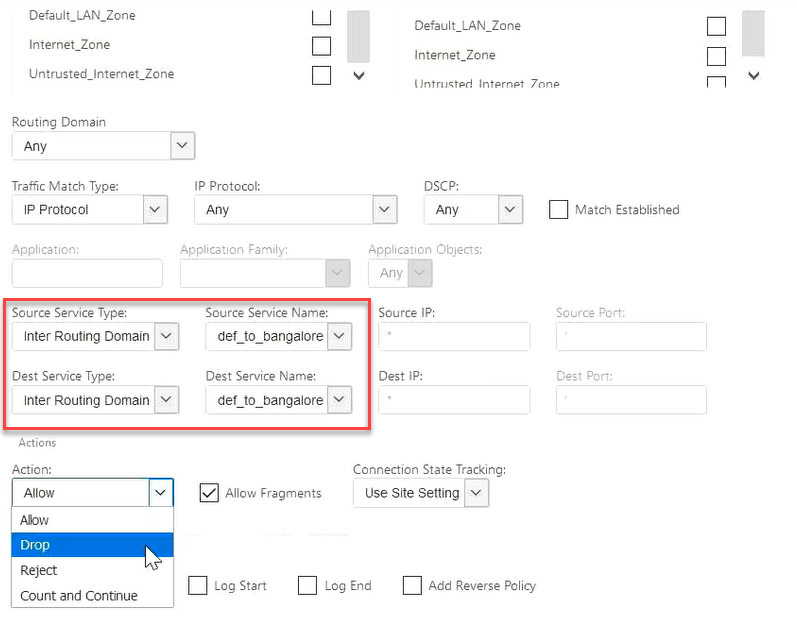
You can also configure firewall policies to control the flow of traffic between routing domains. In the firewall policies, select Inter-Routing domain service for the source and destination services and select the required firewall action. For information on configuring Firewall Policies, see Policies.
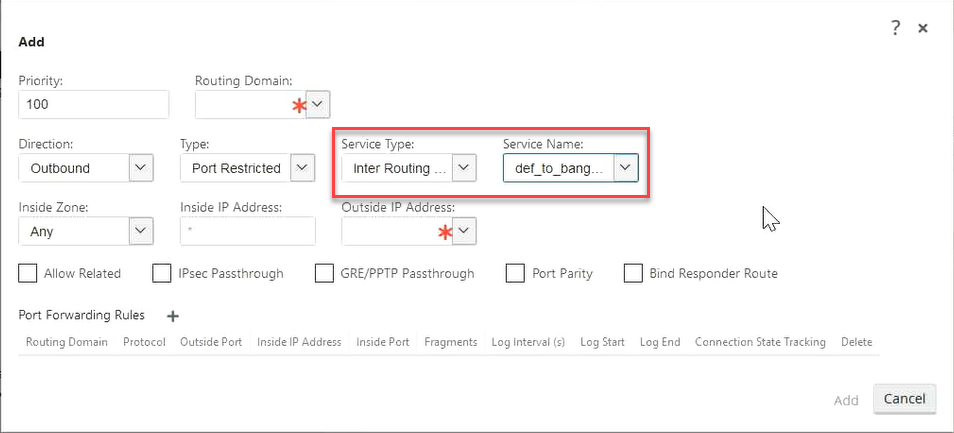
You can also choose Intranet service type to configure Static and Dynamic NAT policies. For more information on configuring NAT policies, see Network Address Translation.
Monitoring
You can view monitoring statistics for connections that use inter-routing-domain services under Monitoring > Firewall Statistics > Connections.
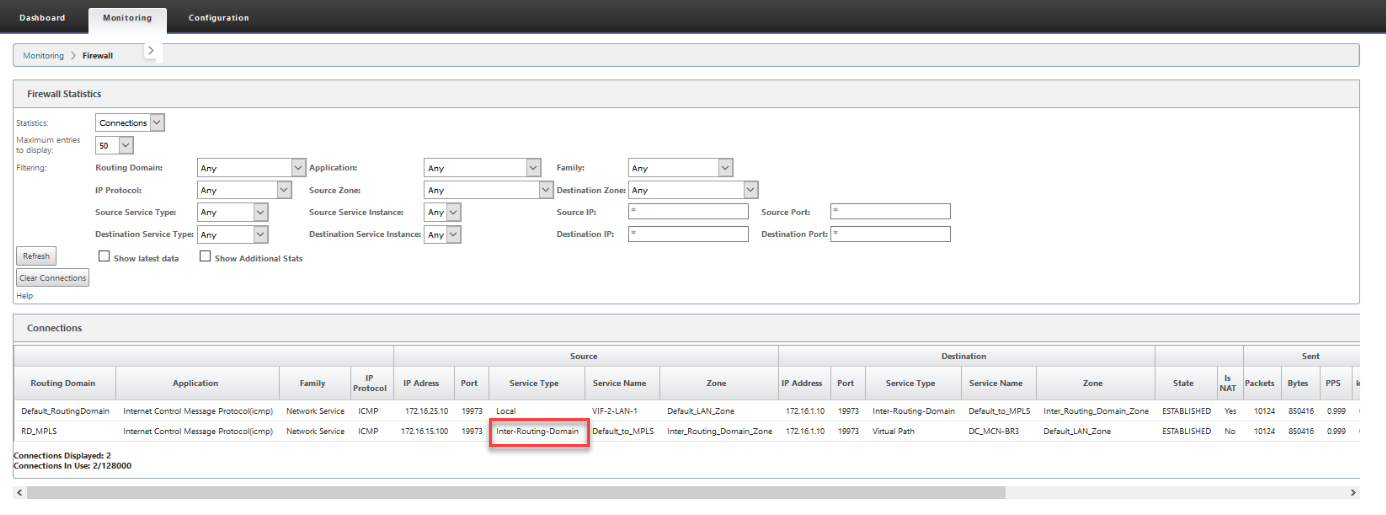
Use Case: Sharing resources across Routing Domains
Let us consider a scenario, in which users in different routing domains need to access common assets, such a printer or network storage. There are 3 routing domains at a branch RD1, RD2, and Shared RD as shown in the figure.
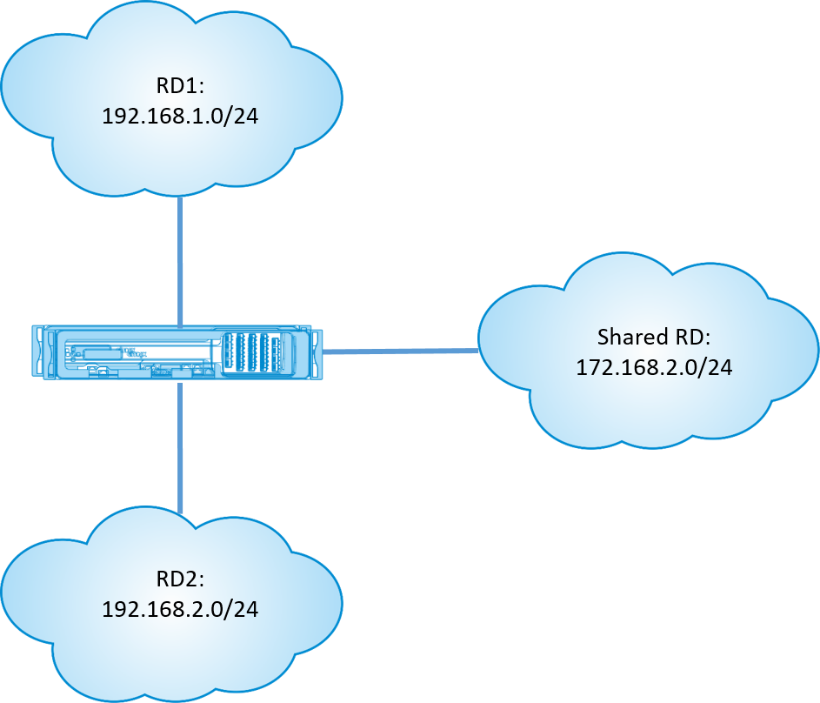
To enable users in RD1 and RD2 to access resources in Shared RD:
- Create an Inter-Routing Domain service between RD1 and Shared RD, for example Inter RD1.
-
Create an Inter-Routing Domain service between RD2 and Shared RD, for example Inter RD2.
-
Configure a static route to Shared RD from RD1 and RD2. In RD1, add a route 172.168.2.0/24 to InterRD1.

-
In RD2, add a route 172.168.2.0/24 to InterRD2.

-
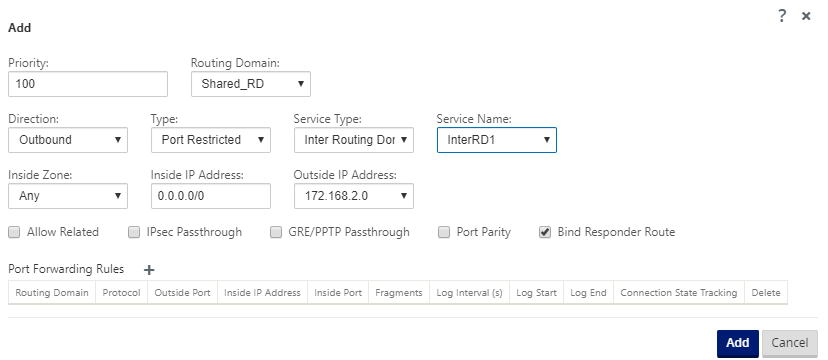
Add a Dynamic NAT rule to InterRD1 using a VIP in shared RD. Enable Bind Responder Route to ensure that the reverse route uses the same service type.
-
Add a Dynamic NAT rule to InterRD2 using a VIP in shared RD, for example 10.0.0.11. Enable Bind Responder Route to ensure that the reverse route uses the same service type.
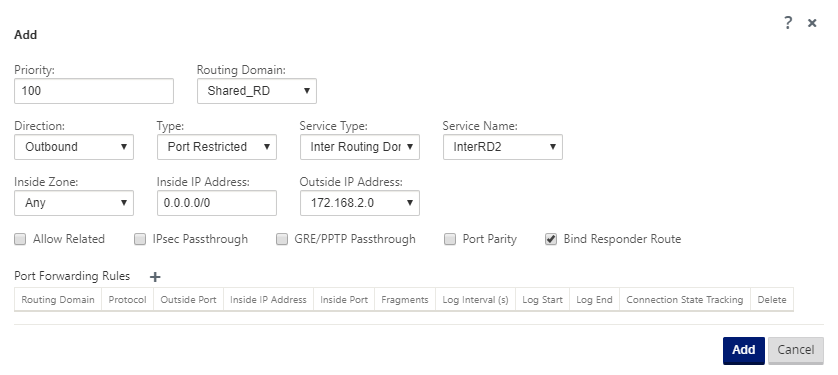
- Use filters to limit what resources in Shared RD are allowed to be accessed by users in RD1/RD2.
Share
Share
This Preview product documentation is Cloud Software Group Confidential.
You agree to hold this documentation confidential pursuant to the terms of your Cloud Software Group Beta/Tech Preview Agreement.
The development, release and timing of any features or functionality described in the Preview documentation remains at our sole discretion and are subject to change without notice or consultation.
The documentation is for informational purposes only and is not a commitment, promise or legal obligation to deliver any material, code or functionality and should not be relied upon in making Cloud Software Group product purchase decisions.
If you do not agree, select I DO NOT AGREE to exit.