-
Configuring the VPN User Experience
-
How to Configure Full VPN Setup on a Citrix Gateway Appliance
-
Integrating the Citrix Gateway plug-in with Citrix Receiver™
-
AlwaysOn VPN before Windows logon (Formally AlwaysOn service)
-
Maintaining and Monitoring the System
-
Deploying with Citrix Endpoint Management, Citrix Virtual Apps, and Citrix Virtual Desktops™
-
Accessing Citrix Virtual Apps and Desktops™ Resources with the Web Interface
-
Integrating Citrix Gateway with Citrix Virtual Apps and Desktops
-
Configuring Additional Web Interface Settings on Citrix Gateway
-
Configuring Access to Applications and Virtual Desktops in the Web Interface
-
-
Integrate Citrix Gateway with Citrix Virtual Apps and Desktops
-
Configuring Settings for Your Citrix Endpoint Management Environment
-
Configuring Load Balancing Servers for Citrix Endpoint Management
-
Configuring Load Balancing Servers for Microsoft Exchange with Email Security Filtering
-
Configuring Citrix Endpoint Management NetScaler® Connector (XNC) ActiveSync Filtering
-
Allowing Access from Mobile Devices with Citrix Mobile Productivity Apps
-
Configuring Domain and Security Token Authentication for Citrix Endpoint Management
-
Configuring Client Certificate or Client Certificate and Domain Authentication
-
-
Citrix Gateway Enabled PCoIP Proxy Support for VMware Horizon View
-
Proxy Auto Configuration for Outbound Proxy support for Citrix Gateway
-
Integrate Citrix Gateway with Citrix Virtual Apps and Desktops
This content has been machine translated dynamically.
Dieser Inhalt ist eine maschinelle Übersetzung, die dynamisch erstellt wurde. (Haftungsausschluss)
Cet article a été traduit automatiquement de manière dynamique. (Clause de non responsabilité)
Este artículo lo ha traducido una máquina de forma dinámica. (Aviso legal)
此内容已经过机器动态翻译。 放弃
このコンテンツは動的に機械翻訳されています。免責事項
이 콘텐츠는 동적으로 기계 번역되었습니다. 책임 부인
Este texto foi traduzido automaticamente. (Aviso legal)
Questo contenuto è stato tradotto dinamicamente con traduzione automatica.(Esclusione di responsabilità))
This article has been machine translated.
Dieser Artikel wurde maschinell übersetzt. (Haftungsausschluss)
Ce article a été traduit automatiquement. (Clause de non responsabilité)
Este artículo ha sido traducido automáticamente. (Aviso legal)
この記事は機械翻訳されています.免責事項
이 기사는 기계 번역되었습니다.책임 부인
Este artigo foi traduzido automaticamente.(Aviso legal)
这篇文章已经过机器翻译.放弃
Questo articolo è stato tradotto automaticamente.(Esclusione di responsabilità))
Translation failed!
Stateless RDP Proxy
The Stateless RDP Proxy accesses a RDP host. Access is granted through the RDPListener on Citrix® Gateway when the user authenticates on a separate Citrix Gateway Authenticator. The information required by the RDPListener for Citrix Gateway is securely stored on a STA Server.
The flow and new knobs created for this functionality are described here.
Prerequisites
-
User is authenticated on Citrix Gateway authenticator.
-
The initial /rdpproxy URL and RDP Client are connected to a different RDPListener Citrix Gateway.
-
The RDPListener Gateway information is securely passed by the Authenticator Gateway using a STA Server.
Configuration
-
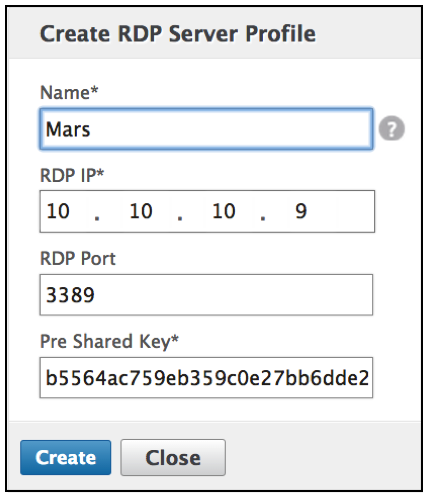
Add a new rdpServer profile. The server profile is configured on the RDPListener Gateway.
 add rdpServer Profile [profilename] -rdpIP [IPV4 address of the RDP listener] -rdpPort [port for terminating RDP client connections] -psk [key to decrypt RDPTarget/RDPUser information, needed while using STA].
 <!--NeedCopy-->
For stateless RDP proxy, the STA Server validates the STA ticket, which is sent by the RDP client, to obtain the RDP Target/RDPUser information.
The rdpServer Profile is configured on the vpn virtual server using the following command:
 add vpn vserver v1 SSL [publicIP] [portforterminatingvpnconnections] -rdpServerProfile [rdpServer Profile]
 <!--NeedCopy-->
Warning Once the rdpServerProfile is configured on the vpn vserver, it cannot be modified. Also, the same serverProfile cannot be reused on another vpn vserver.
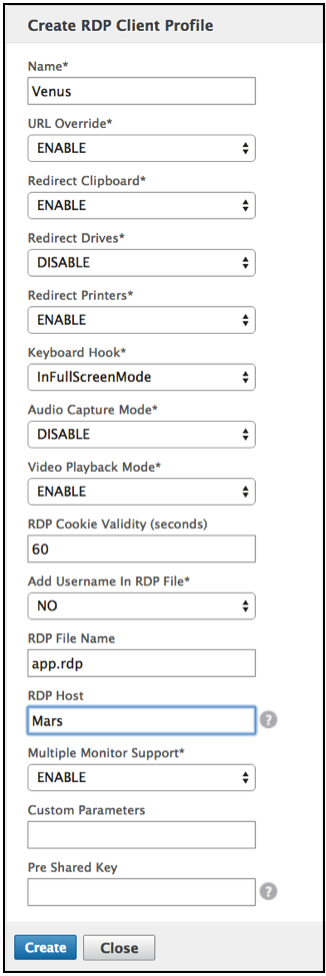
The rdp profile command was renamed as rdpClient profile and has new parameters. The multiMonitorSupport command was added. Also, an option to configure custom params, which are not supported as part ofthe RDP client profile, has been added. The clientSSL param was removed, since the connection is always secured. The client profile is configured on the authenticator Gateway.
add rdpClient profile <name> -rdpHost <optional FQDN that will be put in the RDP file as ‘fulladdress’> \[-rdpUrlOverride \( ENABLE | DISABLE )] \[-redirectClipboard \( ENABLE | DISABLE )] \[-redirectDrives \( ENABLE | DISABLE )]

        \[-redirectPrinters \( ENABLE | DISABLE )] \[-keyboardHook <keyboardHook>] \[-audioCaptureMode \( ENABLE | DISABLE )] \[-videoPlaybackMode \( ENABLE | DISABLE )]

        \[-rdpCookieValidity <positive\_integer>]\[-multiMonitorSupport \( ENABLE | DISABLE )] \[-rdpCustomParams <string>] The –rdpHost configuration is used in a single Gateway deployment.
- Associate the RDP Profile with the vpn virtual server.
This can be done either by configuring a sessionAction+sessionPolicy or by setting the global vpn parameter.
Example
add vpn sessionaction <actname> -rdpClientprofile <rdpprofilename>

add vpn sessionpolicy <polname> NS_TRUE <actname>

bind vpn vserver <vservername> -policy <polname> -priority <prioritynumber>

OR

set vpn parameter –rdpClientprofile <name>
Connection Counter
A new connection counter ns_rdp_tot_curr_active_conn was added, which keeps the record of number of active connections in use. It can be viewed as a part of nsconmsg command on NetScaler shell. Later, we will be providing a new CLI command to view this counters.
Connection Flow
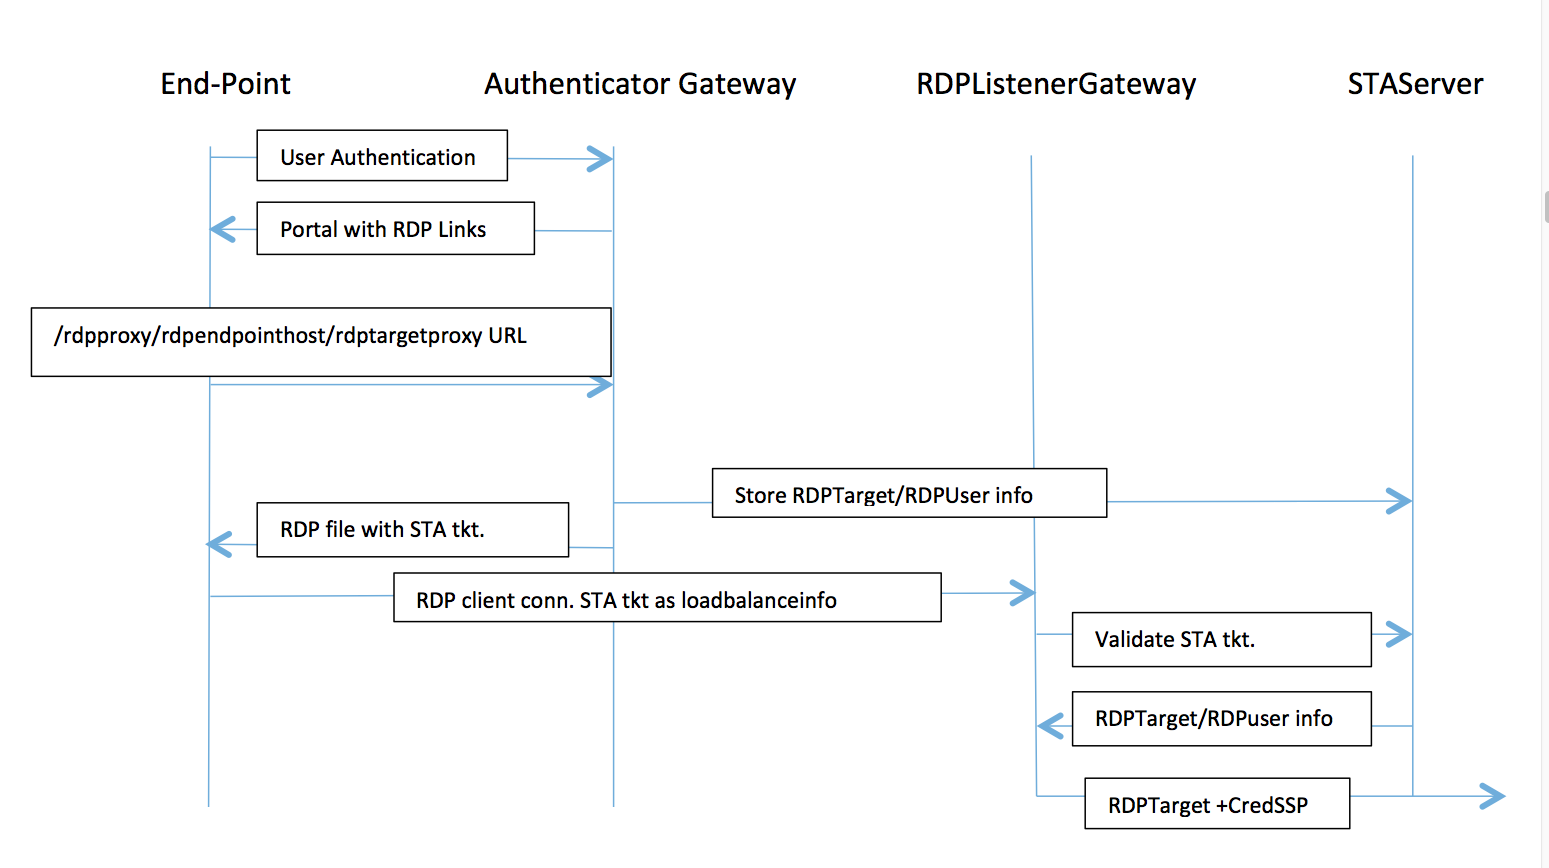
There are two connections involved in the RDP Proxy flow. The first connection is the user’s SSL VPN connection to the Citrix Gateway VIP, and enumeration of the RDP resources.
The second connection is the native RDP client connection to the RDP listener (configures using rdpIP and rdpPort) on the Citrix Gateway, and subsequent proxying of the RDP client to server packets securely.
-
User connects to the Authenticator Gateway VIP and provides his/her credentials.
-
After successful login to the Gateway, user is redirected to the homepage/external portal which enumerates the remote desktop resources that the user can access.
-
Once the user selects a RDP resource, a request is received by the Authenticator Gateway VIP, in the format
https://AGVIP/rdpproxy/ip:port/rdptargetproxyindicating the published resource that the user clicked. This request has the information about the IP and port of the RDP server that the user has selected. -
The /rdpproxy/ request is processed by the Authenticator Gateway. Since the user is already authenticated, this request comes with a valid Gateway cookie.
-
The RDPTarget and RDPUser information is stored on the STA server and a STA Ticket is generated. The information is stored as an XML blob which is optionally encrypted using the configured pre-shared key. If encrypted, the blob is base64 encoded and stored. The Authenticator Gateway will use one of the STA servers that is configured on the Gateway Vserver.
-
The XML blob will be in the following format
<Value name=”IPAddress”>ipaddr</Value>\n<Value name=”Port”>port</Value>\n
<Value name=”Username”>username</Value>\n<Value name=”Password”>pwd</Value>
-
The “rdptargetproxy” obtained in the /rdpproxy/ request is put as the ‘fulladdress’ and the STA ticket (pre-pended with the STA AuthID) is put as the ‘loadbalanceinfo’ in the .rdp file.
-
The .rdp file is sent back to the client end-point.
-
The native RDP client launches and connects to the RDPListener Gateway. It sends the STA ticket in the initial x.224 packet.
-
The RDPListener Gateway validates the STA ticket and obtains the RDPTarget and RDPUser information. The STA server to be used is retrieved using the ‘AuthID’ present in the loadbalanceinfo.
-
A Gateway session is created for storing authorization/auditing policies. If a session already exists for the user, it is re-used.
-
The RDPListener Gateway connects to the RDPTarget and single signs on using CREDSSP.
Single Gateway Compatibility
If the RDP file is generated using the /rdpproxy/rdptarget/rdptargetproxy URL, we will generate a STA ticket, otherwise the current method of the ‘loadbalanceinfo’ referring to the session directly will be used.
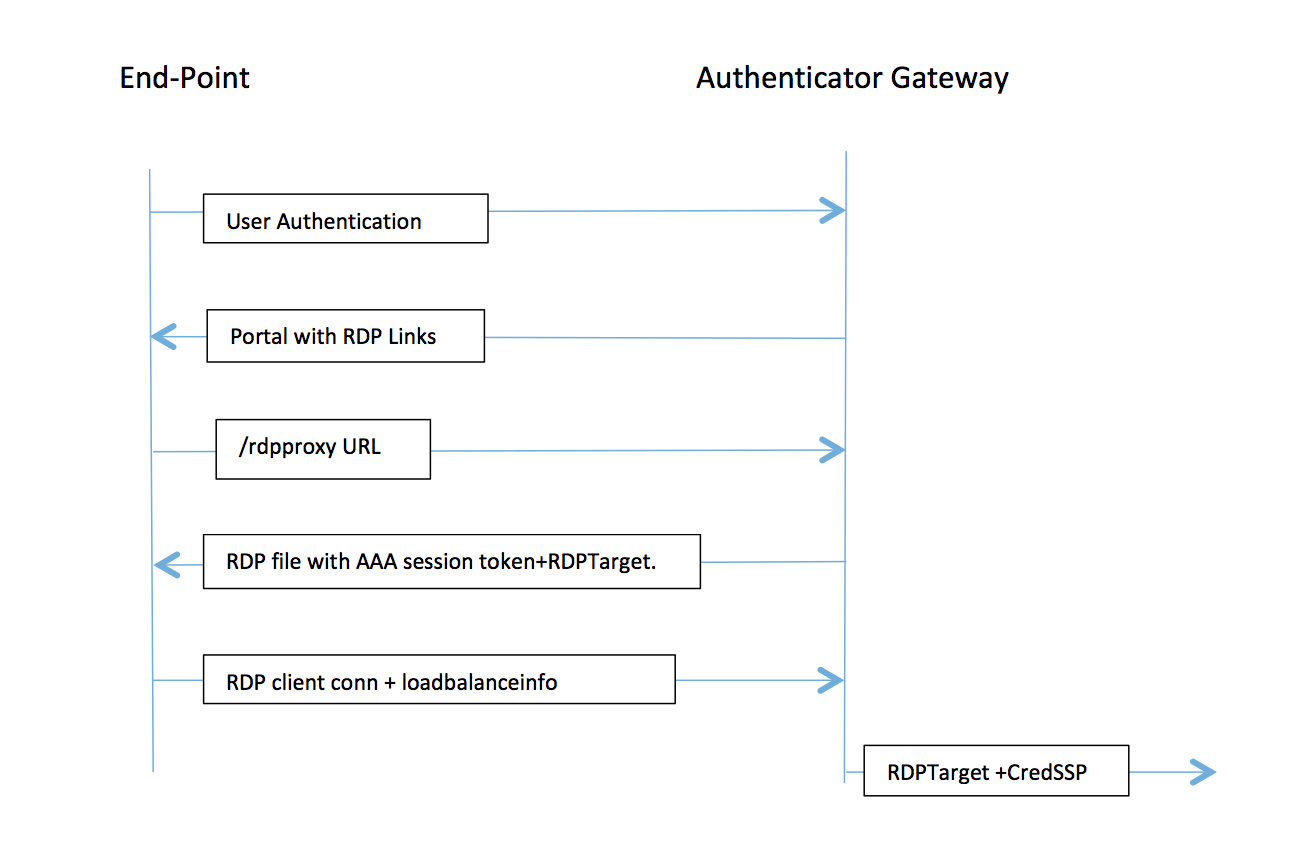
In case of a single gateway deployment, the /rdpproxy URL comes to the Authenticator Gateway itself. A STA server is not required. The authenticator gateway encodes the RDPTarget and the AAA session cookie securely and sends this as the ‘loadbalanceinfo’ in the .rdp file. When the RDP Client sends this token in the x.224 packet, the authenticator gateway decodes the RDPTarget information, looks up the session and connects to the RDPTarget.
Upgrade Notes
Earlier configuration doesn’t work with this new release, since the parameters rdpIP and rdpPort, which were earlier configured on vpn vserver has been updated to be part of the rdpServerProfile and ‘rdp Profile’ has been renamed as ‘rdp ClientProfile’ and the old parameter clientSSL has been removed.
Create RDP Server Profile
-
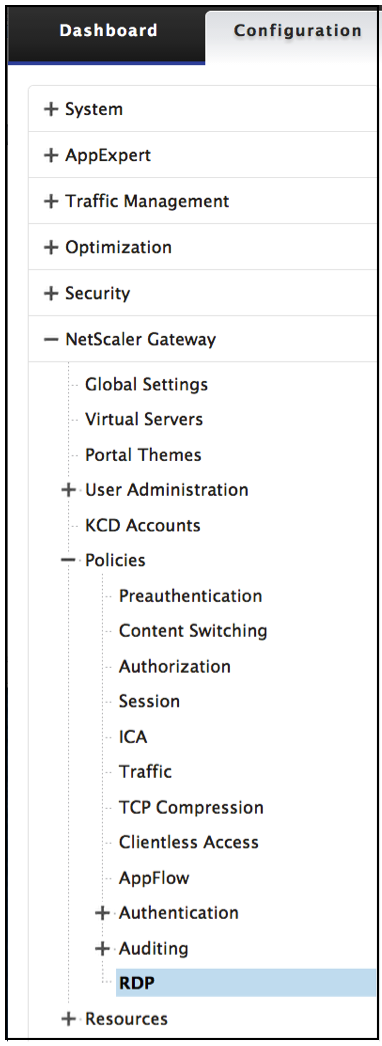
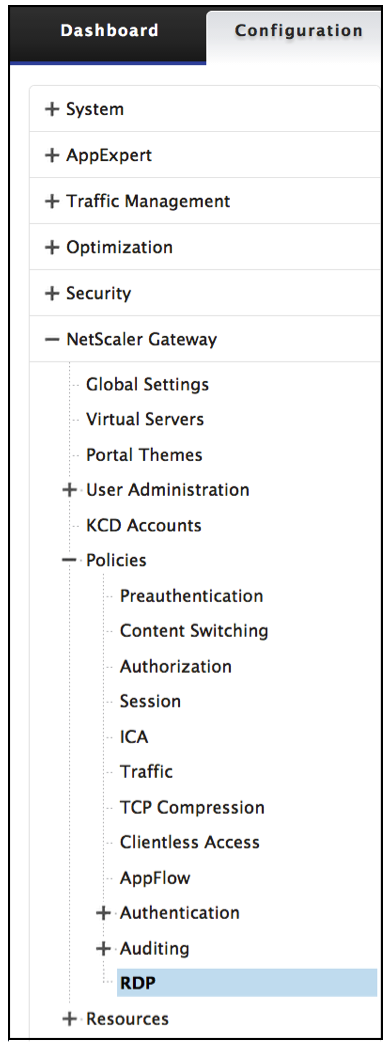
Go to Citrix Gateway > Policies > RDP.
-
Go to Server Profiles tab and click Add.

-
Enter the following information to create the RDP Server Profile.
Configure RDP Client Profile
-
Go to Citrix Gateway > Policies > RDP
-
Go to Client Profiles tab and click Add.

-
Enter the following information to configure the RDP Server Profile.
Setup a Virtual Server
-
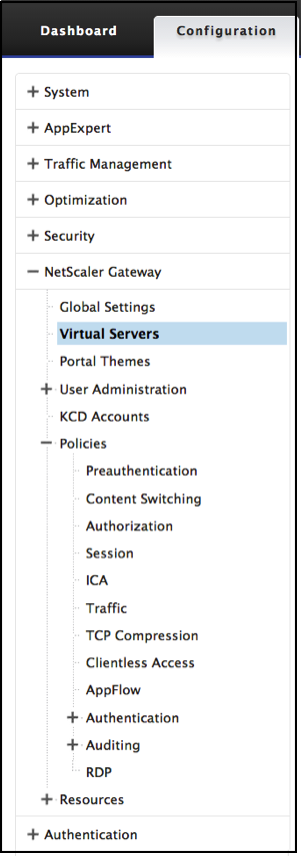
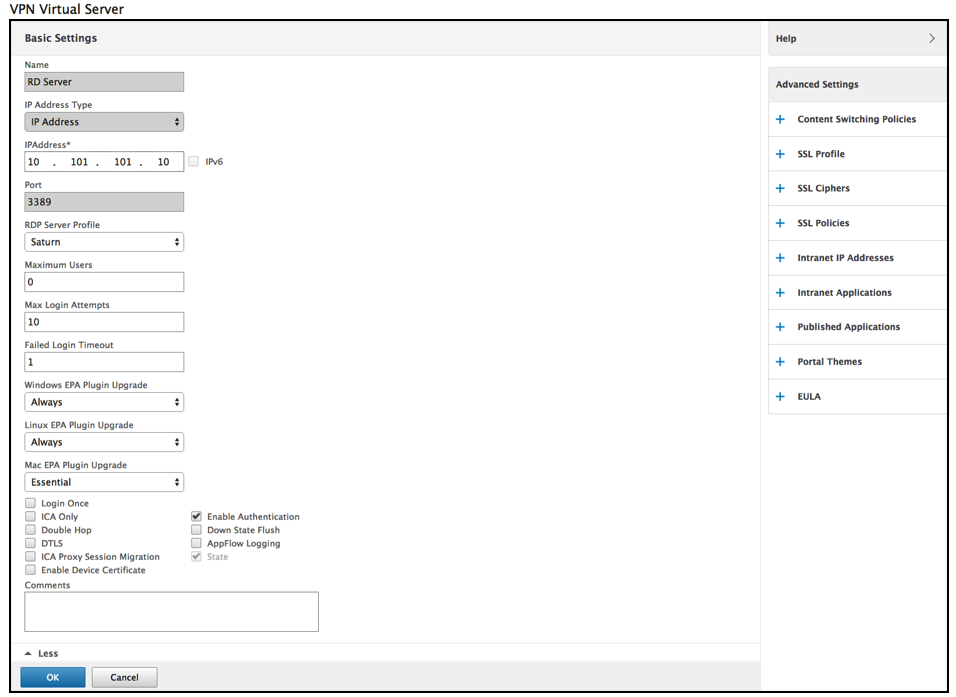
Go to Citrix Gateway > Virtual Server.
-
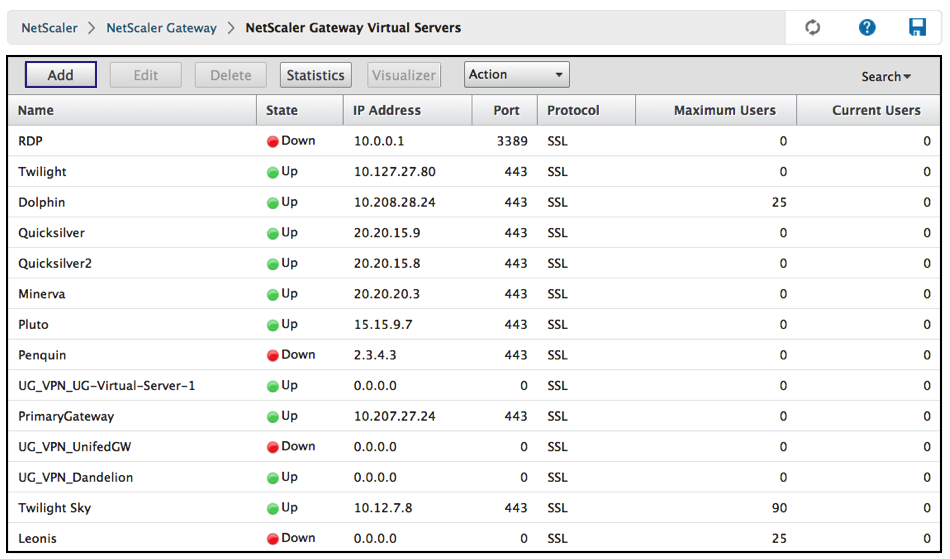
Click Add to create a new RDP Server.
-
Complete the data on this Basic Settings page and click OK.
-
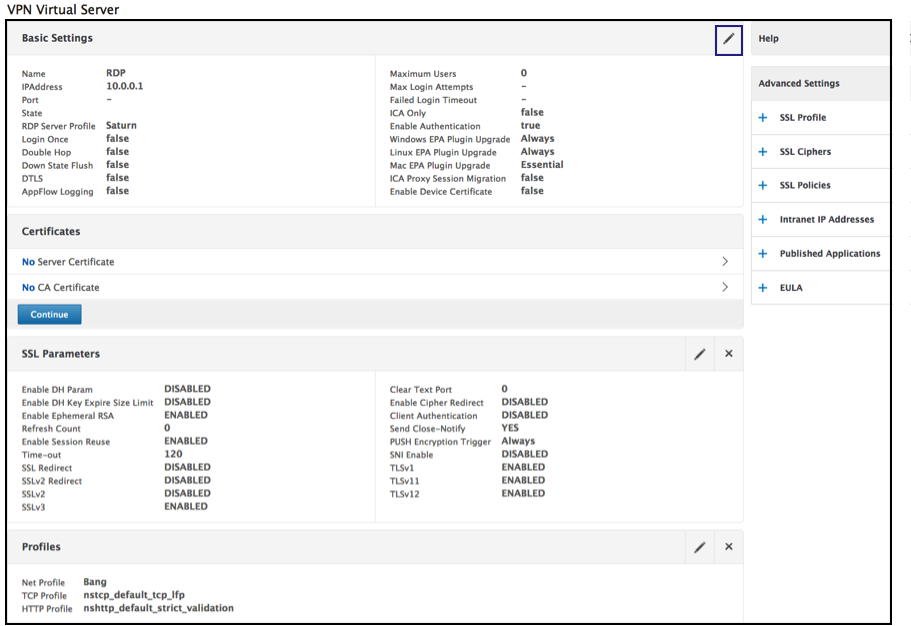
Click the pencil to edit the page.
Share
Share
This Preview product documentation is Cloud Software Group Confidential.
You agree to hold this documentation confidential pursuant to the terms of your Cloud Software Group Beta/Tech Preview Agreement.
The development, release and timing of any features or functionality described in the Preview documentation remains at our sole discretion and are subject to change without notice or consultation.
The documentation is for informational purposes only and is not a commitment, promise or legal obligation to deliver any material, code or functionality and should not be relied upon in making Cloud Software Group product purchase decisions.
If you do not agree, select I DO NOT AGREE to exit.