-
Install and configure the NetScaler Gateway appliance
-
Maintain and monitor NetScaler Gateway systems
-
Configure DTLS VPN virtual server using SSL VPN virtual server
-
Integrate NetScaler Gateway with Citrix products
-
Integrate NetScaler Gateway with StoreFront
-
Integrate NetScaler Gateway with Citrix Virtual Apps and Desktops
-
Configure settings for your Citrix Endpoint Management Environment
-
Configure load balancing servers for Citrix Endpoint Management
-
Configure load balancing servers for Microsoft Exchange with Email Security Filtering
-
Configure Citrix Endpoint Management NetScaler Connector (XNC) ActiveSync Filtering
-
Allow Access from mobile devices with Citrix Mobile Productivity Apps
-
Configure domain and security token authentication for Citrix Endpoint Management
-
Configure client certificate or client certificate and domain authentication
-
-
NetScaler Gateway Enabled PCoIP Proxy Support for VMware Horizon View
-
Proxy Auto Configuration for Outbound Proxy support for NetScaler Gateway
This content has been machine translated dynamically.
Dieser Inhalt ist eine maschinelle Übersetzung, die dynamisch erstellt wurde. (Haftungsausschluss)
Cet article a été traduit automatiquement de manière dynamique. (Clause de non responsabilité)
Este artículo lo ha traducido una máquina de forma dinámica. (Aviso legal)
此内容已经过机器动态翻译。 放弃
このコンテンツは動的に機械翻訳されています。免責事項
이 콘텐츠는 동적으로 기계 번역되었습니다. 책임 부인
Este texto foi traduzido automaticamente. (Aviso legal)
Questo contenuto è stato tradotto dinamicamente con traduzione automatica.(Esclusione di responsabilità))
This article has been machine translated.
Dieser Artikel wurde maschinell übersetzt. (Haftungsausschluss)
Ce article a été traduit automatiquement. (Clause de non responsabilité)
Este artículo ha sido traducido automáticamente. (Aviso legal)
この記事は機械翻訳されています.免責事項
이 기사는 기계 번역되었습니다.책임 부인
Este artigo foi traduzido automaticamente.(Aviso legal)
这篇文章已经过机器翻译.放弃
Questo articolo è stato tradotto automaticamente.(Esclusione di responsabilità))
Translation failed!
Integrate NetScaler Gateway with StoreFront
This article describes how to create a NetScaler Gateway virtual server for remotely accessing StoreFront, for users who are using Citrix Workspace app or a web browser.
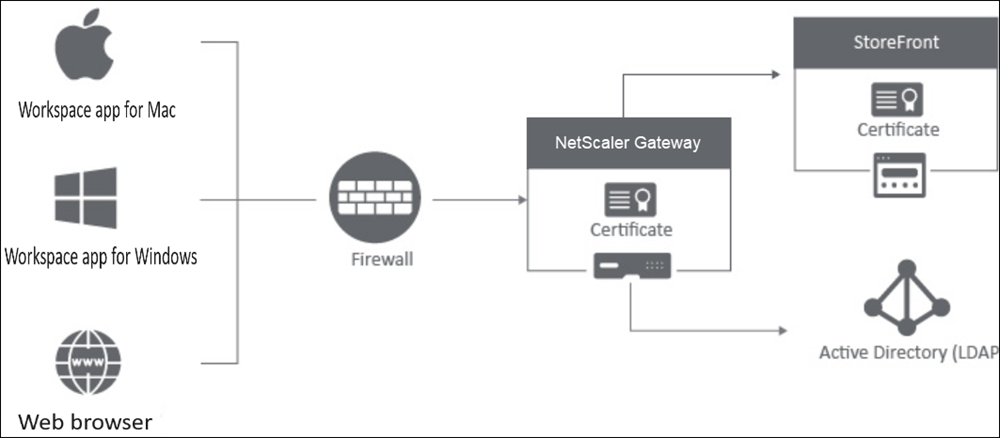
Users connect to NetScaler Gateway through a web browser or Citrix Workspace app. NetScaler Gateway authenticates users based on the configured policies. If the authentication is successful, then NetScaler Gateway enables the users to single sign-on to the store and proxies the StoreFront store to the user.
Important:
We recommend that you do not use the Citrix Virtual Apps and Desktops wizard to integrate NetScaler Gateway with StoreFront as it creates an invalid configuration by using the classic authentication policies (deprecated).
Configure NetScaler Gateway to use with StoreFront
To integrate NetScaler Gateway with StoreFront, complete the following steps:
- Create a session policy for web browser-based access
- Create a session policy for Citrix Workspace app-based access
- Create an authentication profile
- Create a NetScaler Gateway virtual server
-
Add the NetScaler Gateway instance on StoreFront

1. Create a session policy for web browser-based access
-
Navigate to Configuration > NetScaler Gateway > Policies > Session.
-
In the Session Profiles tab, click Add.
-
Assign a name to the session profile.
-
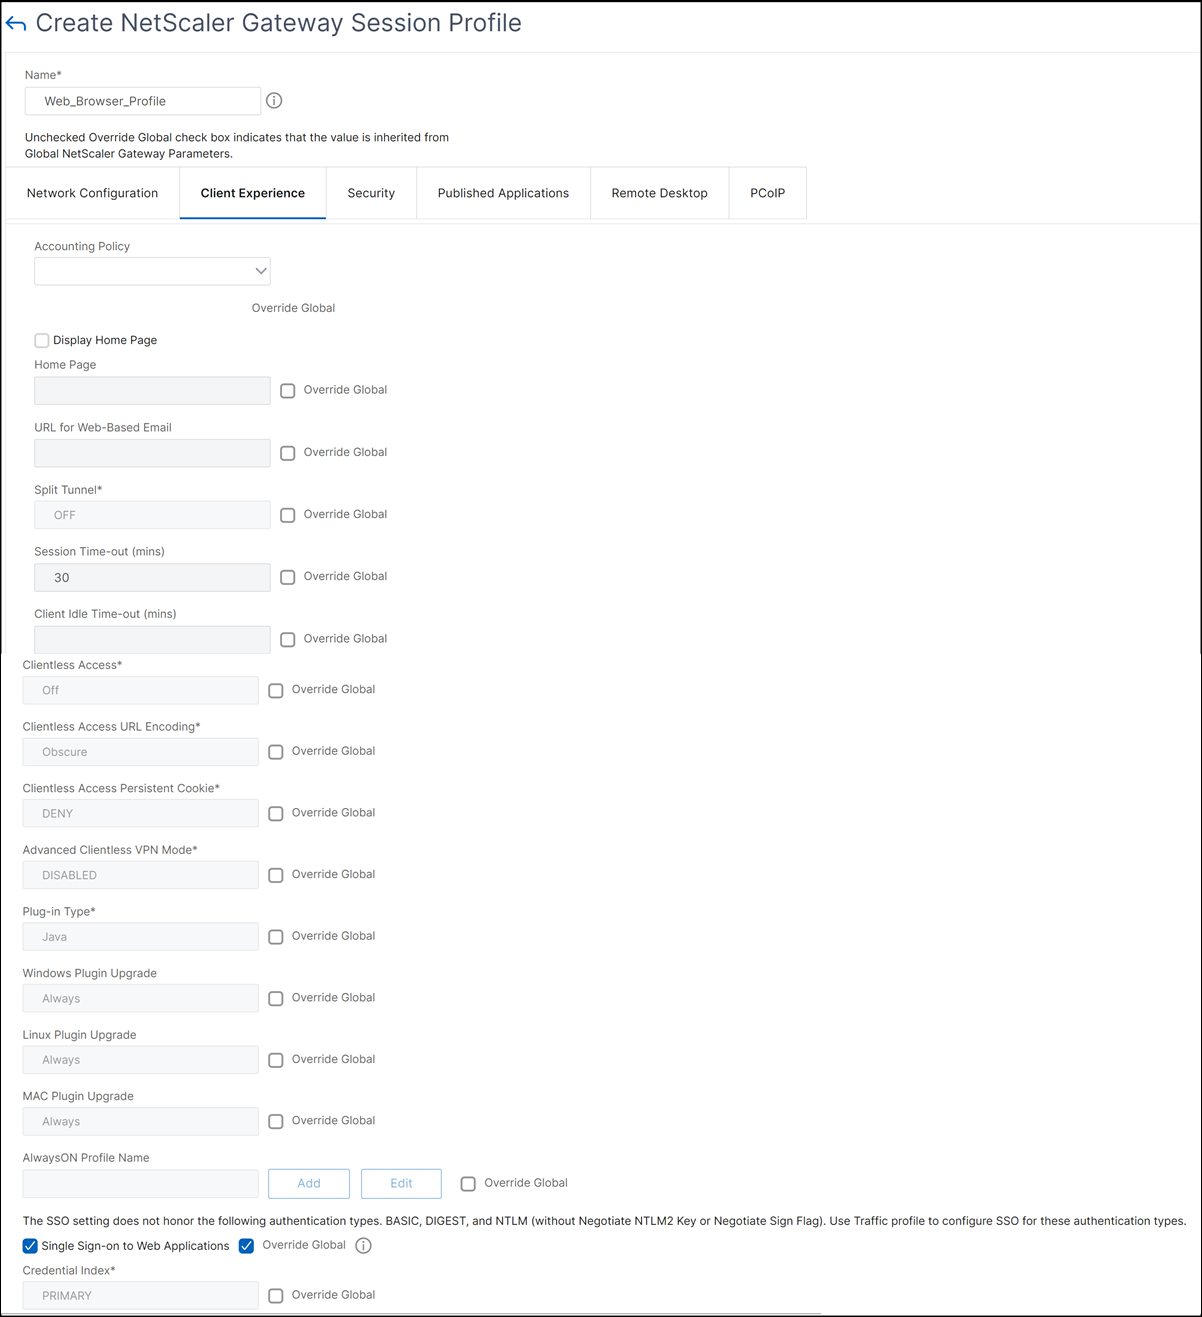
In the Client Experience tab, enable the following settings:
- Session Time-out (mins): It is recommended that you select Override Global even if you intend to use the global session timeout settings. Failing to explicitly override this setting, even when using the default 30-minute timeout, can lead to authentication loops and force users to re-login.
- Plug-in Type: The plug-in type is set to Java, by default. Although this setting is optional, it is recommended if users want to disable the full VPN.
- Single Sign-on to Web Application: By selecting this option, when a user logs on to NetScaler Gateway, it forwards the credentials to the StoreFront website. This setting avoids users from having to enter their credentials twice. However, you must also enable the Pass-through from NetScaler Gateway authentication method on StoreFront. Disable this option if you require users to log on to NetScaler Gateway and the StoreFront store with different credentials.
-
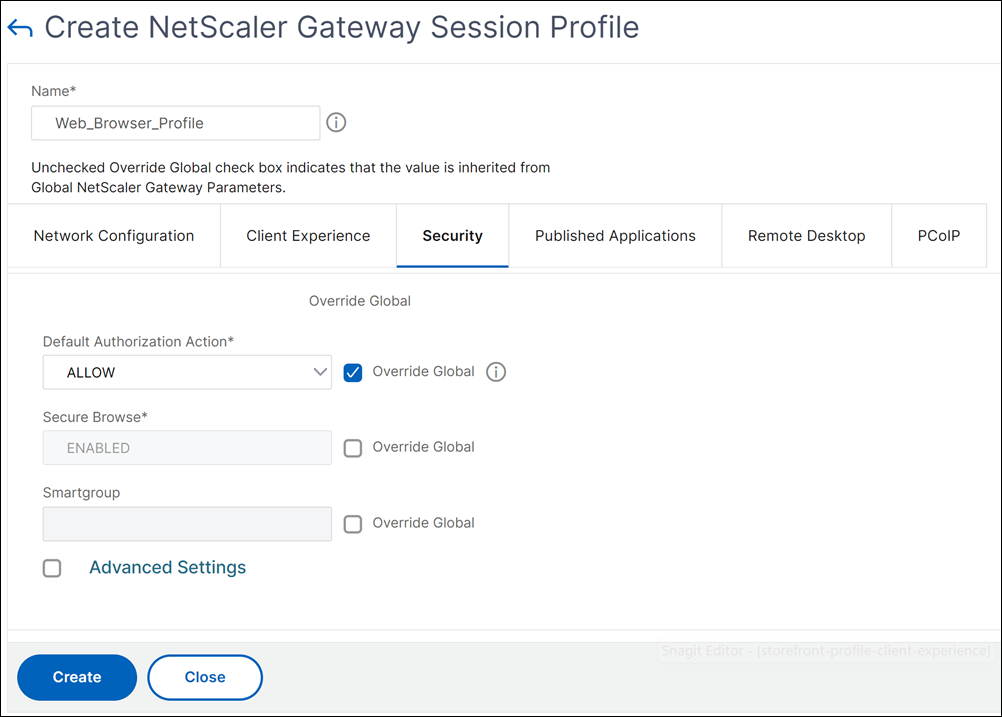
In the Security tab, enable Default Authorization Action and set it to ALLOW.
-
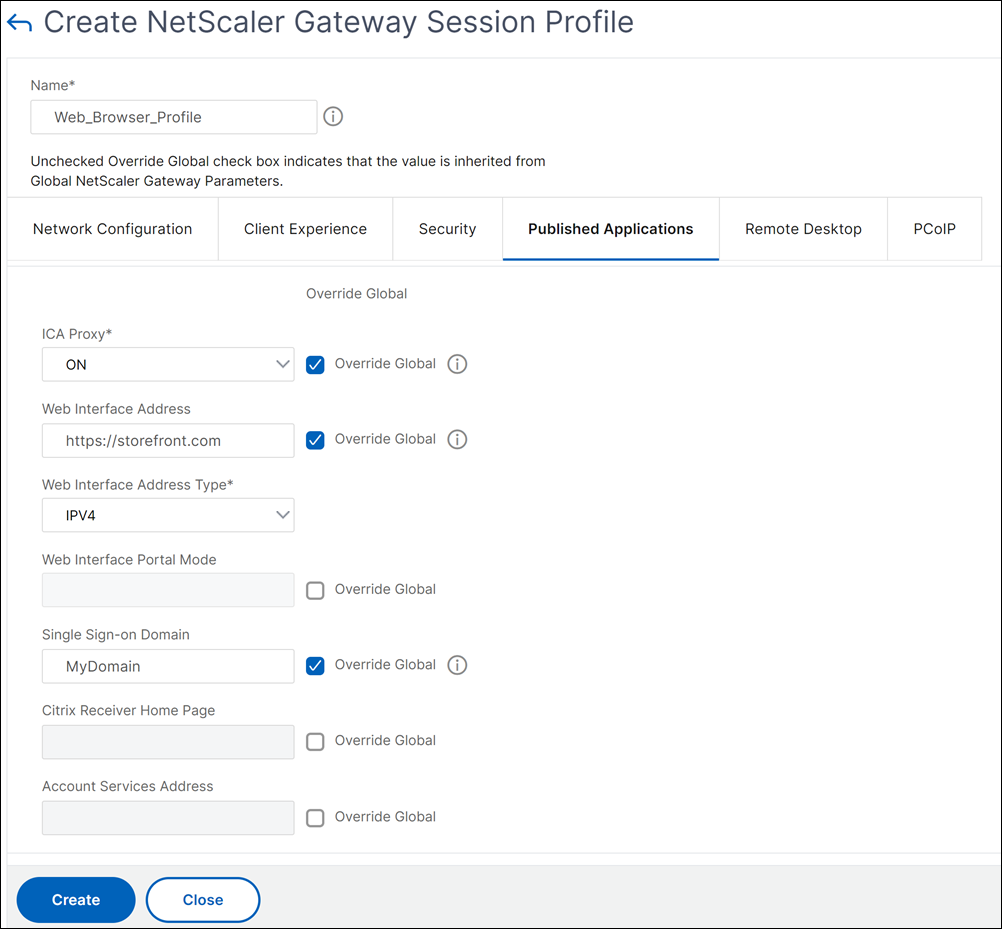
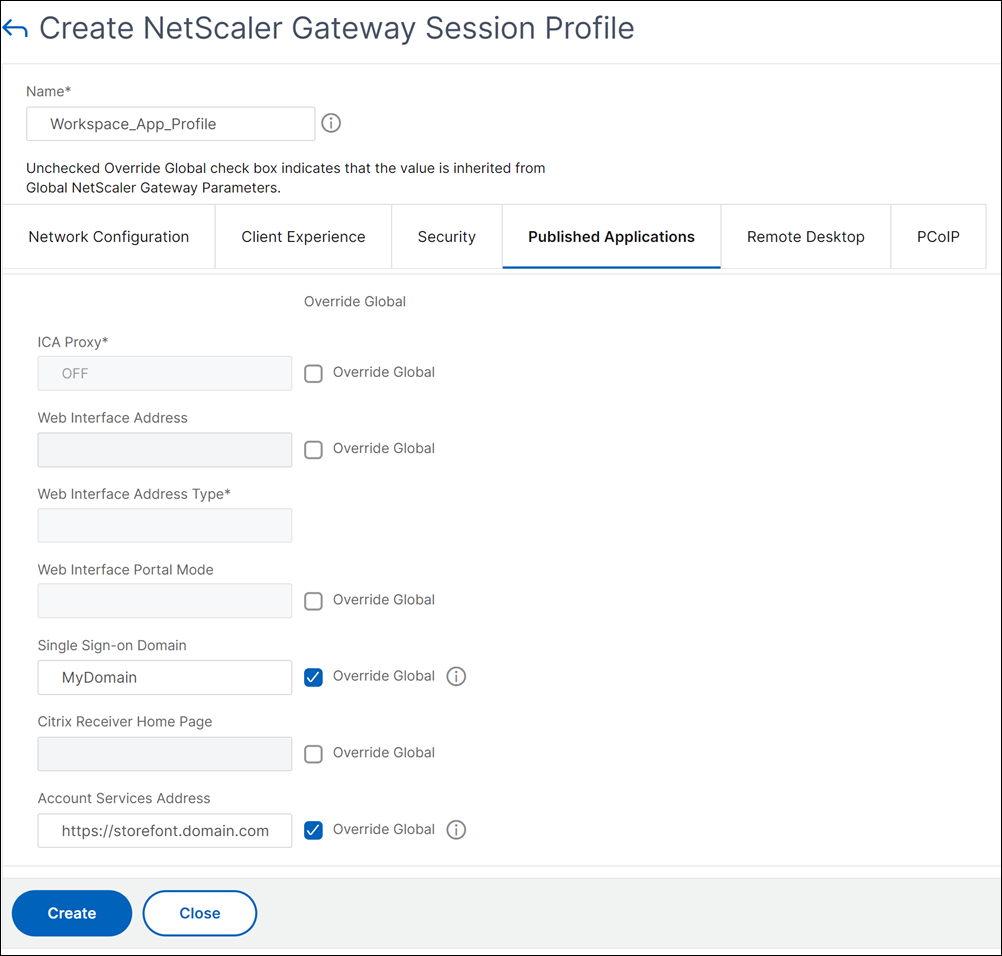
In the Published Applications tab, enable the following settings:
- ICA Proxy: Set to ON.
- Web Interface Address: FQDN of the StoreFront server followed by the path to the store website.
- Single Sign-on Domain: If you only use one domain, optionally enter the NetBIOS name for the domain.
-
Click Create.
-
In the Session Policies tab, click Add. The session policy is required for NetScaler to differentiate between the web browser-based and Citrix Workspace app-based connections. This policy is applied to web browser-based connections.
-
In Name, assign a name to session policy.
-
In Profile, select the session profile that you created.
-
Click the Advanced Policy option and enter the following syntax under Expression:
HTTP.REQ.HEADER("User-Agent").CONTAINS("CitrixReceiver").NOT -
Click Create.

For more details about NetScaler Gateway session policies, see Session policies.
2. Create a session policy for Citrix Workspace app-based access
Repeat the preceding steps to create a session policy and session profile for Citrix Workspace app-based access. However, in the Published Applications tab, instead of configuring the web interface address, you must configure the Account service address setting. This step requires you to provide the FQDN of the StoreFront server. Citrix Workspace app uses this address to discover the stores that are available on the server.
3. Create an authentication profile
Create an authentication profile on NetScaler based on the type of authentication method that you need to configure.
Although this step is optional, we recommend it as a good practice to use NetScaler Gateway to authenticate identity of the users before granting access to StoreFront.
Refer to Authentication and Authorization for more details.
4. Create a NetScaler Gateway virtual server
-
Navigate to NetScaler Gateway > Virtual Servers.
-
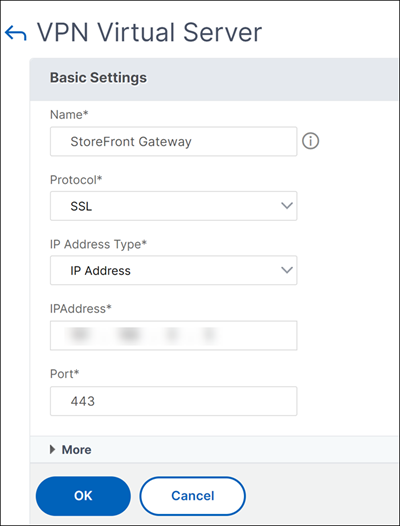
Click Add to add a NetScaler Gateway virtual server.
-
Assign a name and address to the virtual server.
Note:
If you choose not to use NetScaler Gateway to authenticate the users, click More and clear the Enable Authentication checkbox.
-
Under Certificate, Click Server Certificate.
-
Upload a server certificate and click Bind.
-
Add the session policies:
- Under Policies, click +.
- From the Choose Policy drop-down list, select Session. From the Type drop-down list, select Request and then click Continue.
- Under Policy Binding, click Select Policy and select the web browser-based session policy and the Citrix Workspace app-based session policy that you previously created and click Bind to bind the session policies to the virtual server.
-
Under Published Applications, click STA Server. Specify at least one Security Ticket Authority (STA) URL. If you are using Citrix Virtual Apps and Desktops, enter the URLs of the Desktop Delivery Controllers. If you are using Citrix DaaS, enter the URLs of the Citrix Cloud Connectors.
-
Under Authentication Profile, select the authentication profile you created. This step is required because classic policies are no longer supported.
-
Click Done.
5. Add a NetScaler Gateway instance on StoreFront
For instructions on how to add a NetScaler Gateway instance on StoreFront, see Configure NetScaler Gateways.
References
For more details on StoreFront and NetScaler Gateway integration, refer to the following topics:
Share
Share
In this article
This Preview product documentation is Cloud Software Group Confidential.
You agree to hold this documentation confidential pursuant to the terms of your Cloud Software Group Beta/Tech Preview Agreement.
The development, release and timing of any features or functionality described in the Preview documentation remains at our sole discretion and are subject to change without notice or consultation.
The documentation is for informational purposes only and is not a commitment, promise or legal obligation to deliver any material, code or functionality and should not be relied upon in making Cloud Software Group product purchase decisions.
If you do not agree, select I DO NOT AGREE to exit.