Migrate the configuration of a NetScaler instance across SDX appliances
Before you migrate the NetScaler instance configuration to a new SDX appliance, you must first set up the new SDX appliance.
The following table lists the device names involved in the migration process:
| Term | Description |
|---|---|
| SDX-OLD-A1, SDX-OLD-A2 | Name of the old SDX platform |
| SDX-NEW-A1, SDX-NEW-A2 | Name of the new SDX platform |
| VPX-OLD-A1, VPX-OLD-A2 | Name of the VPX instance hosted on the old SDX platform |
| VPX-NEW-A1, VPX-NEW-A2 | Name of the VPX instance hosted on the new SDX platform |
The following images explain the migration process, showing the current, interim, and final states for the High Availability (HA) configurations.
Figure 1. Current state
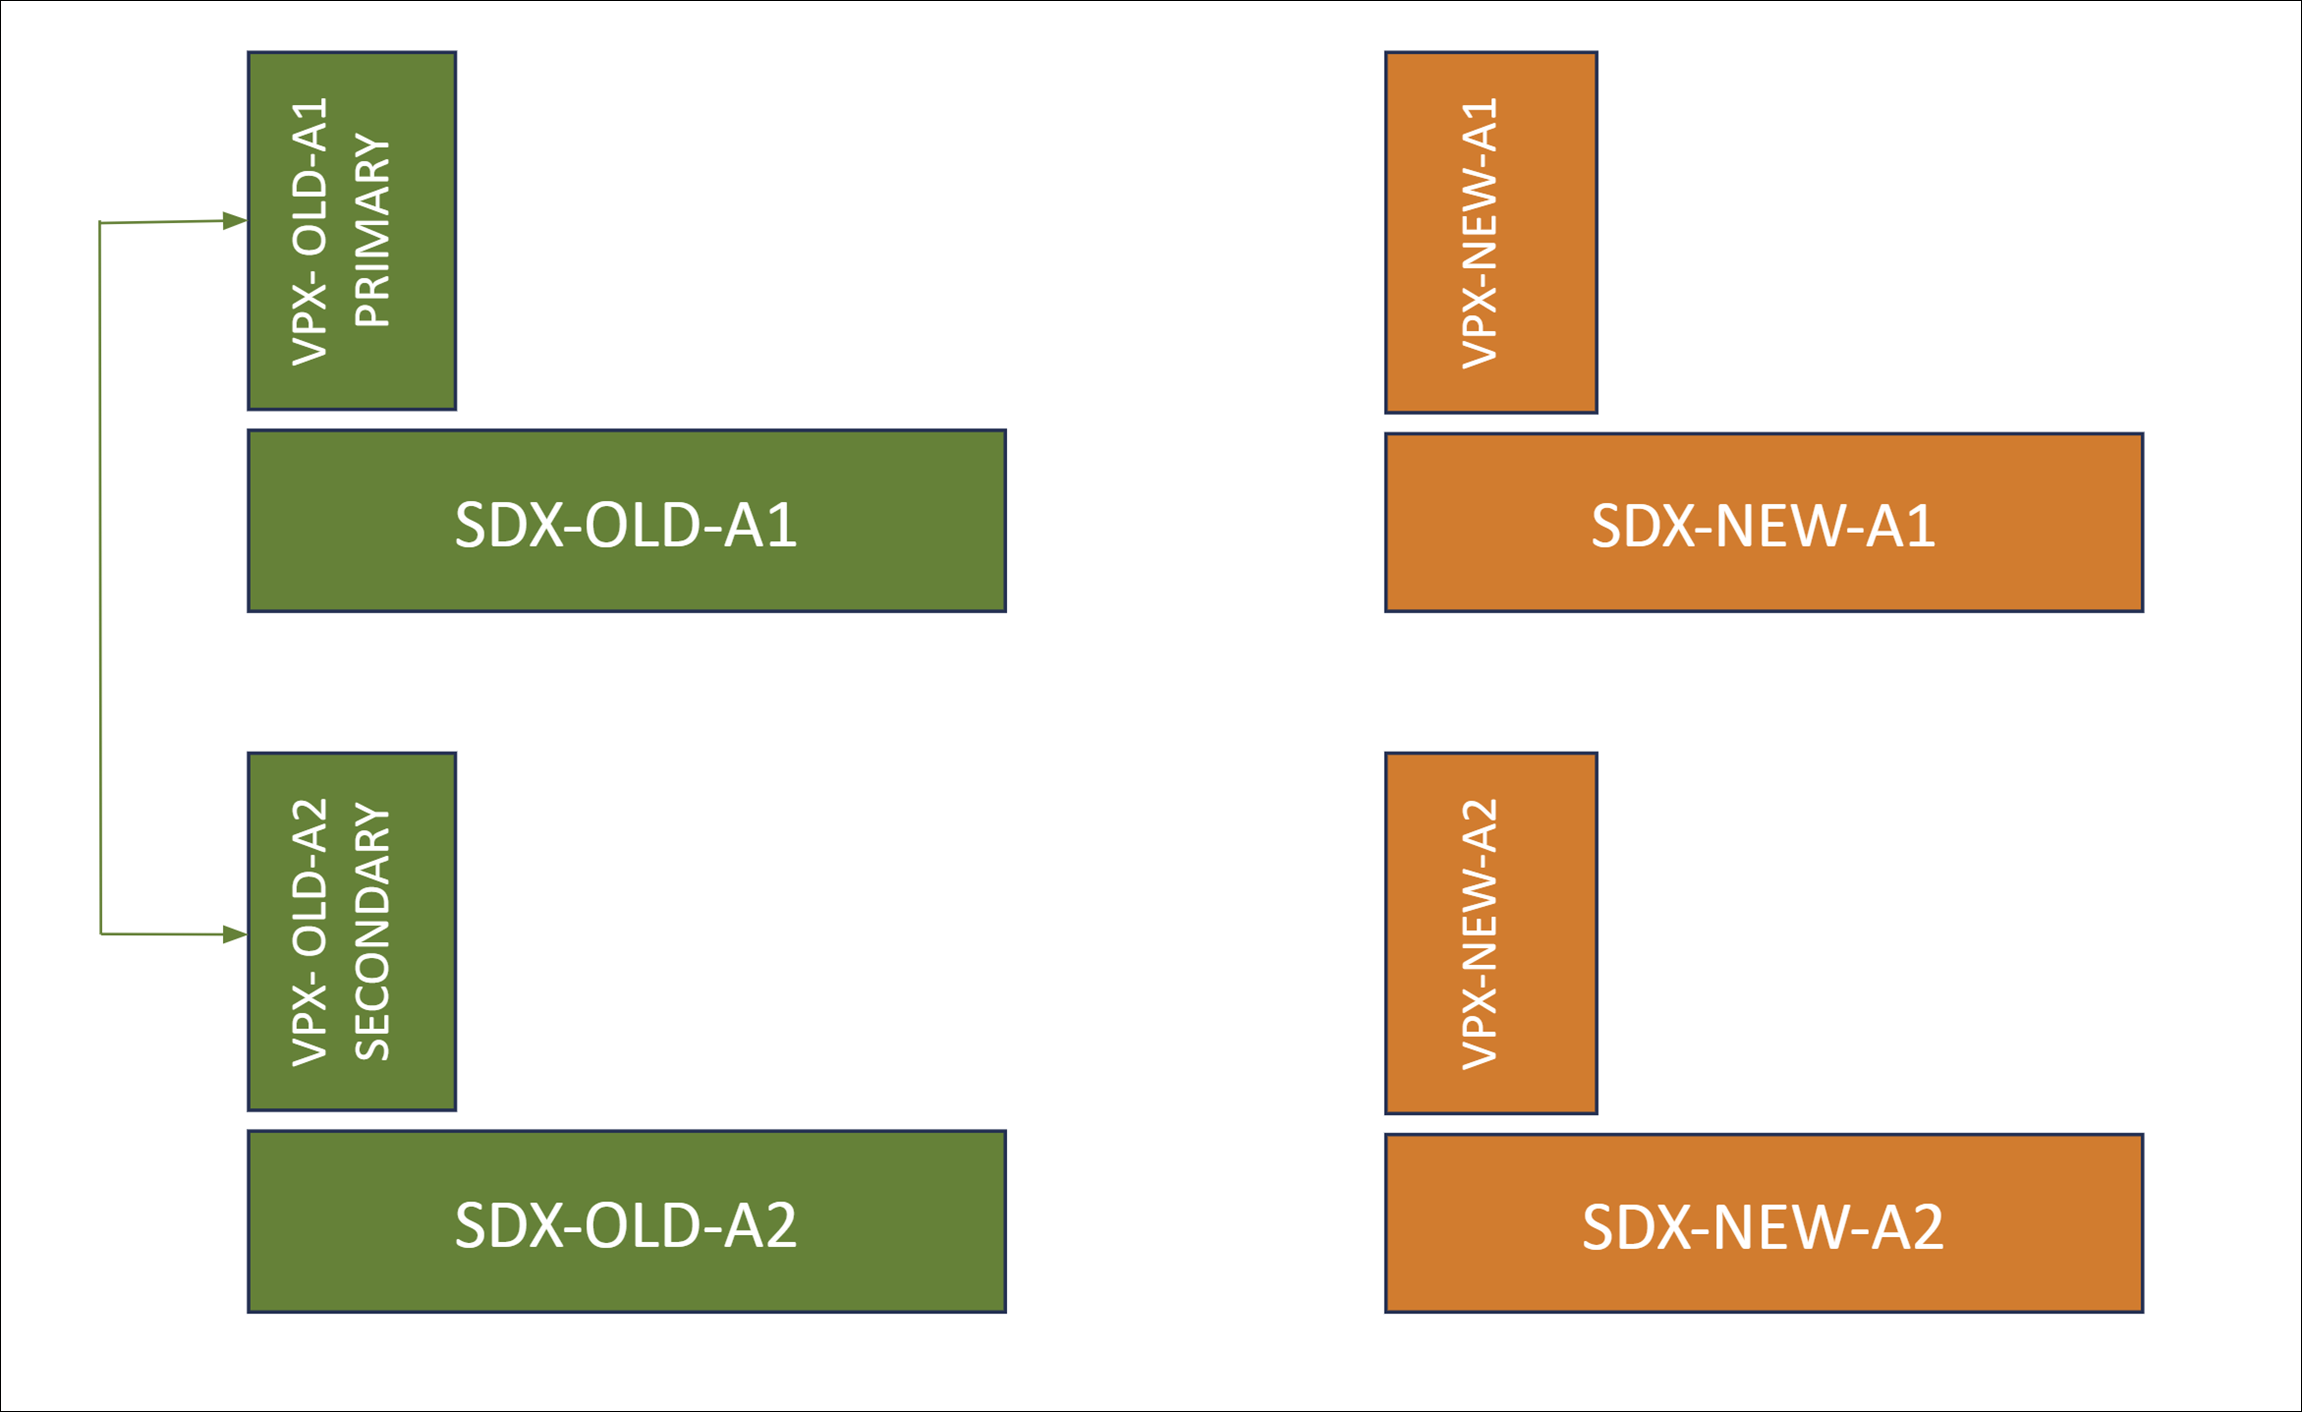
Figure 2. Interim state
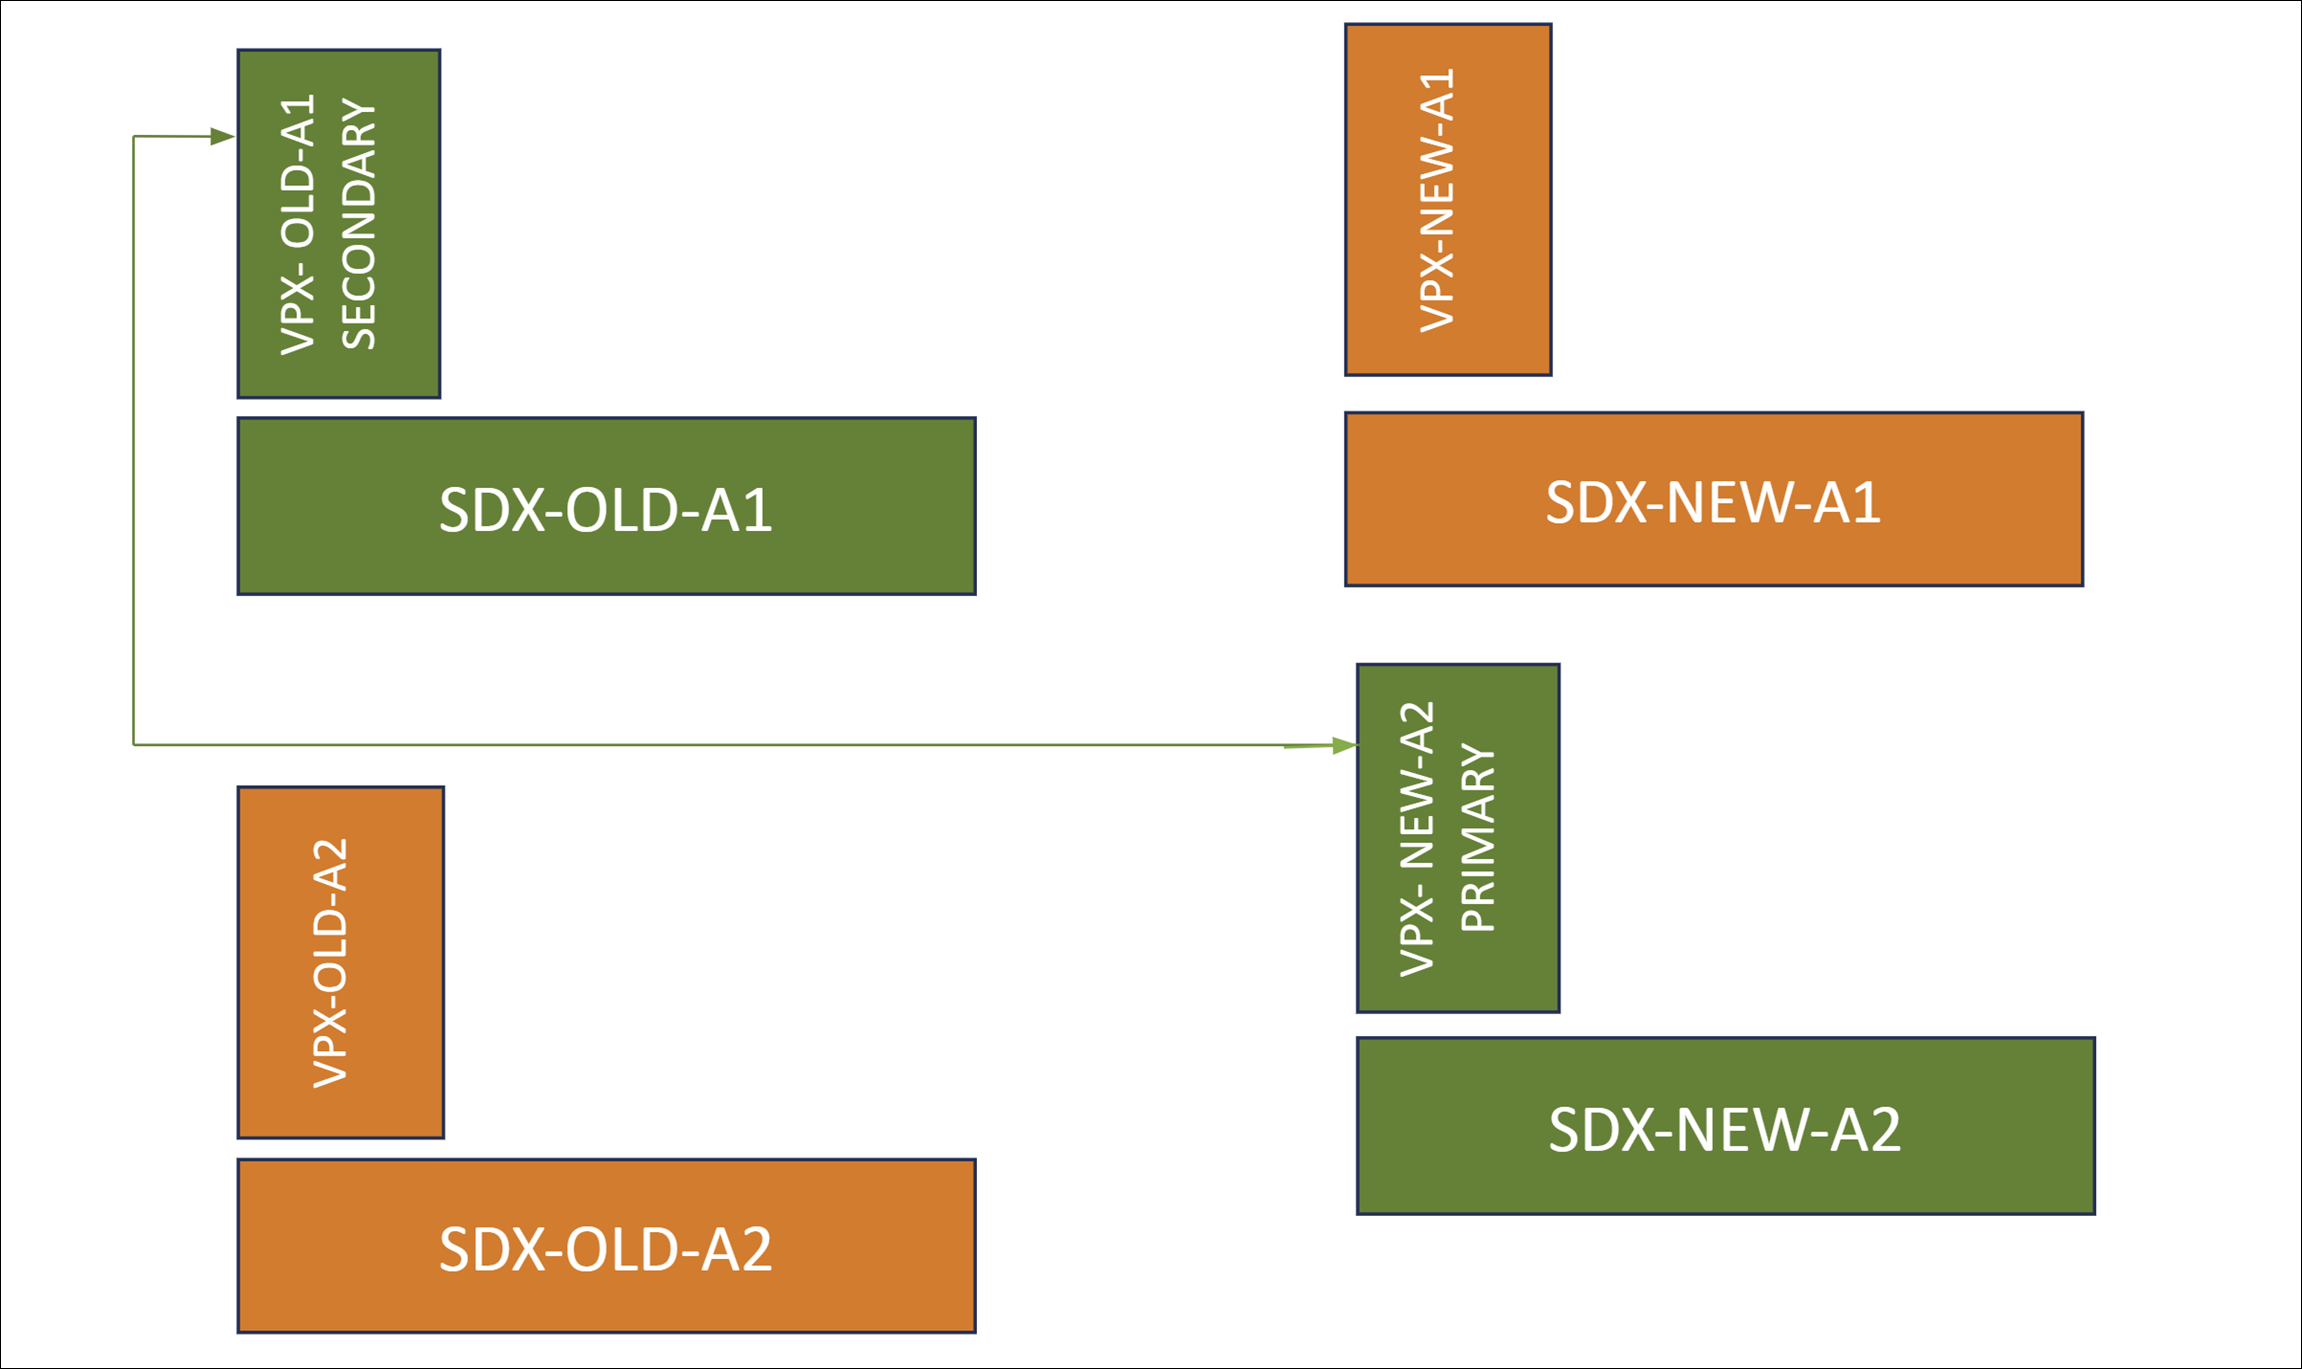
Figure 3. Desired state

The following table explains the color legends used in the diagram:
| Color legends | Description |
|---|---|
| Green | Represents the platforms and instances in their current or desired state. |
| Orange | Represents the platforms and instances undergoing transition or pending migration. |
Prerequisites
-
Upgrade the new SDX appliance (SDX-NEW-A2) to the same build version as the older one. If the build on the old SDX appliance is not supported on the new SDX, first upgrade the older SDX appliance to a build that is supported on the new SDX.
-
In the new SDX appliance (SDX-NEW-A2), complete the initial configuration, including setting up usernames, passwords, IP addresses, and gateway configurations.
-
If any specific configurations exist on the old SDX appliances that need to be replicated, use the Management Service to configure settings such as channel creation, mtu settings, and admin profiles on the new SDX appliance.
-
Provision a NetScaler instance (VPX-NEW-A2) on the new SDX appliance (SDX-NEW-A2) with the same build and configuration as the older one. For more information, see Provision NetScaler instance on SDX appliance.
Supported migration scenarios
This migration applies to the following scenarios:
- High Availability (HA) configuration
- Standalone deployments
- Migrating to an identical SDX platform
- Migrating to a different SDX platform
Notes:
- This migration process doesn’t support migrating from SDX to third-party hypervisor hosted VPX instances.
- These outlined steps are validated for migrating SDX platforms from SDX 14000 to 15000, SDX 14000 to 16000, and SDX 22000 to 15000. The same steps are also applicable to other SDX platforms.
The different scenarios are explained below:
Case 1: No channel and same interface speed and numbering
If the old VPX instance (VPX-OLD-A2) is configured with interfaces 10/1, 10/2, …, 10/n, the new VPX instance (VPX-NEW-A2) must replicate this configuration precisely.
Case 2: No channel and different interface speed or numbering
If the old VPX instance (VPX-OLD-A2) is configured with interfaces 10/1 and 10/2, and the new VPX instance (VPX-NEW-A2) is configured with interfaces 10/3 and 10/4. Alternatively, the new VPX instance (VPX-NEW-A2) might use interfaces 25/1 and 25/2.
Case 3: Same channel numbering
If the old VPX instance (VPX-OLD-A2) is configured with channels LA/1, LA/2, …, LA/n, then the new VPX instance (VPX-NEW-A2) must replicate this configuration precisely. The underlying member interface numbering or speed does not affect this requirement.
Case 4: Different channel numbering
If the old VPX instance (VPX-OLD-A2) is configured with channels LA/1 and LA/2, while the new VPX instance (VPX-NEW-A2) is configured with channels LA/3 and LA/4.
Phases in migration
Phase 1: Break HA (if applicable) and remove the secondary VPX
If HA is enabled, you must break the HA configuration and remove the secondary VPX (VPX-OLD-A2) from the HA setup.
- Break the HA configuration
-
Log on to the primary VPX instance (VPX-OLD-A1) CLI.
-
To set the HA status on VPX-OLD-A1 to stay as the primary node, type:
set ha node -hastatus STAYPRIMARY <!--NeedCopy--> -
To disable the HA sync status on the primary node (VPX-OLD-A1), type:
set ha node -haSync DISABLED
<!--NeedCopy-->
-
-
Remove the secondary VPX from the HA pair
-
Log on to the secondary VPX instance (VPX-OLD-A2) CLI.
-
To set the HA status on VPX-OLD-A2 to stay as the secondary node, type:
set ha node -hastatus STAYSECONDARY <!--NeedCopy--> -
Remove VPX-OLD-A2 from the HA pair to break the ha configuration. Identify the node ID for VPX-OLD-A2 and run the following command:
rm ha node <node_id>
<!--NeedCopy-->
-
Phase 2: Form an HA pair between the old primary VPX and the new VPX
To establish an HA pair between the old primary VPX (VPX-OLD-A1) and the new VPX (VPX-NEW-A2):
-
On the CLI of the old primary VPX (VPX-OLD-A1), type:
add ha node 1 <IP address of VPX-NEW-A2> <!--NeedCopy--> -
On the CLI of the new VPX (VPX-NEW-A2), type:
add ha node 1 <IP address of VPX-OLD-A1>
<!--NeedCopy-->
Phase 3: Migrate VPX configuration
On the primary VPX (VPX-OLD-A1), enable HA sync using the following command:
set ha node -haSync ENABLED
<!--NeedCopy-->
Phase 4 (optional): Additional steps required for case 2 and case 4
Perform the following steps to address specific scenarios in case 2 (no channel and different interface speed or numbering) and case 4 (different channel numbering) migration.
On the new secondary VPX (VPX-NEW-A2):
-
Check the log file at
/var/nssynclog/sync_batch_status.logfor errors. -
The interface-related settings might generate errors. Manually fix the
bind vlanandset interfaceconfigurations. -
If any other errors are found, manually address them.
-
Save the configuration using either the
save configorsave ns config -allcommand.
Notes:
Before you initiate the traffic failover to the new VPX on the new SDX appliance, ensure the following:
Verify that HA sync is enabled.
Validate the configuration of the current secondary VPX (VPX-NEW-A2) using the command
show ns runningconfig.Check for errors in the log file located at
/var/nssynclog/sync_batch_status.logon the secondary node.
Phase 5: Force failover to migrate the traffic to the new VPX on the new SDX appliance
To initiate a forced failover to shift traffic to the new VPX (VPX-NEW-A2) hosted on the new SDX appliance, perform the following steps:
-
On VPX-OLD-A1, to enable the HA pair, type:
set ha node -haStatus ENABLED
<!--NeedCopy-->
Here, VPX-OLD-A1 becomes active in the HA pair.
-
To force the failover of traffic to the new VPX (VPX-NEW-A2), type:
force ha failover
<!--NeedCopy-->
VPX-NEW-A2 becomes the primary node handling the incoming traffic.
In the transition from the previous SDX platform, SDX-OLD-A2, to the new SDX platform, SDX-NEW-A2, the VPX-NEW-A2 on SDX-NEW-A2 is now the primary node and manages traffic. These steps are also applicable to replace SDX-OLD-A1 with the new SDX platform, SDX-NEW-A1.