Convert a NetScaler MPX 26000-50S appliance to a NetScaler SDX 26000-50S appliance
You can convert a NetScaler MPX appliance to an NetScaler SDX appliance by upgrading the software through a new solid-state drive (SSD). NetScaler supplies a field conversion kit to migrate a NetScaler MPX appliance to an SDX appliance.
The conversion requires all eight SSDs.
Note:
Citrix recommends that you configure the lights out management (LOM) port of the appliance before starting the conversion process. For more information on the LOM port of the ADC appliance, see Lights out management port of the NetScaler SDX appliance.
To convert an MPX appliance to an SDX appliance, you must access the appliance through a console cable attached to a computer or terminal. Before connecting the console cable, configure the computer or terminal to support the following configuration:
- VT100 terminal emulation
- 9600 baud
- 8 data bits
- 1 stop bit
- Parity and flow control set to NONE
Connect one end of the console cable to the RS232 serial port on the appliance, and the other end to the computer or terminal.
Note:
To use a cable with an RJ-45 converter, insert the optional converter into the console port and attach the cable to it.
With the cable attached, verify that the MPX appliance’s components are functioning correctly. You are then ready to begin the conversion. The conversion process modifies the BIOS, installs a Citrix Hypervisor and a Service Virtual Machine image, and copies the NetScaler VPX image to the Solid State Drive.
The conversion process also sets up a redundant array of independent disks (RAID) controller for local storage and NetScaler VPX storage. SSD slots #1 and #2 are used for local storage and SSD slots #3, #4, #5, #6, #7, and #8 are used for NetScaler VPX storage.
After the conversion process, modify the appliance’s configuration and apply a new license. You can then provision the VPX instances through the Management Service on what is now an NetScaler SDX appliance.
Verify proper operation of the MPX appliance’s components
- Access the console port and enter the administrator credentials.
-
Run the following command from the command line interface of the appliance to display the serial number:
show hardware. You might need the serial number to log on to the appliance after the conversion.Example
> show hardware
Platform: NSMPX-26000-50S 28*CPU+256GB+4*MLX(50)+16*F2X+2*E1K+4*4-CHIP CO 520310
Manufactured on: 9/15/2020
CPU: 2400MHZ
Host Id: 1862303878
Serial no: 83WRVD62EM
Encoded serial no: 83WRVD62EM
Netscaler UUID: 258f9971-f7db-11ea-b021-00e0ed9041b6
BMC Revision: 5.03
Done
<!--NeedCopy-->
The serial number might be helpful when you want to contact Citrix® technical support.
-
Run the following command to display the status of the active interfaces:
show interfaceExample
> show interface 1) Interface 0/1 (Gig Ethernet 10/100/1000 MBits) #8 flags=0xc020 <ENABLED, UP, UP, autoneg, HAMON, HEARTBEAT, 802.1q> MTU=1500, native vlan=1, MAC=0c:c4:7a:56:64:7e, uptime 120h29m33s Requested: media AUTO, speed AUTO, duplex AUTO, fctl OFF, throughput 0 Actual: media UTP, speed 1000, duplex FULL, fctl OFF, throughput 1000 LLDP Mode: NONE, LR Priority: 1024 RX: Pkts(1614945) Bytes(104805024) Errs(0) Drops(1601312) Stalls(0) TX: Pkts(9166) Bytes(2556380) Errs(0) Drops(0) Stalls(0) NIC: InDisc(0) OutDisc(0) Fctls(0) Stalls(0) Hangs(0) Muted(0) Bandwidth thresholds are not set. 2) Interface 0/2 (Gig Ethernet 10/100/1000 MBits) #9 flags=0x4000 <ENABLED, DOWN, down, autoneg, HAMON, HEARTBEAT, 802.1q> MTU=1500, native vlan=1, MAC=0c:c4:7a:56:64:7f, downtime 120h29m53s Requested: media AUTO, speed AUTO, duplex AUTO, fctl OFF, throughput 0 LLDP Mode: NONE, LR Priority: 1024 RX: Pkts(0) Bytes(0) Errs(0) Drops(0) Stalls(0) TX: Pkts(0) Bytes(0) Errs(0) Drops(0) Stalls(0) NIC: InDisc(0) OutDisc(0) Fctls(0) Stalls(0) Hangs(0) Muted(0) Bandwidth thresholds are not set. 3) Interface 25/1 (25G Ethernet, unknown device) #10 flags=0x4000 <ENABLED, DOWN, down, autoneg, HAMON, HEARTBEAT, 802.1q> MTU=1500, native vlan=1, MAC=00:e0:ed:90:41:bc, downtime 120h29m53s Requested: media AUTO, speed AUTO, duplex AUTO, fctl OFF, throughput 0 LLDP Mode: NONE, LR Priority: 1024 RX: Pkts(0) Bytes(0) Errs(0) Drops(0) Stalls(0) TX: Pkts(0) Bytes(0) Errs(0) Drops(0) Stalls(0) NIC: InDisc(0) OutDisc(0) Fctls(0) Stalls(0) Hangs(0) Muted(0) Bandwidth thresholds are not set. Rx Ring: Configured size=2048, Actual size=512, Type: Elastic 4) Interface 25/2 (25G Ethernet, unknown device) #11 flags=0x4000 <ENABLED, DOWN, down, autoneg, HAMON, HEARTBEAT, 802.1q> MTU=1500, native vlan=1, MAC=00:e0:ed:90:41:bd, downtime 120h29m53s Requested: media AUTO, speed AUTO, duplex AUTO, fctl OFF, throughput 0 LLDP Mode: NONE, LR Priority: 1024 RX: Pkts(0) Bytes(0) Errs(0) Drops(0) Stalls(0) TX: Pkts(0) Bytes(0) Errs(0) Drops(0) Stalls(0) NIC: InDisc(0) OutDisc(0) Fctls(0) Stalls(0) Hangs(0) Muted(0) Bandwidth thresholds are not set. Rx Ring: Configured size=2048, Actual size=512, Type: Elastic 5) Interface 25/3 (25G Ethernet, unknown device) #12 flags=0x4000 <ENABLED, DOWN, down, autoneg, HAMON, HEARTBEAT, 802.1q> MTU=1500, native vlan=1, MAC=00:e0:ed:90:41:be, downtime 120h29m53s Requested: media AUTO, speed AUTO, duplex AUTO, fctl OFF, throughput 0 LLDP Mode: NONE, LR Priority: 1024 RX: Pkts(0) Bytes(0) Errs(0) Drops(0) Stalls(0) TX: Pkts(0) Bytes(0) Errs(0) Drops(0) Stalls(0) NIC: InDisc(0) OutDisc(0) Fctls(0) Stalls(0) Hangs(0) Muted(0) Bandwidth thresholds are not set. Rx Ring: Configured size=2048, Actual size=512, Type: Elastic 6) Interface 25/4 (25G Ethernet, unknown device) #13 flags=0x4000 <ENABLED, DOWN, down, autoneg, HAMON, HEARTBEAT, 802.1q> MTU=1500, native vlan=1, MAC=00:e0:ed:90:41:bf, downtime 120h29m53s Requested: media AUTO, speed AUTO, duplex AUTO, fctl OFF, throughput 0 LLDP Mode: NONE, LR Priority: 1024 RX: Pkts(0) Bytes(0) Errs(0) Drops(0) Stalls(0) TX: Pkts(0) Bytes(0) Errs(0) Drops(0) Stalls(0) NIC: InDisc(0) OutDisc(0) Fctls(0) Stalls(0) Hangs(0) Muted(0) Bandwidth thresholds are not set. Rx Ring: Configured size=2048, Actual size=512, Type: Elastic 7) Interface 25/5 (25G Ethernet, unknown device) #14 flags=0x4000 <ENABLED, DOWN, down, autoneg, HAMON, HEARTBEAT, 802.1q> MTU=1500, native vlan=1, MAC=00:e0:ed:90:41:f2, downtime 120h29m53s Requested: media AUTO, speed AUTO, duplex AUTO, fctl OFF, throughput 0 LLDP Mode: NONE, LR Priority: 1024 RX: Pkts(0) Bytes(0) Errs(0) Drops(0) Stalls(0) TX: Pkts(0) Bytes(0) Errs(0) Drops(0) Stalls(0) NIC: InDisc(0) OutDisc(0) Fctls(0) Stalls(0) Hangs(0) Muted(0) Bandwidth thresholds are not set. Rx Ring: Configured size=2048, Actual size=512, Type: Elastic 8) Interface 25/6 (25G Ethernet, unknown device) #15 flags=0x4000 <ENABLED, DOWN, down, autoneg, HAMON, HEARTBEAT, 802.1q> MTU=1500, native vlan=1, MAC=00:e0:ed:90:41:f3, downtime 120h29m53s Requested: media AUTO, speed AUTO, duplex AUTO, fctl OFF, throughput 0 LLDP Mode: NONE, LR Priority: 1024 RX: Pkts(0) Bytes(0) Errs(0) Drops(0) Stalls(0) TX: Pkts(0) Bytes(0) Errs(0) Drops(0) Stalls(0) NIC: InDisc(0) OutDisc(0) Fctls(0) Stalls(0) Hangs(0) Muted(0) Bandwidth thresholds are not set. Rx Ring: Configured size=2048, Actual size=512, Type: Elastic 9) Interface 25/7 (25G Ethernet, unknown device) #16 flags=0x4000 <ENABLED, DOWN, down, autoneg, HAMON, HEARTBEAT, 802.1q> MTU=1500, native vlan=1, MAC=00:e0:ed:90:41:f4, downtime 120h29m53s Requested: media AUTO, speed AUTO, duplex AUTO, fctl OFF, throughput 0 LLDP Mode: NONE, LR Priority: 1024 RX: Pkts(0) Bytes(0) Errs(0) Drops(0) Stalls(0) TX: Pkts(0) Bytes(0) Errs(0) Drops(0) Stalls(0) NIC: InDisc(0) OutDisc(0) Fctls(0) Stalls(0) Hangs(0) Muted(0) Bandwidth thresholds are not set. Rx Ring: Configured size=2048, Actual size=512, Type: Elastic 10) Interface 25/8 (25G Ethernet, unknown device) #17 flags=0x4000 <ENABLED, DOWN, down, autoneg, HAMON, HEARTBEAT, 802.1q> MTU=1500, native vlan=1, MAC=00:e0:ed:90:41:f5, downtime 120h30m00s Requested: media AUTO, speed AUTO, duplex AUTO, fctl OFF, throughput 0 LLDP Mode: NONE, LR Priority: 1024 RX: Pkts(0) Bytes(0) Errs(0) Drops(0) Stalls(0) TX: Pkts(0) Bytes(0) Errs(0) Drops(0) Stalls(0) NIC: InDisc(0) OutDisc(0) Fctls(0) Stalls(0) Hangs(0) Muted(0) Bandwidth thresholds are not set. Rx Ring: Configured size=2048, Actual size=512, Type: Elastic 11) Interface 25/9 (25G Ethernet, unknown device) #2 flags=0x4000 <ENABLED, DOWN, down, autoneg, HAMON, HEARTBEAT, 802.1q> MTU=1500, native vlan=1, MAC=00:e0:ed:90:41:b4, downtime 120h30m00s Requested: media AUTO, speed AUTO, duplex AUTO, fctl OFF, throughput 0 LLDP Mode: NONE, LR Priority: 1024 RX: Pkts(0) Bytes(0) Errs(0) Drops(0) Stalls(0) TX: Pkts(0) Bytes(0) Errs(0) Drops(0) Stalls(0) NIC: InDisc(0) OutDisc(0) Fctls(0) Stalls(0) Hangs(0) Muted(0) Bandwidth thresholds are not set. Rx Ring: Configured size=2048, Actual size=512, Type: Elastic 12) Interface 25/10 (25G Ethernet, unknown device) #3 flags=0x4000 <ENABLED, DOWN, down, autoneg, HAMON, HEARTBEAT, 802.1q> MTU=1500, native vlan=1, MAC=00:e0:ed:90:41:b5, downtime 120h30m00s Requested: media AUTO, speed AUTO, duplex AUTO, fctl OFF, throughput 0 LLDP Mode: NONE, LR Priority: 1024 RX: Pkts(0) Bytes(0) Errs(0) Drops(0) Stalls(0) TX: Pkts(0) Bytes(0) Errs(0) Drops(0) Stalls(0) NIC: InDisc(0) OutDisc(0) Fctls(0) Stalls(0) Hangs(0) Muted(0) Bandwidth thresholds are not set. Rx Ring: Configured size=2048, Actual size=512, Type: Elastic 13) Interface 25/11 (25G Ethernet, unknown device) #0 flags=0x4000 <ENABLED, DOWN, down, autoneg, HAMON, HEARTBEAT, 802.1q> MTU=1500, native vlan=1, MAC=00:e0:ed:90:41:b6, downtime 120h30m00s Requested: media AUTO, speed AUTO, duplex AUTO, fctl OFF, throughput 0 LLDP Mode: NONE, LR Priority: 1024 RX: Pkts(0) Bytes(0) Errs(0) Drops(0) Stalls(0) TX: Pkts(0) Bytes(0) Errs(0) Drops(0) Stalls(0) NIC: InDisc(0) OutDisc(0) Fctls(0) Stalls(0) Hangs(0) Muted(0) Bandwidth thresholds are not set. Rx Ring: Configured size=2048, Actual size=512, Type: Elastic 14) Interface 25/12 (25G Ethernet, unknown device) #1 flags=0x4000 <ENABLED, DOWN, down, autoneg, HAMON, HEARTBEAT, 802.1q> MTU=1500, native vlan=1, MAC=00:e0:ed:90:41:b7, downtime 120h30m00s Requested: media AUTO, speed AUTO, duplex AUTO, fctl OFF, throughput 0 LLDP Mode: NONE, LR Priority: 1024 RX: Pkts(0) Bytes(0) Errs(0) Drops(0) Stalls(0) TX: Pkts(0) Bytes(0) Errs(0) Drops(0) Stalls(0) NIC: InDisc(0) OutDisc(0) Fctls(0) Stalls(0) Hangs(0) Muted(0) Bandwidth thresholds are not set. Rx Ring: Configured size=2048, Actual size=512, Type: Elastic 15) Interface 25/13 (25G Ethernet, unknown device) #6 flags=0x4000 <ENABLED, DOWN, down, autoneg, HAMON, HEARTBEAT, 802.1q> MTU=1500, native vlan=1, MAC=00:e0:ed:90:41:ee, downtime 120h30m00s Requested: media AUTO, speed AUTO, duplex AUTO, fctl OFF, throughput 0 LLDP Mode: NONE, LR Priority: 1024 RX: Pkts(0) Bytes(0) Errs(0) Drops(0) Stalls(0) TX: Pkts(0) Bytes(0) Errs(0) Drops(0) Stalls(0) NIC: InDisc(0) OutDisc(0) Fctls(0) Stalls(0) Hangs(0) Muted(0) Bandwidth thresholds are not set. Rx Ring: Configured size=2048, Actual size=512, Type: Elastic 16) Interface 25/14 (25G Ethernet, unknown device) #7 flags=0x4000 <ENABLED, DOWN, down, autoneg, HAMON, HEARTBEAT, 802.1q> MTU=1500, native vlan=1, MAC=00:e0:ed:90:41:ef, downtime 120h30m00s Requested: media AUTO, speed AUTO, duplex AUTO, fctl OFF, throughput 0 LLDP Mode: NONE, LR Priority: 1024 RX: Pkts(0) Bytes(0) Errs(0) Drops(0) Stalls(0) TX: Pkts(0) Bytes(0) Errs(0) Drops(0) Stalls(0) NIC: InDisc(0) OutDisc(0) Fctls(0) Stalls(0) Hangs(0) Muted(0) Bandwidth thresholds are not set. Rx Ring: Configured size=2048, Actual size=512, Type: Elastic 17) Interface 25/15 (25G Ethernet, unknown device) #4 flags=0x4000 <ENABLED, DOWN, down, autoneg, HAMON, HEARTBEAT, 802.1q> MTU=1500, native vlan=1, MAC=00:e0:ed:90:41:f0, downtime 120h30m00s Requested: media AUTO, speed AUTO, duplex AUTO, fctl OFF, throughput 0 LLDP Mode: NONE, LR Priority: 1024 RX: Pkts(0) Bytes(0) Errs(0) Drops(0) Stalls(0) TX: Pkts(0) Bytes(0) Errs(0) Drops(0) Stalls(0) NIC: InDisc(0) OutDisc(0) Fctls(0) Stalls(0) Hangs(0) Muted(0) Bandwidth thresholds are not set. Rx Ring: Configured size=2048, Actual size=512, Type: Elastic 18) Interface 25/16 (25G Ethernet, unknown device) #5 flags=0x4000 <ENABLED, DOWN, down, autoneg, HAMON, HEARTBEAT, 802.1q> MTU=1500, native vlan=1, MAC=00:e0:ed:90:41:f1, downtime 120h30m00s Requested: media AUTO, speed AUTO, duplex AUTO, fctl OFF, throughput 0 LLDP Mode: NONE, LR Priority: 1024 RX: Pkts(0) Bytes(0) Errs(0) Drops(0) Stalls(0) TX: Pkts(0) Bytes(0) Errs(0) Drops(0) Stalls(0) NIC: InDisc(0) OutDisc(0) Fctls(0) Stalls(0) Hangs(0) Muted(0) Bandwidth thresholds are not set. Rx Ring: Configured size=2048, Actual size=512, Type: Elastic 19) Interface 50/1 (mce Ethernet, unknown device) #20 flags=0xc020 <ENABLED, UP, UP, autoneg, HAMON, HEARTBEAT, 802.1q> MTU=9216, native vlan=1, MAC=24:8a:07:a4:91:0c, uptime 99h59m54s Requested: media AUTO, speed AUTO, duplex AUTO, fctl OFF, throughput 0 Actual: media UTP, speed 50000, duplex FULL, fctl OFF, throughput 50000 LLDP Mode: NONE, LR Priority: 1024 RX: Pkts(215681) Bytes(11431096) Errs(0) Drops(215680) Stalls(0) TX: Pkts(131) Bytes(5516) Errs(0) Drops(0) Stalls(0) NIC: InDisc(0) OutDisc(0) Fctls(0) Stalls(0) Hangs(0) Muted(0) Bandwidth thresholds are not set. 20) Interface 50/2 (mce Ethernet, unknown device) #21 flags=0xc020 <ENABLED, UP, UP, autoneg, HAMON, HEARTBEAT, 802.1q> MTU=1500, native vlan=1, MAC=24:8a:07:a4:91:0d, uptime 100h00m22s Requested: media AUTO, speed AUTO, duplex AUTO, fctl OFF, throughput 0 Actual: media UTP, speed 50000, duplex FULL, fctl OFF, throughput 50000 LLDP Mode: NONE, LR Priority: 1024 RX: Pkts(313720) Bytes(17365302) Errs(0) Drops(312232) Stalls(0) TX: Pkts(114) Bytes(4788) Errs(0) Drops(0) Stalls(0) NIC: InDisc(0) OutDisc(0) Fctls(0) Stalls(0) Hangs(0) Muted(0) Bandwidth thresholds are not set. 21) Interface 50/3 (100G Ethernet) #18 flags=0x4000 <ENABLED, DOWN, down, autoneg, HAMON, HEARTBEAT, 802.1q> MTU=1500, native vlan=1, MAC=24:8a:07:a4:91:00, downtime 120h30m07s Requested: media AUTO, speed AUTO, duplex AUTO, fctl OFF, throughput 0 LLDP Mode: NONE, LR Priority: 1024 RX: Pkts(0) Bytes(0) Errs(0) Drops(0) Stalls(0) TX: Pkts(0) Bytes(0) Errs(0) Drops(0) Stalls(0) NIC: InDisc(0) OutDisc(0) Fctls(0) Stalls(0) Hangs(0) Muted(0) Bandwidth thresholds are not set. 22) Interface 50/4 (100G Ethernet) #19 flags=0x4000 <ENABLED, DOWN, down, autoneg, HAMON, HEARTBEAT, 802.1q> MTU=1500, native vlan=1, MAC=24:8a:07:a4:91:01, downtime 120h30m07s Requested: media AUTO, speed AUTO, duplex AUTO, fctl OFF, throughput 0 LLDP Mode: NONE, LR Priority: 1024 RX: Pkts(0) Bytes(0) Errs(0) Drops(0) Stalls(0) TX: Pkts(0) Bytes(0) Errs(0) Drops(0) Stalls(0) NIC: InDisc(0) OutDisc(0) Fctls(0) Stalls(0) Hangs(0) Muted(0) Bandwidth thresholds are not set. 23) Interface LO/1 (Netscaler Loopback interface) #22 flags=0x20008020 <ENABLED, UP, UP> MTU=9216, native vlan=1, MAC=0c:c4:7a:56:64:7e, uptime 120h30m01s LLDP Mode: NONE, LR Priority: 1024 RX: Pkts(611167959) Bytes(89143315781) Errs(0) Drops(0) Stalls(0) TX: Pkts(1207140213) Bytes(120806672260) Errs(0) Drops(0) Stalls(0) Bandwidth thresholds are not set. Done > <!--NeedCopy--> -
In the
show interfacecommand’s output, verify that all the interfaces are enabled and the status of every interface is shown as UP/UP.Notes:
-
The interface status is displayed as UP/UP only if the cables are connected to the interfaces.
-
If you do not have an SFP+ transceiver for every port, verify the interfaces in stages. After checking the first set of interfaces, unplug the SFP+ transceivers and plug them in to the next set of ports.
-
-
Run the following command for each of the interfaces that are not in the UP/UP state:
enable interface 50/xWhere x is the new interface number.> enable interface 50/1 Done > enable interface 50/2 Done > enable interface 50/3 Done > enable interface 50/4 Done <!--NeedCopy--> -
Run the following command to verify that the status of the power supplies is normal:
stat system –detail
Example
> stat system -detail

Citrix ADC Executive View

System Information:
Up since    Wed Jan 20 21:35:18 2021
Up since(Local) Wed Jan 20 21:35:18 2021
Memory usage (MB)               5802
InUse Memory (%)                2.52
Number of CPUs                    15

System Health Statistics (Standard):
CPU 0 Core Voltage (Volts)                  1.80
CPU 1 Core Voltage (Volts)                  1.80
Main 3.3 V Supply Voltage                   3.35
Standby 3.3 V Supply Voltage                    3.25
+5.0 V Supply Voltage                           5.03
+12.0 V Supply Voltage                         12.13
Battery Voltage (Volts)                         2.98
Intel CPU Vtt Power(Volts)                      0.00
5V Standby Voltage(Volts)                   4.97
Voltage Sensor2(Volts)                      0.00
CPU Fan 0 Speed (RPM)                       3100
CPU Fan 1 Speed (RPM)                       3100
System Fan Speed (RPM)                      3100
System Fan 1 Speed (RPM)                    3100
System Fan 2 Speed (RPM)                    3100
CPU 0 Temperature (Celsius)                       47
CPU 1 Temperature (Celsius)                       51
Internal Temperature (Celsius)                    35
Power supply 1 status                         NORMAL
Power supply 2 status                         NORMAL
Power supply 3 status              NOT SUPPORTED
Power supply 4 status              NOT SUPPORTED

System Disk Statistics:
/flash Size (MB)                               23801
/flash Used (MB)                                 787
/flash Available (MB)                          21110
/flash Used (%)                                    3
/var Size (MB)                                341167
/var Used (MB)                                112391
/var Available (MB)                           201482
/var Used (%)                                     35

System Health Statistics(Auxiliary):
Voltage 0 (Volts)                           1.20
Voltage 1 (Volts)                           1.20
Voltage 2 (Volts)                           1.21
Voltage 3 (Volts)                           1.20
Voltage 4 (Volts)                           1.54
Voltage 5 (Volts)                           0.00
Voltage 6 (Volts)                           0.00
Voltage 7 (Volts)                           0.00
Fan 0 Speed (RPM)                           3200
Fan 1 Speed (RPM)                              0
Fan 2 Speed (RPM)                              0
Fan 3 Speed (RPM)                              0
Temperature 0 (Celsius)                       27
Temperature 1 (Celsius)                       38
Temperature 2 (Celsius)                        0
Temperature 3 (Celsius)                        0
 Done
>
<!--NeedCopy-->
-
Run the following command to generate a tar of system configuration data and statistics:
show techsupportExample
> show techsupport

showtechsupport data collector tool - $Revision$!
NetScaler version 13.0
The NS IP of this box is 10.217.206.43
This is not HA configuration
Copying selected configuration files ....
Running shell commands ....
Running CLI show commands ....
Collecting ns running configuration....
Collecting running gslb configuration....
Running CLI stat commands ....
Running vtysh commands ....
Copying newnslog files ....
Copying core files from /var/core ....
Copying core files from /var/crash ....
Copying GSLB location database files ....
Copying GSLB auto sync log files ....
Copying Safenet Gateway log files ....
Copying messages, ns.log, dmesg and other log files ....
Creating archive ....
/var/tmp/support/support.tgz  ---- points to ---> /var/tmp/support/collector_P_10.217.206.43_5Dec2020_05_32.tar.gz

showtechsupport script took 1 minute(s) and 17 second(s) to execute.
Done
<!--NeedCopy-->
Note
The output of the command is available in the
/var/tmp/support/collector_<IP_address>_P_<date>.tar.gzfile. Copy this file to another computer for future reference. The output of the command might be helpful when you want to contact Citrix technical support. -
At the command line interface, switch to the shell prompt. Type:
shellExample
> shell Copyright (c) 1992-2013 The FreeBSD Project. Copyright (c) 1979, 1980, 1983, 1986, 1988, 1989, 1991, 1992, 1993, 1994 The Regents of the University of California. All rights reserved. root@ns# <!--NeedCopy--> -
Run the following command to verify the memory on your appliance:
root@ns# grep "memory" /var/nslog/dmesg.bootExample
root@ns# grep "memory" /var/nslog/dmesg.boot real memory = 274877906944 (262144 MB) avail memory = 264024535040 (251793 MB) root@ns# <!--NeedCopy--> -
Run the following command to verify the number of CPU cores depending upon your appliance:
root@ns# grep "cpu" /var/nslog/dmesg.bootExample
root@ns# grep "cpu" /var/nslog/dmesg.boot cpu0 (BSP): APIC ID: 0 cpu1 (AP): APIC ID: 2 cpu2 (AP): APIC ID: 4 cpu3 (AP): APIC ID: 6 cpu4 (AP): APIC ID: 8 cpu5 (AP): APIC ID: 10 cpu6 (AP): APIC ID: 12 cpu7 (AP): APIC ID: 16 cpu8 (AP): APIC ID: 18 cpu9 (AP): APIC ID: 20 cpu10 (AP): APIC ID: 22 cpu11 (AP): APIC ID: 24 cpu12 (AP): APIC ID: 26 cpu13 (AP): APIC ID: 28 cpu14 (AP): APIC ID: 32 cpu15 (AP): APIC ID: 34 cpu16 (AP): APIC ID: 36 cpu17 (AP): APIC ID: 38 cpu18 (AP): APIC ID: 40 cpu19 (AP): APIC ID: 42 cpu20 (AP): APIC ID: 44 cpu21 (AP): APIC ID: 48 cpu22 (AP): APIC ID: 50 cpu23 (AP): APIC ID: 52 cpu24 (AP): APIC ID: 54 cpu25 (AP): APIC ID: 56 cpu26 (AP): APIC ID: 58 cpu27 (AP): APIC ID: 60 cpu0: <ACPI CPU> on acpi0 cpu1: <ACPI CPU> on acpi0 cpu2: <ACPI CPU> on acpi0 cpu3: <ACPI CPU> on acpi0 cpu4: <ACPI CPU> on acpi0 cpu5: <ACPI CPU> on acpi0 cpu6: <ACPI CPU> on acpi0 cpu7: <ACPI CPU> on acpi0 cpu8: <ACPI CPU> on acpi0 cpu9: <ACPI CPU> on acpi0 cpu10: <ACPI CPU> on acpi0 cpu11: <ACPI CPU> on acpi0 cpu12: <ACPI CPU> on acpi0 cpu13: <ACPI CPU> on acpi0 cpu14: <ACPI CPU> on acpi0 cpu15: <ACPI CPU> on acpi0 cpu16: <ACPI CPU> on acpi0 cpu17: <ACPI CPU> on acpi0 cpu18: <ACPI CPU> on acpi0 cpu19: <ACPI CPU> on acpi0 cpu20: <ACPI CPU> on acpi0 cpu21: <ACPI CPU> on acpi0 cpu22: <ACPI CPU> on acpi0 cpu23: <ACPI CPU> on acpi0 cpu24: <ACPI CPU> on acpi0 cpu25: <ACPI CPU> on acpi0 cpu26: <ACPI CPU> on acpi0 cpu27: <ACPI CPU> on acpi0 est0: <Enhanced SpeedStep Frequency Control> on cpu0 p4tcc0: <CPU Frequency Thermal Control> on cpu0 est1: <Enhanced SpeedStep Frequency Control> on cpu1 p4tcc1: <CPU Frequency Thermal Control> on cpu1 est2: <Enhanced SpeedStep Frequency Control> on cpu2 p4tcc2: <CPU Frequency Thermal Control> on cpu2 est3: <Enhanced SpeedStep Frequency Control> on cpu3 p4tcc3: <CPU Frequency Thermal Control> on cpu3 est4: <Enhanced SpeedStep Frequency Control> on cpu4 p4tcc4: <CPU Frequency Thermal Control> on cpu4 est5: <Enhanced SpeedStep Frequency Control> on cpu5 p4tcc5: <CPU Frequency Thermal Control> on cpu5 est6: <Enhanced SpeedStep Frequency Control> on cpu6 p4tcc6: <CPU Frequency Thermal Control> on cpu6 est7: <Enhanced SpeedStep Frequency Control> on cpu7 p4tcc7: <CPU Frequency Thermal Control> on cpu7 est8: <Enhanced SpeedStep Frequency Control> on cpu8 p4tcc8: <CPU Frequency Thermal Control> on cpu8 est9: <Enhanced SpeedStep Frequency Control> on cpu9 p4tcc9: <CPU Frequency Thermal Control> on cpu9 est10: <Enhanced SpeedStep Frequency Control> on cpu10 p4tcc10: <CPU Frequency Thermal Control> on cpu10 est11: <Enhanced SpeedStep Frequency Control> on cpu11 p4tcc11: <CPU Frequency Thermal Control> on cpu11 est12: <Enhanced SpeedStep Frequency Control> on cpu12 p4tcc12: <CPU Frequency Thermal Control> on cpu12 est13: <Enhanced SpeedStep Frequency Control> on cpu13 p4tcc13: <CPU Frequency Thermal Control> on cpu13 est14: <Enhanced SpeedStep Frequency Control> on cpu14 p4tcc14: <CPU Frequency Thermal Control> on cpu14 est15: <Enhanced SpeedStep Frequency Control> on cpu15 p4tcc15: <CPU Frequency Thermal Control> on cpu15 est16: <Enhanced SpeedStep Frequency Control> on cpu16 p4tcc16: <CPU Frequency Thermal Control> on cpu16 est17: <Enhanced SpeedStep Frequency Control> on cpu17 p4tcc17: <CPU Frequency Thermal Control> on cpu17 est18: <Enhanced SpeedStep Frequency Control> on cpu18 p4tcc18: <CPU Frequency Thermal Control> on cpu18 est19: <Enhanced SpeedStep Frequency Control> on cpu19 p4tcc19: <CPU Frequency Thermal Control> on cpu19 est20: <Enhanced SpeedStep Frequency Control> on cpu20 p4tcc20: <CPU Frequency Thermal Control> on cpu20 est21: <Enhanced SpeedStep Frequency Control> on cpu21 p4tcc21: <CPU Frequency Thermal Control> on cpu21 est22: <Enhanced SpeedStep Frequency Control> on cpu22 p4tcc22: <CPU Frequency Thermal Control> on cpu22 est23: <Enhanced SpeedStep Frequency Control> on cpu23 p4tcc23: <CPU Frequency Thermal Control> on cpu23 est24: <Enhanced SpeedStep Frequency Control> on cpu24 p4tcc24: <CPU Frequency Thermal Control> on cpu24 est25: <Enhanced SpeedStep Frequency Control> on cpu25 p4tcc25: <CPU Frequency Thermal Control> on cpu25 est26: <Enhanced SpeedStep Frequency Control> on cpu26 p4tcc26: <CPU Frequency Thermal Control> on cpu26 est27: <Enhanced SpeedStep Frequency Control> on cpu27 p4tcc27: <CPU Frequency Thermal Control> on cpu27 root@ns# <!--NeedCopy--> -
Run the following command to verify that the /var drive is mounted as
/dev/ ar0s1a: root@ns# df –hExample
root@ns# df -h Filesystem Size Used Avail Capacity Mounted on /dev/md0 422M 404M 9.1M 98% / devfs 1.0k 1.0k 0B 100% /dev procfs 4.0k 4.0k 0B 100% /proc /dev/ar0s1a 23G 6.9G 14G 32% /flash /dev/ar0s1e 333G 32G 274G 10% /var root@ns# <!--NeedCopy--> -
Type the following command to run the ns_hw_err.bash script, which checks for latent hardware errors:
root@ns# ns_hw_err.bashExample
root@ns# ns_hw_err.bash
NetScaler NS13.0: Build 73.17.nc, Date: Nov 11 2020, 07:56:08   (64-bit)
platform: serial 83WRVD62EM
platform: sysid 520310 - NSMPX-26000-50S 28*CPU+256GB+4*MLX(50)+16*F2X+2*E1K+4*4-CHIP COL 8955
HDD MODEL: ar0: 434992MB <Intel MatrixRAID RAID1> status: READY

Generating the list of newnslog files to be processed...
Generating the events from newnslog files...
Checking for HDD errors...
Checking for HDD SMART errors...
Checking for Flash errors...
Checking for Mega Raid Controller errors...
Checking for SSL errors...
Checking for BIOS errors...
Checking for SMB errors...
Checking for MotherBoard errors...
Checking for CMOS errors...
        License year: 2021: OK
Checking for SFP/NIC errors...

Checking for Firmware errors...
Checking for License errors...
Checking for Undetected CPUs...
Checking for DIMM flaps...
Checking for Memory Channel errors...
Checking for LOM errors...
Checking the Power Supply Errors...
Checking for Hardware Clock errors...
Script Done.
root@ns#
<!--NeedCopy-->
Important: Physically disconnect all ports, except the LOM port, including the management port from the network.
-
At the shell prompt, switch to the ADC command line. Type: exit
Example
root@ns# exit logout Done <!--NeedCopy--> -
Run the following command to shut down the appliance. You are asked if you want to completely stop the ADC. Type:
shutdown -p nowExample
> shutdown -p now
Are you sure you want to completely stop NetScaler (Y/N)? [N]:y
Done
> Dec  5 06:09:11 <auth.notice> ns shutdown: power-down by root:
Dec  5 06:09:13 <auth.emerg> ns init: Rebooting via init mechanism
Dec  5 06:09:13 <syslog.err> ns syslogd: exiting on signal 15
Dec  5 06:09:13 aslearn[1662]: before pthread_join(), task name: Aslearn_Packet_Loop_Task
Dec  5 06:09:15 aslearn[1662]: Exiting function ns_do_logging
Dec  5 06:09:15 aslearn[1662]: before pthread_join(), task name: Aslearn_WAL_Cleanup_Task
Dec  5 06:09:15 aslearn[1662]: before pthread_join(), task name: Aslearn_HA_Primary_Task
Dec  5 06:09:15 aslearn[1662]: 1662 exiting gracefully
Dec  5 06:09:18 [1672]: nsnet_tcpipconnect: connect() failed; returned -1 errno=61
qat0: qat_dev0 stopped 12 acceleration engines
pci4: Resetting device
qat1: qat_dev1 stopped 12 acceleration engines
pci6: Resetting device
qat2: qat_dev2 stopped 12 acceleration engines
pci132: Resetting device
qat3: qat_dev3 stopped 12 acceleration engines
pci134: Resetting device
Dec  5 06:09:33 init: some processes would not die; ps axl advised
reboot initiated by init with parent kernel
Waiting (max 60 seconds) for system process `vnlru' to stop...done
Waiting (max 60 seconds) for system process `bufdaemon' to stop...done
Waiting (max 60 seconds) for system process `syncer' to stop...
Syncing disks, vnodes remaining...0 0 0 done
All buffers synced.
Uptime: 1h53m18s
ixl_shutdown: lldp start 0
ixl_shutdown: lldp start 0
ixl_shutdown: lldp start 0
ixl_shutdown: lldp start 0
usbus0: Controller shutdown
uhub0: at usbus0, port 1, addr 1 (disconnected)
usbus0: Controller shutdown complete
usbus1: Controller shutdown
uhub1: at usbus1, port 1, addr 1 (disconnected)
ugen1.2: <vendor 0x8087> at usbus1 (disconnected)
uhub3: at uhub1, port 1, addr 2 (disconnected)
ugen1.3: <FTDI> at usbus1 (disconnected)
uftdi0: at uhub3, port 1, addr 3 (disconnected)
ugen1.4: <vendor 0x1005> at usbus1 (disconnected)
umass0: at uhub3, port 3, addr 4 (disconnected)
(da0:umass-sim0:0:0:0): lost device - 0 outstanding, 0 refs
(da0:umass-sim0:0:0:0): removing device entry
usbus1: Controller shutdown complete
usbus2: Controller shutdown
uhub2: at usbus2, port 1, addr 1 (disconnected)
 ugen2.2: <vendor 0x8087> at usbus2 (disconnected)
uhub4: at uhub2, port 1, addr 2 (disconnected)
ugen2.3: <vendor 0x0557> at usbus2 (disconnected)
uhub5: at uhub4, port 7, addr 3 (disconnected)
ugen2.4: <vendor 0x0557> at usbus2 (disconnected)
ukbd0: at uhub5, port 1, addr 4 (disconnected)
ums0: at uhub5, port 1, addr 4 (disconnected)
usbus2: Controller shutdown complete
ixl_shutdown: lldp start 0
ixl_shutdown: lldp start 0
ixl_shutdown: lldp start 0
ixl_shutdown: lldp start 0
acpi0: Powering system off
<!--NeedCopy-->
Upgrade the appliance
To upgrade the appliance, follow these steps:
- Power off the ADC appliance.
-
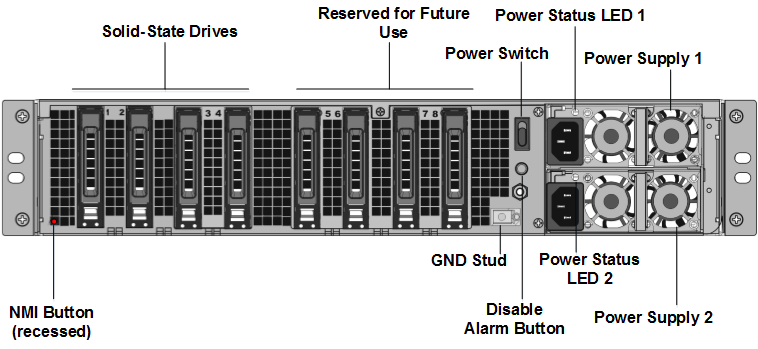
Locate the two solid-state drives (SSDs) on the back of the appliance in slot #1 and slot #2, as shown in the following figure:
-
Verify that the replacement solid-state drives (SSDs) are the ones required for your ADC model. The conversion requires a minimum of four SSDs. The NetScaler label is on the top of one of the SSDs. The SSD is pre-populated with a new version of the BIOS and a recent build of the required NetScaler SDX Management Service. This SSD must be installed in slot # 1.
-
Remove the SSDs by pushing the safety latch of the drive cover down while pulling the drive handle.
-
On the new Citrix certified SSD drive, open the drive handle completely to the left. Then insert the new drive into the slot #1 as far as possible.
-
To seat the drive, close the handle flush with the rear side of the appliance so that the drive locks securely into the slot.
Important: The orientation of the SSD is important. When you insert the drive, make sure that the NetScaler® product label is at the side, similar to the already inserted SSDs.
-
Insert a second Citrix certified SSD, which matches the capacity of the SSD in slot #1, in slot # 2.
Important
Mixing and matching of old and new SSDs is not supported. SSDs in slot #1 and slot #2, which constitute the first RAID pair (local storage), must be of the same size and type. Similarly, SSDs in slot #3 and slot #4, which constitute the second RAID pair (VPX storage), must be of the same size and type. Use only drives that are part of the provided conversion kit.
-
Insert the 960 GB blank SSD drives in slots 3, 4, 5, 6, 7, and 8.
-
Disconnect all the network cables from the data ports and the management ports.
-
Start the ADC appliance. For instructions, see Switch on the appliance.
The conversion process can take up to 90 minutes, during which you must not power cycle the appliance. The entire conversion process might not be visible on the console and might appear to be unresponsive.
The conversion process updates the BIOS, installs the Citrix Hypervisor™, and the Management Service Operating system.
-
Keep the console cable attached during the conversion process. Allow the process to complete, at which point the SDX login prompt appears.
-
During the conversion process the LOM port connection might be lost as it resets the IP address to the default value of 192.168.1.3.
-
The default credentials for the Citrix Hypervisor are changed to root/nsroot after the appliance is converted from an MPX to SDX. If this password does not work, try typing nsroot/the serial number of the appliance. The serial number bar code is available at the back of the appliance, and is also available in the output of the
show hardwarecommand.Note:
The serial number of the appliance remains the same.
- To make sure that the conversion is successful, verify that the FVT result indicates success. Run the following command:
tail /var/log/fvt/fvt.log
Reconfigure the converted appliance
After the conversion process, the appliance no longer has its previous working configuration. Therefore, you can access the appliance through a web browser only by using the default IP address: 192.168.100.1/16. Configure a computer on network 192.168.0.0 and connect it directly to the appliance’s management port (0/1) with a cross-over Ethernet cable. Alternately, access the NetScaler SDX appliance through a network hub by using a straight-through Ethernet cable. Use the default credentials to log on, and then do the following:
- Select the Dashboard tab.
- Verify that the System Resource section displays the accurate number of CPU cores, SSL cores, and the total memory for your NetScaler SDX appliance.
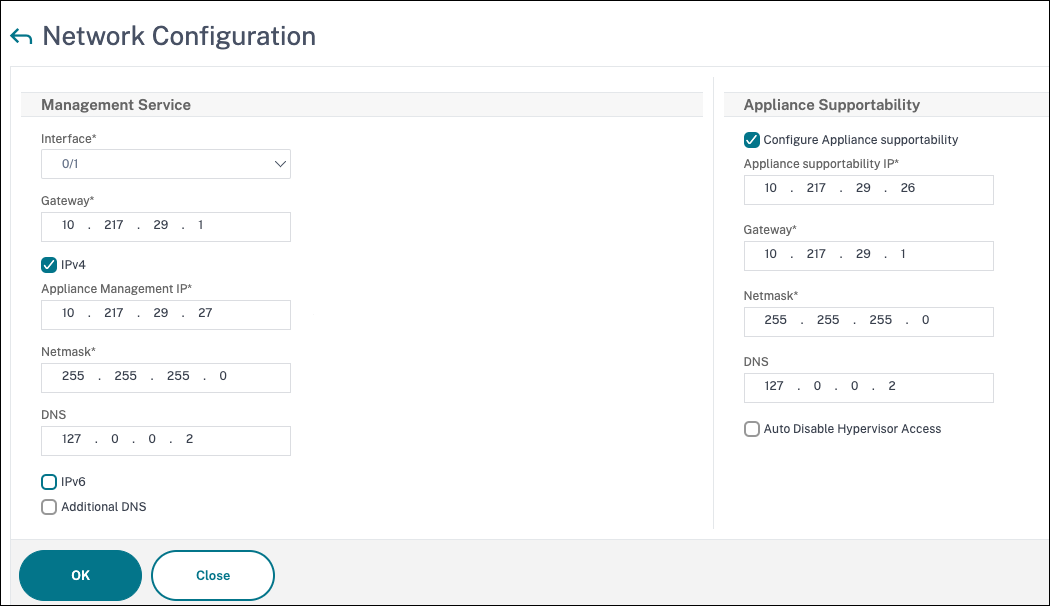
- Navigate to Configuration > System to modify the network information of the Management Service.
- In the Modify Network Configuration dialog box, specify the following details:
- Interface: Management interface that connects the appliance to a management workstation or network. Possible values: 0/1, 0/2. Default: 0/1.
- Gateway: IP address of the router that forwards traffic out of the appliance’s subnet.
- Select the IPv4 checkbox if you want to use the IPv4 address for the Management Service and enter the details for the following parameters:
- Appliance Management IP: The IPv4 address that is used to access the Management Service by using a web browser.
- Netmask: The subnet mask in which the SDX appliance is located.
- DNS: IPv4 address of the primary DNS server. IPv6 addresses are not supported for the primary DNS server.
- Select the IPv6 checkbox if you want to use the IPv6 address for the Management Service and enter the details for the following parameters:
- Management Service IP Address: The IPv6 address that is used to access the Management Service by using a Web browser.
- Gateway IPv6 Address: The IPv4 address of the router that forwards traffic out of the appliance’s subnet.
- Select Additional DNS to add DNS server IP addresses as an extra DNS server apart from the primary DNS server. The IP addresses can be either IPv4 or IPv6.
-
Click OK. Connection to the Management Service is lost as the network information was changed.
-
Connect the NetScaler SDX appliance’s management port 0/1 to a switch to access it through the network. Browse to the IP address used earlier and log in with the default credentials.
-
Apply the new licenses. For instructions, see SDX Licensing Overview.
- Navigate to Configuration > System and, in the System Administration group, click Reboot Appliance. Click Yes to confirm. You are now ready to provision the VPX instances on the NetScaler SDX appliance. For instructions, see Provisioning NetScaler instances.