This content has been machine translated dynamically.
Dieser Inhalt ist eine maschinelle Übersetzung, die dynamisch erstellt wurde. (Haftungsausschluss)
Cet article a été traduit automatiquement de manière dynamique. (Clause de non responsabilité)
Este artículo lo ha traducido una máquina de forma dinámica. (Aviso legal)
此内容已经过机器动态翻译。 放弃
このコンテンツは動的に機械翻訳されています。免責事項
이 콘텐츠는 동적으로 기계 번역되었습니다. 책임 부인
Este texto foi traduzido automaticamente. (Aviso legal)
Questo contenuto è stato tradotto dinamicamente con traduzione automatica.(Esclusione di responsabilità))
This article has been machine translated.
Dieser Artikel wurde maschinell übersetzt. (Haftungsausschluss)
Ce article a été traduit automatiquement. (Clause de non responsabilité)
Este artículo ha sido traducido automáticamente. (Aviso legal)
この記事は機械翻訳されています.免責事項
이 기사는 기계 번역되었습니다.책임 부인
Este artigo foi traduzido automaticamente.(Aviso legal)
这篇文章已经过机器翻译.放弃
Questo articolo è stato tradotto automaticamente.(Esclusione di responsabilità))
Translation failed!
使用 SSL 转发代理与 IPS 或 NGFW 作为内联设备集成
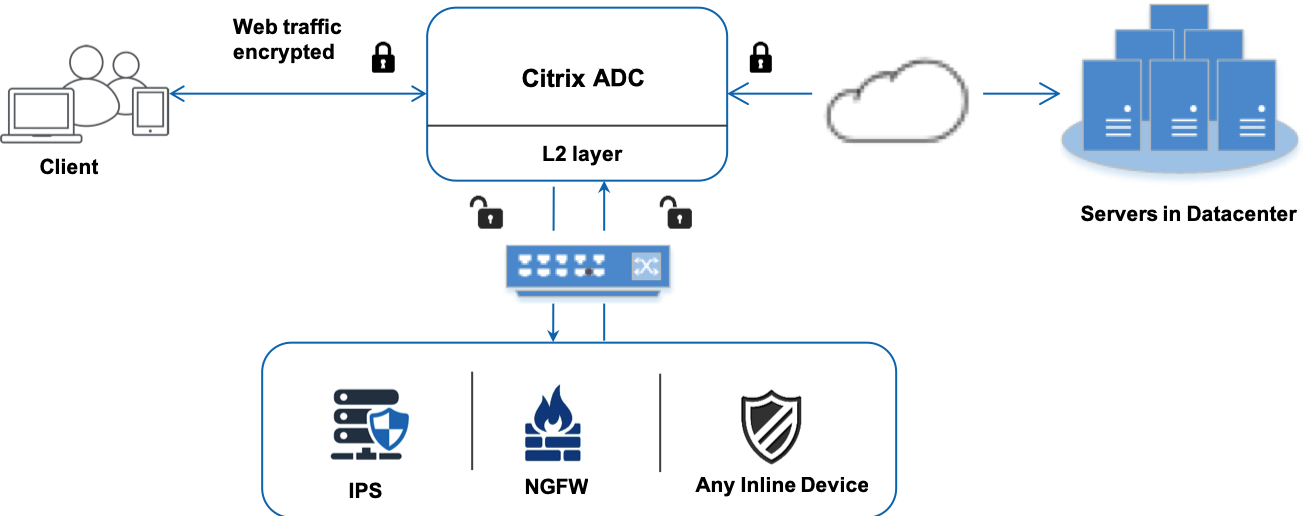
入侵防护系统 (IPS) 和下一代防火墙 (NGFW) 等安全设备可保护服务器免受网络攻击。这些设备可以检查实时流量,并且通常以第 2 层内联模式部署。当访问 Internet 上的资源时,SSL 转发代理设备可为用户和企业网络提供安全性。
SSL 转发代理设备可以与一个或多个内联设备集成,以防止威胁并提供高级安全保护。内联设备可以是任何安全设备,例如 IPS 和 NGFW。
使用 SSL 转发代理设备和内联设备集成可以从中受益的一些用例有:
-
检查加密流量: 大多数 IPS 和 NGFW 设备都会绕过加密流量,这可能会使服务器容易受到攻击。SSL 转发代理设备可以解密流量并将其发送到内联设备进行检查。这种集成增强了客户的网络安全性。
-
从 TLS/SSL 处理中卸载内联设备: TLS/SSL 处理费用昂贵,如果 IPS 或 NGFW 设备也解密流量,可能会导致 CPU 利用率高。SSL 转发代理设备有助于从内联设备卸载 TLS/SSL 处理。因此,内联设备可以检查更高的流量。
-
负载平衡内联设备: 如果您配置了多个串联设备来管理大量流量,则 SSL 转发代理设备可以进行负载平衡并将流量均匀地分配到这些设备。
-
智能流量选择: 设备不是将所有流量发送到内联设备进行检查,而是智能选择流量。例如,它跳过向内联设备发送要检查的文本文件。
与内联设备的 SSL 转发代理集成
下图显示了 SSL 转发代理如何与内联安全设备集成。
将内联设备与 SSL 转发代理设备集成时,组件的交互方式如下:
-
客户端向 SSL 转发代理设备发送请求。
-
设备将数据发送到内联设备,以便根据策略评估进行内容检查。对于 HTTPS 流量,设备会解密数据并将其以纯文本形式发送到内联设备以进行内容检查。
注意
如果有两个或更多串联设备,则设备会对设备进行负载平衡并发送流量。
- 添加内容交换或 HTTP/HTTPS 负载平衡虚拟服务器。
- 内联设备检查数据是否存在威胁,并决定是删除、重置或将数据发回设备。
- 如果存在安全威胁,设备将修改数据并将其发送到设备。
- 对于 HTTPS 流量,设备会重新加密数据并将请求转发到后端服务器。
- 后端服务器向设备发送响应。
- 设备再次解密数据并将其发送到内联设备进行检查。
- 内联设备检查数据。如果存在安全威胁,设备将修改数据并将其发送到设备。
- 设备重新加密数据并将响应发送给客户端。
配置内联设备集成
您可以通过以下三种不同的方式使用内联设备配置 SSL 转发代理设备:
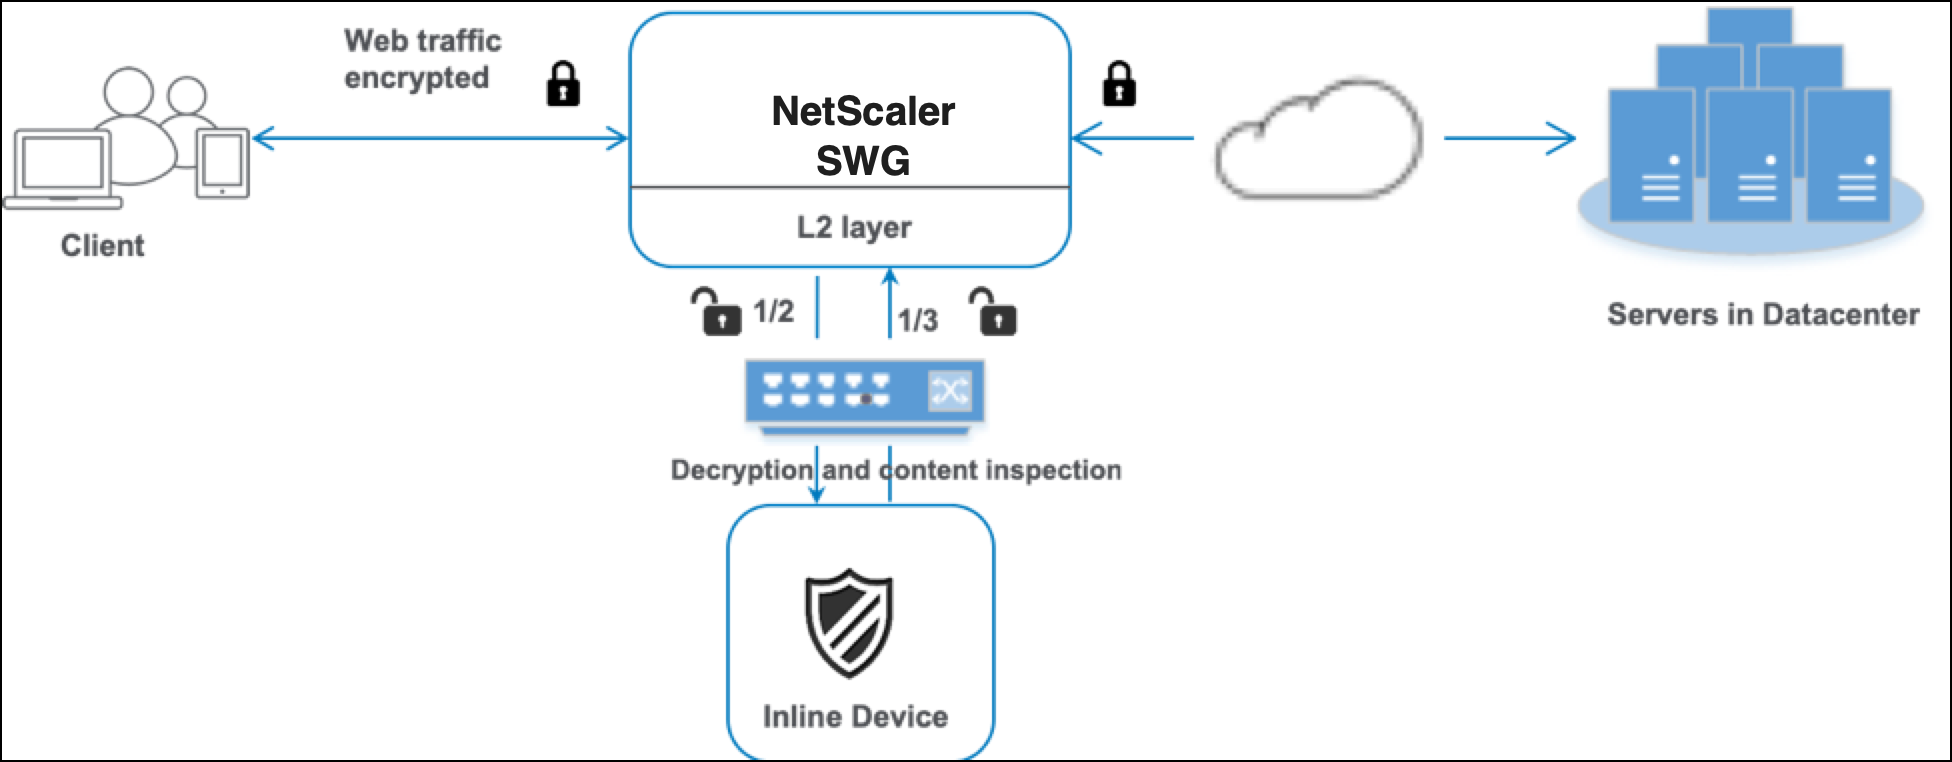
方案 1:使用单个内联设备
要在串联模式下集成安全设备(IPS 或 NGFW),您必须在全局模式下在 SSL 转发代理设备上启用内容检查和基于 MAC 的转发 (MBF)。然后,添加内容检查配置文件、TCP 服务、内联设备的内容检查操作,以便根据检查重置、阻止或删除流量。此外,还要添加内容检查策略,设备使用该策略来决定发送到串联设备的流量子集。最后,在服务器上配置启用第 2 层连接的代理虚拟服务器,并将内容检查策略绑定到该代理虚拟服务器。
请执行以下步骤:
- 启用基于 MAC 的转发 (MPF) 模式。
- 启用内容检查功能。
- 为服务添加内容检查配置文件。内容检查配置文件包含内联设备设置,这些设置将 SSL 转发代理设备与内联设备集成。
-
(可选)添加 TCP 监视器。
注意:
透明设备没有 IP 地址。因此,要执行运行状况检查,必须显式绑定监视器。
- 添加服务。服务代表内联设备。
- (可选)将服务绑定到 TCP 监视器。
- 为服务添加内容检查操作。
- 添加内容检查策略并指定操作。
- 添加 HTTP 或 HTTPS 代理(内容交换)虚拟服务器。
- 将内容检查策略绑定到虚拟服务器。
使用 CLI 进行配置
在命令提示符处键入以下命令。大多数命令后面都给出了示例。
- 启用 MBF。
enable ns mode mbf
- 启用功能。
enable ns feature contentInspection
- 添加内容检查配置文件。
add contentInspection profile <name> -type InlineInspection -egressInterface <interface_name> -ingressInterface <interface_name>[-egressVlan <positive_integer>] [-ingressVlan <positive_integer>]
示例:
add contentInspection profile ipsprof -type InlineInspection -ingressinterface “1/2” -egressInterface “1/3”
- 添加服务。指定不属于任何设备(包括内联设备)的虚拟 IP 地址。将
use source IP address(USIP) 设置为“是”。设置useproxyport为“否”。默认情况下,运行状况监视处于开启状态,将服务绑定到运行状况监视器,并将监视器中的 TRANSPARENT 选项设置为 ON。
add service <service_name> <IP> TCP * - contentinspectionProfileName <Name> -healthMonitor YES -usip YES –useproxyport NO
示例:
add service ips_service 198.51.100.2 TCP * -healthMonitor YES -usip YES -useproxyport NO -contentInspectionProfileName ipsprof
-
添加运行状况监视器。默认情况下,运行状况监视器处于打开状态,如有必要,您还可以选择将其禁用。在命令提示符下,键入:
add lb monitor <name> TCP -destIP <ip address> -destPort 80 -transparent <YES, NO>
示例:
add lb monitor ips_tcp TCP -destIP 192.168.10.2 -destPort 80 -transparent YES
- 将服务绑定到运行状况监视器
配置运行状况监视器后,必须将服务绑定到运行状况监视器。在命令提示符下,键入:
bind service <name> -monitorName <name>
示例:
bind service ips_svc -monitorName ips_tcp
- 添加内容检查操作。
add contentInspection action <name> -type INLINEINSPECTION -serverName <string>
示例:
add contentInspection action ips_action -type INLINEINSPECTION -serverName ips_service
- 添加内容检查策略。
add contentInspection policy <name> -rule <expression> -action <string>
示例:
add contentInspection policy ips_pol -rule "HTTP.REQ.METHOD.NE(\"CONNECT\")" -action ips_action
- 添加代理虚拟服务器。
add cs vserver <name> PROXY <IPAddress> <port> -cltTimeout <secs> -Listenpolicy <expression> -authn401 ( ON | OFF ) -authnVsName <string> -l2Conn ON
注意:
还支持 HTTP/SSL 类型的负载平衡虚拟服务器。
示例:
add cs vserver transparentcs PROXY * * -cltTimeout 180 -Listenpolicy exp1 -authn401 on -authnVsName swg-auth-vs-trans-http -l2Conn ON
- 将策略绑定到虚拟服务器。
bind cs vserver <name> -policyName <string> -priority <positive_integer> -gotoPriorityExpression <expression> -type REQUEST
示例:
bind cs vserver explicitcs -policyName ips_pol -priority 1 -gotoPriorityExpression END -type REQUEST
使用 GUI 进行配置
-
导航到 System(系统)> Settings(设置)。在“模式和功能”中,单击“配置模式”。
-
在“配置模式”页面中,选择 基于 MAC 的转发 选项。
-
导航到 System(系统)> Settings(设置)。在“模式和功能”中,单击“配置高级功能”。
-
在“配置高级功能”页面中,选择“内容检查”选项。
-
导航到 Secure Web Gateway > 内容检查 > 内容检查配置文件。单击添加。 导航到 负载平衡 > 服务 > 添加 和添加服务。
-
In Advanced Settings, click Profiles. In the CI Profile Name list, select the content inspection profile created earlier.
-
In Service Settings, set Use Source IP Address to YES and Use Proxy Port to No. In Basic Settings, set Health Monitoring to NO.
-
Turn on health monitoring only if you bind this service to a TCP monitor. If you bind a monitor to a service, then set the TRANSPARENT option in the monitor to ON.
-
-
导航到 Secure Web Gateway > 代理虚拟服务器 > 添加。指定名称、IP 地址和端口。在“高级设置”中,选择“策略”。单击“+”号。
-
在“选择策略”中,选择“内容检查”。单击继续。
-
单击添加。指定一个名称。在“操作”中,单击“添加”。
-
指定一个名称。在类型中,选择联机检查。在 服务器名称中,选择之前创建的 TCP 服务。
-
单击 Create(创建)。指定规则,然后单击“创建”。
-
单击绑定。
-
单击 Done(完成)。
场景 2:使用专用接口对多个串联设备进行负载平衡
如果您使用的是两个或多个内联设备,则可以使用具有专用接口的不同内容检测服务对设备进行负载平衡。在这种情况下,SSL 转发代理设备对通过专用接口发送到每台设备的流量子集进行负载均衡。子集是根据配置的策略决定的。例如,TXT 或图像文件可能不会被发送到内联设备以进行检查。

基本配置与场景 1 中的配置相同。但是,您必须为每台内联设备创建内容检查配置文件,并在每个配置文件中指定入口和出口接口。为每个嵌入式设备添加一项服务。添加负载平衡虚拟服务器,并在内容检查操作中指定该服务器。执行以下额外步骤:
- 为每项服务添加内容检查配置文件。
- 为每台设备添加一项服务。
- 添加负载平衡虚拟服务器。
- 在内容检查操作中指定负载平衡虚拟服务器。
使用 CLI 进行配置
在命令提示符处键入以下命令。每个命令后都会给出示例。
- 启用 MBF。
enable ns mode mbf
- 启用功能。
enable ns feature contentInspection
- 为服务 1 添加配置文件 1。
add contentInspection profile <name> -type InlineInspection -egressInterface <interface_name> -ingressInterface <interface_name>[-egressVlan <positive_integer>] [-ingressVlan <positive_integer>]
示例:
add contentInspection profile ipsprof1 -type InlineInspection -ingressInterface "1/2" -egressInterface "1/3"
- 为服务 2 添加配置文件 2。
add contentInspection profile <name> -type InlineInspection -egressInterface <interface_name> -ingressInterface <interface_name>[-egressVlan <positive_integer>] [-ingressVlan <positive_integer>]
示例:
add contentInspection profile ipsprof2 -type InlineInspection -ingressInterface "1/4" -egressInterface "1/5"
- 添加服务 1。指定不属于任何设备(包括内联设备)的虚拟 IP 地址。将
use source IP address(USIP) 设置为“是”。设置useproxyport为“否”。在“透明”选项设置为“打开”的情况下,使用 TCP 监视器开启运行状况监视。
add service <service_name> <IP> TCP * - contentinspectionProfileName <Name> -healthMonitor NO -usip YES –useproxyport NO
示例:
add service ips_service1 192.168.10.2 TCP * -healthMonitor NO -usip YES -useproxyport NO -contentInspectionProfileName ipsprof1
- 添加服务 2。指定不属于任何设备(包括内联设备)的虚拟 IP 地址。将
use source IP address(USIP) 设置为“是”。设置useproxyport为“否”。在“透明”选项设置为“打开”的情况下打开运行状况监视。
add service <service_name> <IP> TCP * - contentinspectionProfileName <Name> -healthMonitor NO -usip YES –useproxyport NO
示例:
add service ips_service2 192.168.10.3 TCP * -healthMonitor NO -usip YES -useproxyport NO -contentInspectionProfileName ipsprof2
- 添加负载平衡虚拟服务器。
add lb vserver <LB_VSERVER_NAME> TCP <IP> <port>
示例:
add lb vserver lb_inline_vserver TCP 192.0.2.100 *
- 将服务绑定到负载平衡虚拟服务器。
bind lb vserver <LB_VSERVER_NAME> <service_name>
bind lb vserver <LB_VSERVER_NAME> <service_name>
示例:
bind lb vserver lb_inline_vserver ips_service1
bind lb vserver lb_inline_vserver ips_service2
- 在内容检查操作中指定负载平衡虚拟服务器。
add contentInspection action <name> -type INLINEINSPECTION -serverName <string>
示例:
add contentInspection action ips_action -type INLINEINSPECTION -serverName lb_inline_vserver
- 添加内容检查策略。在策略中指定内容检查操作。
add contentInspection policy <name> -rule <expression> -action <string>
示例:
add contentInspection policy ips_pol -rule "HTTP.REQ.METHOD.NE(\"CONNECT\")" -action ips_action
- 添加代理虚拟服务器。
add cs vserver <name> PROXY <IPAddress> <port> -l2Conn ON
示例:
add cs vserver transparentcs PROXY * * -l2Conn ON
- 将内容检查策略绑定到虚拟服务器。
bind cs vserver <name> -policyName <string> -priority <positive_integer> -gotoPriorityExpression <expression> -type REQUEST
示例:
bind cs vserver explicitcs -policyName ips_pol -priority 1 -gotoPriorityExpression END -type REQUEST
使用 GUI 进行配置
-
导航到 System(系统)> Settings(设置)。在“模式和功能”中,单击“配置模式”。
-
在“配置模式”页面中,选择 基于 MAC 的转发 选项。
-
导航到 System(系统)> Settings(设置)。在“模式和功能”中,单击“配置高级功能”。
-
导航到 Secure Web Gateway > 内容检查 > 内容检查配置文件。单击添加。
-
指定入口和出口接口。
-
创建两个个人资料。在第二个配置文件中指定不同的入口和出口接口。
-
导航到 负载平衡 > 服务 > 添加 并添加服务。
-
在“高级设置”中,单击“配置文件”。在 CI 配置文件名称 列表中,选择之前创建的内容检查配置文件。
-
在“服务设置”中,将“使用源 IP 地址”设置为“是”,将“使用代理端口”设置为“否”。在“基本设置”中,将“运行状况监视”设置为“否”。
-
只有将此服务绑定到 TCP 监视器后,才会开启运行状况监视。如果将监视器绑定到服务,则将监视器中的“透明”选项设置为“开”。
创建两个服务。指定不属于任何设备(包括内联设备)的虚拟 IP 地址。
-
-
导航到 负载平衡 > 虚拟服务器 > 添加。创建 TCP 负载平衡虚拟服务器,然后单击“确定”。
-
单击“负载平衡虚拟服务器服务绑定”部分。在“服务绑定”中,单击“选择服务”中的箭头。选择之前创建的两个服务,然后单击“选择”。单击绑定。
-
导航到 Secure Web Gateway > 代理虚拟服务器 > 添加。指定名称、IP 地址和端口。在“高级设置”中,选择“策略”。单击“+”号。
-
在“选择策略”中,选择“内容检查”。单击继续。
-
单击添加。指定一个名称。在“操作”中,单击“添加”。
-
指定一个名称。在类型中,选择联机检查。在 服务器名称中,选择之前创建的负载平衡虚拟服务器。
-
单击 Create(创建)。指定规则,然后单击“创建”。
-
单击绑定。
-
单击 Done(完成)。
场景 3:使用共享接口对多个串联设备进行负载平衡
如果您使用的是两个或多个内联设备,则可以使用具有共享接口的不同内容检查服务对设备进行负载平衡。在这种情况下,SSL 转发代理设备对通过共享接口发送到每台设备的流量子集进行负载均衡。子集是根据配置的策略决定的。例如,TXT 或图像文件可能不会被发送到内联设备以进行检查。
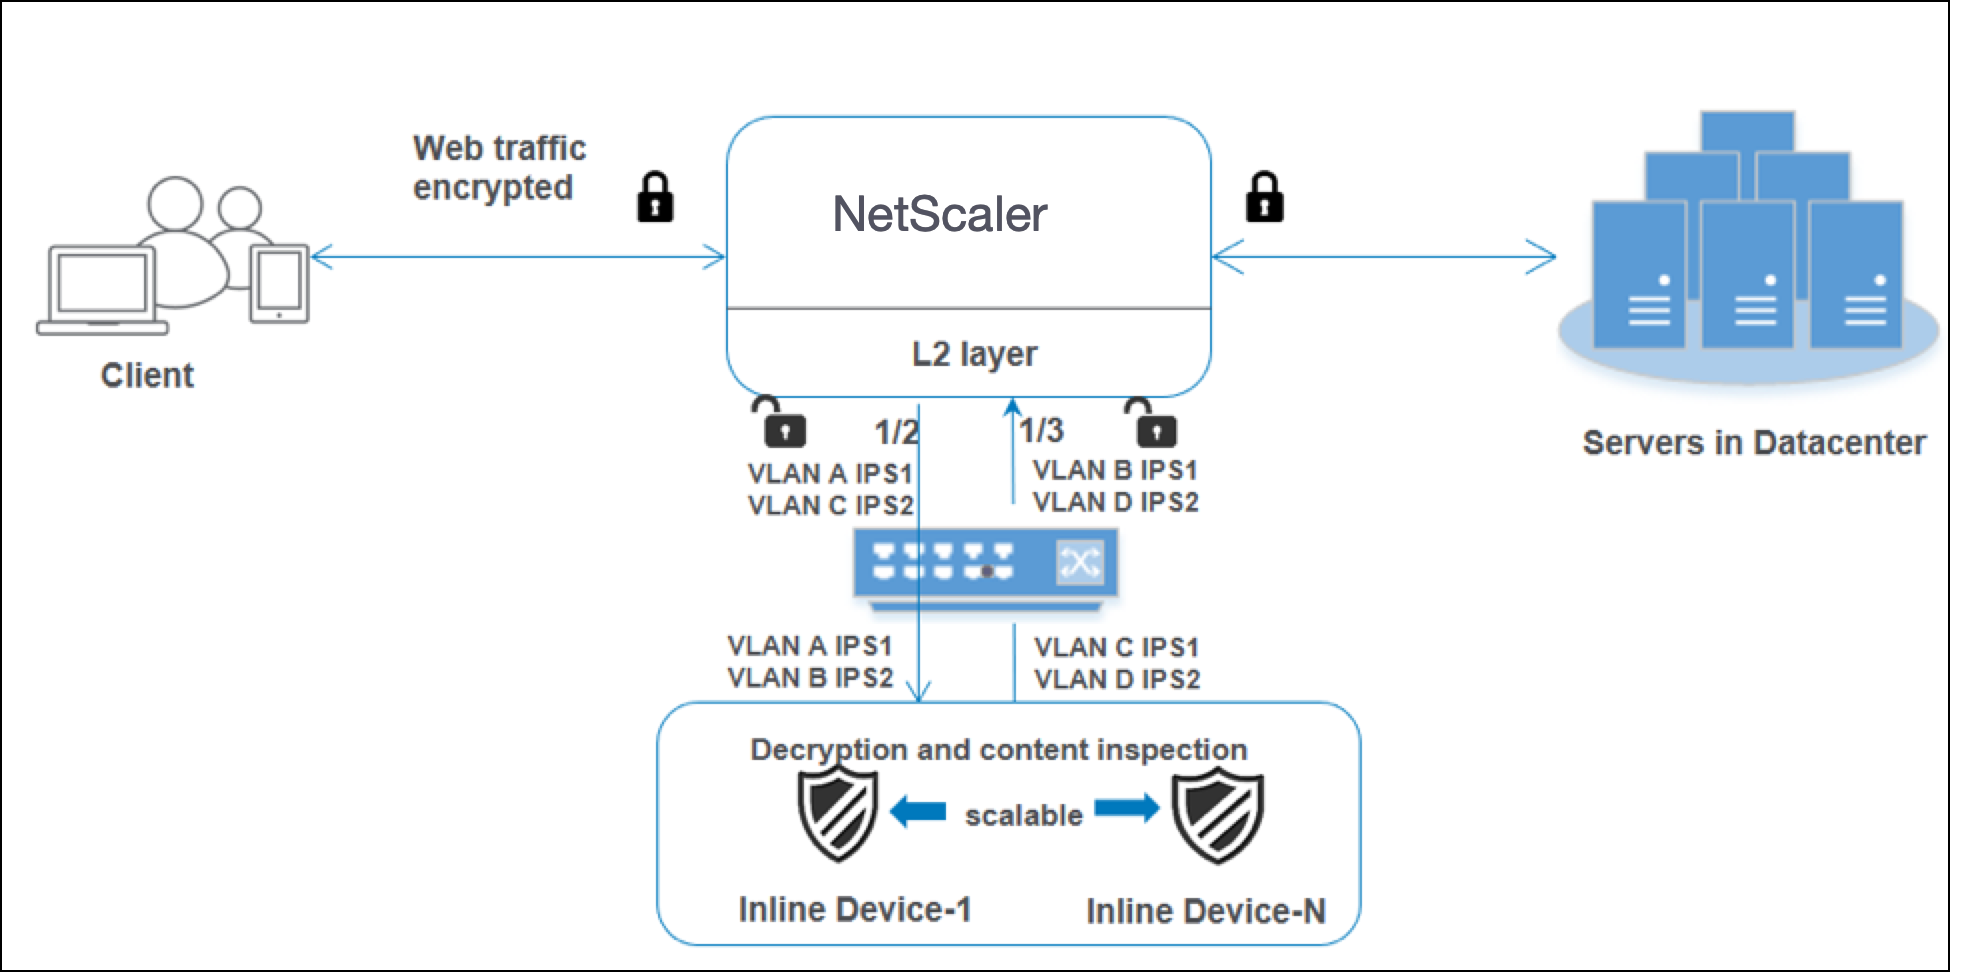
基本配置与场景 2 中的配置相同。在这种情况下,将接口绑定到不同的 VLAN,以隔离每台串联设备的流量。在内容检查配置文件中指定 VLAN。执行以下额外步骤:
-
将共享接口绑定到不同的 VLAN。
-
在内容检查配置文件中指定入口和出口 VLAN。
使用 CLI 进行配置
在命令提示符处键入以下命令。每个命令后都会给出示例。
- 启用 MBF。
enable ns mode mbf
- 启用功能。
enable ns feature contentInspection
-
将共享接口绑定到不同的 VLAN。
bind vlan <id> -ifnum <interface> -tagged
示例:
bind vlan 100 –ifnum 1/2 tagged
bind vlan 200 –ifnum 1/3 tagged
bind vlan 300 –ifnum 1/2 tagged
bind vlan 400 –ifnum 1/3 tagged
<!--NeedCopy-->
- 为服务 1 添加配置文件 1。在配置文件中指定入口和出口 VLAN。
add contentInspection profile <name> -type InlineInspection -egressInterface <interface_name> -ingressInterface <interface_name>[-egressVlan <positive_integer>] [-ingressVlan <positive_integer>]
示例:
add contentInspection profile ipsprof1 -type InlineInspection -egressInterface “1/3” -ingressinterface “1/2” –egressVlan 100 -ingressVlan 300
- 为服务 2 添加配置文件 2。在配置文件中指定入口和出口 VLAN。
add contentInspection profile <name> -type InlineInspection -egressInterface <interface_name> -ingressInterface <interface_name>[-egressVlan <positive_integer>] [-ingressVlan <positive_integer>]
示例:
add contentInspection profile ipsprof2 -type InlineInspection -egressInterface “1/3” -ingressinterface “1/2” –egressVlan 200 -ingressVlan 400
- 添加服务 1。
add service <service_name> <IP> TCP * - contentinspectionProfileName <Name> -healthMonitor NO -usip YES –useproxyport NO
示例:
add service ips_service1 192.168.10.2 TCP * -healthMonitor NO -usip YES -useproxyport NO -contentInspectionProfileName ipsprof1
- 添加服务 2。
add service <service_name> <IP> TCP * - contentinspectionProfileName <Name> -healthMonitor NO -usip YES –useproxyport NO
示例:
add service ips_service2 192.168.10.3 TCP * -healthMonitor NO -usip YES -useproxyport NO -contentInspectionProfileName ipsprof2
- 添加负载平衡虚拟服务器。
add lb vserver <LB_VSERVER_NAME> TCP <IP> <port>
示例:
add lb vserver lb_inline_vserver TCP 192.0.2.100 *
- 将服务绑定到负载平衡虚拟服务器。
bind lb vserver <LB_VSERVER_NAME> <service_name>
bind lb vserver <LB_VSERVER_NAME> <service_name>
示例:
bind lb vserver lb_inline_vserver ips_service1
bind lb vserver lb_inline_vserver ips_service2
- 在内容检查操作中指定负载平衡虚拟服务器。
add contentInspection action <name> -type INLINEINSPECTION -serverName <string>
示例:
add contentInspection action ips_action -type INLINEINSPECTION -serverName lb_inline_vserver
- 添加内容检查策略。在策略中指定内容检查操作。
add contentInspection policy <name> -rule <expression> -action <string>
示例:
add contentInspection policy ips_pol -rule "HTTP.REQ.METHOD.NE(\"CONNECT\")" -action ips_action
- 添加代理虚拟服务器。
add cs vserver <name> PROXY <IPAddress> <port> -l2Conn ON
示例:
add cs vserver transparentcs PROXY * * -l2Conn ON
- 将内容检查策略绑定到虚拟服务器。
bind cs vserver <name> -policyName <string> -priority <positive_integer> -gotoPriorityExpression <expression> -type REQUEST
示例:
bind cs vserver explicitcs -policyName ips_pol -priority 1 -gotoPriorityExpression END -type REQUEST
使用 GUI 进行配置
-
导航到 System(系统)> Settings(设置)。在“模式和功能”中,单击“配置模式”。
-
在“配置模式”页面中,选择 基于 MAC 的转发 选项。
-
导航到 System(系统)> Settings(设置)。在“模式和功能”中,单击“配置高级功能”。
-
在“配置高级功能”页面中,选择“内容检查”选项。
-
导航到“系统”>“网络”>“VLAN”>“添加”。添加四个 VLAN 并将其标记到接口。
-
导航到 Secure Web Gateway > 内容检查 > 内容检查配置文件。单击添加。
-
指定入口和出口 VLAN。
-
创建其他个人资料。在第二个配置文件中指定不同的入口和出口 VLAN。
-
导航到 负载平衡 > 服务 > 添加 并添加服务。
-
在“高级设置”中,单击“配置文件”。在 CI 配置文件名称 列表中,选择之前创建的内容检查配置文件。
-
在“服务设置”中,将“使用源 IP 地址”设置为“是”,将“使用代理端口”设置为“否”。在“基本设置”中,将“运行状况监视”设置为“否”。
-
只有将此服务绑定到 TCP 监视器后,才会开启运行状况监视。如果将监视器绑定到服务,则将监视器中的“透明”选项设置为“开”。
创建两个服务。指定不属于任何设备(包括内联设备)的虚拟 IP 地址。在服务 1 中指定配置文件 1,在服务 2 中指定配置文件 2。
-
-
导航到 负载平衡 > 虚拟服务器 > 添加。创建 TCP 负载平衡虚拟服务器,然后单击“确定”。
-
单击“负载平衡虚拟服务器服务绑定”部分。在“服务绑定”中,单击“选择服务”中的箭头。选择之前创建的两个服务,然后单击“选择”。单击绑定。
-
导航到 Secure Web Gateway > 代理虚拟服务器 > 添加。指定名称、IP 地址和端口。在“高级设置”中,选择“策略”。单击“+”号。
-
在“选择策略”中,选择“内容检查”。单击继续。
-
单击添加。指定一个名称。在“操作”中,单击“添加”。
-
指定一个名称。在类型中,选择联机检查。在 服务器名称中,选择之前创建的负载平衡虚拟服务器。
-
单击 Create(创建)。指定规则,然后单击“创建”。
- 单击绑定。
- 单击 Done(完成)。
共享
共享
This Preview product documentation is Cloud Software Group Confidential.
You agree to hold this documentation confidential pursuant to the terms of your Cloud Software Group Beta/Tech Preview Agreement.
The development, release and timing of any features or functionality described in the Preview documentation remains at our sole discretion and are subject to change without notice or consultation.
The documentation is for informational purposes only and is not a commitment, promise or legal obligation to deliver any material, code or functionality and should not be relied upon in making Cloud Software Group product purchase decisions.
If you do not agree, select I DO NOT AGREE to exit.