Configure Network Access Control device check for NetScaler Gateway virtual server for single factor login
This topic provides information on configuring NetScaler Gateway to connect to an internal network from a mobile device (iOS and Android) with the Network Access Compliance (NAC) security offered by Microsoft Intune. When a user tries to connect to NetScaler Gateway from an iOS or Android VPN client, the gateway first checks with the Intune service if the device is a managed and a compliant device.
-
Managed: The device is enrolled using the Intune Company Portal client.
-
Compliant: Required policies pushed from the Intune MDM server are applied.
Only if the device is both managed and compliant, the VPN session is established and the user is provided access to the internal resources.
Note:
In this setup, NetScaler Gateway at the back-end talks to the Intune service. The SSL profiles handle the incoming connections to the NetScaler Gateway. The NetScaler Gateway back-end communication handles any SNI requirements of the back-end cloud services (Intune).
SNI for DTLS gateway virtual server is supported in NetScaler Gateway release 13.0 build 64.x and later.
Intune NAC check, for the per-app VPN or even device-wide VPN, is supported only when the VPN profile is provisioned by the Intune management portal (now known as Microsoft Endpoint Manager). These features are not supported for end-user added VPN profiles. The end user device must have the VPN profile deployed to their device from Microsoft Endpoint Manager by their Intune administrator to use the NAC check.
Licensing
Citrix Enterprise Edition license is required for this functionality.
System requirements
-
NetScaler Gateway release 11.1 build 51.21 or later
-
iOS VPN – 10.6 or later
-
Android VPN – 2.0.13 or later
-
Microsoft
-
Microsoft Entra ID access (having tenant and admin privileges)
-
Intune enabled tenant
-
-
Firewall
Enable firewall rules to all DNS and SSL traffic from subnet IP address to
https://login.microsoftonline.comandhttps://graph.windows.net(port 53 and port 443)
Prerequisites
-
All existing authentication policies must be converted from classic to advanced policies. For information on how to convert from classic policies to advanced policies, see https://support.citrix.com/article/CTX131024.
-
Create a NetScaler Gateway application on the Azure portal. For details, see Configuring a NetScaler Gateway application on the Azure portal.
-
Configure the OAuth policy on the NetScaler Gateway application that you created using the following application specific information.
-
Client ID / Application ID
-
Client secret / Application key
-
Microsoft Entra tenant ID
-
References
-
This document captures the NetScaler Gateway setup configuration. Most of the Citrix SSO client (iOS/Android) configuration is done on the Intune side. For details on Intune VPN configuration for NAC, see https://docs.microsoft.com/en-us/mem/intune/protect/network-access-control-integrate.
-
To configure the VPN profile for an iOS app, see https://docs.microsoft.com/en-us/mem/intune/configuration/vpn-settings-ios.
-
To set up the NetScaler Gateway application on the Azure portal, see Configuring a NetScaler Gateway application on the Azure portal.
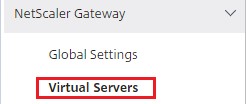
To add a NetScaler Gateway virtual server with nFactor for gateway deployment
-
Navigate to NetScaler Gateway > Virtual Servers.
-
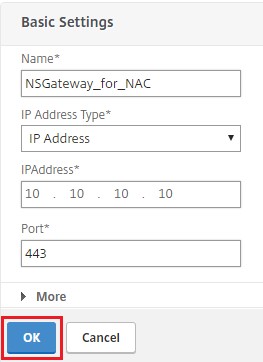
Click Add.
-
Provide the required information in the Basic Settings area and click OK.
-
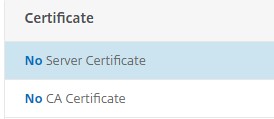
Select Server Certificate.
-
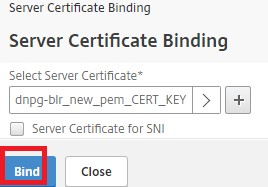
Select the required server certificate and click Bind.
-
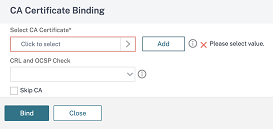
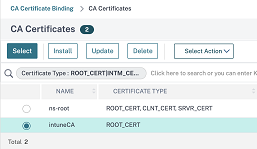
As part of Intune NAC v2 API support, you must bind a Certificate Authority file (CA certificate) to ensure that the NetScaler appliance gets a valid certificate from mobile devices. In Intune NAC v2, the mobile devices send device IDs as part of the client certificate. The CA certificate bound here must be the one used to issue client certificates to the end user iOS and Android devices. If there are intermediate certificates, those must also be bound here. For more on Intune configuration, see Configuring a NetScaler Gateway application on the Azure portal. For Intune NAC v2 API support, select the required CA certificate and click Bind.
-
Click Continue.
-
Click Continue.
-
Click Continue.
-
Click the plus icon [+] next to Policies and select Session from the Choose Policy list and select Request from the Choose Type list and click Continue.
-
Click the plus icon [+] next to Select Policy.
-
On the Create NetScaler Gateway Session Policy page, provide a name for the Session policy.
-
Click the plus icon [+] next to Profile and on the Create NetScaler Gateway Session Profile page, provide a name for the Session profile.
-
On the Client Experience tab, click the checkbox next to Clientless Access and select Off from the list.
-
Click the checkbox next to Plug-in Type and select Windows/Mac OS X from the list.
-
Click Advanced Settings and select the checkbox next to Client Choices and set its value to ON.
-
On the Security tab, click the checkbox next to Default Authorization Action and select Allow from the list.
-
On the Published Applications tab, click the checkbox next to ICA Proxy and select OFF from the list.
-
Click Create.
-
On the Create NetScaler Gateway Session Policy page, In the Expression area, configure the qualifying expression.
-
Click Create.
-
Click Bind.
-
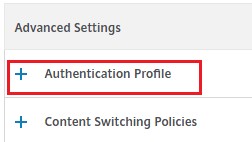
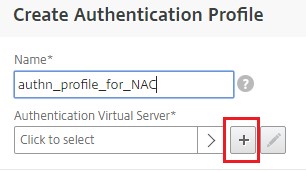
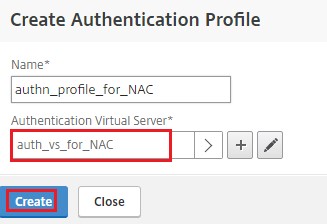
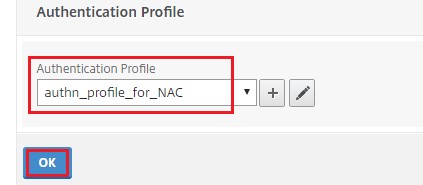
Select Authentication Profile in Advanced Settings.
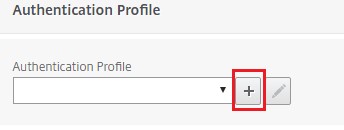
-
Click the plus icon [+] and provide a name for the Authentication Profile.
-
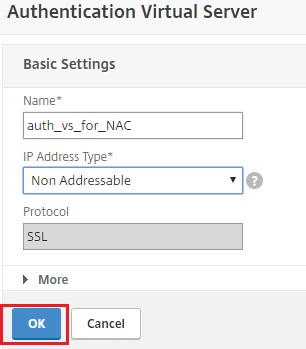
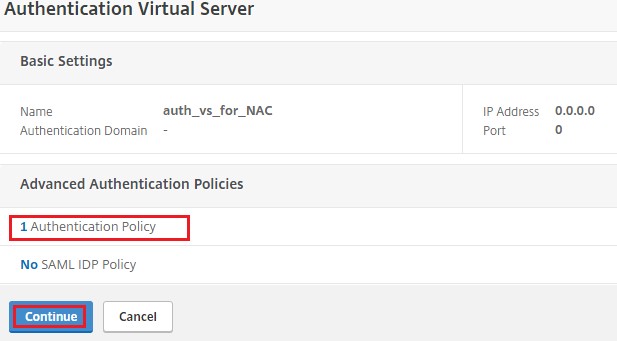
Click the plus icon [+] to create an authentication virtual server.
-
Specify the name and IP address type for authentication virtual server under Basic Settings area and click OK. The IP address type can be Non Addressable as well.
-
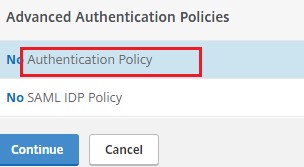
Click Authentication Policy.
-
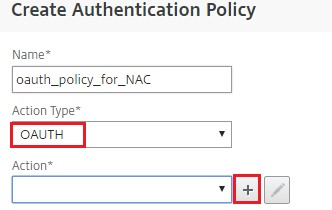
Under the Policy Binding view, click the plus icon [+] to create an authentication policy.
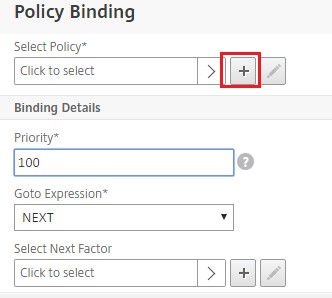
-
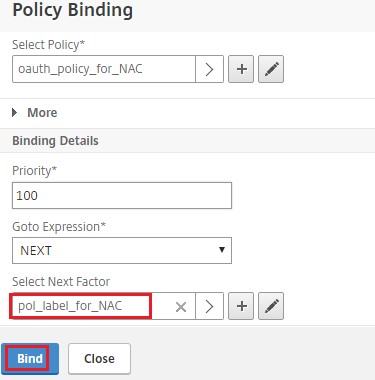
Select OAUTH as an Action Type and click the plus icon [+] to create an OAuth action for NAC.
-
Create an OAuth action using Client ID, Client Secret, and Tenant ID.
Note:
-
Client ID, Client Secret, and Tenant ID are generated after configuring the NetScaler Gateway application on the Azure portal.
-
Note down the Client ID/Application ID, Client Secret/Application Secret, and Microsoft Entra tenant ID information as they are required when creating an OAuth action on NetScaler Gateway later.
Ensure that you have an appropriate DNS name server configured on your appliance to resolve and reach;
-  `https://login.microsoftonline.com/,`

-  `https://graph.windows.net/`,

-  *.manage.microsoft.com.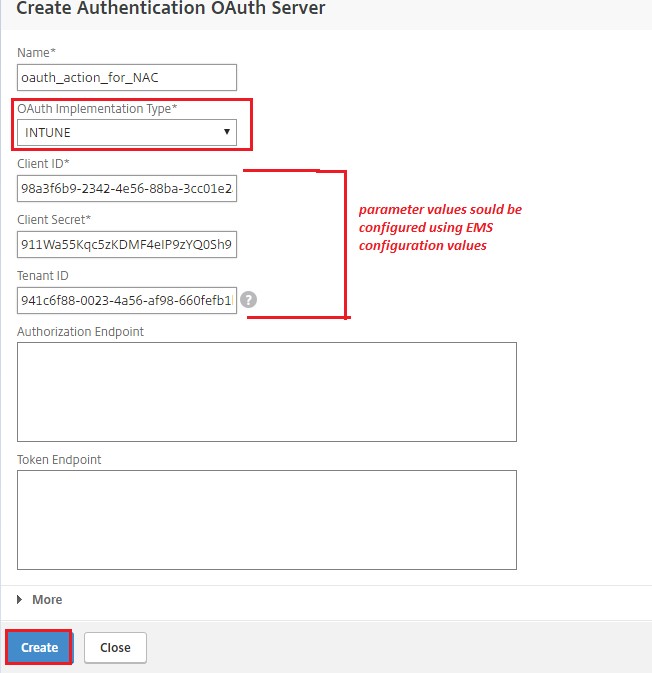
-
-
Create an authentication policy for OAuth Action.
Rule:
http.req.header("User-Agent").contains("NAC/1.0")&& ((http.req.header("User-Agent").contains("iOS") && http.req.header("User-Agent").contains("NSGiOSplugin")) || (http.req.header("User-Agent").contains("Android") && http.req.header("User-Agent").contains("CitrixVPN")))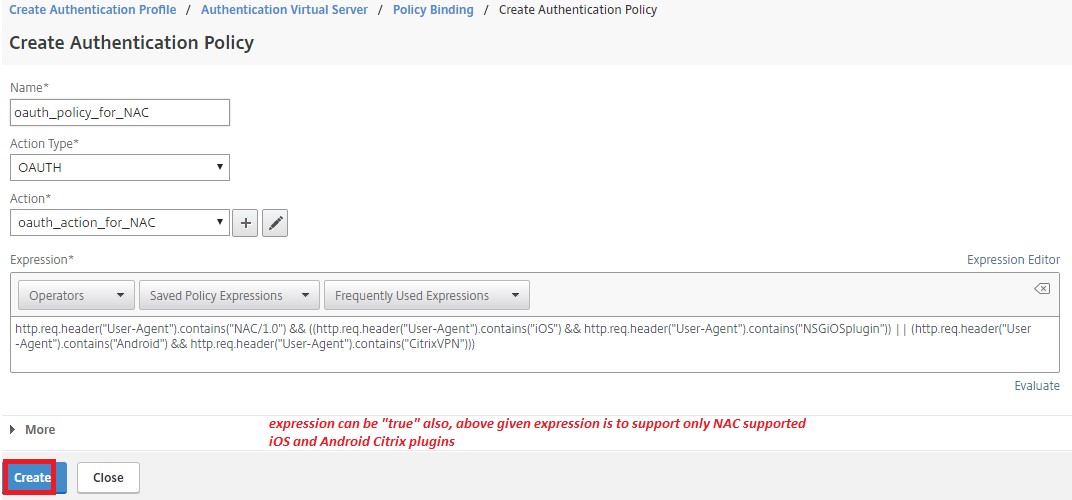
-
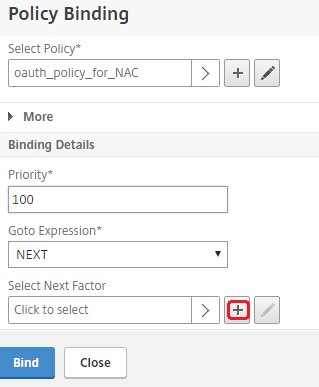
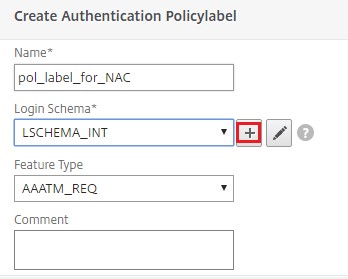
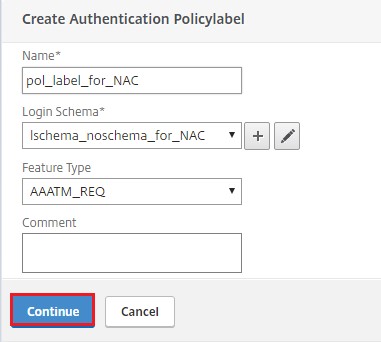
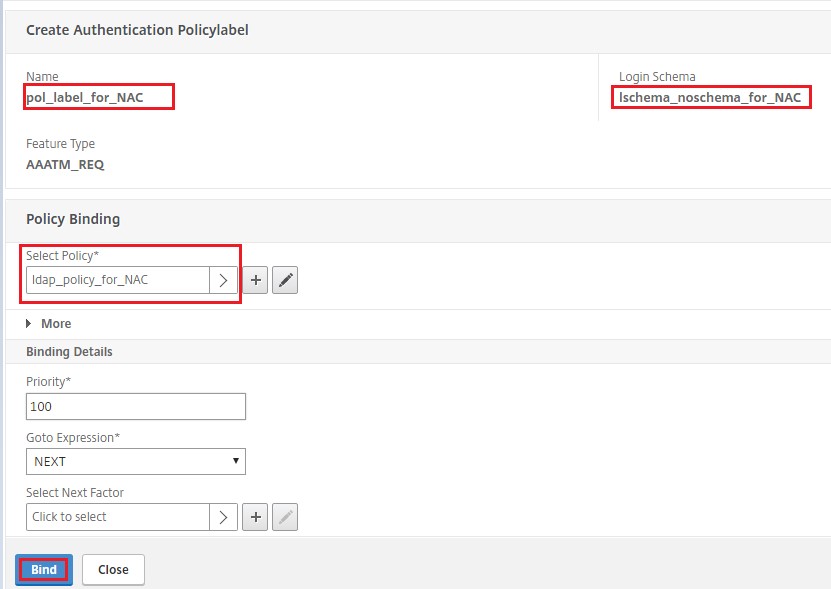
Click the plus icon [+] to create a nextFactor policy label.
-
Click the plus icon [+] to create a login schema.
-
Select
noschemaas an authentication schema and click Create.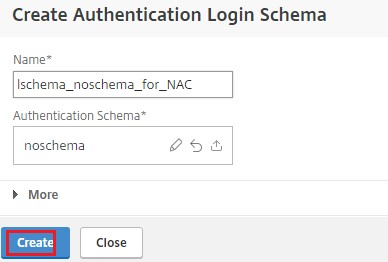
-
After selecting the created login schema, click Continue.
-
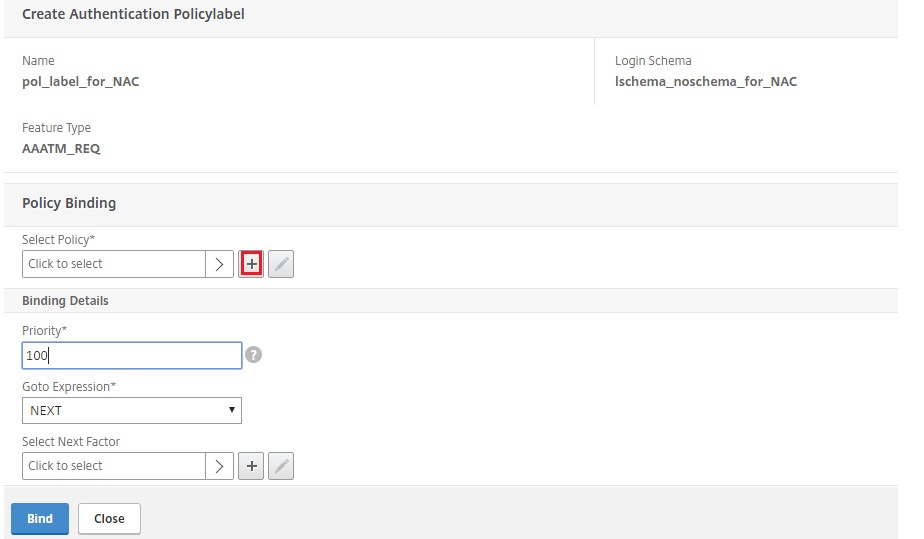
In Select Policy, select an existing authentication policy for user login or click the plus icon + to create an authentication policy.
For details on creating an authentication policy, see Configuring advanced authentication policies and Configuring LDAP Authentication.
-
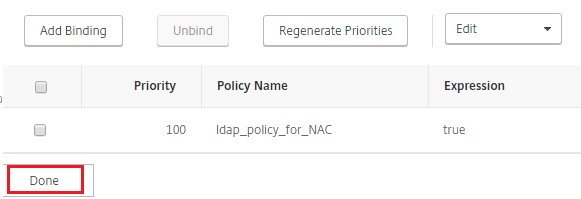
Click Bind.
-
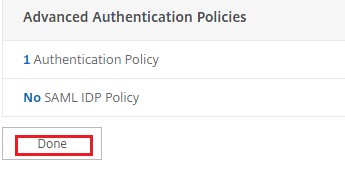
Click Done.
-
Click Bind.
-
Click Continue.
-
Click Done.
-
Click Create.
-
Click OK.
-
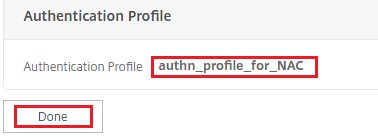
Click Done.
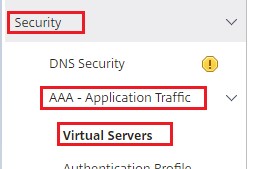
To bind authentication login schema to authentication virtual server to indicate VPN plug-ins to send device ID as part of /cgi/login request
-
Navigate to Security > AAA - Application Traffic > Virtual Servers.
-
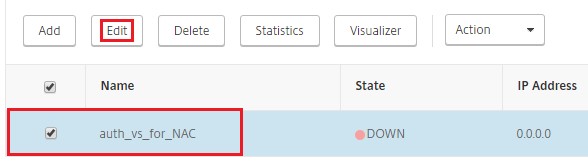
Select the previously selected virtual-server and click Edit.
-
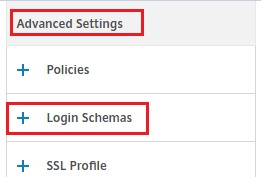
Click Login Schemas under Advanced Settings.
-
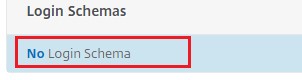
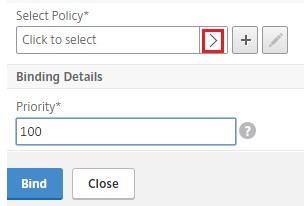
Click Login Schemas to bind.
-
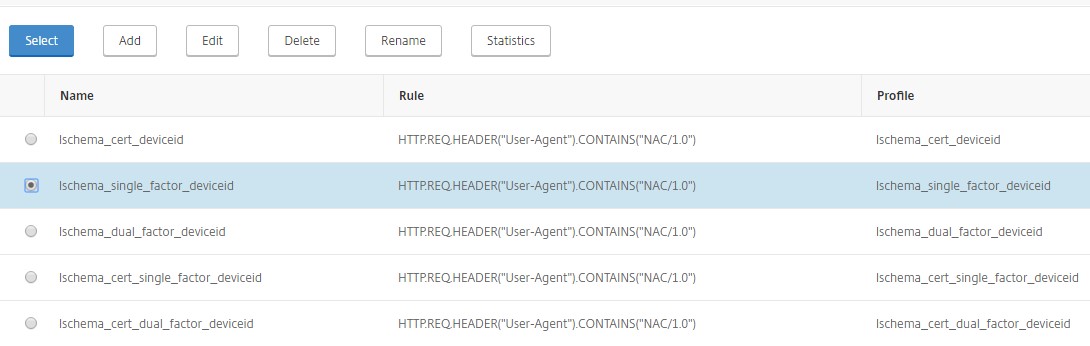
Click [>] to select and bind the existing build-in login schema policies for NAC device check.
-
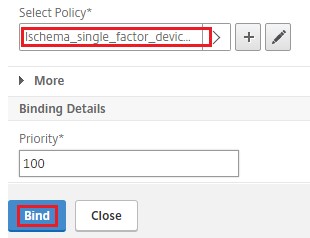
Select the required login schema policy appropriate for your authentication deployment and click Select.
In the previous explained deployment, single factor authentication (LDAP) along with a NAC OAuth Action policy is used. Hence lschema_single_factor_deviceid is selected.
-
Click Bind.
-
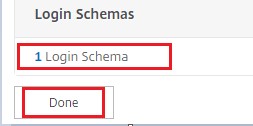
Click Done.
Intune NAC v2 API support
As part of Intune NAC v2 API support, you must bind a Certificate Authority file (CA certificate) to ensure that the NetScaler appliance gets a valid certificate from mobile devices. In Intune NAC v2, the mobile devices send device IDs as part of the CA certificate. The CA certificate bound here must be the one used to issue client certificates to the end-user iOS and Android devices. If there are intermediate certificates, those must also be bound here.
You can use the following sample command to bind your CA certificate.
bind ssl vserver intune_nac_check_443 -certkeyName clientca -CA -ocspCheck Optional
Important:
Intune NAC v2 API support is available in the NetScaler Gateway versions 13.1 build 12.50 or later and 13.0 build 84.11 or later.
You must enable client certificate-based authentication by setting
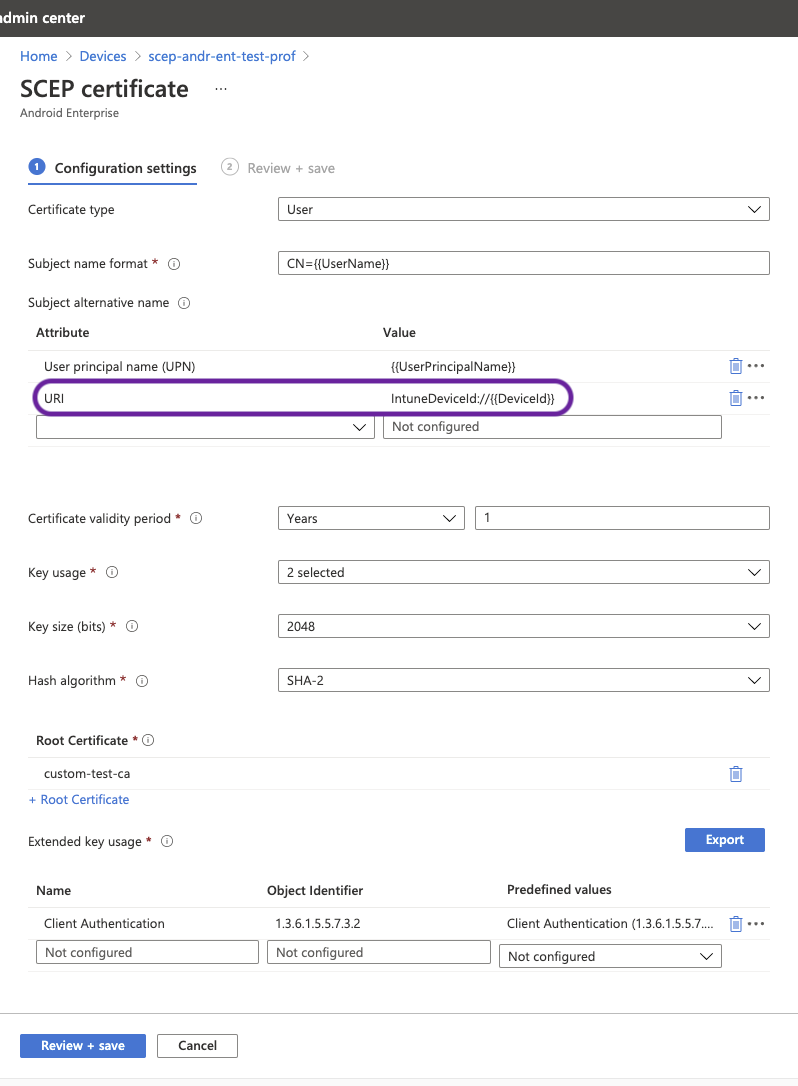
clientAuthto ENABLED andclientCertto OPTIONAL on the VPN and authentication virtual servers. TheclientCertparameter is set to OPTIONAL so that other endpoints which do not need the Intune NAC check can authenticate via the same virtual server without providing the client certificate. Android and iOS devices must provide the client certificate. Otherwise the Intune NAC check fails.You must ensure that the client certificates provisioned via Intune on the mobile device must have Intune Device ID in the SAN field of URI type as called out in the New Microsoft Intune service for network access control document. For details, see https://techcommunity.microsoft.com/t5/intune-customer-success/new-microsoft-intune-service-for-network-access-control/ba-p/2544696. The format of the URI value field must be the same as indicated in the following figure. Also, the Citrix SSO app must use the same certificate for authenticating with the gateway.
Troubleshooting
General issues
| Issue | Resolution |
|---|---|
| The “Add Policy Required” message appears when you open an app | Add policies in the Microsoft Graph API |
| There are policy conflicts | Only a single policy per app is allowed |
| Your app can’t connect to internal resources | Ensure that the correct firewall ports are open, used correct tenant ID, and so on |
NetScaler Gateway issues
| Issue | Resolution |
|---|---|
| The permissions required to be configured for the gateway app on Azure are unavailable. | Check if a proper Intune license is available. Try using the manage.windowsazure.com portal to see if the permission can be added. Contact Microsoft support if the issue persists. |
NetScaler Gateway cannot reach login.microsoftonline.comandgraph.windows.net. |
From NS Shell, check if you are able to reach the following Microsoft website: cURL -v -k https://login.microsoftonline.com. Then, check whether DNS is configured on NetScaler Gateway. Also check that the firewall settings are correct (in case DNS requests are firewalled). |
| An error appears in ns.log after you configure OAuthAction. | Check if Intune licensing is enabled and the Azure Gateway app has the proper permissions set. |
Sh OAuthAction command does not show OAuth status as complete. |
Check the DNS settings and configured permissions on the Azure Gateway App. |
| The Android or iOS device does not show the dual authentication prompt. | Check if the Dual Factor Device ID logonSchema is bound to the authentication virtual server. |
NetScaler Gateway OAuth status and error condition
| Status | Error condition |
|---|---|
| AADFORGRAPH | Invalid secret, URL not resolved, connection timeout |
| MDMINFO |
*manage.microsoft.comis down or unreachable |
| GRAPH | Graph endpoint is down unreachable |
| CERTFETCH | Cannot talk to “Token Endpoint: https://login.microsoftonline.com because of a DNS error. To validate this configuration, go to the Shell prompt and type cURL https://login.microsoftonline.com. This command must validate. |
Note: When the OAuth status is successful, the status is displayed as COMPLETE.
Intune configuration check
Make sure to select the I agree checkbox in Base iOS VPN configuration for Citrix SSO > Enable network access control (NAC). Else, the NAC check does not work.
In this article
- Licensing
- System requirements
- Prerequisites
- References
- To add a NetScaler Gateway virtual server with nFactor for gateway deployment
- To bind authentication login schema to authentication virtual server to indicate VPN plug-ins to send device ID as part of /cgi/login request
- Intune NAC v2 API support
- Troubleshooting