
NetScaler Console on Kubernetes cluster
Before you install NetScaler Console virtual appliances on a Kubernetes cluster, read the prerequisites section.
Prerequisites
Ensure the following prerequisites are met before you install NetScaler Console.
Kubernetes cluster
-
The Kubernetes cluster must be of the following version or above:
-
Server version v1.20
-
Client version v1.20
Type the commandkubectl versionto check the version. -
-
The Helm application installed on the cluster must have the Client version v3.4.0 or above.Use the command
helm versionto check the version. -
Kubernetes cluster CNI (Container Network Interface) must be Calico version v3.21.1 or above.
-
All the subordinate nodes in the cluster must have an NFS client installed on them. This is because the NetScaler Console application persists the data and configuration on volumes mounted on a Network File Server. To install an NFS client on an Ubuntu-based subordinate, type the following commands:
apt-get update apt install nfs-common
-
The NetScaler Console application needs 32 GB memory and 8 vCPUs across the cluster and 120 GB space on NFS.
NetScaler appliance
The NetScaler appliance is required as the ingress device. NetScaler makes the required application services available outside the Kubernetes cluster. The NetScaler appliance must be outside the Kubernetes cluster, and the worker nodes must be reachable from the NetScaler. Perform the following steps:
-
Configure a SNIP on the NetScaler. NetScaler uses this SNIP to reach the worker nodes of the Kubernetes cluster.
-
Identify a free IP address to be used as virtual server IP address to make the required application services available outside the Kubernetes cluster.
Install NetScaler Console on Kubernetes cluster
Follow these steps to install a NetScaler Console appliance on a Kubernetes cluster:
-
Go to the NetScaler site and download the file for the NetScaler Console Helm Chart for Kubernetes.
-
Extract the downloaded Helm Chart tarball into the /var directory of the main node of the Kubernetes cluster.
-
Open the
values.yamlfile under the/var/citrixadmdirectory. -
Enter a password for the database in the
dbpasswdfield in the file. -
Change the following values. The NetScaler Console application uses these values to configure the NetScaler appliance so that the services are exposed to the external world:
-
ingressIP: a Virtual IP configured in the NetScaler for accessing the application. -
applicationID: a unique ID to distinguish the ingress configuration from the rest of the configuration on the NetScaler appliance. -
ingressADCIP: NetScaler IP address (NSIP), which is used as an ingress for the NetScaler Console application. -
ingressADCUsername: a user name to access the NetScaler appliance. This user must have write privileges. -
ingressADCPassword: Password for the user name.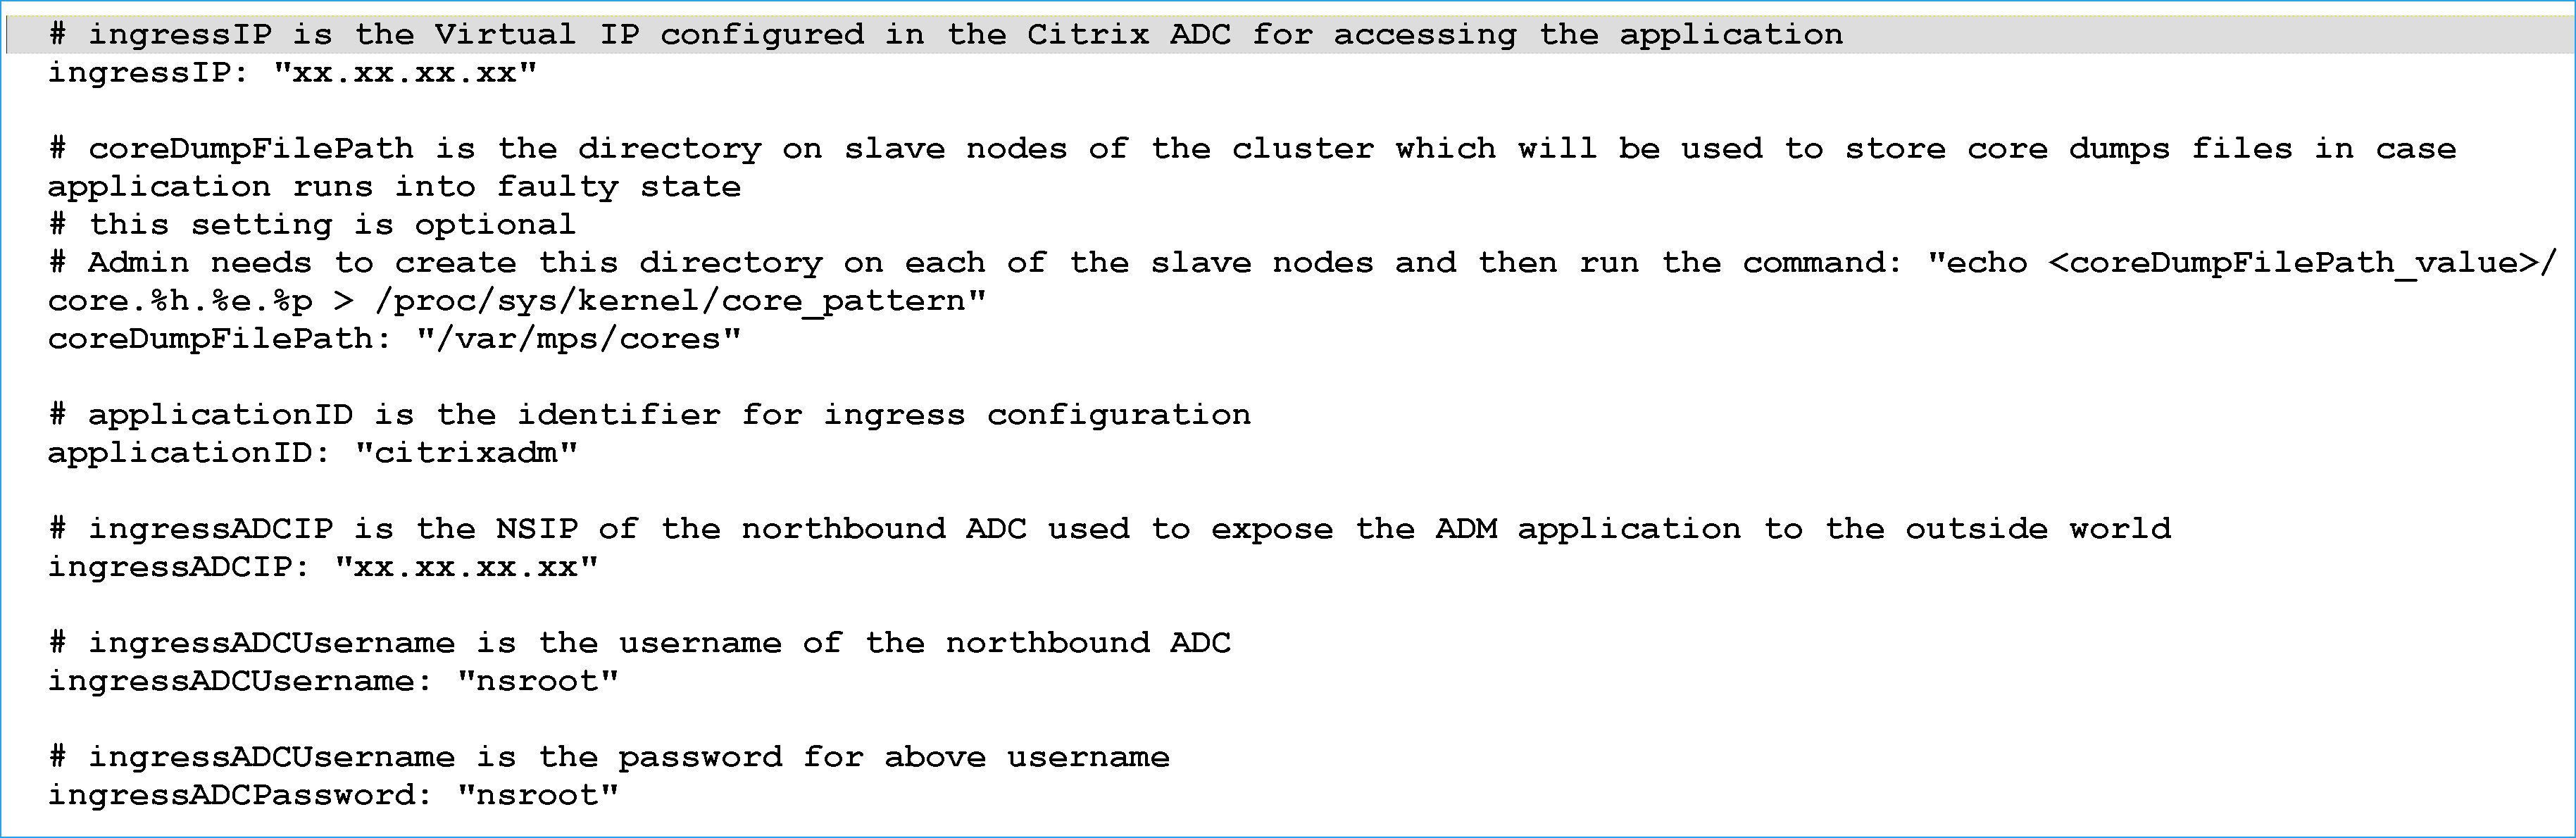
-
-
Change the following values in the storage section. These values specify the persistence required to store files required by the NetScaler Console application.
-
nfsServer: Host name or IP address of the NFS server -
path: mount the path for the folder to store application files. -
size: at least 10 GB.
NoteThe unit for this value is Gi. For example, 10Gi, 20Gi. -
-
Go to storage section under
pg-datastoreand change the following values. These values specify the persistence used for creating a database.-
nsfServer: Host name or IP address of the NFS server. -
size: mount a path for the folder used for the datastore. -
path: at least 100 GB.
NoteThe unit for this value is Gi. For example, 100Gi, 200Gi. -
-
Go to the /var/citrix directory in the main node and run the following command to install a NetScaler Console application:
helm install -n citrixadm --namespace <name> ./citrixadmNoteThis helm command is not supported in helm version 3.x.This command also installs the required pods in your cluster. Namespace argument is optional. If namespace is not provided, Helm installs NetScaler Console in the default namespace. For ease of management, install NetScaler Console under a separate namespace. -
Open your browser and type
http://< virtual server IP address >and log in to the NetScaler Console usingnsroot/nsrootas credentials. For secure access typehttps://< virtual server IP address >.
Note
During deployment, the NetScaler Console application creates tables in the datastore, which can take a while. Depending upon the resources allocated by Kubernetes to various pods of the NetScaler Console application, it can take 5- 15 mins for the service to come up.