-
Configuration guide for Citrix Virtual Apps and Desktops™ workloads
-
-
-
Administrative interface
This content has been machine translated dynamically.
Dieser Inhalt ist eine maschinelle Übersetzung, die dynamisch erstellt wurde. (Haftungsausschluss)
Cet article a été traduit automatiquement de manière dynamique. (Clause de non responsabilité)
Este artículo lo ha traducido una máquina de forma dinámica. (Aviso legal)
此内容已经过机器动态翻译。 放弃
このコンテンツは動的に機械翻訳されています。免責事項
이 콘텐츠는 동적으로 기계 번역되었습니다. 책임 부인
Este texto foi traduzido automaticamente. (Aviso legal)
Questo contenuto è stato tradotto dinamicamente con traduzione automatica.(Esclusione di responsabilità))
This article has been machine translated.
Dieser Artikel wurde maschinell übersetzt. (Haftungsausschluss)
Ce article a été traduit automatiquement. (Clause de non responsabilité)
Este artículo ha sido traducido automáticamente. (Aviso legal)
この記事は機械翻訳されています.免責事項
이 기사는 기계 번역되었습니다.책임 부인
Este artigo foi traduzido automaticamente.(Aviso legal)
这篇文章已经过机器翻译.放弃
Questo articolo è stato tradotto automaticamente.(Esclusione di responsabilità))
Translation failed!
Administrative interface
You can manage and maintain your Citrix SD-WAN appliances using the following administrative options using Citrix SD-WAN Orchestrator service. For more information, see Appliance settings.
- User accounts
- RADIUS server
- TACACS+ server
- HTTPS Cert
- HTTPS Settings
- Miscellaneous
User accounts
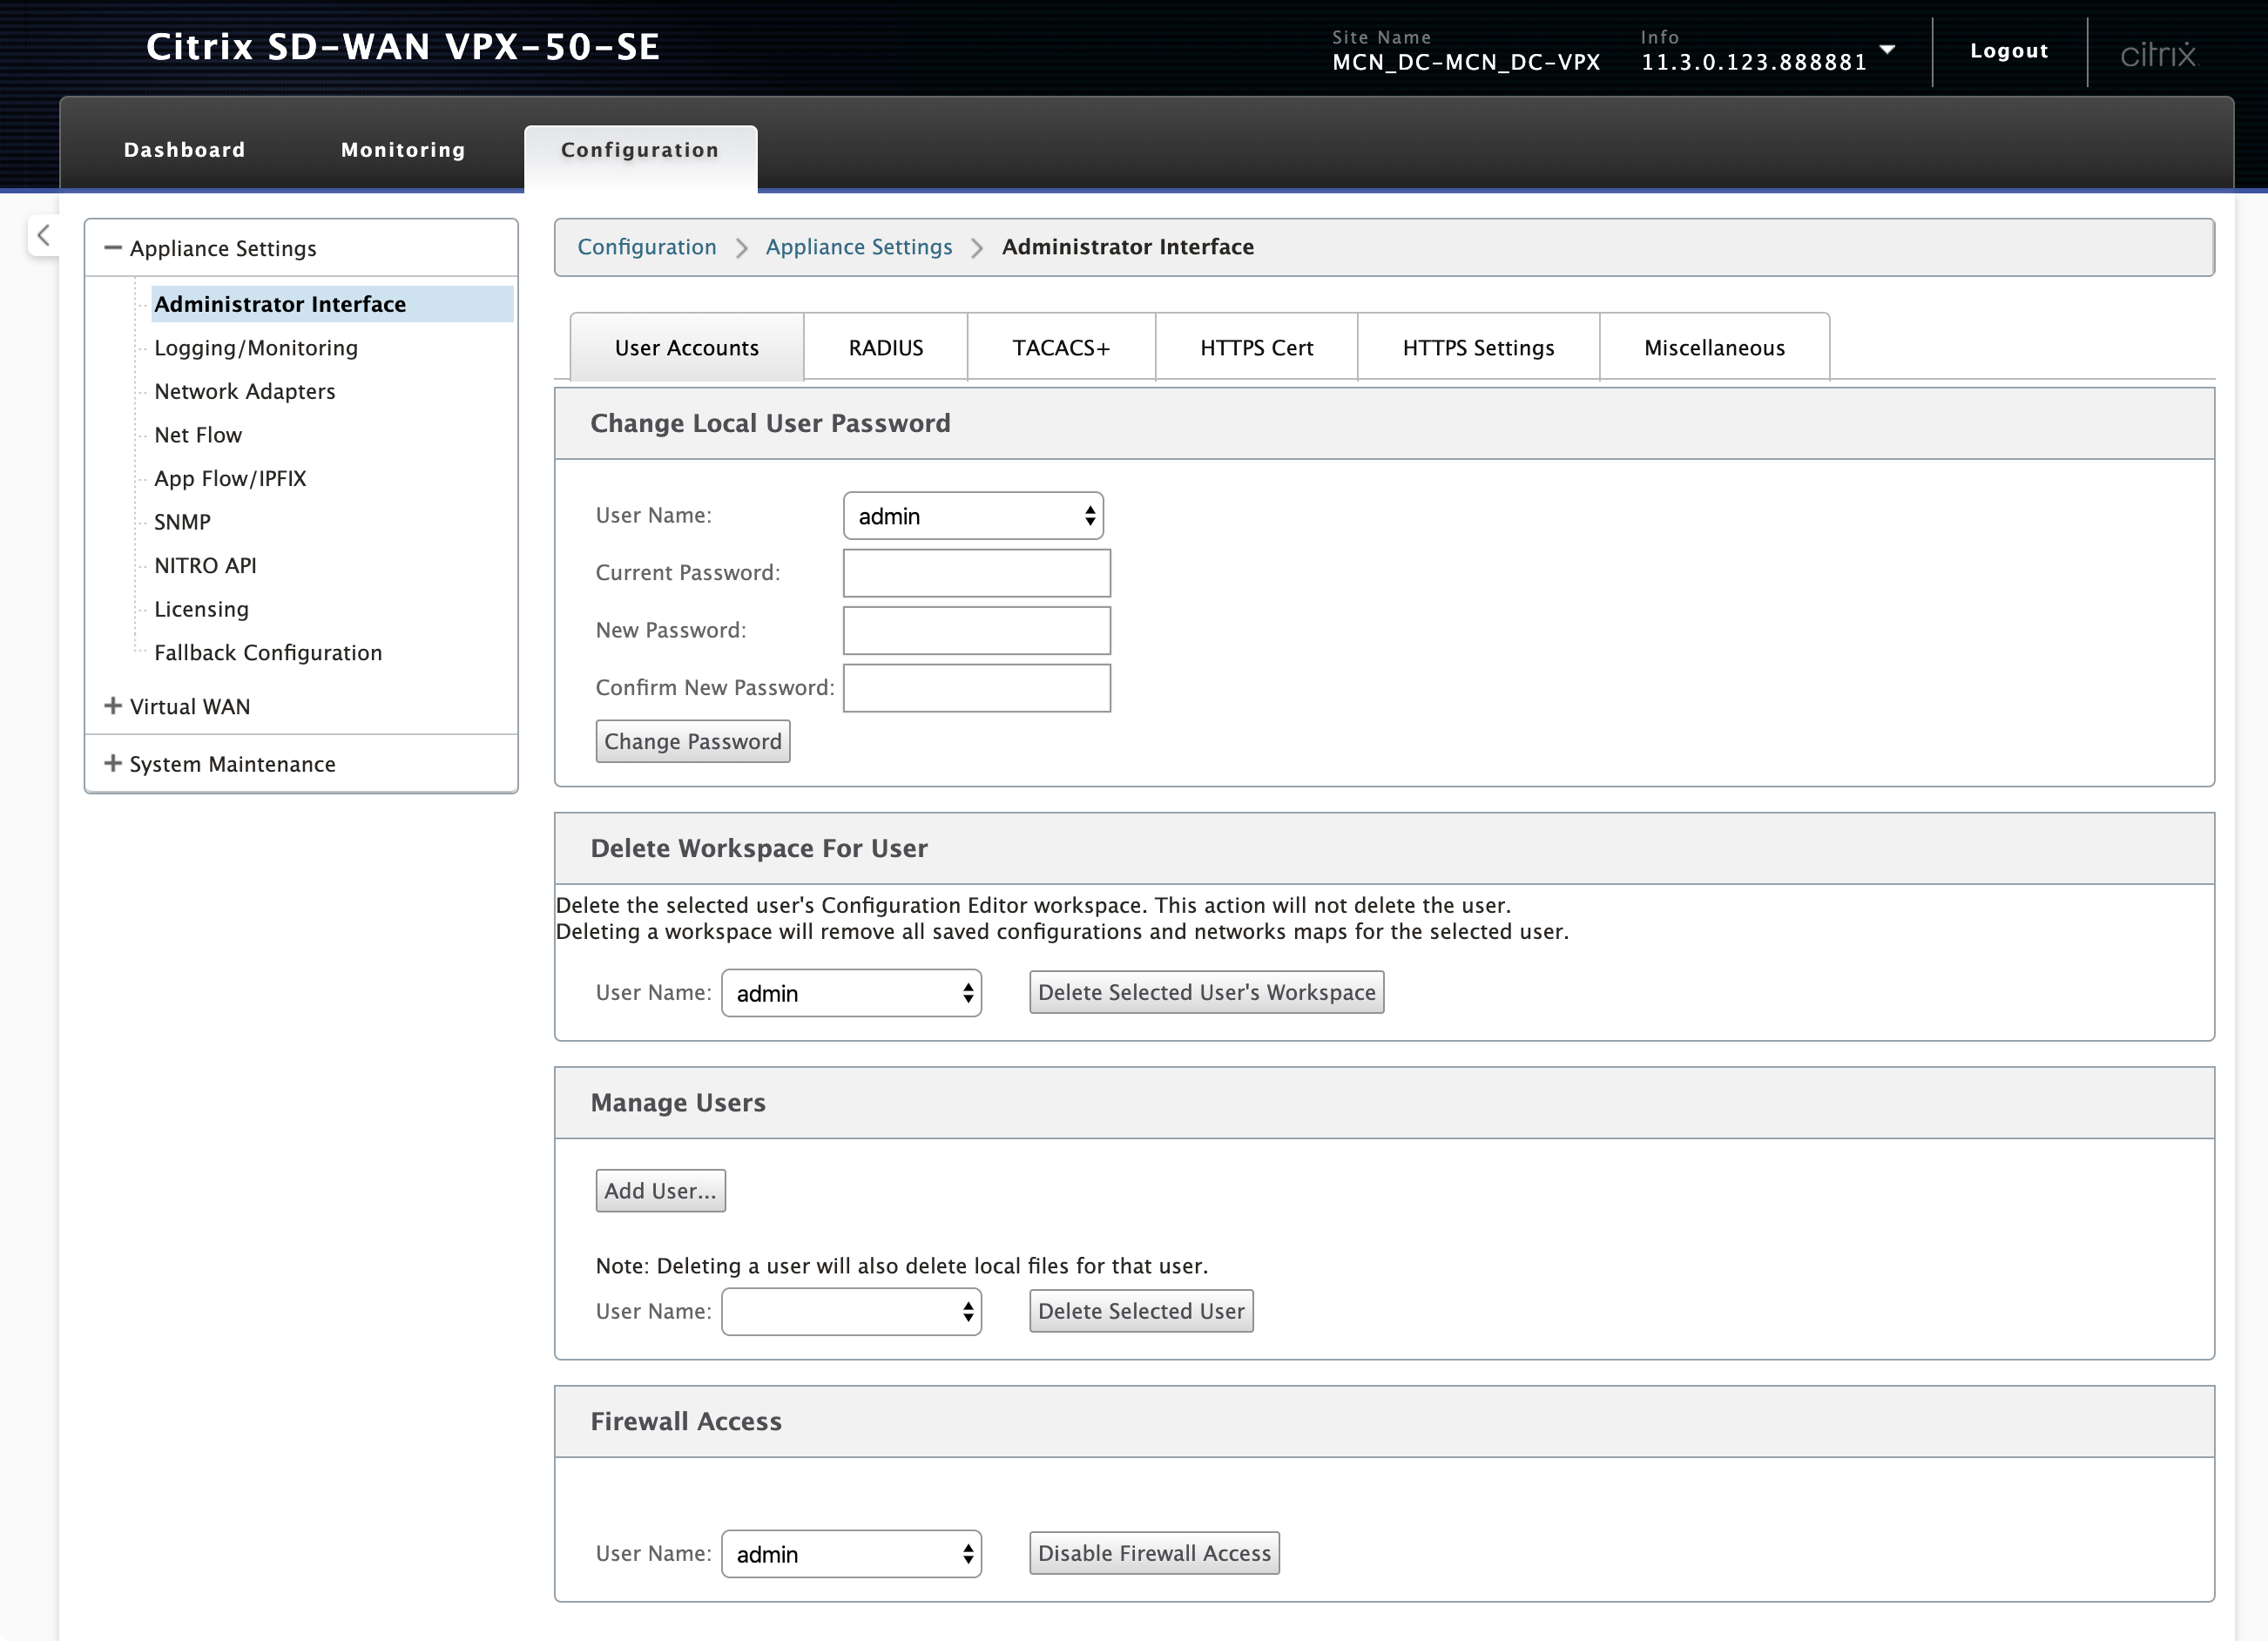
You can add new user accounts and manage the existing user accounts under Configuration > Appliance Settings > Administrator Interface page > User Accounts tab.
You can choose to authenticate the newly added user accounts either locally by the SD-WAN appliance or remotely. User accounts that are authenticated remotely, are authenticated through RADIUS or TACACS+ authentication servers.
User roles
The following user roles are supported:
-
Viewer: Viewer account is a read-only account with access to Dashboard, Reporting, and Monitoring pages.
-
Admin: Admin account has the administrative privileges and read-write access to all the sections.
A super administrator (admin) has the following privileges:
- Can export the configuration to the change management inbox to perform a configuration and software update to the network.
- Can also toggle the read-write access of the Network and Security Admins.
- Maintains both network and security related settings.
-
Security Admin: A security administrator has the read-write access only for the firewall and security related settings, while having read-only access to the remaining sections. Security administrator also has the capability to enable or disable write access to the firewall for other users except the super administrator (admin).
-
Network Admin: A network administrator has read-write permissions to all the sections and can fully provision a branch except for the firewall and security related settings. The hosted firewall node is not available for the network administrator. In this case, the network administrator must import a new configuration.
Both network administrator and security administrator can make changes to the configuration and also deploy them on the network.
NOTE
The network administrator and security administrator cannot add or delete user accounts. They can only edit their own account passwords.

Add a user
To add a user, click Add User in the Manage Users section. Provide the User Name and Password. Select the user role from the User Level drop-down list and click Apply.
You can also delete a user account, if needed. Deleting a user also deletes the local files belonging to that user. To delete, under Manage Users section, select the user from the User Name drop-down list and click Delete Selected User.

Change password of a user
The administrator role can change the password of a user account that is authenticated locally by the SD-WAN appliance.
To change the password, under Change Local User Password section, select the user from the User Name drop-down list. Enter the current password and the new password. Click Change Password.
RADIUS server
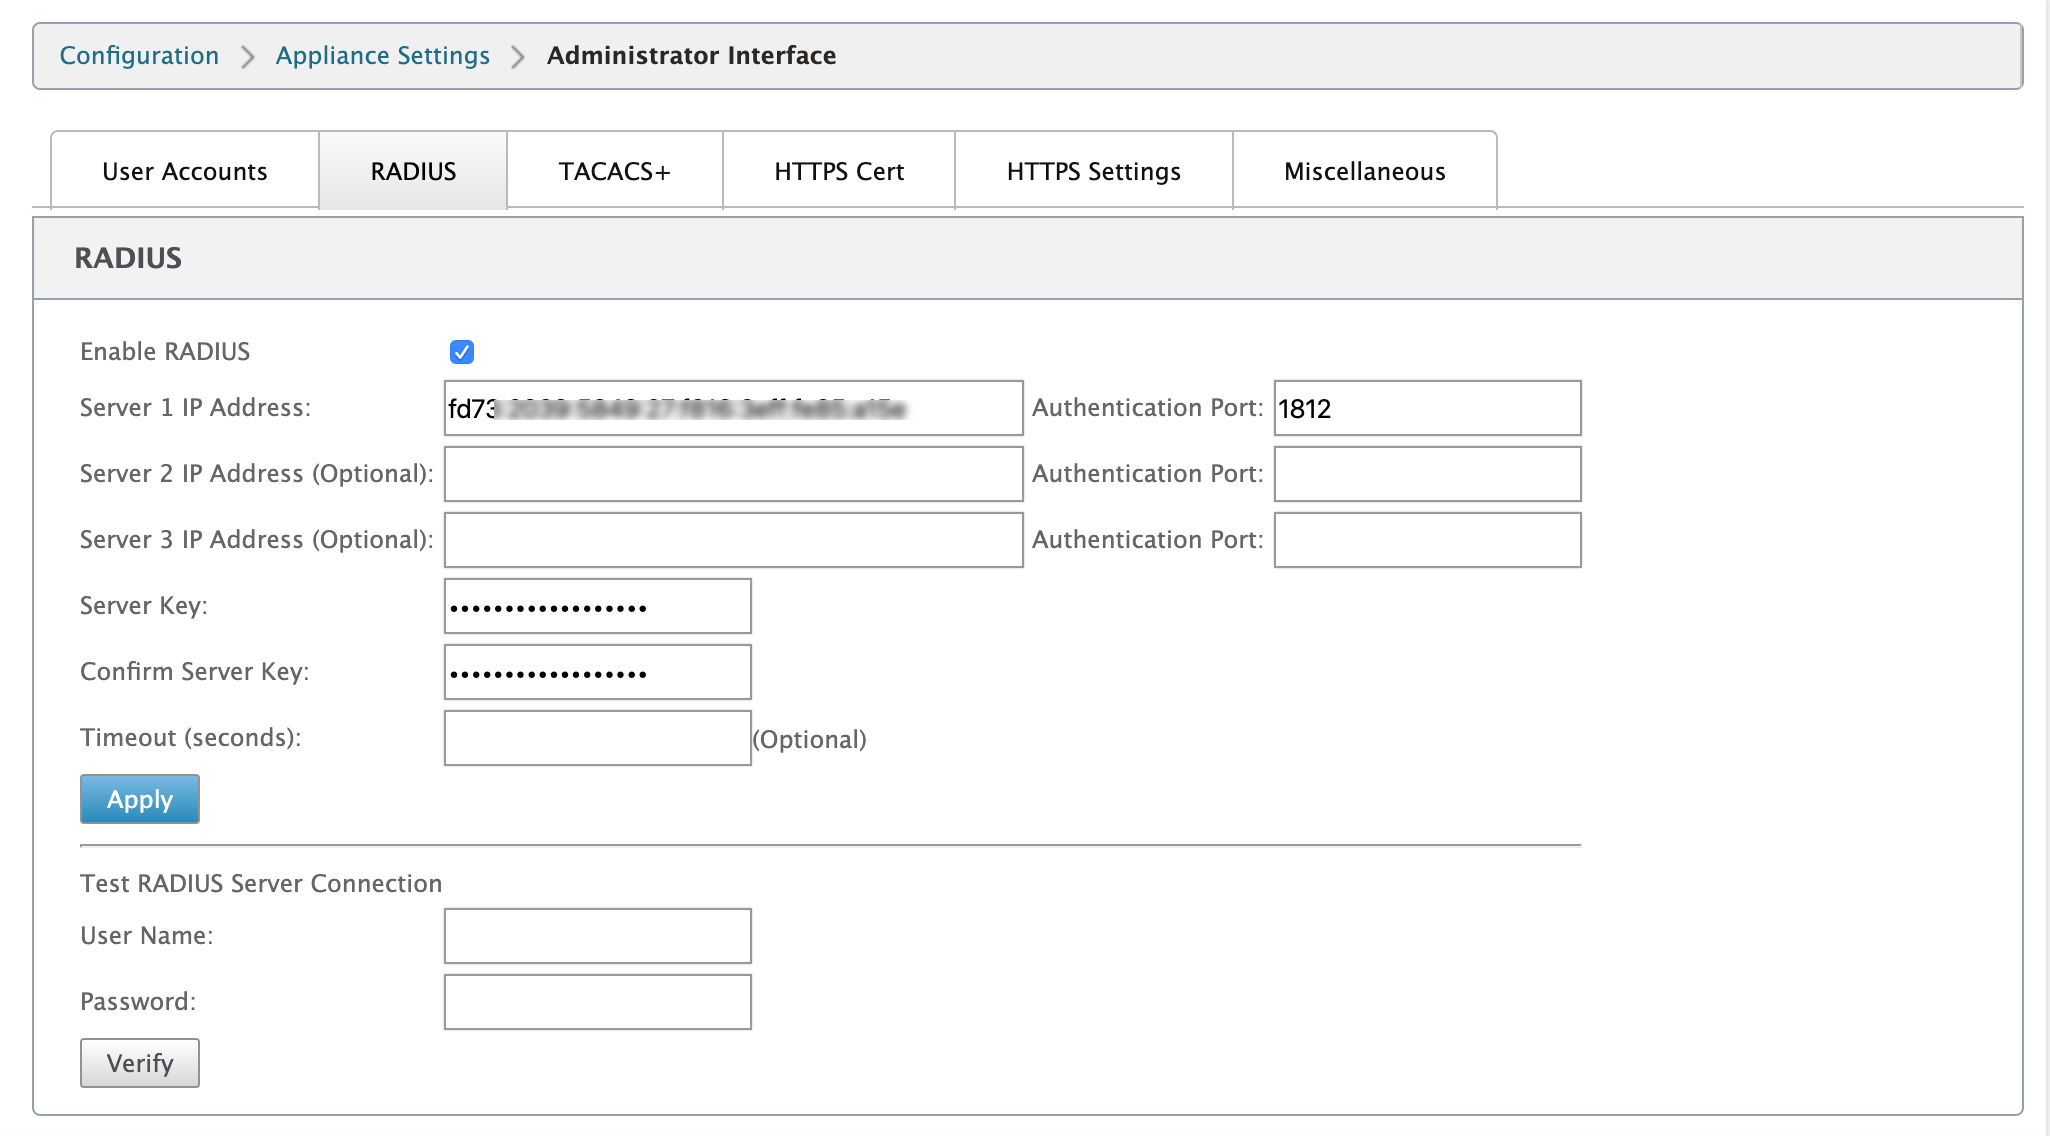
You can configure an SD-WAN appliance to authenticate user access with one or a maximum of three RADIUS servers. The default port is 1812.
To configure the RADIUS server:
-
Navigate to Configuration > Appliance Settings > Administrator Interface > RADIUS.
-
Select the Enable RADIUS check box.
-
Enter the Server IP Address and Authentication Port. A maximum of three server IP addresses can be configured.
NOTE
To configure an IPv6 address, ensure that the RADIUS server is also configured with an IPv6 address.
-
Enter the Server Key and confirm.
-
Enter the Timeout value in seconds.
-
Click Save.
You can also test the RADIUS server connection. Enter the User Name and Password. Click Verify.

TACACS+ server
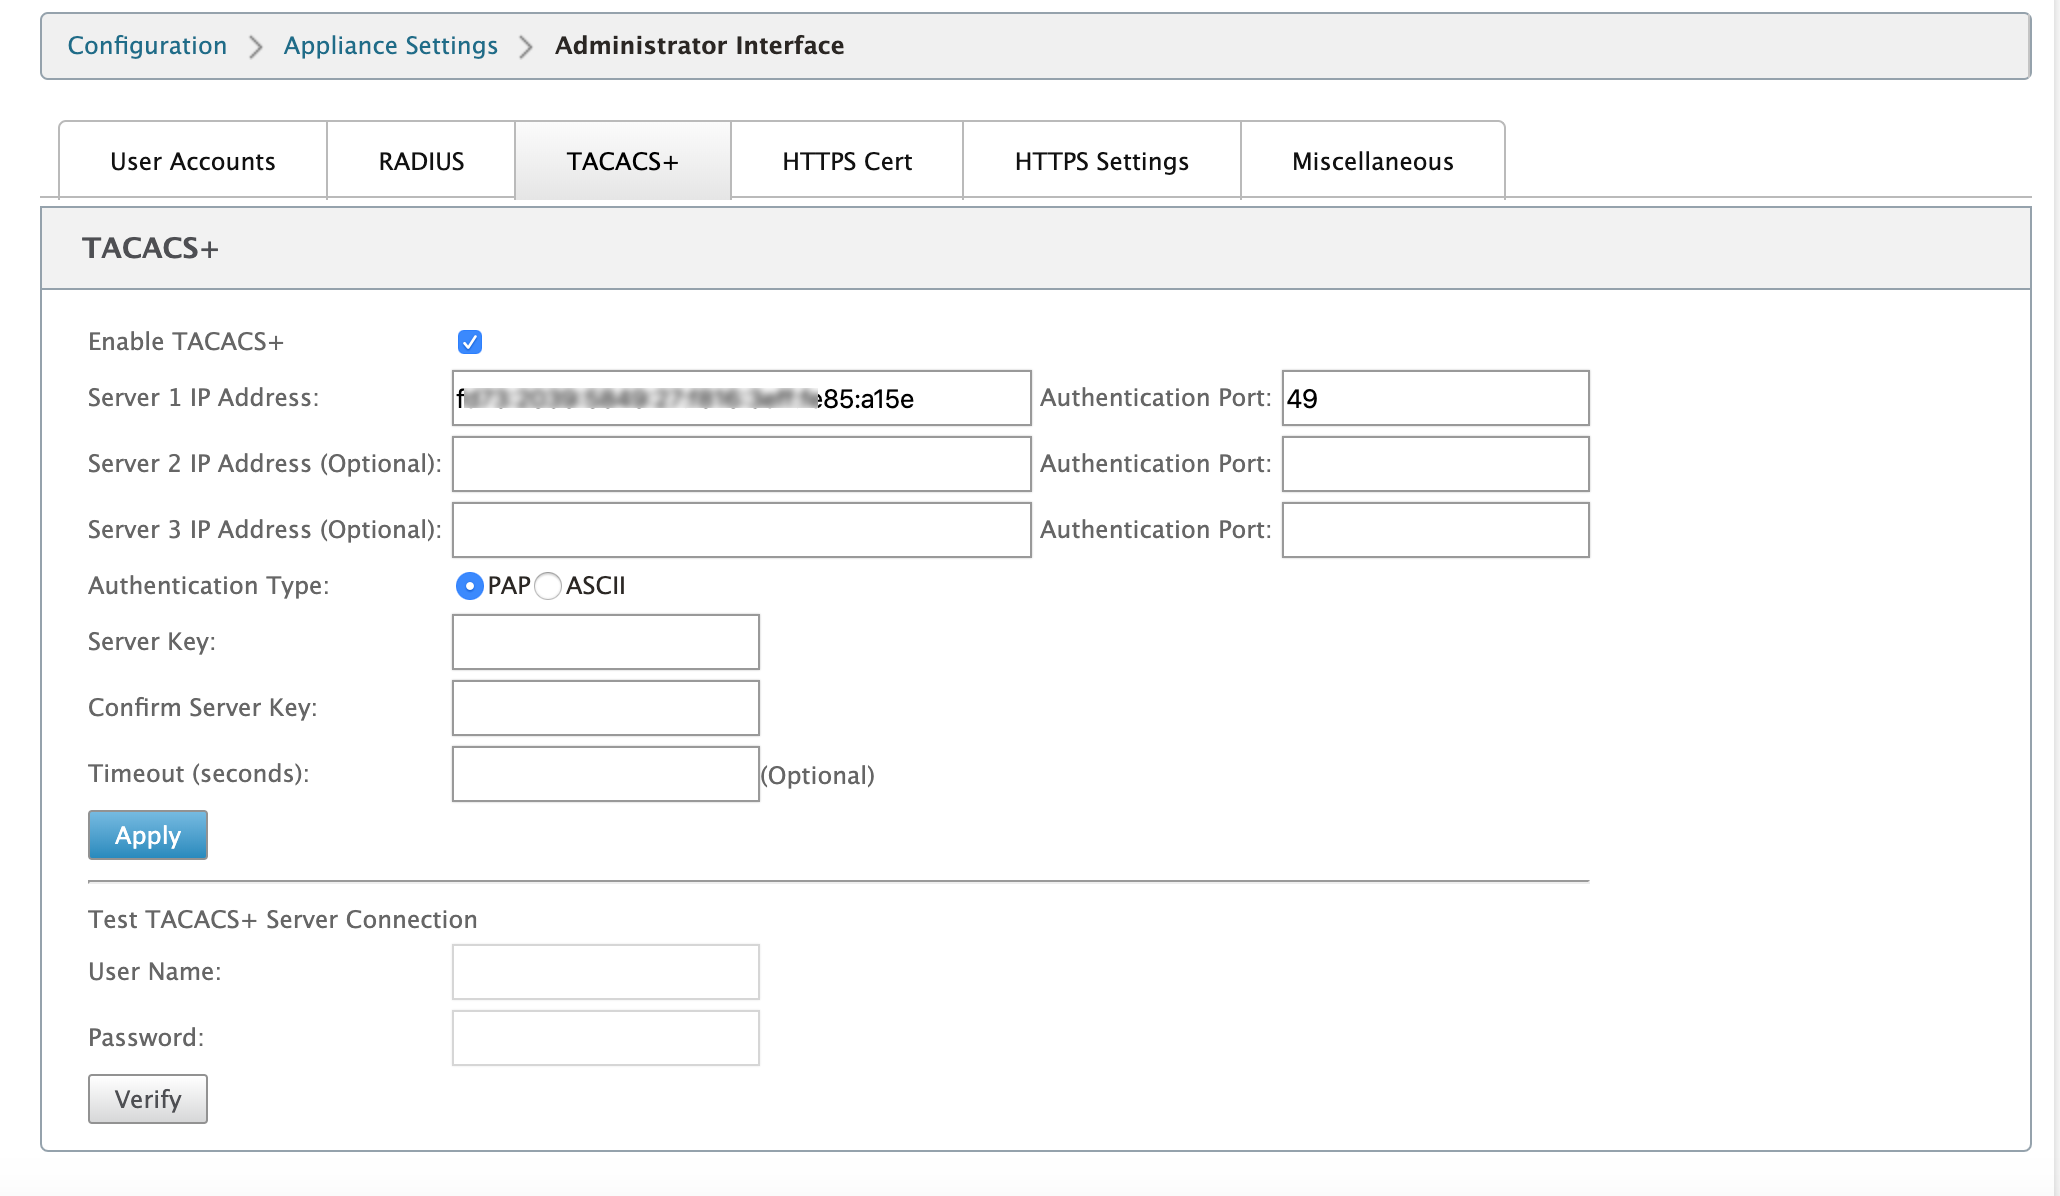
You can configure a TACACS+ server for authentication. Similar to RADIUS authentication, TACACS+ uses a secret key, an IP address, and the port number. The default port number is 49.
To configure the TACACS+ server:
-
Navigate to Configuration > Appliance Settings > Administrator Interface > TACACS+.
-
Select the Enable TACACS+ check box.
-
Enter the Server IP Address and Authentication Port. A maximum of three server IP addresses can be configured.
NOTE
To configure an IPv6 address, ensure that the TACACS+ server is also configured with an IPv6 address.
-
Select PAP or ASCII as the Authentication Type.
-
PAP: Uses Password Authentication Protocol (PAP) to strengthen user authentication by assigning a strong shared secret to the TACACS+ server.
-
ASCII: Uses the ASCII character set to strengthen user authentication by assigning a strong shared secret to the TACACS+ server.
-
-
Enter the Server Key and confirm.
-
Enter the Timeout value in seconds.
-
Click Save.
You can also test the TACACS+ server connection. Enter the User Name and Password. Click Verify.

Share
Share
This Preview product documentation is Cloud Software Group Confidential.
You agree to hold this documentation confidential pursuant to the terms of your Cloud Software Group Beta/Tech Preview Agreement.
The development, release and timing of any features or functionality described in the Preview documentation remains at our sole discretion and are subject to change without notice or consultation.
The documentation is for informational purposes only and is not a commitment, promise or legal obligation to deliver any material, code or functionality and should not be relied upon in making Cloud Software Group product purchase decisions.
If you do not agree, select I DO NOT AGREE to exit.