This content has been machine translated dynamically.
Dieser Inhalt ist eine maschinelle Übersetzung, die dynamisch erstellt wurde. (Haftungsausschluss)
Cet article a été traduit automatiquement de manière dynamique. (Clause de non responsabilité)
Este artículo lo ha traducido una máquina de forma dinámica. (Aviso legal)
此内容已经过机器动态翻译。 放弃
このコンテンツは動的に機械翻訳されています。免責事項
이 콘텐츠는 동적으로 기계 번역되었습니다. 책임 부인
Este texto foi traduzido automaticamente. (Aviso legal)
Questo contenuto è stato tradotto dinamicamente con traduzione automatica.(Esclusione di responsabilità))
This article has been machine translated.
Dieser Artikel wurde maschinell übersetzt. (Haftungsausschluss)
Ce article a été traduit automatiquement. (Clause de non responsabilité)
Este artículo ha sido traducido automáticamente. (Aviso legal)
この記事は機械翻訳されています.免責事項
이 기사는 기계 번역되었습니다.책임 부인
Este artigo foi traduzido automaticamente.(Aviso legal)
这篇文章已经过机器翻译.放弃
Questo articolo è stato tradotto automaticamente.(Esclusione di responsabilità))
Translation failed!
Check Point firewall integration the on SD-WAN 1100 platform
Citrix SD-WAN™ supports hosting Check Point Quantum Edge on the SD-WAN 1100 platform.
The Check Point Quantum Edge runs as a virtual machine on the SD-WAN 1100 SE platform. The firewall virtual machine is integrated in Bridge mode with two data virtual interfaces connected to it. Required traffic can be redirected to the firewall virtual machine by configuring policies on SD-WAN.
For information on how to provision the firewall virtual machine through SD-WAN Orchestrator service, see Hosted firewalls.
Note
From Citrix SD-WAN 11.3.1 onwards, the Check Point VM version 80.20 and above are supported for provisioning VM on new sites.
Benefits
The following are the primary goals or benefits of Check Point integration on the SD-WAN 1100 platform:
-
Branch device consolidation: A single appliance that does both SD-WAN and advanced security
-
Branch office security with on-prem NGFW (Next Generation Firewall) to protect LAN-to-LAN, LAN-to-Internet, and Internet-to-LAN traffic
Firewall virtual machine provisioning through SD-WAN appliance GUI
On SD-WAN platform, provision and boot up the hosted virtual machine. Perform the following steps for provisioning:
-
From the Citrix SD-WAN GUI, navigate to Configuration > Appliance Settings > select Hosted Firewall.
-
Upload the software image:
- Select the Software Images tab. Select the Vendor Name as Check Point.
- Choose the software image file.
- Click Upload.

Note
Maximum of two images can be uploaded. Uploading of the Check Point virtual machine image might take longer time depending on the bandwidth availability.
You can see a status bar to track the upload process. The file detail reflects, once the image is uploaded successfully. The image that is used for provisioning cannot be deleted. Do not perform any action or go back to any other page until the image file shows 100% uploaded.
-
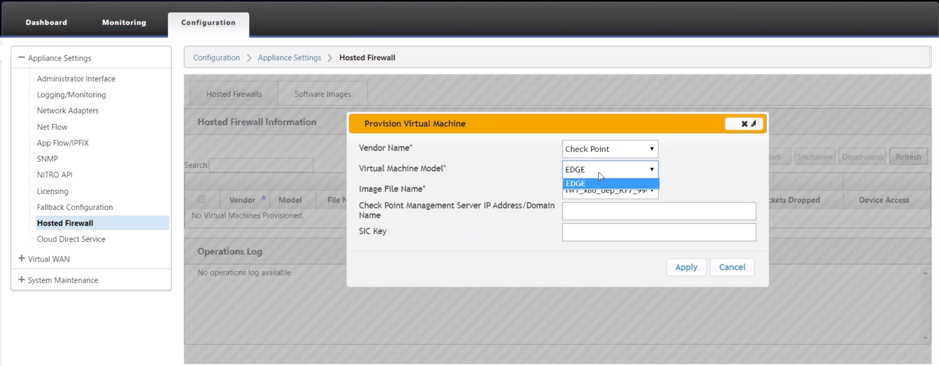
For provisioning, select Hosted Firewall tab > click Provision button.

-
Provide the following details for provisioning.
- Vendor Name: Select the Vendor Name as Check Point.
- Virtual Machine Model: The virtual machine model is auto filled as Edge.
- Image File Name: The image file name is auto-populated.
- Check Point Management Server IP Address/Domain: Provide the check point management server IP address/domain.
- SIC Key: Provide the SIC key (Optional). SIC creates trusted connections between Check Point components. Click Apply.

-
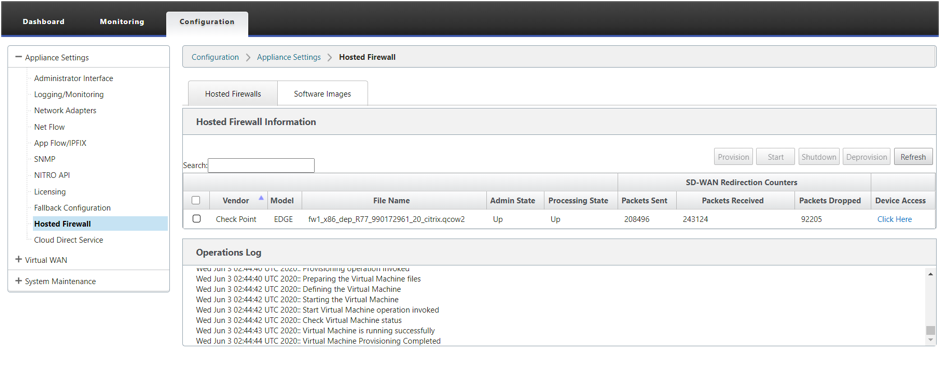
Click Refresh to get the latest status. After the Check Point virtual machine is completely bootup, it will reflect on the SD-WAN UI with the operations Log detail.

- Admin State: Indicates if the virtual machine is up or down.
- Processing State: Datapath processing state of the virtual machine.
- Packet Sent: Packets sent from SD-WAN to the security virtual machine.
- Packet Received: Packets received by SD-WAN from the security virtual machine.
- Packet Dropped: Packets dropped by SD-WAN (for example, when the security virtual machine is down).
- Device Access: Click the link to get the GUI access to the security virtual machine.
You can Start, Shutdown, and Deprovision the virtual machine as needed. Use Click Here option to access the Check Point virtual machine GUI or use your management IP along with 4100 port (management IP: 4100).
Note
Always use incognito mode to access the Check Point GUI.
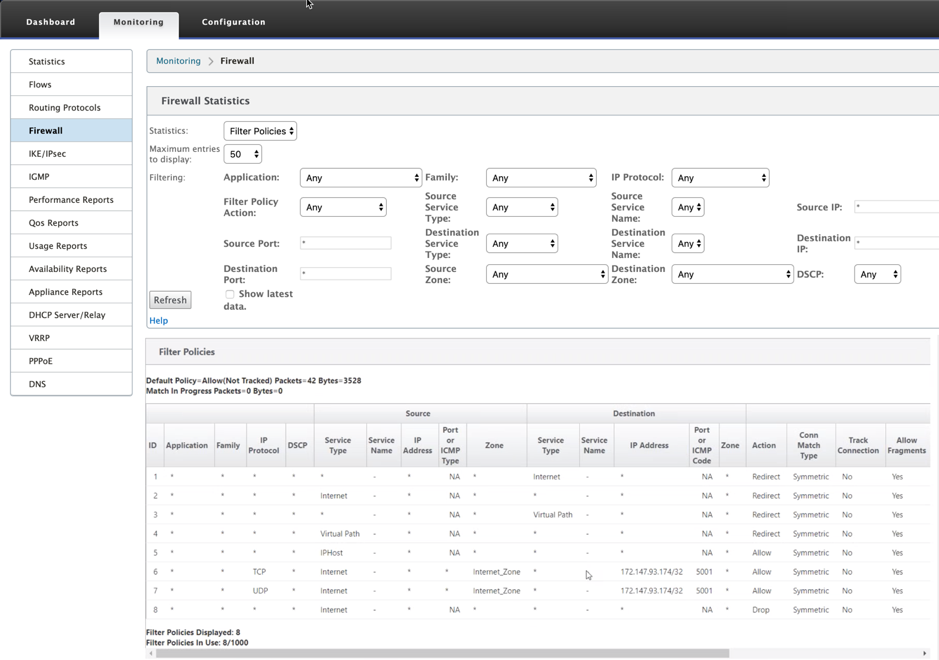
While all the network configuration is up and running mode, you can monitor the connection under Monitoring > Firewall > Filter Policies.

Share
Share
This Preview product documentation is Cloud Software Group Confidential.
You agree to hold this documentation confidential pursuant to the terms of your Cloud Software Group Beta/Tech Preview Agreement.
The development, release and timing of any features or functionality described in the Preview documentation remains at our sole discretion and are subject to change without notice or consultation.
The documentation is for informational purposes only and is not a commitment, promise or legal obligation to deliver any material, code or functionality and should not be relied upon in making Cloud Software Group product purchase decisions.
If you do not agree, select I DO NOT AGREE to exit.