-
Install and configure the NetScaler Gateway appliance
-
Maintain and monitor NetScaler Gateway systems
-
Configure DTLS VPN virtual server using SSL VPN virtual server
-
Integrate NetScaler Gateway with Citrix products
-
Integrate NetScaler Gateway with Citrix Virtual Apps and Desktops™
-
Configure settings for your Citrix Endpoint Management Environment
-
Configure load balancing servers for Citrix Endpoint Management
-
Configure load balancing servers for Microsoft Exchange with Email Security Filtering
-
Configure Citrix Endpoint Management NetScaler Connector (XNC) ActiveSync Filtering
-
Allow Access from mobile devices with Citrix Mobile Productivity Apps
-
Configure domain and security token authentication for Citrix Endpoint Management
-
Configure client certificate or client certificate and domain authentication
-
-
NetScaler Gateway Enabled PCoIP Proxy Support for VMware Horizon View
-
Proxy Auto Configuration for Outbound Proxy support for NetScaler Gateway
This content has been machine translated dynamically.
Dieser Inhalt ist eine maschinelle Übersetzung, die dynamisch erstellt wurde. (Haftungsausschluss)
Cet article a été traduit automatiquement de manière dynamique. (Clause de non responsabilité)
Este artículo lo ha traducido una máquina de forma dinámica. (Aviso legal)
此内容已经过机器动态翻译。 放弃
このコンテンツは動的に機械翻訳されています。免責事項
이 콘텐츠는 동적으로 기계 번역되었습니다. 책임 부인
Este texto foi traduzido automaticamente. (Aviso legal)
Questo contenuto è stato tradotto dinamicamente con traduzione automatica.(Esclusione di responsabilità))
This article has been machine translated.
Dieser Artikel wurde maschinell übersetzt. (Haftungsausschluss)
Ce article a été traduit automatiquement. (Clause de non responsabilité)
Este artículo ha sido traducido automáticamente. (Aviso legal)
この記事は機械翻訳されています.免責事項
이 기사는 기계 번역되었습니다.책임 부인
Este artigo foi traduzido automaticamente.(Aviso legal)
这篇文章已经过机器翻译.放弃
Questo articolo è stato tradotto automaticamente.(Esclusione di responsabilità))
Translation failed!
Creating a Session Policy and Profile for the Citrix Secure Access™ client
You can configure NetScaler Gateway to provide users access to published applications and virtual desktops with the Citrix Secure Access client instead of with Receiver. Then, in the session policy, you add an HTTP header rule for the Citrix Secure Access client.
To create the session policy rule for the Citrix Secure Access client
- Go to NetScaler Gateway > Policies > Session.
- In the details pane, click Add.
- In the Create NetScaler Gateway Session Policy dialog box, next to Match Any Expression, click the down arrow, select Advanced Free-Form, and then click Add.
- In the Add Expression dialog box, do the following:
- In Expression Type, click General.
- In Flow Type, select REQ.
- In Protocol, select HTTP.
- In Qualifier, select Header.
- In Operator, select NOTEXISTS.
- In Header Name, type
**Referer**and then click OK.
- Click Create and then click Close.
If users install the following versions of Receiver, you need to configure the following session profile for the Citrix Secure Access client:
- Receiver for Windows 3.4
- Receiver for Windows 8/RT 1.3
- Receiver for Mac 11.7
- Receiver for iOS 5.7
- Receiver for Android 3.3
To configure the session profile for the Citrix Secure Access client
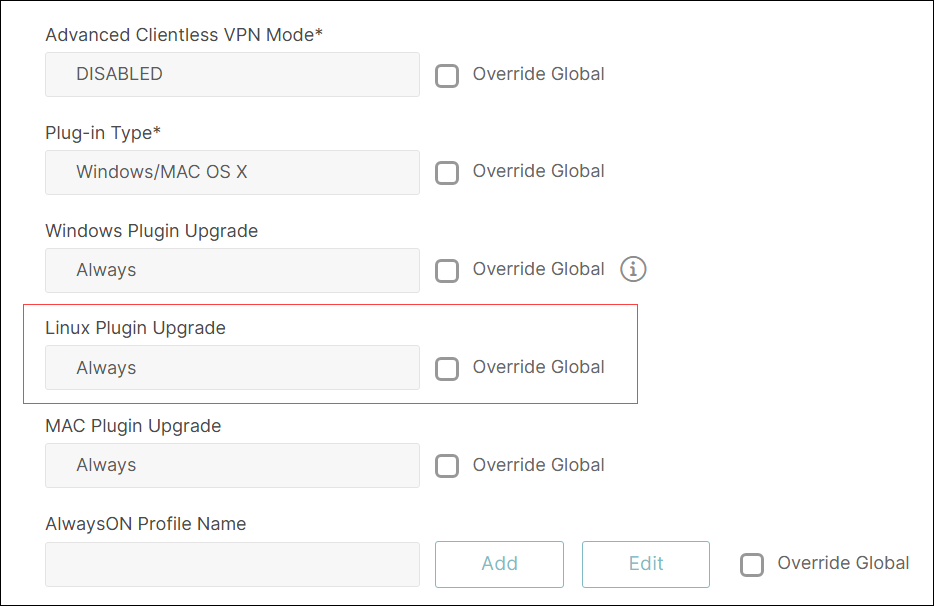
Note:
For deployments using classic authentication, the Linux Plugin Upgrade setting within the session profile is not supported.
- Go to NetScaler Gateway > Policies > Session.
- In the details pane, on the Profiles tab, click Add.
- In Name, type a name for the profile.
- Click the Client Experience tab and then do the following:
- Next to Single Sign-on to Web Applications, click Override Global and then select the check box. This setting is required to allow single sign-on for desktop versions of Receiver and uses a Citrix Secure Access client cookie.
- Next to Clientless Access URL Encoding, click Override Global and then select Clear. Important: Set Clientless Access to Off.
- Click the Published Applications tab and then configure the following settings:
-
Next to Single Sign-on Domain, click Override Global, enter the domain name, and then click Create. For example, enter
mydomain. -
Next to Account Services Address, click Override Global, and then enter the StoreFront™ URL.
For example, enter
https://<StoreFrontFQDN>.This setting is needed for adding accounts if both the receiver and the Citrix Secure Access client are already installed on the user device.
-
Share
Share
This Preview product documentation is Cloud Software Group Confidential.
You agree to hold this documentation confidential pursuant to the terms of your Cloud Software Group Beta/Tech Preview Agreement.
The development, release and timing of any features or functionality described in the Preview documentation remains at our sole discretion and are subject to change without notice or consultation.
The documentation is for informational purposes only and is not a commitment, promise or legal obligation to deliver any material, code or functionality and should not be relied upon in making Cloud Software Group product purchase decisions.
If you do not agree, select I DO NOT AGREE to exit.