Configure a responder action
After enabling the responder feature, you must configure one or more actions for handling requests. The responder supports the following types of actions:
-
Respond with. Sends the response defined by the Target expression without forwarding the request to a web server. (The NetScaler appliance substitutes for and acts as a web server.) Use this type of action to manually define a simple HTML-based response. Normally the text for a Respond with action consists of a web server error code and brief HTML page.
-
Respond with SQL OK. Sends the designated SQL OK response defined by the Target expression. Use this type of action to send an SQL OK response to an SQL query.
-
Respond with SQL Error. Sends the designated SQL Error response defined by the Target expression. Use this type of action to send an SQL Error response to an SQL query.
-
Respond with HTML page. Sends the designated HTML page as the response. You can choose from a drop-down list of HTML pages that were previously uploaded, or upload a new HTML page. Use this type of action to send an imported HTML page as the response. The appliance responds with a custom header in the responsewithhtmlpage responder action. You can configure up to eight custom headers. The imported HTML page is stored in the
/var/download/responderdirectory. -
Redirect. Redirects the request to a different webpage or web server. A Redirect action can redirect requests originally sent to a “dummy” website that exists in DNS, but for which there is no actual web server, to an actual website. It can also redirect search requests to an appropriate URL. Normally, the redirection target for a Redirect action consists of a complete URL.
Configure a responder action by using the CLI:
Displays the current settings for the specified responder action. If no action name is provided, display a list of all responder actions currently configured on the NetScaler appliance, with abbreviated settings.
At the command prompt, type the following commands to configure a responder action and verify the configuration:
add responder action <name> <type> <target>show responder action
Parameters:
-
Name. Name of the responder action. Maximum Length: 127
-
type. Type of responder action. It can be: (respondwith).
-
target. An expression specifying what to respond with.
-
htmlpage. Option specifying to respond with an html page.
-
hits. The number of times the action has been taken.
-
referenceCount. The number of references to the action.
-
undefHits. The number of times the action resulted in UNDEF.
-
comment. Any type of information about this responder action.
-
builtin. Flag to determine whether responder action is built in or not.
Example:
Create a responder action that displays a “Not Found” error page for URLs that do not exist:

> add responder action act404Error respondWith '"HTTP/1.1 404 Not Found\r\n\r\n"+ HTTP.REQ.URL.HTTP_URL_SAFE + " does not exist on the web server."'
Done

> show responder action

1) Name: act404Error
Operation: respondwith
Target: "HTTP/1.1 404 Not Found" + HTTP.REQ.URL.HTTP_URL_SAFE + " does not exist on the web server."
Hits: 0
Undef Hits: 0
Action Reference Count: 0
Done

Create a responder action that displays a “Not Found” error page for URLs that do not exist:

add responder action act404Error respondWith '"HTTP/1.1 404 Not Found\r\n\r\n"+ HTTP.REQ.URL.HTTP_URL_SAFE + " does not exist on the web server."'
Done
> show responder action

1) Name: act404Error
Operation: respondwith
Target: "HTTP/1.1 404 Not Found" + HTTP.REQ.URL.HTTP_URL_SAFE + " does not exist on the web server."
Hits: 0
Undef Hits: 0
Action Reference Count: 0
Done

<!--NeedCopy-->
Modify an existing responder action by using the CLI:
At the command prompt, type the following command to modify an existing responder action and verify the configuration:
set responder action <name> -target <string>show responder action
Example:
set responder action act404Error  -target '"HTTP/1.1 404 Not Found\r\n\r\n"+ HTTP.REQ.URL.HTTP_URL_SAFE + " does not exist on the web server."'
 Done
> show responder action

1)      Name: act404Error
        Operation: respondwith
        Target: "HTTP/1.1 404 Not Found" + HTTP.REQ.URL.HTTP_URL_SAFE + " does not exist on the web server."
        Hits: 0
        Undef Hits: 0
        Action Reference Count: 0
 Done

<!--NeedCopy-->
Remove a responder action by using the CLI:
At the command prompt, type the following command to remove a responder action and verify the configuration:
rm responder action <name>show responder action
Example:
rm responder action act404Error
 Done

> show responder action
 Done

<!--NeedCopy-->
Add custom headers in responsewithhtmlpage responder action by using the CLI:
A NetScaler appliance can now respond with custom headers in the responsewithhtmlpage responder action. You can configure up to eight custom headers. Previously, the appliance responded only with Content-type:text/html and Content-Length:<value> static headers.
Note:
In the custom header configuration, you can also over-write the “Content-Type” header value.
At the command prompt, type the following command:
add responder action <name> <type> (<target> | <htmlpage>) [-comment <string>] [-responseStatusCode <positive_integer>] [-reasonPhrase <expression>] [-headers <name(value)> ...]
Where,
name: Name for the responder action. Must begin with a letter, number, or the underscore character (_), and must contain only letters, numbers, and the hyphen (-), period (.) hash (#),space ( ), at (@), equals (=), colon (:), and underscore characters. Can be changed after the responder policy is added.
Type: Type of responder action. Available settings function as follows:
-
respondwith
<target>- Respond to the request with the expression specified as the target. - respondwithhtmlpage - Respond to the request with the uploaded HTML page object specified as the target.
- redirect - Redirect the request to the URL specified as the target.
- sqlresponse_ok - Send an SQL OK response.
-
sqlresponse_error - Send an SQL ERROR response. This is a mandatory argument. Possible values:
noop,respondwith,redirect,respondwithhtmlpage,sqlresponse_ok,sqlresponse_error
Target: Expression specifying what to respond with. Typically a URL for redirect policies or a default-syntax expression. In addition to NetScaler default-syntax expressions that refer to information in the request, a string builder expression can contain text and HTML, and simple escape codes that define new lines and paragraphs. Enclose each string builder expression element (either a NetScaler default-syntax expression or a string) in double quotation marks. Use the plus (+) character to join the elements.
htmlpage: For respondwithhtmlpage policies, name of the HTML page object to use as the response. You must first import the page object. Maximum Length: 31
Comment: Any type of information about this responder action. Maximum Length: 255
responseStatusCode: HTTP response status code, for example 200, 302, 404, and so forth The
default value for the redirect action type is 302 and for respondwithhtmlpage is 200 Minimum value: 100 Maximum value: 599
reasonPhrase: Expression specifying the reason phrase of the HTTP response. The reason phrase may be a string literal with quotes or a PI expression. For example: "Invalid URL: " + HTTP.REQ.URL Maximum Length: 8191
Headers: One or more headers to insert into the HTTP response. Each header is specified as "name(expr)," where expr is an expression that is evaluated at runtime to provide the value for the named header. You can configure a maximum of eight headers for a responder action.
Configure a responder action by using the GUI:
- Navigate to AppExpert > Responder > Actions.
- In the details pane, do one of the following:
- To create an action, click Add.
- To modify an existing action, select the action, and then click Open.
- Click Create or OK, depending on whether you are creating an action or modifying an existing action.
- Click Close. A message appears in the status bar, stating that the feature has been enabled.
- To delete a responder action, select the action, and then click Remove. A message appears in the status bar, stating that the feature has been disabled.
Add an expression by using the Add Expression dialog box
-
In the Create Responder Action or Configure Responder Action dialog box, click Add.
- In the Add Expression dialog box, in the first list box choose the first term for your expression.
- HTTP. The HTTP protocol. Choose this if you want to examine some aspect of the request that pertains to the HTTP protocol.
- SYS. One or more protected websites. Choose this if you want to examine some aspect of the request that pertains to the recipient of the request.
- CLIENT. The computer that sent the request. Choose this if you want to examine some aspect of the sender of the request.
- ANALYTICS. The analytics data associated with the request. Choose this if you want to examine request metadata.
- SIP. A SIP request. Choose this if you want to examine some aspect of a SIP request. When you make your choice, the rightmost list box lists appropriate terms for the next part of your expression.
- In the second list box, choose the second term for your expression. The choices depend upon which choice you made in the previous step, and are appropriate to the context. After you make your second choice, the Help window below the Construct Expression window (which was blank) displays help describing the purpose and use of the term you just chose.
- Continue choosing terms from the list boxes that appear to the right of the previous list box, or typing strings or numbers in the text boxes that appear to prompt you to enter a value, until your expression is finished.
Configuring the Global HTTP Action
You can configure the global HTTP action to invoke a responder action when an HTTP request times out. To configure this feature, you must first create the responder action that you want to invoke. Then, configure the global HTTP timeout action to respond to a timeout with that responder action.
Configure the global HTTP action by using the CLI:
At the command prompt, type the following command:
set ns httpProfile -reqTimeoutAction <responder action name>save ns config
For <responder action name>, replace the name of the responder action.
Configure an HTML page import
When a NetScaler appliance responds with a custom message, we can respond with an HTML file. You can import the file using the import responder htmlpage command and then use this file in add responder action <act name> respondwithhtmlpage <file name> command. You can also import the file through the NetScaler GUI. You can import a desired HTML page into the appliance folder and upload the page during responder run time.
Import an HTML page by using the CLI
At the command prompt, type:
import responder htmlpage [<src>] <name> [-comment <string>] [-overwrite][-CAcertFile <string>]
Example:
import responder htmlpage http://www.example.com/page.html my-responder-page -CAcertFile my_root_ca_cert
Where,
A CA certificate is used for verifying the client certificate. The certificate has to be imported using the import ssl certfile CLI command or equivalent through an API or GUI. If a certificate name is not configured, then default root CA certificates are used for the certificate verification.
Import an HTML page from the local filesystem
You can also import an HTML page from the local filesystem. To import, copy the file using SCP or any other way to the /var/tmp/ directory and then import it using the “local:” keyword. For example:
import responder htmlpage local:my_local_file.html my_local_file
Where my_local_file.html is present at “/var/tmp/” directory.
Note
“local:” keyword only searches the file in the “/var/tmp/” directory. For non-default partitions, you need to copy the file into the partition specific tmp directory that is present at
/var/partitions/<partition name>/tmp.
Import an HTML page by using the GUI
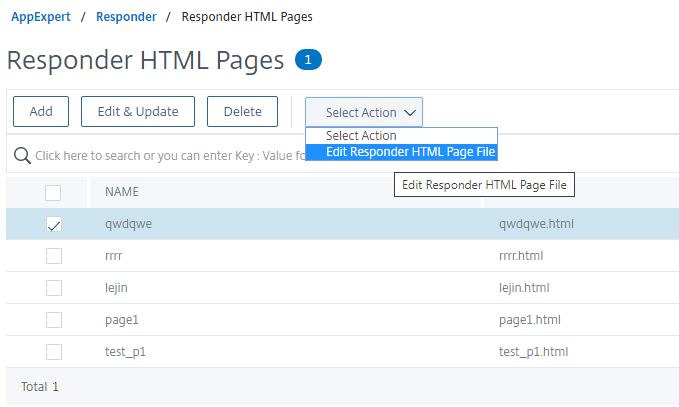
- Navigate to AppExpert > Responder > HTML Page Imports.
- In the Responder HTML Imports details pane, click Add.
-
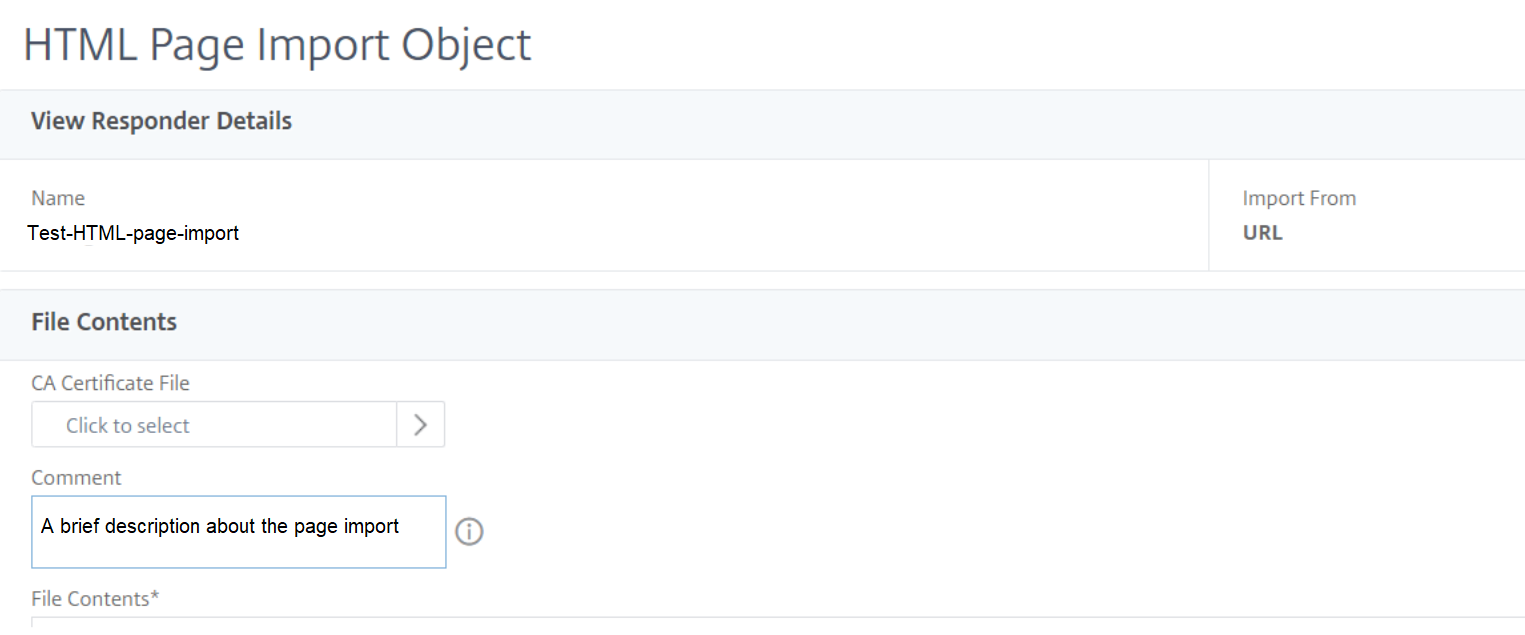
In the HTML Page Import Object page, set the following parameters:
- Name. Name of the HTML page.
- Import From. Imported from file, text, or text.
- URL. Select to enter the URL location of the HTML file.
- File. Select the HTML file from the appliance directory.
- Text. Select the HTML file as a text.
- Click Continue.
- Verify responder HTML page details.
-
Click Done.
To edit an HTML page, you can select a file and click Edit Responder HTML Page File from the Select Action drop-down list.