-
-
-
-
Importing and synchronizing StyleBooks from GitHub repository
-
Simplified migration of Citrix ADC application configuration using StyleBooks
-
-
Use ADM log messages for managing and monitoring your infrastructure
-
-
Citrix ADC automation using Citrix ADM in Cisco ACI hybrid mode
-
Citrix ADC device package in Cisco ACI's cloud orchestrator mode
-
This content has been machine translated dynamically.
Dieser Inhalt ist eine maschinelle Übersetzung, die dynamisch erstellt wurde. (Haftungsausschluss)
Cet article a été traduit automatiquement de manière dynamique. (Clause de non responsabilité)
Este artículo lo ha traducido una máquina de forma dinámica. (Aviso legal)
此内容已经过机器动态翻译。 放弃
このコンテンツは動的に機械翻訳されています。免責事項
이 콘텐츠는 동적으로 기계 번역되었습니다. 책임 부인
Este texto foi traduzido automaticamente. (Aviso legal)
Questo contenuto è stato tradotto dinamicamente con traduzione automatica.(Esclusione di responsabilità))
This article has been machine translated.
Dieser Artikel wurde maschinell übersetzt. (Haftungsausschluss)
Ce article a été traduit automatiquement. (Clause de non responsabilité)
Este artículo ha sido traducido automáticamente. (Aviso legal)
この記事は機械翻訳されています.免責事項
이 기사는 기계 번역되었습니다.책임 부인
Este artigo foi traduzido automaticamente.(Aviso legal)
这篇文章已经过机器翻译.放弃
Questo articolo è stato tradotto automaticamente.(Esclusione di responsabilità))
Translation failed!
Detailed procedures to setup dual tier or service mesh lite topology
Software requirements
| Kubernetes Distribution | Kubernetes Version | Container Network Interfaces (CNI) | CPX version | CIC version | Citrix ADM version | Citrix ADM Agent Version |
|---|---|---|---|---|---|---|
| Open source | v1.16.3 | Flannel | 13.0–41.28 | 1.5.25 | 13.0–47.22 | 13.0–47.22 |
Before you begin
You can view service graph using the following scenarios:
-
Citrix ADM and Kubernetes cluster on the same network (for example, Citrix ADM and Kubernetes cluster hosted on Citrix Hypervisor).
-
Citrix ADM and Kubernetes cluster on a different network. In this scenario, you must configure an on-prem agent and register the agent on the network, where Kubernetes cluster is hosted.
To use service graph in Citrix ADM, ensure you have:
-
Kubernetes cluster with Citrix ADC CPX as a proxy. For more information see, Citrix Ingress Controller.
-
Configured static routes on Citrix ADM to enable communication between Citrix ADM and Citrix ADC CPX
-
Downloaded the sample deployment files from GitHub repository.
-
Added required parameters in CPX YAML file to ensure successful CPX registration with Citrix ADM.
-
Added Kubernetes cluster in Citrix ADM.
-
Deployed a sample microservice application.
-
Deployed Citrix ADC CPX and registered CPX to ADM.
-
Enabled Auto-select Virtual Servers to license the virtual servers.
-
Changed the Web Transaction Settings to All for Citrix ADM agent to get HTTP transactions.
-
Updated the Istream.conf file and changed the TCP setting to All for Citrix ADM agent to get TCP metrics.
Configure static routes in Citrix ADM
Inside the Kubernetes cluster, all containerized pods use an overlay network. Establishing the communication using those private IP addresses directly is not possible. To enable communication from Citrix ADM to Kubernetes cluster, you must configure static routing in Citrix ADM.
Note
If you are using an on-prem agent, ensure you configure static routes on the agent. Using an SSH client, log on to Citrix ADM agent and configure the static routes.
Consider that you have the following IP addresses for your Kubernetes cluster:
-
Kubernetes master – 101.xx.xx.112
-
Kubernetes worker 1 – 101.xx.xx.111
-
Kubernetes worker 2 – 101.xx.xx.110
On the Kubernetes master, run the following command to identify the pod network to do the static routing:
kubectl get nodes -o jsonpath="{range .items[*]}{'podNetwork: '}{.spec.podCIDR}{'\t'}{'gateway: '}{.status.addresses[0].address}{'\n'}{end}"
The following is an example output after you run the command:

-
Using an SSH client, log on to Citrix ADM
-
Configure the static routing using the command
route add -net <public IP address range> <Kubernetes IP address>For example:
route add -net 192.168.0.0/24 101.xx.xx.112route add -net 192.168.1.0/24 101.xx.xx.111route add -net 192.168.2.0/24 101.xx.xx.110 -
Verify the configuration by using
netstat -rn
-
Append these route commands in
/mpsconfig/svm.conffile.-
In Citrix ADM, access the svm.conf file using the following command:
vim /mpsconfig/svm.conf -
Add the static routes in svm.conf file.
For example,
route add -net 192.168.0.0/24 101.xx.xx.112.
-
Download the sample deployment files from GitHub
-
Use the command git clone
https://github.com/citrix/citrix-k8s-ingress-controller.gitto clone the git hub repository in the master node. -
To access the YAMLs:
cd citrix-k8s-ingress-controller/example/servicegraph-demo/
Add parameters in CPX YAML file
Note
If you are using CPX 58.x or later, you must use the non-nsroot password while registering to ADM agent. To ensure security, Citrix ADM agent 61.x or later releases need mandatory password change. If your Citrix ADM agent is upgraded to 61.x or latest version, you must ensure to use CPX 58.x or later build.
You must include the following parameters in the cpx.yaml file to ensure CPX registration with Citrix ADM:
- name: "NS_MGMT_SERVER"
  value: "xx.xx.xx.xx"
- name: "NS_MGMT_FINGER_PRINT"
  value: "xx:xx:xx:xx:xx:xx:xx:xx:xx:xx:xx:xx:xx:xx"
- name: "NS_HTTP_PORT"
  value: "9080"
- name: "NS_HTTPS_PORT"
  value: 9443"
- name: "NS_MGMT_USER"
  value: "nsroot"
- name: "NS_MGMT_PASS"
  value: <your password>
- name: "LOGSTREAM_COLLECTOR_IP"
  value: "xx.xx.xx.xx"

<!--NeedCopy-->
-
NS_MGMT_SERVER – Indicates the Citrix ADM IP address
Note
If ADM agent is used, then this indicates the on-prem agent IP address.
-
NS_MGMT_FINGER_PRINT – Indicates the authentication for CPX in Citrix ADM. To get the fingerprint:
-
In Citrix ADM, navigate to System > Administration
-
Under System Configurations, click View ADM Fingerprint

Note:
If you have configured an on-prem agent, navigate to Networks > Agents, select the agent, and then click View Fingerprint.

-
-
NS_HTTP_PORT – Indicates the HTTP port for communication
-
NS_HTTPS_PORT – Indicates the HTTPS port for communication
-
NS_MGMT_USER - Indicates the user name
-
NS_MGMT_PASS - Indicates the password. Specify a password of your choice
-
LOGSTREAM_COLLECTOR_IP – Indicates the Citrix ADM agent IP address, where Logstream protocol must be enabled to transfer log data from CPX to ADM
Add VPX or SDX or MPX or BLX instance in Citrix ADM
To get the tier-1 ADC instance analytics in service graph, you must add the VPX/SDX/MPX/BLX instance in Citrix ADM and enable Web Insight.
-
Navigate to Networks > Instances > Citrix ADC
-
Click the Add option to add the instance. For more information, see Add instances in Citrix ADM
-
After adding the instance, select the virtual server and enable Web Insight. For more information, see Manage licensing and enable analytics on virtual servers
Add Kubernetes cluster in Citrix ADM
To add the Kubernetes cluster:
-
Log on to Citrix ADM with administrator credentials.
-
Navigate to Orchestration > Kubernetes > Cluster. The Clusters page is displayed.
-
Click Add.
-
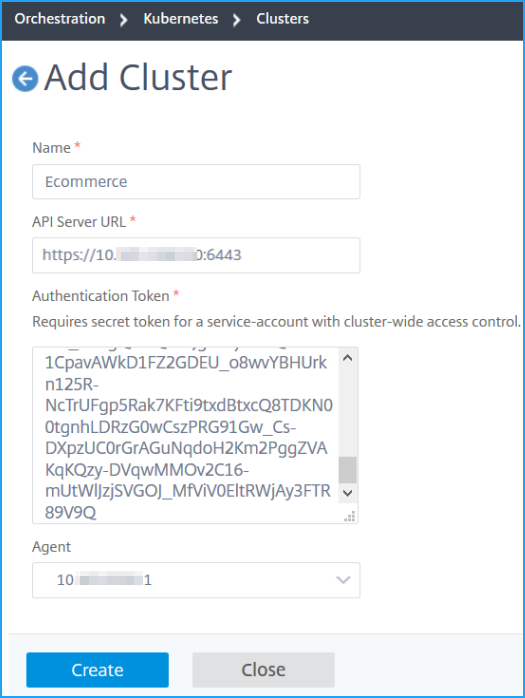
In the Add Cluster page, specify the following parameters:
-
Name - Specify a name of your choice.
-
API Server URL - You can get the API Server URL details from the Kubernetes Master node.
-
On the Kubernetes master node, run the command
kubectl cluster-info.
-
Enter the URL that displays for “Kubernetes master is running at.”
-
-
Authentication Token - Specify the authentication token. The authentication token is required to validate access for communication between Kubernetes cluster and Citrix ADM. To generate an authentication token:
On the Kubernetes master node:
-
Use the following YAML to create a service account:
apiVersion: v1 kind: ServiceAccount metadata: name: <name> namespace: <namespace> <!--NeedCopy--> -
Run
kubectl create -f <yaml file>.The service account is created.
-
Run
kubectl create clusterrolebinding <name> --clusterrole=cluster-admin --serviceaccount=<namespace>:<name>to bind the cluster role to service account.The service account now has the cluster-wide access.
A token is automatically generated while creating the service account.
-
Run
kubectl describe sa <name>to view the token. -
To get the secret string, run
kubectl describe secret <token-name>.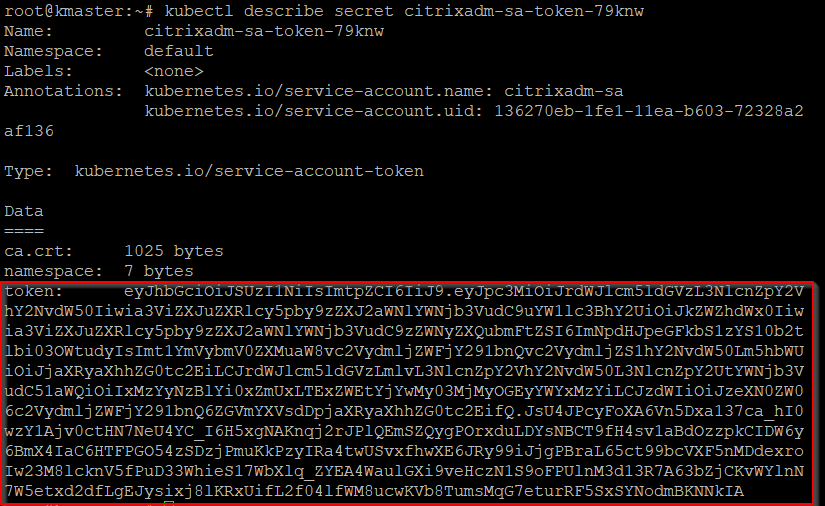
-
-
Select the agent from the list.
Note
If you are using an on-prem agent, ensure to select the same agent that you have added in the CPX YAML.
-
Click Create.
-
Deploy a sample microservice application
On the master node:
-
Run
kubectl create -f namespace.yamlto create a namespace. -
Deploy
hotdrinkmicroservices, ingress, and secrets using following commands:kubectl create -f team_hotdrink.yaml -n sg-demokubectl create -f hotdrink-secret.yaml -n sg-demo
Deploy CPX and register CPX in ADM
-
Run
kubectl create -f rbac.yamlto deploy cluster role and cluster binding. -
Run
kubectl create -f cpx.yaml -n sg-demoto deploy CPX.
After the deployment, the CPX registration is automatically done.
Enable auto select virtual servers for licensing
Note
Ensure you have sufficient virtual server licenses. For more information, see Licensing
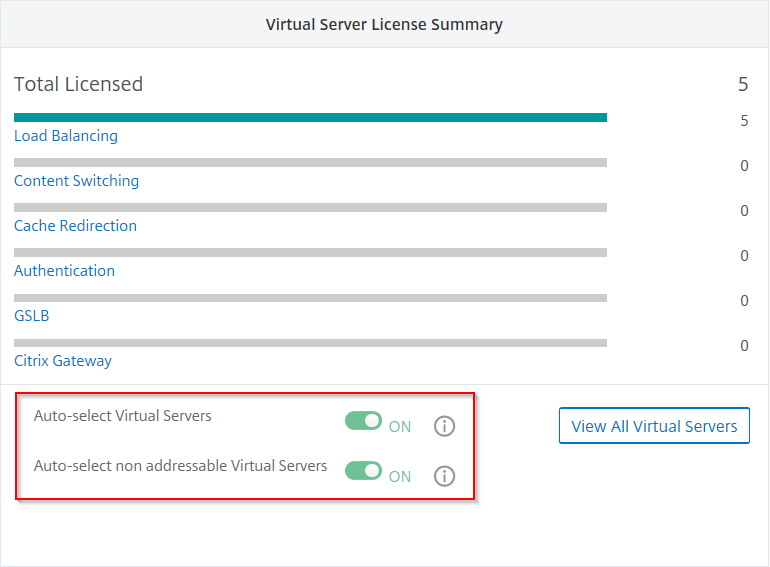
After you add Kubernetes cluster in Citrix ADM, you must ensure to auto-select virtual servers for licensing. Virtual servers must be licensed to display data in Service Graph. To auto-select virtual servers:
-
Navigate to System > Licensing & Analytics.
-
Under Virtual Server License Summary, enable Auto-select Virtual Servers and Auto-select non addressable Virtual Servers.
Enable Web Transaction and TCP Transaction settings
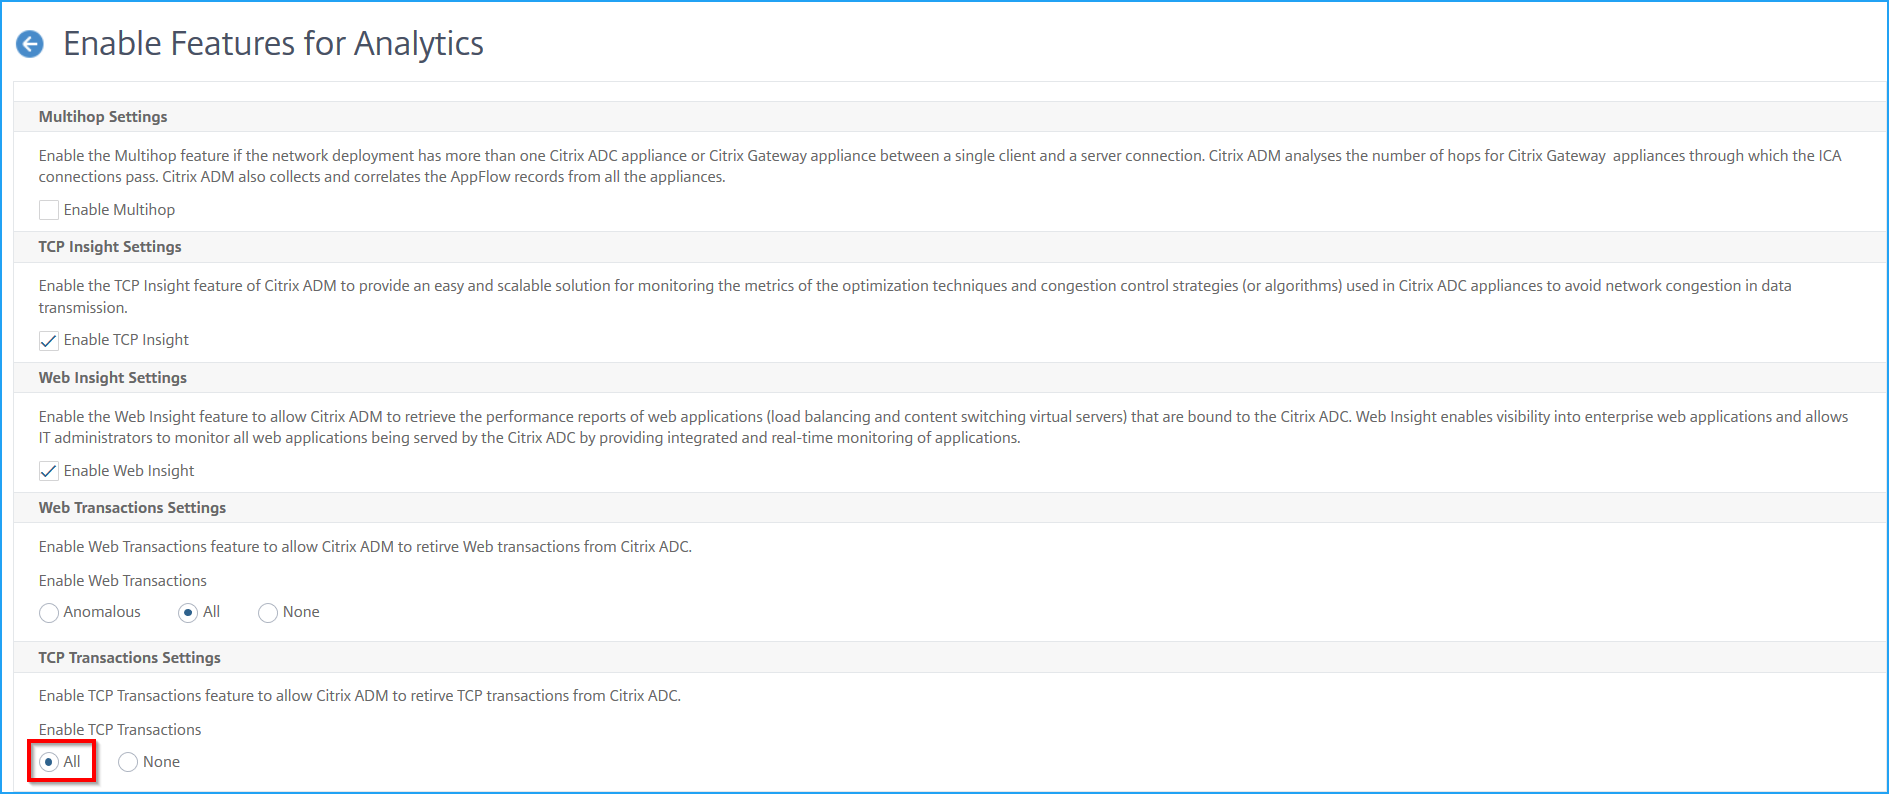
After you add the Kubernetes cluster and enable the auto-select virtual servers, change the Web Transaction Settings and TCP Transactions Settings to All.
-
Navigate to Analytics > Settings.
The Settings page is displayed.
-
Click Enable Features for Analytics.
-
Under Web Transaction Settings, select All.
-
Under TCP Transactions Settings, select All.
-
Click OK.
Send traffic to microservices
Next, you must send traffic to microservices to get the service graph populated in Citrix ADM.
-
Run
kubectl get svc -n sg-demoto expose CPX through NodePort.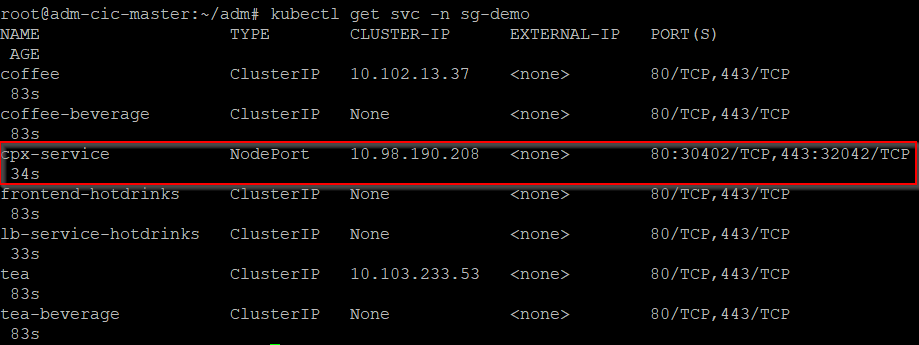
-
Edit the etc/host file and create a domain IP entry for
hotdrink.beverages.comYou can now access the microservice using
https://hotdrink.beverages.com
Share
Share
In this article
- Software requirements
- Before you begin
- Software requirements
- Before you begin
- Configure static routes in Citrix ADM
- Download the sample deployment files from GitHub
- Add parameters in CPX YAML file
- Add VPX or SDX or MPX or BLX instance in Citrix ADM
- Add Kubernetes cluster in Citrix ADM
- Deploy a sample microservice application
- Deploy CPX and register CPX in ADM
- Enable auto select virtual servers for licensing
- Enable Web Transaction and TCP Transaction settings
- Send traffic to microservices
This Preview product documentation is Cloud Software Group Confidential.
You agree to hold this documentation confidential pursuant to the terms of your Cloud Software Group Beta/Tech Preview Agreement.
The development, release and timing of any features or functionality described in the Preview documentation remains at our sole discretion and are subject to change without notice or consultation.
The documentation is for informational purposes only and is not a commitment, promise or legal obligation to deliver any material, code or functionality and should not be relied upon in making Cloud Software Group product purchase decisions.
If you do not agree, select I DO NOT AGREE to exit.