-
Implementar una instancia de NetScaler ADC VPX
-
Optimice el rendimiento de NetScaler ADC VPX en VMware ESX, Linux KVM y Citrix Hypervisors
-
Instalar una instancia de NetScaler ADC VPX en un servidor desnudo
-
Instalar una instancia de NetScaler ADC VPX en Citrix Hypervisor
-
Instalación de una instancia NetScaler ADC VPX en la nube de VMware en AWS
-
Instalación de una instancia NetScaler ADC VPX en servidores Microsoft Hyper-V
-
Instalar una instancia de NetScaler ADC VPX en la plataforma Linux-KVM
-
Requisitos previos para instalar dispositivos virtuales NetScaler ADC VPX en la plataforma Linux-KVM
-
Aprovisionamiento de NetScaler ADC Virtual Appliance mediante OpenStack
-
Aprovisionamiento de NetScaler ADC Virtual Appliance mediante Virtual Machine Manager
-
Configuración de dispositivos virtuales NetScaler ADC para utilizar la interfaz de red SR-IOV
-
Aprovisionamiento de NetScaler ADC Virtual Appliance mediante el programa virsh
-
Administración de las máquinas virtuales invitadas de NetScaler ADC
-
Aprovisionamiento de NetScaler ADC Virtual Appliance con SR-IOV, en OpenStack
-
-
Implementar una instancia de NetScaler ADC VPX en AWS
-
Implementación de una instancia independiente NetScaler ADC VPX en AWS
-
Servidores de equilibrio de carga en diferentes zonas de disponibilidad
-
Implementar un par de alta disponibilidad de VPX en la misma zona de disponibilidad de AWS
-
Alta disponibilidad en diferentes zonas de disponibilidad de AWS
-
Implementar un par de alta disponibilidad VPX con direcciones IP privadas en distintas zonas de AWS
-
Implementación de una instancia NetScaler ADC VPX en AWS Outposts
-
Configurar una instancia de NetScaler ADC VPX para utilizar la interfaz de red SR-IOV
-
Configurar una instancia de NetScaler ADC VPX para utilizar redes mejoradas con AWS ENA
-
Implementar una instancia de NetScaler ADC VPX en Microsoft Azure
-
Arquitectura de red para instancias NetScaler ADC VPX en Microsoft Azure
-
Configuración de una instancia independiente de NetScaler ADC
-
Configuración de varias direcciones IP para una instancia independiente NetScaler ADC VPX
-
Configurar una configuración de alta disponibilidad con varias direcciones IP y NIC
-
Configurar una instancia de Citrix ADC VPX para usar redes aceleradas de Azure
-
Configurar nodos HA-INC mediante la plantilla de alta disponibilidad de Citrix con Azure ILB
-
Instalación de una instancia NetScaler ADC VPX en la solución Azure VMware
-
Configurar GSLB en una configuración de alta disponibilidad activa en espera
-
Configuración de grupos de direcciones (IIP) para un dispositivo NetScaler Gateway
-
Scripts de PowerShell adicionales para la implementación de Azure
-
Implementación de una instancia NetScaler ADC VPX en Google Cloud Platform
-
Automatizar la implementación y las configuraciones de NetScaler ADC
-
Soluciones para proveedores de servicios de telecomunicaciones
-
Equilibrio de carga del tráfico de plano de control basado en protocolos de diámetro, SIP y SMPP
-
Utilización del ancho de banda mediante la funcionalidad de redirección de caché
-
Optimización TCP de NetScaler ADC
-
Autenticación, autorización y auditoría del tráfico de aplicaciones
-
Cómo funciona la autenticación, la autorización y la auditoría
-
Componentes básicos de la configuración de autenticación, autorización y auditoría
-
Autorización del acceso de los usuarios a los recursos de aplicaciones
-
NetScaler ADC como proxy del servicio de federación de Active Directory
-
NetScaler Gateway local como proveedor de identidad de Citrix Cloud
-
Compatibilidad de configuración para el atributo de cookie SameSite
-
Configuración de autenticación, autorización y auditoría para protocolos de uso común
-
Solución de problemas relacionados con la autenticación y la autorización
-
-
-
-
Configuración de la expresión de directiva avanzada: Introducción
-
Expresiones de directivas avanzadas: trabajo con fechas, horas y números
-
Expresiones de directivas avanzadas: análisis de datos HTTP, TCP y UDP
-
Expresiones de directivas avanzadas: análisis de certificados SSL
-
Expresiones de directivas avanzadas: direcciones IP y MAC, rendimiento, ID de VLAN
-
Expresiones de directivas avanzadas: funciones de Stream Analytics
-
Expresiones de referencia: expresiones de directivas avanzadas
-
Resumen de ejemplos de expresiones y directivas de sintaxis predeterminadas
-
Ejemplos de aprendizaje de directivas de sintaxis predeterminadas para reescritura
-
Migración de las reglas mod_rewrite de Apache a la sintaxis predeterminada
-
-
-
-
Comprobaciones de protección XML
-
-
-
Administrar un servidor virtual de redirección de caché
-
Ver estadísticas del servidor virtual de redirección de caché
-
Habilitar o inhabilitar un servidor virtual de redirección de caché
-
Resultados directos de directivas a la caché en lugar del origen
-
Realizar una copia de seguridad de un servidor virtual de redirección de caché
-
Habilitar la comprobación de estado TCP externa para servidores virtuales UDP
-
-
Traducir la dirección IP de destino de una solicitud a la dirección IP de origen
-
-
Compatibilidad de configuración de NetScaler ADC en un clúster
-
Descripción general del cluster
-
Administración del clúster de NetScaler ADC
-
Grupos de nodos para configuraciones detectadas y parcialmente rayadas
-
Desactivación de la dirección en el plano posterior del clúster
-
Eliminar un nodo de un clúster implementado mediante la agregación de vínculos de clúster
-
Supervisión de la configuración del clúster mediante SNMP MIB con enlace SNMP
-
Supervisión de los errores de propagación de comandos en una implementación de clúster
-
Compatibilidad con logotipos preparados para IPv6 para clústeres
-
Enlace de interfaz VRRP en un clúster activo de un solo nodo
-
Casos de configuración y uso de clústeres
-
Migración de una configuración de HA a una configuración de clúster
-
Interfaces comunes para cliente y servidor e interfaces dedicadas para backplane
-
Conmutador común para cliente y servidor y conmutador dedicado para placa posterior
-
Supervisar servicios en un clúster mediante la supervisión de rutas
-
-
-
Configurar NetScaler ADC como un solucionador de stubs con reconocimiento de seguridad no validante
-
Compatibilidad con tramas gigantes para DNS para gestionar respuestas de grandes tamaños
-
Configurar el almacenamiento en caché negativo de los registros DNS
-
-
Estado de servicio y servidor virtual de equilibrio de carga
-
Insertar atributos de cookie a las cookies generadas por ADC
-
Proteja una configuración de equilibrio de carga contra fallos
-
Administrar el tráfico de clientes
-
Configurar servidores virtuales de equilibrio de carga sin sesión
-
Reescritura de puertos y protocolos para la redirección HTTP
-
Insertar la dirección IP y el puerto de un servidor virtual en el encabezado de solicitud
-
Utilizar una IP de origen especificada para la comunicación de back-end
-
Establecer un valor de tiempo de espera para las conexiones de cliente inactivas
-
Gestionar el tráfico de clientes en función de la velocidad de tráfico
-
Utilizar un puerto de origen de un rango de puertos especificado para la comunicación de back-end
-
Configurar la persistencia IP de origen para la comunicación back-end
-
-
Configuración avanzada de equilibrio de carga
-
Aumenta gradualmente la carga en un nuevo servicio con un inicio lento a nivel de servidor virtual
-
Proteger aplicaciones en servidores protegidos contra los picos de tráfico
-
Habilitar la limpieza de las conexiones de servicios y servidores virtuales
-
Habilitar o inhabilitar la sesión de persistencia en los servicios TROFS
-
Habilitar la comprobación de estado TCP externa para servidores virtuales UDP
-
Mantener la conexión de cliente para varias solicitudes de cliente
-
Insertar la dirección IP del cliente en el encabezado de solicitud
-
Utilizar la dirección IP de origen del cliente al conectarse al servidor
-
Configurar el puerto de origen para las conexiones del lado del servidor
-
Establecer un límite en el número de solicitudes por conexión al servidor
-
Establecer un valor de umbral para los monitores enlazados a un servicio
-
Establecer un valor de tiempo de espera para las conexiones de clientes inactivas
-
Establecer un valor de tiempo de espera para las conexiones de servidor inactivas
-
Establecer un límite en el uso del ancho de banda por parte de los clientes
-
Conservar el identificador de VLAN para la transparencia de VLAN
-
-
Configurar monitores en una configuración de equilibrio de carga
-
Configurar el equilibrio de carga para los protocolos de uso común
-
Caso de uso 3: Configurar el equilibrio de carga en modo de Direct Server Return
-
Caso de uso 6: Configurar el equilibrio de carga en modo DSR para redes IPv6 mediante el campo TOS
-
Caso de uso 7: Configurar el equilibrio de carga en modo DSR mediante IP sobre IP
-
Caso de uso 8: Configurar el equilibrio de carga en modo de un brazo
-
Caso de uso 9: Configurar el equilibrio de carga en modo en línea
-
Caso de uso 10: Equilibrio de carga de los servidores del sistema de detección de intrusiones
-
Caso de uso 11: Aislamiento del tráfico de red mediante directivas de escucha
-
Caso de uso 12: Configurar Citrix Virtual Desktops para el equilibrio de carga
-
Caso de uso 13: Configurar Citrix Virtual Apps para equilibrar la carga
-
Caso de uso 14: Asistente de ShareFile para equilibrar la carga Citrix ShareFile
-
Caso práctico 15: Configurar el equilibrio de carga de capa 4 en el dispositivo NetScaler ADC
-
-
Configurar para obtener el tráfico de datos NetScaler ADC FreeBSD desde una dirección SNIP
-
-
Compatibilidad con protocolos TLSv1.3 tal como se define en RFC 8446
-
Matriz de compatibilidad de certificados de servidor en el dispositivo ADC
-
Compatibilidad con plataformas basadas en chip SSL Intel Coleto
-
Compatibilidad con el módulo de seguridad de hardware Thales Luna Network
-
-
-
-
-
Configuración de un túnel de CloudBridge Connector entre dos centros de datos
-
Configuración de CloudBridge Connector entre el centro de datos y la nube de AWS
-
Configuración de un túnel de CloudBridge Connector entre un centro de datos y Azure Cloud
-
Configuración del túnel CloudBridge Connector entre Datacenter y SoftLayer Enterprise Cloud
-
Diagnóstico y solución de problemas de túnel CloudBridge Connector
-
-
Puntos a tener en cuenta para una configuración de alta disponibilidad
-
Sincronizar archivos de configuración en una configuración de alta disponibilidad
-
Restricción del tráfico de sincronización de alta disponibilidad a una VLAN
-
Configuración de nodos de alta disponibilidad en distintas subredes
-
Limitación de las conmutaciones por error causadas por monitores de ruta en modo no INC
-
Configuración del conjunto de interfaces de conmutación por error
-
Administración de mensajes de latido de alta disponibilidad en un dispositivo NetScaler ADC
-
Quitar y reemplazar un NetScaler ADC en una configuración de alta disponibilidad
-
This content has been machine translated dynamically.
Dieser Inhalt ist eine maschinelle Übersetzung, die dynamisch erstellt wurde. (Haftungsausschluss)
Cet article a été traduit automatiquement de manière dynamique. (Clause de non responsabilité)
Este artículo lo ha traducido una máquina de forma dinámica. (Aviso legal)
此内容已经过机器动态翻译。 放弃
このコンテンツは動的に機械翻訳されています。免責事項
이 콘텐츠는 동적으로 기계 번역되었습니다. 책임 부인
Este texto foi traduzido automaticamente. (Aviso legal)
Questo contenuto è stato tradotto dinamicamente con traduzione automatica.(Esclusione di responsabilità))
This article has been machine translated.
Dieser Artikel wurde maschinell übersetzt. (Haftungsausschluss)
Ce article a été traduit automatiquement. (Clause de non responsabilité)
Este artículo ha sido traducido automáticamente. (Aviso legal)
この記事は機械翻訳されています.免責事項
이 기사는 기계 번역되었습니다.책임 부인
Este artigo foi traduzido automaticamente.(Aviso legal)
这篇文章已经过机器翻译.放弃
Questo articolo è stato tradotto automaticamente.(Esclusione di responsabilità))
Translation failed!
Optimize Citrix ADC VPX performance on VMware ESX, Linux KVM, and Citrix Hypervisors
The Citrix ADC VPX performance greatly varies depending on the hypervisor, allocated system resources, and the host configurations. To achieve the desired performance, first follow the recommendations in the VPX data sheet, and then further optimize it using the best practices provided in this document.
Citrix ADC VPX instance on VMware ESX hypervisors
This section contains details of configurable options and settings, and other suggestions that help you achieve optimal performance of Citrix ADC VPX instance on VMware ESX hypervisors.
- Recommended configuration on ESX hosts
- Citrix ADC VPX with E1000 network interfaces
- Citrix ADC VPX with VMXNET3 network interfaces
- Citrix ADC VPX with SR-IOV and PCI passthrough network interfaces
Recommended configuration on ESX hosts
To achieve high performance for VPX with E1000, VMXNET3, SR-IOV, and PCI passthrough network interfaces, follow these recommendations:
- The total number of virtual CPUs (vCPUs) provisioned on the ESX host must be less than or equal to the total number of physical CPUs (pCPUs) on the ESX host.
-
Non-uniform Memory Access (NUMA) affinity and CPU affinity must be set for the ESX host to achieve good results.
– To find the NUMA affinity of a Vmnic, log in to the host locally or remotely, and type:
#vsish -e get /net/pNics/vmnic7/properties | grep NUMA Device NUMA Node: 0 <!--NeedCopy-->- To set NUMA and vCPU affinity for a VM, see VMware documentation.
Citrix ADC VPX with E1000 network interfaces
Perform the following settings on the VMware ESX host:
- On the VMware ESX host, create two vNICs from one pNIC vSwitch. Multiple vNICs create multiple Rx threads in the ESX host. This increases the Rx throughput of the pNIC interface.
- Enable VLANs on the vSwitch port group level for each vNIC that you have created.
- To increase vNIC transmit (Tx) throughput, use a separate Tx thread in the ESX host per vNIC. Use the following ESX command:
-
For ESX version 5.5:
esxcli system settings advanced set –o /Net/NetTxWorldlet –i <!--NeedCopy--> -
For ESX version 6.0 onwards:
 esxcli system settings advanced set -o /Net/NetVMTxType –i 1
 <!--NeedCopy-->
-
-
To further increase the vNIC Tx throughput, use a separate Tx completion thread and Rx threads per device (NIC) queue. Use the following ESX command:
 esxcli system settings advanced set -o /Net/NetNetqRxQueueFeatPairEnable -i 0
 <!--NeedCopy-->
Note:
Make sure that you reboot the VMware ESX host to apply the updated settings.
Two vNICs per pNIC deployment
The following is a sample topology and configuration commands for the Two vNICs per pNIC model of deployment that delivers better network performance.
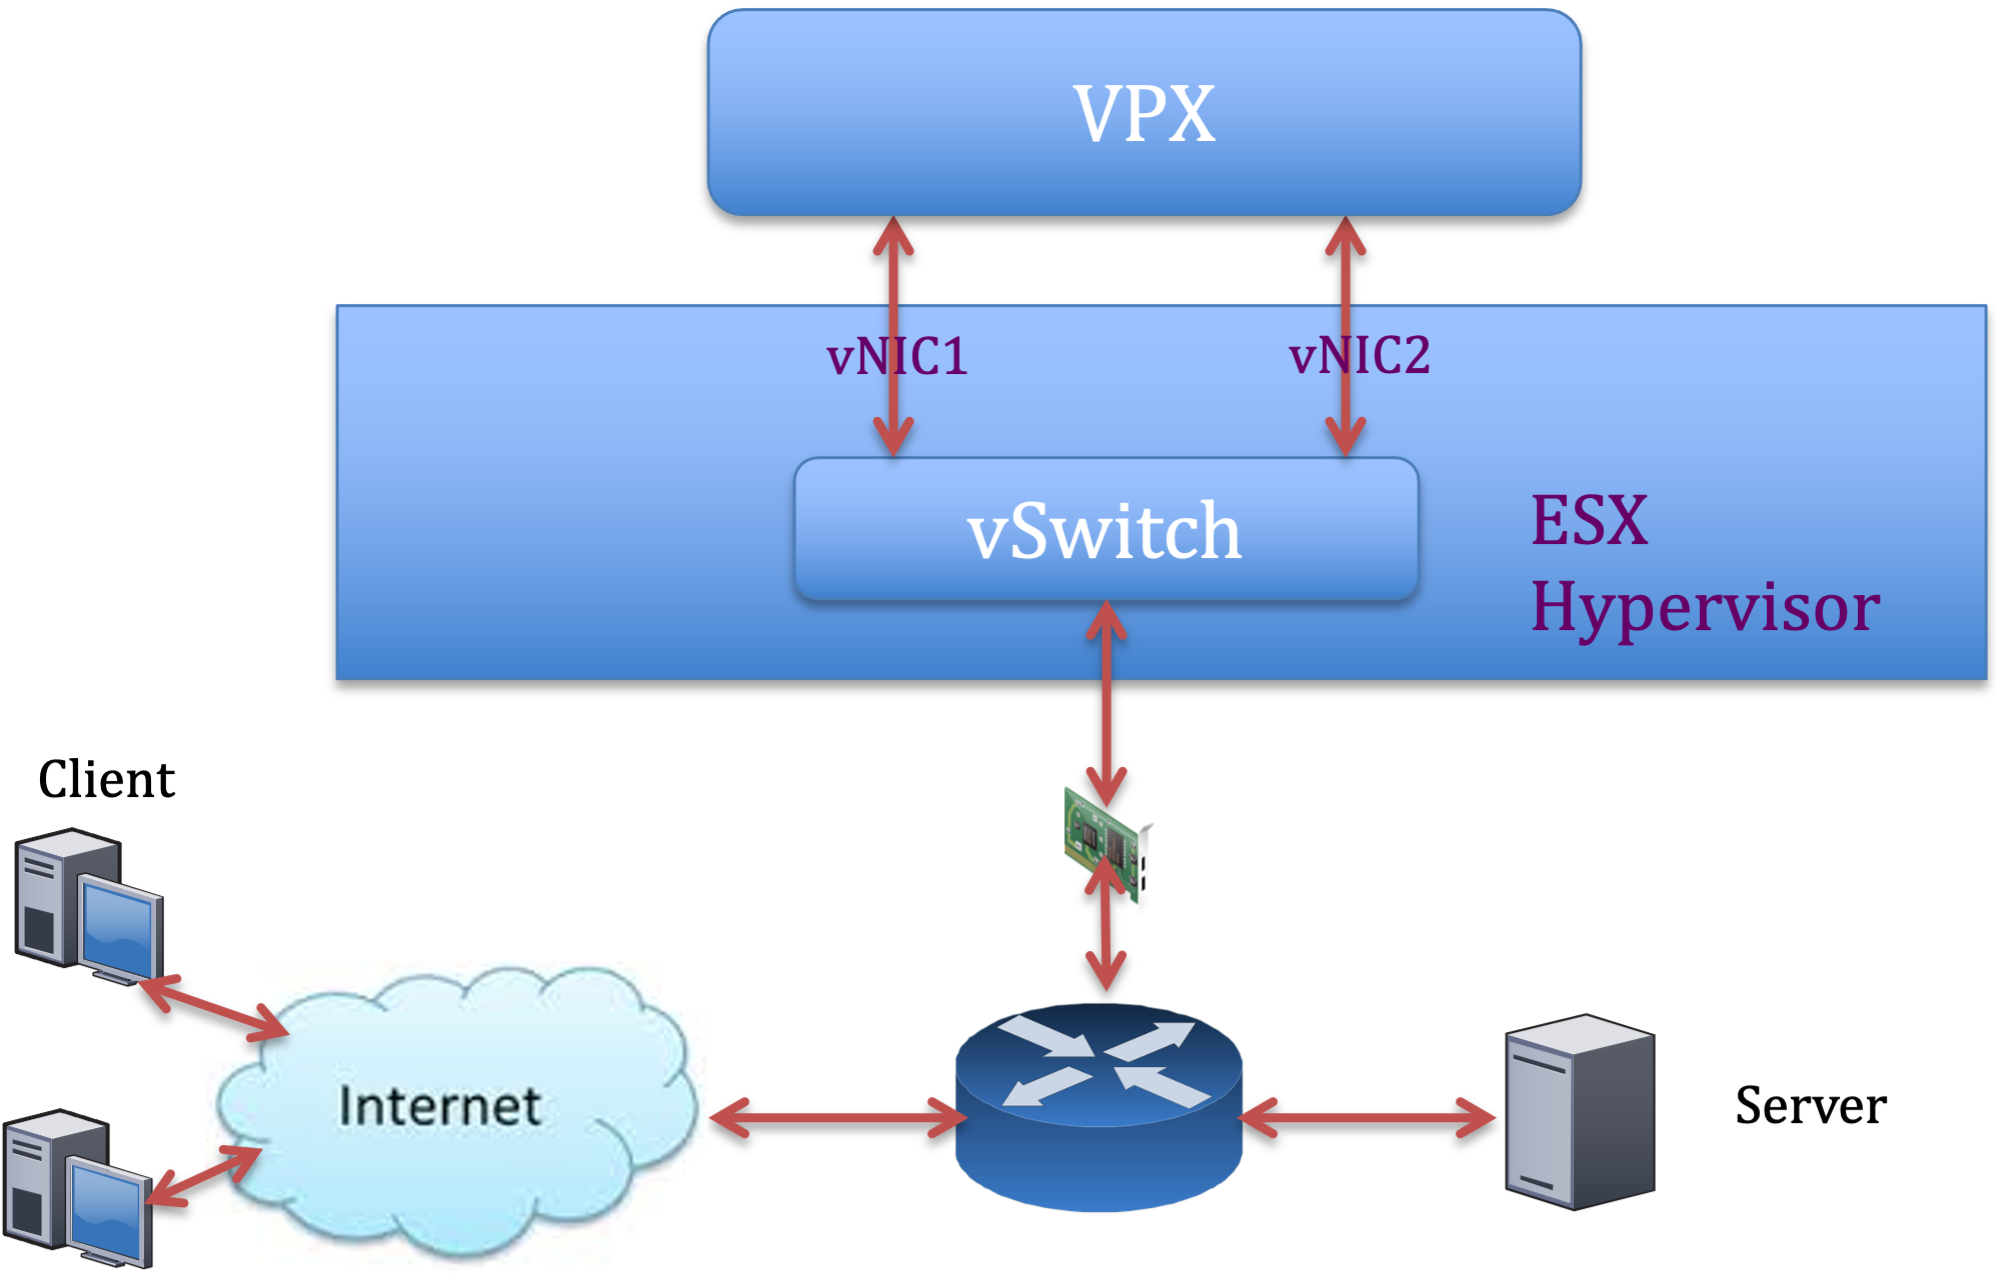
Citrix ADC VPX sample configuration:
To achieve the deployment shown in the preceding sample topology, perform the following configuration on the Citrix ADC VPX instance:
-
On the client side, bind the SNIP (1.1.1.2) to network interface 1/1 and enable the VLAN tag mode.
bind vlan 2 -ifnum 1/1 –tagged bind vlan 2 -IPAddress 1.1.1.2 255.255.255.0 <!--NeedCopy--> -
On the server side, bind the SNIP (2.2.2.2) to network interface 1/1 and enable the VLAN tag mode.
bind vlan 3 -ifnum 1/2 –tagged bind vlan 3 -IPAddress 2.2.2.2 255.255.255.0 <!--NeedCopy--> -
Add an HTTP virtual server (1.1.1.100) and bind it to a service (2.2.2.100).
 add lb vserver v1 HTTP 1.1.1.100 80 -persistenceType NONE -Listenpolicy None -cltTimeout 180
 add service s1 2.2.2.100 HTTP 80 -gslb NONE -maxClient 0 -maxReq 0 -cip DISABLED -usip NO -useproxyport YES -sp ON -cltTimeout 180 -svrTimeout 360 -CKA NO -TCPB NO -CMP NO
 bind lb vserver v1 s1
 <!--NeedCopy-->
Note:
Make sure that you include the following two entries in the route table:
- 1.1.1.0/24 subnet with gateway pointing to SNIP 1.1.1.2
- 2.2.2.0/24 subnet with gateway pointing to SNIP 2.2.2.2
Citrix ADC VPX with VMXNET3 network interfaces
To achieve high performance for VPX with VMXNET3 network interfaces, do the following settings on the VMware ESX host:
- Create two vNICs from one pNIC vSwitch. Multiple vNICs create multiple Rx threads in the ESX host. This increases the Rx throughput of the pNIC interface.
- Enable VLANs on the vSwitch port group level for each vNIC that you have created.
- To increase vNIC transmit (Tx) throughput, use a separate Tx thread in the ESX host per vNIC. Use the following ESX commands:
- For ESX version 5.5:
esxcli system settings advanced set –o /Net/NetTxWorldlet –i <!--NeedCopy-->- For ESX version 6.0 onwards:
  esxcli system settings advanced set -o /Net/NetVMTxType –i 1
  <!--NeedCopy-->
On the VMware ESX host, perform the following configuration:
- On the VMware ESX host, create two vNICs from 1 pNIC vSwitch. Multiple vNICs create multiple Tx and Rx threads in the ESX host. This increases the Tx and Rx throughput of the pNIC interface.
- Enable VLANs on the vSwitch port group level for each vNIC that you have created.
-
To increase Tx throughput of a vNIC, use a separate Tx completion thread and Rx threads per device (NIC) queue. Use the following command:
esxcli system settings advanced set -o /Net/NetNetqRxQueueFeatPairEnable -i 0 <!--NeedCopy--> -
Configure a VM to use one transmit thread per vNIC, by adding the following setting to the VM’s configuration:
 ethernetX.ctxPerDev = "1"
 <!--NeedCopy-->
For more information, see Best Practices for Performance Tuning of Telco and NFV Workloads in vSphere
Note:
Make sure that you reboot the VMware ESX host to apply the updated settings.
You can configure VMXNET3 as a Two vNICs per pNIC deployment. For more information, see Two vNICs per pNIC deployment.
Citrix ADC VPX with SR-IOV and PCI passthrough network interfaces
To achieve high performance for VPX with SR-IOV and PCI passthrough network interfaces, see Recommended configuration on ESX hosts.
Citrix ADC VPX instance on Linux-KVM platform
This section contains details of configurable options and settings, and other suggestions that help you achieve optimal performance of Citrix ADC VPX instance on Linux-KVM platform.
- Performance settings for KVM
- Citrix ADC VPX with PV network interfaces
- Citrix ADC VPX with SR-IOV and Fortville PCIe passthrough network interfaces
Performance settings for KVM
Perform the following settings on the KVM host:
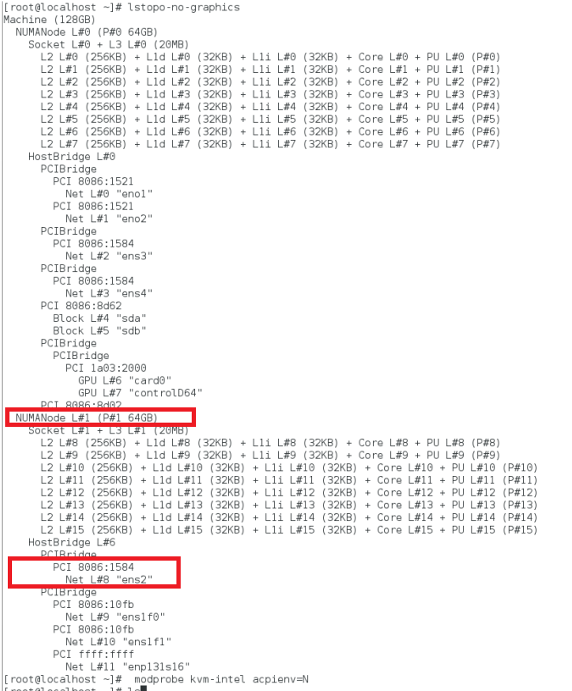
Find the NUMA domain of the NIC using the lstopo command:
Make sure that memory for the VPX and the CPU is pinned to the same location. In the following output, the 10G NIC “ens2” is tied to NUMA domain #1.
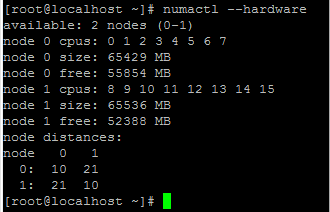
Allocate the VPX memory from the NUMA domain.
The numactl command indicates the NUMA domain from which the memory is allocated. In the following output, around 10 GB RAM is allocated from NUMA node #0.
To change the NUMA node mapping, follow these steps.
-
Edit the .xml of the VPX on the host.
/etc/libvirt/qemu/<VPX_name>.xml <!--NeedCopy--> -
Add the following tag:
<numatune> <memory mode="strict" nodeset="1"/> This is the NUMA domain name </numatune> <!--NeedCopy--> -
Shut down the VPX.
-
Run the following command:
virsh define /etc/libvirt/qemu/<VPX_name>.xml
<!--NeedCopy-->
This command updates the configuration information for the VM with the NUMA node mappings.
-
Power on the VPX. Then check the
numactl –hardwarecommand output on the host to see the updated memory allocations for the VPX.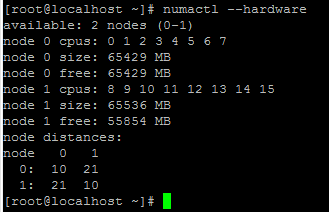
Pin vCPUs of VPX to physical cores.
-
To view the vCPU to pCPU mappings of a VPX, type the following command
 virsh vcpupin <VPX name>
 <!--NeedCopy-->
The vCPUs 0–4 are mapped to physical cores 8–11.
-
To view the current pCPU usage, type the following command:
 mpstat -P ALL 5
 <!--NeedCopy-->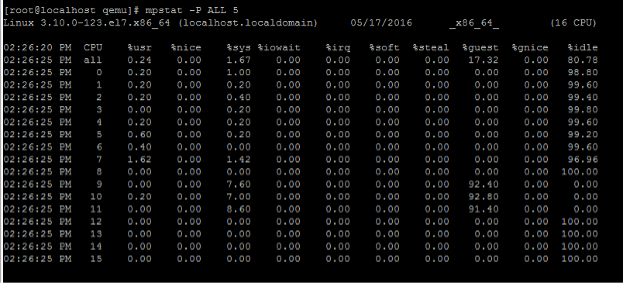
In this output, 8 is management CPU, and 9–11 are packet engines.
-
To change the vCPU to pCPU pinning, there are two options.
-
Change it at runtime after the VPX boots up using the following command:
virsh vcpupin <VPX name> <vCPU id> <pCPU number> virsh vcpupin NetScaler-VPX-XML 0 8 virsh vcpupin NetScaler-VPX-XML 1 9 virsh vcpupin NetScaler-VPX-XML 2 10 virsh vcpupin NetScaler-VPX-XML 3 11 <!--NeedCopy--> -
To make static changes to the VPX, edit the
.xmlfile as before with the following tags:-
Edit the .xml file of the VPX on the host
/etc/libvirt/qemu/<VPX_name>.xml <!--NeedCopy--> -
Add the following tag:
<vcpu placement='static' cpuset='8-11'>4</vcpu> <cputune> <vcpupin vcpu='0' cpuset='8'/> <vcpupin vcpu='1' cpuset='9'/> <vcpupin vcpu='2' cpuset='10'/> <vcpupin vcpu='3' cpuset='11'/> </cputune> <!--NeedCopy--> -
Shut down the VPX.
-
Update the configuration information for the VM with the NUMA node mappings using the following command:
virsh define /etc/libvirt/qemu/ <VPX_name>.xml <!--NeedCopy--> -
Power on the VPX. Then check the
virsh vcpupin <VPX name>command output on the host to see the updated CPU pinning.
-
-
Eliminate host interrupt overhead.
-
Detect VM_EXITS using the
kvm_statcommand.At the hypervisor level, host interrupts are mapped to the same pCPUs on which the vCPUs of the VPX are pinned. This might cause vCPUs on the VPX to get kicked out periodically.
To find the VM exits done by VMs running the host, use the
kvm_statcommand.[root@localhost ~]# kvm_stat -1 | grep EXTERNAL kvm_exit(EXTERNAL_INTERRUPT) 1728349 27738 [root@localhost ~]# <!--NeedCopy-->A higher value in the order of 1+M indicates an issue.
If a single VM is present, the expected value is 30–100 K. Anything more than that can indicate that there are one or more host interrupt vectors mapped to the same pCPU.
-
Detect host interrupts and migrate host interrupts.
When you run the
concatenatecommand for the “/proc/interrupts” file, it displays all the host interrupt mappings. If one or more active IRQs map to the same pCPU, its corresponding counter increments.Move any interrupts that overlap with your Citrix ADC VPX’s pCPUs to unused pCPUs:
echo 0000000f > /proc/irq/55/smp_affinity 0000000f - - > it is a bitmap, LSBs indicates that IRQ 55 can only be scheduled on pCPUs 0 – 3 <!--NeedCopy--> -
Disable IRQ balance.
Disable IRQ balance daemon, so that no rescheduling happens on the fly.
 service irqbalance stop
 service irqbalance show - To check the status
 service irqbalance start - Enable if needed
 <!--NeedCopy-->
Make sure you run the
kvm_statcommand to ensure that there are not many counters.
Citrix ADC VPX with PV network interfaces
You can configure para-virtualization (PV), SR-IOV, and PCIe passthrough network interfaces as a Two vNICs per pNIC deployment. For more information, see Two vNICs per pNIC deployment.
For optimal performance of PV (virtio) interfaces, follow these steps:
- Identify the NUMA domain to which the PCIe slot/NIC is tied to.
- The Memory and vCPU for the VPX must be pinned to the same NUMA domain.
- Vhost thread must be bound to the CPUs in the same NUMA domain.
Bind the virtual host threads to the corresponding CPUs:
-
Once the traffic is started, run the
topcommand on the host.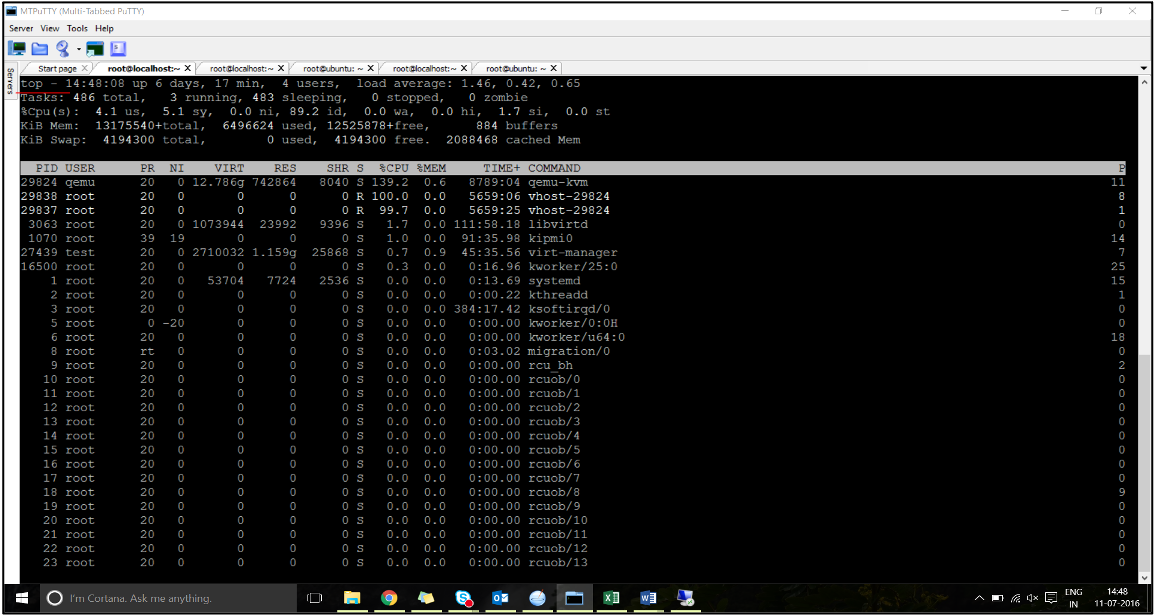
- Identify the virtual host process (named as
vhost-<pid-of-qemu>) affinity. -
Bind the vHost processes to the physical cores in the NUMA domain identified earlier using the following command:
taskset –pc <core-id> <process-id>
<!--NeedCopy-->
Example:
taskset –pc 12 29838 <!--NeedCopy--> -
The processor cores corresponding to the NUMA domain can be identified with the following command:
[root@localhost ~]# virsh capabilities | grep cpu
<cpu>
    </cpu>
        <cpus num='8'>
            <cpu id='0' socket_id='0' core_id='0' siblings='0'/>
            <cpu id='1' socket_id='0' core_id='1' siblings='1'/>
            <cpu id='2' socket_id='0' core_id='2' siblings='2'/>
            <cpu id='3' socket_id='0' core_id='3' siblings='3'/>
            <cpu id='4' socket_id='0' core_id='4' siblings='4'/>
            <cpu id='5' socket_id='0' core_id='5' siblings='5'/>
            <cpu id='6' socket_id='0' core_id='6' siblings='6'/>
            <cpu id='7' socket_id='0' core_id='7' siblings='7'/>
        </cpus>

        <cpus num='8'>
        <cpu id='8' socket_id='1' core_id='0' siblings='8'/>
        <cpu id='9' socket_id='1' core_id='1' siblings='9'/>
        <cpu id='10' socket_id='1' core_id='2' siblings='10'/>
        <cpu id='11' socket_id='1' core_id='3' siblings='11'/>
        <cpu id='12' socket_id='1' core_id='4' siblings='12'/>
        <cpu id='13' socket_id='1' core_id='5' siblings='13'/>
        <cpu id='14' socket_id='1' core_id='6' siblings='14'/>
        <cpu id='15' socket_id='1' core_id='7' siblings='15'/>
        </cpus>

    <cpuselection/>
    <cpuselection/>

<!--NeedCopy-->
Bind the QEMU process to the corresponding physical core:
- Identify the physical cores on which the QEMU process is running. For more information, see the preceding output.
-
Bind the QEMU process to the same physical cores to which you bind the vCPUs, using the following command:
taskset –pc 8-11 29824
<!--NeedCopy-->
Citrix ADC VPX with SR-IOV and Fortville PCIe passthrough network interfaces
For optimal performance of the SR-IOV and Fortville PCIe passthrough network interfaces, follow these steps:
- Identify the NUMA domain to which the PCIe slot/NIC is tied to.
- The Memory and vCPU for the VPX must be pinned to the same NUMA domain.
Sample VPX XML file for vCPU and memory pinning for Linux KVM:
    <domain type='kvm'>
        <name>NetScaler-VPX</name>
        <uuid>138f7782-1cd3-484b-8b6d-7604f35b14f4</uuid>
        <memory unit='KiB'>8097152</memory>
        <currentMemory unit='KiB'>8097152</currentMemory>
        <vcpu placement='static'>4</vcpu>

    <cputune>
        <vcpupin vcpu='0' cpuset='8'/>
        <vcpupin vcpu='1' cpuset='9'/>
        <vcpupin vcpu='2' cpuset='10'/>
        <vcpupin vcpu='3' cpuset='11'/>
    </cputune>

    <numatune>
    <memory mode='strict' nodeset='1'/>
    </numatune>

    </domain>
<!--NeedCopy-->
Citrix ADC VPX instance on Citrix Hypervisors
This section contains details of configurable options and settings, and other suggestions that help you achieve optimal performance of Citrix ADC VPX instance on Citrix Hypervisors.
- Performance settings for Citrix Hypervisors
- Citrix ADC VPX with SR-IOV network interfaces
- Citrix ADC VPX with para-virtualized interfaces
Performance settings for Citrix Hypervisors
Find the NUMA domain of the NIC using the “xl” command:
xl info -n
<!--NeedCopy-->
Pin vCPUs of VPX to physical cores.
xl vcpu-pin <Netsclaer VM Name>  <vCPU id>  <physical CPU id>
<!--NeedCopy-->
Check binding of vCPUs.
xl vcpu-list
<!--NeedCopy-->
Allocate more than 8 vCPUs to Citrix ADC VMs.
For configuring more than 8 vCPUs, run the following commands from the Citrix Hypervisor console:
xe vm-param-set uuid=your_vms_uuid VCPUs-max=16
xe vm-param-set uuid=your_vms_uuid VCPUs-at-startup=16
<!--NeedCopy-->
Citrix ADC VPX with SR-IOV network interfaces
For optimal performance of the SR-IOV network interfaces, follow these steps:
- Identify the NUMA domain to which the PCIe slot or NIC is tied to.
- Pin the Memory and vCPU for the VPX to the same NUMA domain.
- Bind the Domain-0 vCPU to the remaining CPU.
Citrix ADC VPX with para-virtualized interfaces
For optimal performance, two vNICs per pNIC and one vNIC per pNIC configurations are advised, as in other PV environments.
To achieve optimal performance of para-virtualized (netfront) interfaces, follow these steps:
- Identify the NUMA domain to which the PCIe slot or NIC is tied to.
- Pin the memory and vCPU for the VPX to the same NUMA domain.
- Bind the Domain-0 vCPU to the remaining CPU of the same NUMA domain.
- Pin host Rx/Tx threads of vNIC to Domain-0 vCPUs.
Pin host threads to Domain-0 vCPUs:
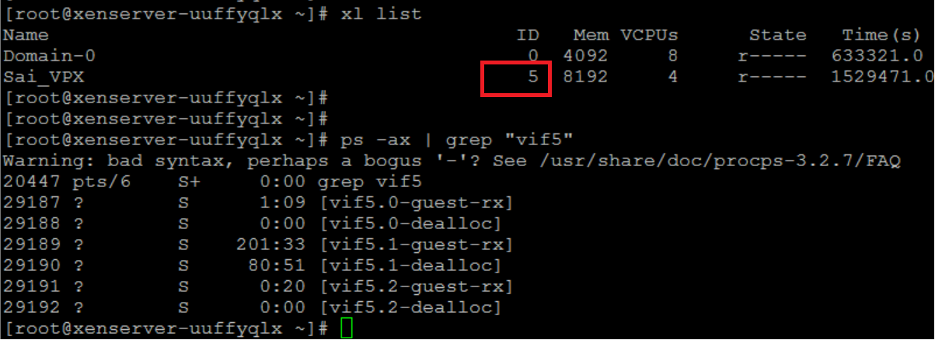
- Find Xen-ID of the VPX by using the
xl listcommand on the Citrix Hypervisor host shell. -
Identify host threads by using the following command:
ps -ax | grep vif <Xen-ID>
<!--NeedCopy-->
In the following example, these values indicate:
- vif5.0 - The threads for first interface allocated to VPX in XenCenter (management interface).
- vif5.1 - The threads for second interface assigned to VPX and so on.
-
Pin the threads to Domain-0 vCPUs using the following command:
taskset –pc <core-id> <process-id>
<!--NeedCopy-->
Example:
taskset -pc 1 29189
<!--NeedCopy-->
Compartir
Compartir
This Preview product documentation is Cloud Software Group Confidential.
You agree to hold this documentation confidential pursuant to the terms of your Cloud Software Group Beta/Tech Preview Agreement.
The development, release and timing of any features or functionality described in the Preview documentation remains at our sole discretion and are subject to change without notice or consultation.
The documentation is for informational purposes only and is not a commitment, promise or legal obligation to deliver any material, code or functionality and should not be relied upon in making Cloud Software Group product purchase decisions.
If you do not agree, select I DO NOT AGREE to exit.