BGP advertisement of external IP addresses for type LoadBalancer services and Ingresses using NetScaler CPX
Kubernetes service of type LoadBalancer support is provided by cloud load balancers in a cloud environment.
Cloud service providers enable this support by automatically creates a load balancer and assign an IP address which is displayed as part of the service status. Any traffic destined to the external IP address is load balanced on NodeIP and NodePort by the cloud load balancer. Once the traffic reaches the Kubernetes cluster, kube-proxy performs the routing to the actual application pods using iptables or IP virtual server rules. However, for on-prem environments the cloud load balancer auto configuration is not available.
You can expose the services of type LoadBalancer using the NetScaler Ingress Controller and Tier-1 NetScaler devices such as NetScaler VPX or MPX. The NetScaler VPX or MPX residing outside the Kubernetes cluster load balances the incoming traffic to the Kubernetes services. For more information on such a deployment, see Expose services of type LoadBalancer.
However, it may not be always feasible to use an external ADC device to expose the service of type LoadBalancer in an on-prem environment. Some times, it is desirable to manage all related resources from the Kubernetes cluster itself without any external component. The NetScaler Ingress Controller provides a way to expose the service of type LoadBalancer using NetScaler CPX that runs within the Kubernetes cluster. The existing BGP fabric to route the traffic to the Kubernetes nodes is leveraged to implement this solution.
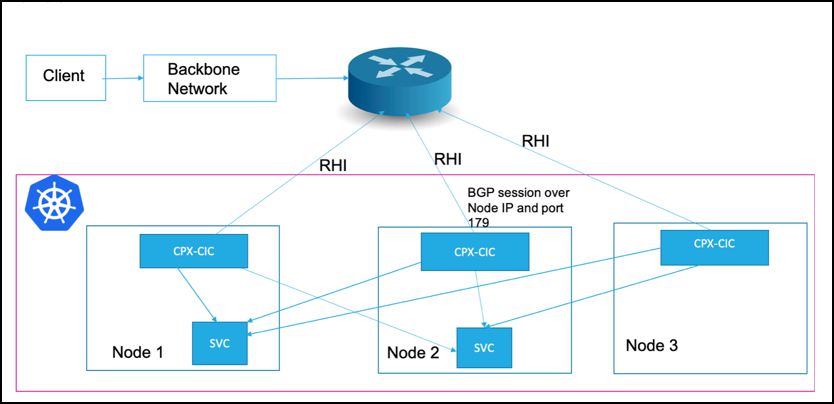
In this deployment, NetScaler CPX is deployed as a daemonset on the Kubernetes nodes in host mode. NetScaler CPX establishes a BGP peering session with your network routers, and uses that peering session to advertise the IP addresses of external cluster services. If your routers have ECMP capability, the traffic is load-balanced to multiple CPX instances by the upstream router, which in turn load-balances to actual application pods. When you deploy the NetScaler CPX with this mode, NetScaler CPX adds iptables rules for each service of type LoadBalancer on Kubernetes nodes. The traffic destined to the external IP address is routed to NetScaler CPX pods.
The following diagram explains a deployment where NetScaler CPX is exposing a service of type LoadBalancer:

As shown in the diagram, NetScaler CPX runs as a daemon set and runs a BGP session over port 179 on the node IP address pointed by the Kubernetes node resource. For every service of type LoadBalancer added to the Kubernetes API server, the NetScaler Ingress Controller configures the NetScaler CPX to advertise the external IP address to the BGP router configured. A /32 prefix is used to advertise the routes to the external router and the node IP address is used as a gateway to reach the external IP address. Once the traffic reaches to the Kubernetes node, the iptables rule steers the traffic to NetScaler CPX which in turn load balance to the actual service pods.
With this deployment, you can also use Kubernetes ingress resources and advertise the Ingress virtual IP (VIP) address to the router. You can specify the NS_VIP environment variable while deploying the NetScaler Ingress Controller which acts as the VIP for all ingress resources. When an Ingress resource is added, NetScaler CPX advertises the NS_VIP to external routers through BGP to attract the traffic. Once traffic comes to the NS_VIP, NetScaler CPX performs the content switching and load balancing as specified in the ingress resource.
Note:
For this solution to work, the NetScaler Ingress Controller must run as a root user and must have the
NET_ADMINcapability.
Deploy NetScaler CPX solution for services of type LoadBalancer
This procedure explains how to deploy NetScaler CPX as a daemonset in the host network to expose services of type LoadBalancer.
This configuration includes the following tasks:
-
Deploy NetScaler CPX with the NetScaler Ingress Controller as sidecar
-
BGP configuration
-
Service configuration
Prerequisites
- You must configure the upstream router for BGP routing with ECMP support and add Kubernetes nodes as neighbors.
- If the router supports load balancing, it is better to use a stable ECMP hashing algorithm for load-balancing with a higher entropy for even load-balancing.
Perform the following:
-
Download the rbac.yaml file and deploy the RBAC rules for NetScaler CPX and the NetScaler Ingress Controller.
kubectl apply -f rbac.yaml -
Download the citrix-k8s-cpx-ingress.yml using the following command.
wget https://raw.githubusercontent.com/citrix/citrix-k8s-ingress-controller/master/docs/configure/cpx-bgp-router/citrix-k8s-cpx-ingress.yml -
Edit the
citrix-k8s-cpx-ingress.yamlfile and specify the required values.- The argument
–configmapspecifies the ConfigMap location for the NetScaler Ingress Controller in the form ofnamespace/name. - The argument
--ipam citrix-ipam-controllercan be specified if you are running the for automatic IP address allocation. - (Optional)
nodeSelectorto select the nodes where you need to run the NetScaler CPX daemonset. By default, it is run on all worker nodes.
- The argument
-
Apply the
citrix-k8s-cpx-ingress.yamlfile to create a daemonset which starts NetScaler CPX and the NetScaler Ingress Controller.kubectl apply -f citrix-k8s-cpx-ingress.yml -
Create a ConfigMap (configmap.yaml) with the BGP configuration which is passed as an argument to the NetScaler Ingress Controller. For detailed information on BGP configuration, see BGP configuration.
You must have the following information to configure BGP routing:
- The router IP address for NetScaler CPX to connect
- The autonomous system (AS number) of the router
- The AS number for NetScaler CPX
Following is a sample ConfigMap with the BGP configuration.
apiVersion: v1 kind: ConfigMap metadata: name: config labels: app: cic data: NS\_BGP\_CONFIG: | bgpConfig: - bgpRouter: localAS: 100 neighbor: - address: 10.102.33.33 remoteAS: 100 advertisementInterval: 10 ASOriginationInterval: 10 -
Apply the ConfigMap created in step 5 to apply the BGP configuration.
kubectl apply -f configmap.yaml
-
Create a YAML file with the required configuration for service of type LoadBalancer.
Note:
For detailed information, see service configuration. The service configuration section explains different ways to get an external IP address for the service and also how to use the service annotation provided by NetScaler to configure different NetScaler functionalities.
Following is an example for configuration of service of type LoadBalancer.
apiVersion: v1 kind: Service metadata: name: kuard-service annotations: # This uses IPAM to allocate an IP from range 'Dev' # service.citrix.com/ipam-range: 'Dev' service.citrix.com/frontend-ip: 172.217.163.17 service.citrix.com/service-type-0: 'HTTP' service.citrix.com/service-type-1: 'SSL' service.citrix.com/lbvserver: '{"80-tcp":{"lbmethod":"ROUNDROBIN"}}' service.citrix.com/servicegroup: '{"80-tcp":{"usip":"yes"}}' service.citrix.com/ssl-termination: edge service.citrix.com/monitor: '{"80-tcp":{"type":"http"}}' service.citrix.com/frontend-httpprofile: '{"dropinvalreqs":"enabled", "websocket" : "enabled"}' service.citrix.com/backend-httpprofile: '{"dropinvalreqs":"enabled", "websocket" : "enabled"}' service.citrix.com/frontend-tcpprofile: '{"ws":"enabled", "sack" : "enabled"}' service.citrix.com/backend-tcpprofile: '{"ws":"enabled", "sack" : "enabled"}' service.citrix.com/frontend-sslprofile: '{"hsts":"enabled", "tls12" : "enabled"}' service.citrix.com/backend-sslprofile: '{"tls12" : "enabled"} service.citrix.com/ssl-certificate-data-1: | -----BEGIN----- [...] -----END----- service.citrix.com/ssl-key-data-1: | spec: type: LoadBalancer selector: app: kuard ports: - port: 80 targetPort: 8080 name: http - port: 443 targetPort: 8443 name: https -
Apply the service of type LoadBalancer.
kubectl apply -f service-example.yaml
Once the service is applied, the NetScaler Ingress Controller creates a load balancing virtual server with BGP route health injection enabled. If the load balancing virtual server state is UP, the route for the external IP address is advertised to the neighbor router with a /32 prefix with the node IP address as the gateway.
BGP configuration
BGP configuration is performed using the ConfigMap which is passed as an argument to the NetScaler Ingress Controller.
You must have the following information to configure BGP routing:
- The router IP address so that NetScaler CPX can connect to it
- The autonomous system (AS number) of the router
- The AS number for NetScaler CPX
In the following ConfigMap for the BGP configuration, the bgpConfig field represents the BGP configuration.
apiVersion: v1
kind: ConfigMap
metadata:
  name: config
  labels:
    app: cic
data:
  NS_BGP_CONFIG: |
    bgpConfig:
    - bgpRouter:
        localAS: 100
        neighbor:
        - address: x.x.x.x
          remoteAS: 100
          advertisementInterval: 10
          ASOriginationInterval: 10
<!--NeedCopy-->
The following table explains the various fields of the bgpConfig field.
| Field | Description | Type | Default value | Required |
|---|---|---|---|---|
nodeSelector |
If the nodeSeclector field is present, then the BGP router configuration is applicable for nodes which matches the nodeSelector field. nodeSelector accepts comma separated key=value pairs where each key represents a label name and the value is the label value. For example: nodeSelector: datacenter=ds1,rack-rack1 |
string | No | |
bgpRouter |
Specifies the BGP configuration. For information on different fields of the bgpRouter, see the following table. |
bgpRouter | Yes |
The following table explains the fields for the bgpRouter field.
| Field | Description | Type | Default value | Required |
|---|---|---|---|---|
localAS |
AS number for the NetScaler CPX | integer | Yes | |
neighbor |
Neighbor router BGP configuration. | neighbor | Yes |
The following table explains the neighbor field.
| Field | Description | Type | Default value | Required | |
|---|---|---|---|---|---|
address |
IP address for the neighbor router. | string | Yes | ||
remoteAS |
AS number of the neighbor router. | integer | Yes | ||
advertisementInterval |
This field sets a minimum interval between the sending of BGP routing updates (in seconds). | integer | 10 seconds | Yes | |
ASOriginationInterval |
This field sets the interval of sending AS origination routing updates (in seconds). | integer | 10 seconds | Yes |
Different neighbors for different nodes
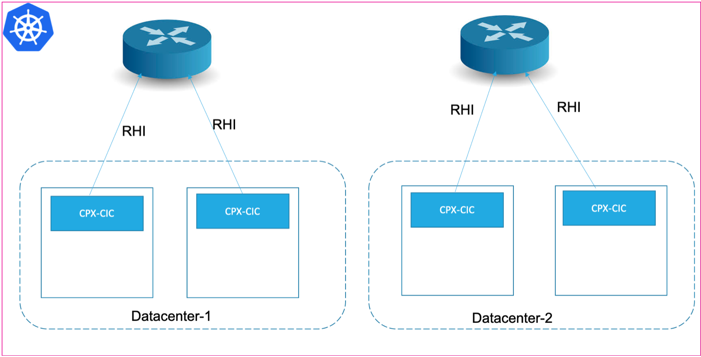
By default, every node in the cluster connects to all the neighbors listed in the configuration. But, if the Kubernetes cluster is spread across different data centers or different networks, different neighbor configurations for different nodes may be required. You can use the nodeSelector field to select the nodes required for the BGP routing configurations.

An example ConfigMap with the nodeSelector configuration is given as follows:
apiVersion: v1
kind: ConfigMap
metadata:
  name: config
  labels:
    app: cic
data:
  NS_BGP_CONFIG: |
    bgpConfig:
    - nodeSelector: datacenter=ds1
      bgpRouter:
        localAS: 100
        neighbor:
        - address: 10.102.33.44
          remoteAS: 100
          advertisementInterval: 10
          ASOriginationInterval: 10
    - nodeSelector: datacenter=ds2
      bgpRouter:
        localAS: 100
        neighbor:
        - address: 10.102.28.12
          remoteAS: 100
          advertisementInterval: 10
          ASOriginationInterval: 10
<!--NeedCopy-->
In this example, the router with the IP address 10.102.33.44 is used as a neighbor by nodes with the label datacenter=ds1. The router with the IP address 10.102.28.12 is used by the nodes with the label datacenter=ds2.
Service configuration
External IP address configuration
An external IP address for the service of type LoadBalancer can be obtained by using one of the following methods.
-
Specifying the
service.citrix.com/frontend-ipannotation in the service specification as follows.metadata: annotations: service.citrix.com/frontend-ip: 172.217.163.17 -
Specifying an IP address in the
spec.loadBalancerIPfield of the service specification as follows.spec: loadBalancerIP: 172.217.163.17 -
By automatically assigning a virtual IP address to the service using the IPAM controller provided by NetScaler. If one of the other two methods is specified, then that method takes precedence over the IPAM controller. The IPAM solution is designed in such a way that you can easily integrate the solution with ExternalDNS providers such as Infoblox. For more information, see Interoperability with ExternalDNS. For deploying and using the , see the documentation.
Service annotation configuration
The NetScaler Ingress Controller provides many service annotations to leverage the various functionalities of the NetScaler. For example, the default service type for the load balancing virtual server is TCP, but you can override this configuration by the service.citrix.com/service-type annotation.
metadata:
    annotations:
        service.citrix.com/service-type-0: 'HTTP'
        service.citrix.com/service-type-1: 'SSL'
With the help of various annotations provided by the NetScaler Ingress Controller, you can leverage various ADC functionalities like SSL offloading, HTTP rewrite and responder policies, and other custom resource definitions (CRDs).
For more information on all annotations for service of type LoadBalancer, see service annotations.
For using secret resources for SSL certificates for Type LoadBalancer services, see SSL certificate for services of type LoadBalancer.
External traffic policy configuration
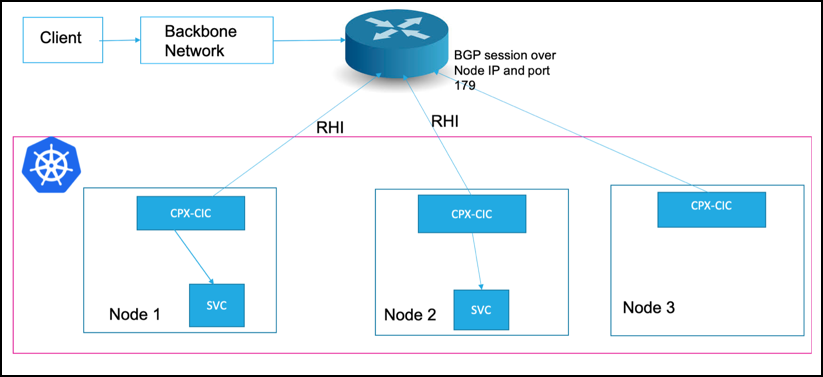
By default, the NetScaler Ingress Controller adds all the service pods as a back-end for the load balancing virtual service in NetScaler CPX. This step ensures better high availability and equal distribution to the service pod instances. All nodes running NetScaler CPX advertises the routes to the upstream server and attracts the traffic from the router. This behavior can be changed by setting the spec.externalTrafficPolicy of the service to Local. When the external traffic policy is set to Local, only the pods running in the same node is added as a back-end for the load balancing virtual server as shown in the following diagram. In this mode, only those nodes which have the service pods advertise the external IP address to the router and CPX sends the traffic only to the local pods.
If you do not want the traffic hopping across the nodes for performance reasons, you can use this feature.

Using Ingress resources
The NetScaler Ingress Controller provides an nt variable NS_VIP, which is the external IP Address for all ingress resources. Whenever an ingress resource is added, NetScaler CPX advertises the ingress IP address to the external routers.
The NetScaler Ingress Controller provides various annotations for ingress. For more information, see the Ingress annotation documentation.
Perform the following steps for the Ingress Configuration:
-
Download the rbac.yaml file and deploy the RBAC rules for NetScaler CPX and the NetScaler Ingress Controller.
kubectl apply -f rbac.yaml -
Download the citrix-k8s-cpx-ingress.yml using the following command.
wget https://raw.githubusercontent.com/citrix/citrix-k8s-ingress-controller/master/docs/configure/cpx-bgp-router/citrix-k8s-cpx-ingress.yml -
Edit the
citrix-k8s-cpx-ingress.ymlfile and specify the required values.-
The argument
–configmapspecifies the ConfigMap location for the NetScaler Ingress Controller in the form of namespace or name. -
The environment variable
NS_VIPto specify the external IP to be used for all Ingress resources. (This is a required parameter).
-
-
Apply the
citrix-k8s-cpx-ingress.ymlfile to create a daemonset which starts NetScaler CPX and the NetScaler Ingress Controller.kubectl apply -f citrix-k8s-cpx-ingress.yml -
Configure BGP using ConfigMap as shown in the previous section.
-
Deploy a sample ingress resource as follows. This step advertises the IP address specified in the
NS_VIPenvironment variable to the external router configured in ConfigMap.kubectl apply -f https://raw.githubusercontent.com/citrix/citrix-k8s-ingress-controller/master/docs/configure/cpx-bgp-router/ingress-example.yaml -
Access the application using
NS_VIP:<port>. By default, Ingress uses port 80 for insecure communication and port 443 for secure communication (If TLS section is provided).
Note: Currently, the ingress.citrix.com/frontend-ip annotation is not supported for BGP advertisements.
Helm Installation
You can use Helm charts to install the NetScaler CPX as BGP router. For more information, see the Citrix Helm chart documentation.
Troubleshooting
-
By default. NetScaler CPX uses the IP address range range 192.168.1.0/24 for internal communication, the IP address 192.168.1.1 as internal gateway to the host, and the IP address IP address 192.168.1.2 as NSIP. The ports 9080 and 9443 are used as management ports between the NetScaler Ingress Controller and NetScaler CPX for HTTP and HTTPS. If the 192.168.1.0/24 network falls within the range of PodCIDR, you can allocate a different set of IP addresses for internal communication. The
NS_IPandNS_GATEWAYenvironment variables control which IP address is used by NetScaler CPX for NSIP and gateway respectively. The same IP address must also be specified as part of the NetScaler Ingress Controller environment variableNS_IPto establish the communication between the NetScaler Ingress Controller and NetScaler CPX. -
By default, BGP on NetScaler CPX runs on port 179 and all the BGP traffic coming to the TCP port 179 is handled by NetScaler CPX. If there is a conflict, for example if you are using Calico’s external BGP peering capability to advertise your cluster prefixes over BGP, you can change the BGP port with the environment variable to the NetScaler Ingress Controller
BGP_PORT. -
Use source IP (USIP) mode of NetScaler does not work due to the constraints in Kubernetes. If the source IP address is required by the service, you can enable the CIP (client IP header) feature on the HTTP/SSL service-type services by using the following annotations.
service.citrix.com/servicegroup: ‘{“cip”:”ENABLED”, “cipheader”:”x-forwarded-for”}’