Multi-cluster ingress
Introduction
Multi-cluster Kubernetes solutions are ideal for distributing the workload across multiple clusters. NetScaler multi-cluster ingress solution enables NetScaler to load balance applications distributed across clusters using a single front-end IP address. The load-balanced applications can be either the same application, different applications of the same domain, or entirely different applications.
Earlier, to load balance applications in multiple clusters, a dedicated content switching virtual server was required on NetScaler for each instance of NetScaler Ingress Controller (NSIC) running in the clusters. With NetScaler multi-cluster ingress solution, multiple ingress controllers can share a content switching virtual server. Therefore, applications deployed across clusters can be load balanced using the same content switching virtual server IP (VIP) address.
To summarize, the multi-cluster ingress solution optimizes the use of load-balancing resources, thereby reducing operational costs.
Note:
The multi-cluster ingress solution is supported starting from NSIC version 2.0.6.
Deployment topology
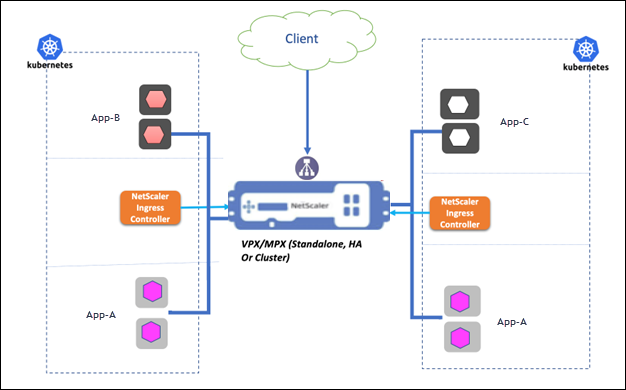
The following diagram describes the multi-cluster ingress deployment topology for two Kubernetes clusters in a data center/site. Here, NetScaler load balances applications distributed across clusters using a single front-end IP address.
-
An NSIC is deployed in both the clusters. Both NSIC instances configure the same NetScaler.
-
Depending on the nature of applications deployed in the clusters, we typically have the following use cases:
-
A different application of the same domain (company.website.com) deployed in each Kubernetes cluster:
App-Bin cluster1 andApp-Cin cluster2.Here, a content switching virtual server on NetScaler load balances traffic across
App-BandApp-C. Separate content switching policies are configured for each application. -
The same application deployed across both Kubernetes clusters.
Here, a content switching virtual server on NetScaler load balances traffic for the same application
App-Adeployed in both the clusters. Only one content switching policy is created forApp-A. which is used by both running instances (endpoints) of the application.
-
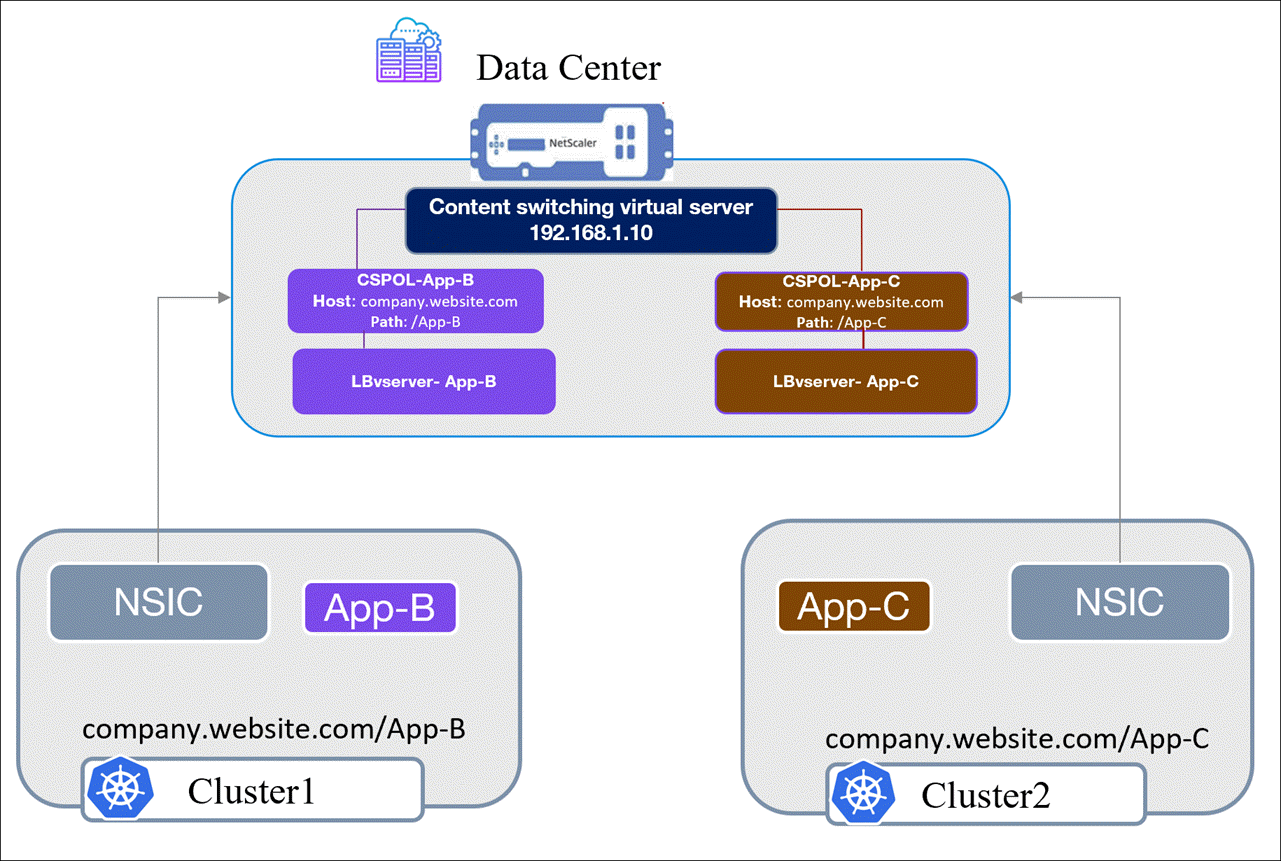
Let’s understand how the same front-end IP address is used to load balance traffic to applications App-B and App-c deployed across cluster1 and cluster2 with the following diagram.
Configuring the following resources enables the multi-cluster ingress solution: Listener and Ingress.
Listener
-
The listener resource deployed in a cluster creates a content switching virtual server on NetScaler using the VIP specified in the listener YAML. In the multi-cluster ingress setup, the same listener resource is deployed in all the clusters.
Listener resource in the multi-cluster ingress solution handles the front-end traffic management. You must provide all secrets, ciphers, and front-end profile configuration required for the content switching virtual server. For more information on listener CRD, see Listener. Details on deploying listener resources for the multi-cluster ingress setup are available in the Steps to deploy a multi-cluster ingress solution section.
Ingress
- The ingress resources deployed in each cluster to route traffic to an application in the multi-cluster setup refer to the same listener resource with the shared VIP address. Therefore, NSIC refers to the same content virtual server that exists and creates only the content switching policies on NetScaler that are later bound to the content switching virtual server.
In this case, the content switching policy for each application, that is, CSPOL-App-B and CSPOL-App-C, are bound to the same content switching virtual server. When a request for example, company.website/App-B is sent to the content switching virtual server IP (VIP) address, the content switching virtual server applies the CSPOL-App-B policy and routes the request to the LBvserver-App-B, which sends it to the App-B service.
Multi-cluster ingress deployment
In this procedure, we deploy the same HTTPS application in two clusters, deploy the required listener and ingress resources in both the clusters, such that NetScaler VPX or NetScaler MPX load balances these applications using a single front-end IP address.
Prerequisites
- Access to Kubernetes clusters hosted in cloud or on-premises. The Kubernetes cluster in the cloud can be a managed Kubernetes (for example: GKE, EKS, or AKS) or a custom created Kubernetes deployment. Kubernetes or OpenShift must be properly configured and operational. Ensure the network connectivity between NetScaler and the cluster’s pod network.
- For Kubernetes deployment, you need access to Kubernetes clusters running version 1.21 or later.
- For OpenShift deployment, you need access to OpenShift clusters running version 4.11 or later.
- You have installed Helm version 3.x or later. To install Helm, see here.
- NetScaler MPX/VPX is deployed in a standalone, HA, or cluster setup depending on your specific needs.
- For instructions to deploy NetScaler MPX, see NetScaler documentation.
- For instructions to deploy NetScaler VPX, see Deploy a NetScaler VPX instance.
- Determine the NSIP (NetScaler IP) address using which NetScaler Ingress Controller communicates with NetScaler. The IP address might be any one of the following IP addresses depending on the type of NetScaler deployment:
-
NSIP (for standalone appliances) - The management IP address of a standalone NetScaler appliance. For more information, see IP Addressing in NetScaler.
-
SNIP (for appliances in High Availability mode) - The subnet IP address. For more information, see IP Addressing in NetScaler.
-
CLIP (for appliances in Cluster mode) - The cluster management IP (CLIP) address for a cluster NetScaler deployment. For more information, see IP addressing for a cluster.
-
-
A user account in NetScaler VPX or NetScaler MPX. NetScaler Ingress Controller uses a system user account in NetScaler to configure NetScaler MPX or NetScaler VPX. For instructions to create the system user account on NetScaler, see Create System User Account for NetScaler Ingress Controller in NetScaler.
You can directly pass the user name and password or use Kubernetes secrets. If you want to use Kubernetes secrets, create a secret for the user name and password using the following command:
 kubectl create secret generic nslogin --from-literal=username=<username> --from-literal=password=<password>
 <!--NeedCopy-->
Steps to deploy a multi-cluster ingress solution
Follow these steps to deploy a multi-cluster ingress solution to expose the Cloud Native Networking (CNN) application deployed across two Kubernetes clusters using NetScaler and a shared front-end IP address.
Note:
Repeat the following steps in both the clusters to set up a multi-cluster ingress solution. There are exceptions added in some steps highlighting what needs to be done in a particular cluster; perform the steps accordingly.
-
Deploy the NetScaler CNN application by using the following YAML.
The CNN application is an HTTP-based application that lists the solutions offered under the NetScaler® cloud native portfolio.
kubectl apply -f - <<EOF
apiVersion: apps/v1
kind: Deployment
metadata:
  name: cnn-website
  labels:
    name: cnn-website
    app: cnn-website
spec:
  selector:
    matchLabels:
      app: cnn-website
  replicas: 2
  template:
    metadata:
      labels:
        name: cnn-website
        app: cnn-website
    spec:
      containers:
      - name: cnn-website
        image: quay.io/sample-apps/cnn-website:v1.0.0
        ports:
        - name: http-80
          containerPort: 80
        - name: https-443
          containerPort: 443
---
apiVersion: v1
kind: Service
metadata:
  name: cnn-website
  labels:
    app: cnn-website
spec:
  type: NodePort
  ports:
  - name: http-80
    port: 80
    targetPort: 80
  - name: https-443
    port: 443
    targetPort: 443
  selector:
    name: cnn-website
EOF
<!--NeedCopy-->
Note:
For an OpenShift deployment, run the following command
oc adm policy add-scc-to-user anyuid system:serviceaccount:<namespace>:defaultto grant a specific Security Context Constraint (SCC) to a service account. Replace<namespace>with the actual namespace where you have deployed the CNN application. -
Add the NetScaler Helm chart repository to your local registry using the following command.
helm repo add netscaler https://netscaler.github.io/netscaler-helm-charts/
<!--NeedCopy-->
If the NetScaler Helm chart repository is already added to your local registry, use the following command to update the repository:
helm repo update netscaler <!--NeedCopy--> -
Update
values.yamlto configure NetScaler Ingress Controller as described as following.Example
values.yamlfor cluster1license: accept: yes adcCredentialSecret: nslogin # K8s Secret Name nsIP: <x.x.x> # CLIP (for appliances in Cluster mode), SNIP (for appliances in High Availability mode) , NSIP (for standalone appliances) openshift: false # set to true for OpenShift deployments entityPrefix: cluster1 # unique for each NSIC instance. clusterName: cluster1 ingressClass: ['nsic-vpx'] # ingress class used in the ingress resources multiClusterPrefix: mc # Multi-cluster prefix for the NSIC instance. Same value must be specified for a set of NSIC instances configuring NetScaler in multi-cluster setup. # serviceClass- To use service type LB, specify the service class <!--NeedCopy-->Example
values.yamlfor cluster2license: accept: yes adcCredentialSecret: nslogin # K8s Secret Name nsIP: <x.x.x> # CLIP (for appliances in Cluster mode), SNIP (for appliances in High Availability mode) , NSIP (for standalone appliances) openshift: false # set to true for OpenShift deployments entityPrefix: cluster2 # unique for each NSIC instance. clusterName: cluster2 ingressClass: ['nsic-vpx'] # ingress class used in the ingress resources multiClusterPrefix: mc # Multi-cluster prefix for the NSIC instance. Same value must be specified for a set of NSIC instances configuring NetScaler in multi-cluster setup. # serviceClass- To use service type LB, specify the service class <!--NeedCopy-->Note:
For an OpenShift deployment, set the
openshiftparameter totrueinvalues.yaml.For information about the mandatory and optional parameters that you can configure during NSIC installation, see Configuration.
-
Deploy NetScaler Ingress Controller with the modified
values.yaml.helm install nsic netscaler/netscaler-ingress-controller -f values.yaml <!--NeedCopy-->Note:
If an earlier version of NSIC is already deployed in the cluster, deploy the listener CRD specification using the following command:
kubectl apply -f https://raw.githubusercontent.com/netscaler/netscaler-k8s-ingress-controller/master/crd/contentrouting/Listener.yaml. -
Deploy the following listener CRD resource.
kubectl apply -f - <<EOF apiVersion: citrix.com/v1 kind: Listener metadata: name: mc-listener spec: multicluster: True ingressclass: nsic-vpx protocol: 'https' vip: <Provide the shared front-end IP address> certificates: # you need to specify either secret name or pre-configured cert-keyname - secret: name: <Provide k8s secret name> # provide k8s secret containing cert-key of the application default: true - preconfigured: <ADC-certkeyname> # provide pre-configured cert-key from ADC. EOF <!--NeedCopy-->-
Update the
vipwith the virtual IP address that is used to expose the application deployed in both the clusters. -
multiclustermust be set asTrue. -
Either update a preconfigured secret with the ssl certificate-key name created on NetScaler or update the name of Kubernetes TLS Secret in the
secret.namesection. Refer Listener.certificates.
In this example, the listener resource
mc-listenerspecifies the front-end configuration such as VIP and secrets. It creates a content switching virtual server in NetScaler on port 443 for HTTPS traffic. -
-
Deploy the following ingress resource to expose the CNN application.
kubectl apply -f - <<EOF apiVersion: networking.k8s.io/v1 kind: Ingress metadata: name: frontend-ingress annotations: ingress.citrix.com/listener: mc-listener spec: ingressClassName: nsic-vpx rules: - http: paths: - path: / pathType: Prefix backend: service: name: cnn-website port: number: 80 --- apiVersion: networking.k8s.io/v1 kind: IngressClass metadata: name: nsic-vpx spec: controller: citrix.com/ingress-controller EOF <!--NeedCopy-->- The listener resource created in the previous step must be passed using
ingress.citrix.com/listenerannotation. In this example, the ingress resourcefrontend-ingressrefers to the Listener resourcemc-listener(created in step 5). - The ingress class is mentioned as
nsic-vpx.
Ingress creates a content switching policy, a load balancing virtual server, a service group and binds the application pod IP addresses as service group members.
Notes:
- When load balancing different applications in the multi-cluster ingress setup, separate content switching policies are created for each application. In such cases, if you require a particular sequence for policy binding, you must assign a priority number to the content switching policies by using the
ingress.citrix.com/multicluster-policy-priority-orderannotation. For more information, see Policy bindings. - For information about listener and ingress resources when load balancing different applications in the multi-cluster ingress setup, see Multi-cluster ingress setup with different applications.
- The listener resource created in the previous step must be passed using
-
To validate the configuration, replace
<VIP>with the virtual IP address provided in the listener resource in step 5.curl -kv https://<VIP> <!--NeedCopy-->
Advanced use cases
When the same application is deployed across multiple clusters, diverse deployment scenarios with varying traffic distribution requirements arise. The default behavior, known as Active-Active, involves all instances of the application receiving traffic based on the load balancing method. Let’s see the advanced use cases considering the same application deployed in two clusters as described here.
Active-backup mode
In this mode, one application is always active, which receives traffic all the time. The other application receives traffic only when this cluster or application is down. You can define which application acts as a backup using ingress.citrix.com/multicluster-backup-order ingress annotation.
Note:
The same listener resource must be deployed in both the clusters. For an example listener resource, see step 5 in the Steps to deploy a multi-cluster ingress solution section.
| Cluster 1 (Active) | Cluster2 (Backup) | |
|---|---|---|
| Ingress annotation | ingress.citrix.com/multicluster-backup-order: “1” | ingress.citrix.com/multicluster-backup-order: “2” |
| Information | The default is active (1). Annotation can be skipped | Annotation is mandatory for the application to be considered as a backup. |
- Application deployed in cluster1 actively receives traffic, whereas cluster2 acts as a backup. The application in cluster2 receives traffic only when cluster1 or application in cluster1 is down.
Canary mode
Note:
For the following deployments, the same listener resource must be deployed in each cluster. For an example listener resource, see step 5 in the Steps to deploy a multi-cluster ingress solution section.
We support canary deployments with two distinct strategies: “Canary by weight” and “Canary by header”.
Canary deployment by weight
You can implement canary deployment by assigning different weights to instances of an application. For instance, if there are two clusters and a new version of the application is being rolled out, you can allocate a certain percentage of traffic to the new version (canary) and the remaining traffic to the existing version. This canary mode allows gradual rollout and monitoring of the new version’s performance in a controlled manner.
| Cluster1 (Version1) | Cluster2 (Version2) | |
|---|---|---|
| Ingress annotation | NA | ingress.citrix.com/multicluster-canary-weight: “10” |
| Information | Annotation is not required | Annotation is mandatory. This application receives 10% of client traffic. |
Canary deployment by header
You can implement a canary deployment based on the specific HTTP headers. For example, a specific header in the HTTP request such as “X-Canary-Version” can be used to control the routing of traffic. In this case, requests with the “X-Canary-Version” header are directed to the canary version of the app, while others are routed to the stable version. This canary mode provides a more granular control over canary deployments, allowing you to target specific subsets of users or requests for testing purposes.
| Cluster1 (Version1) | Cluster2 (Version2) | |
|---|---|---|
| Annotation | NA | ingress.citrix.com/multicluster-canary-by-header: “version2” |
| Information | Annotation is not required | Annotation is mandatory for the canary application. All client traffic with the version2 header is sent to cluster2. |
Policy bindings
If you require a particular sequence for policy binding, you must assign a priority number to the content switching policies by using the ingress.citrix.com/multicluster-policy-priority-order annotation. Lower the number, the higher the priority.
Let’s consider the following ingress resource example to understand policy bindings.
kubectl apply -f - <<EOF
apiVersion: networking.k8s.io/v1
kind: Ingress
metadata:
  name: mc-ing
  annotations:
    ingress.citrix.com/listener: mc-listener
    ingress.citrix.com/multicluster-policy-priority-order: '{"frontend": {"80": "3", "9443": "1"}, "backend": "2"}'
spec:
  ingressClassName: nsic-vpx
  rules:
    - http:
        paths:
          - path: /
            pathType: Prefix
            backend:
              service:
                name: frontend
                port:
                  number: 80
          - path: /abc
            pathType: Prefix
            backend:
              service:
                name: frontend
                port:
                  number: 9443
          - path: /xyz
            pathType: Prefix
            backend:
              service:
                name: backend
                port:
                  number: 80
EOF
<!--NeedCopy-->
This example resource includes ingress.citrix.com/multicluster-policy-priority-order annotation, which defines the priority order for content switching policies. Rather than assigning priorities randomly, NetScaler Ingress Controller uses the priority values you have provided to bind content switching policies to the content switching virtual server.
For the ingress.citrix.com/multicluster-policy-priority-order: ‘{“Front end”: {“80”: “3”, “9443”: “1”}, “back-end”: “2”}’ annotation, the priority is assigned as following:
- The content switching policy associated with the
frontend:80service is bound to the content switching virtual server with a priority of 3. - The content switching policy associated with the
frontend:9443service is bound to the content switching virtual server with a priority of 1. - The content switching policy associated with the
backend:80service is bound to the content switching virtual server with a priority of 2.
Warning:
When a single service is mentioned in the ingress resource with different ports, you must explicitly specify a priority number for each port. Otherwise, random priorities are assigned.
Multi-cluster ingress setup with different applications
In the multi-cluster ingress setup for load balancing different applications, the listener resource deployed in each cluster must be the same. The ingress resource in each cluster must refer to the same listener. For the example described in the deployment topology section, mc-listener is the listener resource deployed in both cluster1 and cluster2. The following sample ingress resources deployed in cluster1 and cluster2 refer to mc-listener.
Ingress resource to expose App-B in cluster1:
kubectl apply -f - <<EOF
apiVersion: networking.k8s.io/v1
kind: Ingress
metadata:
  name: app-b
  annotations:
    ingress.citrix.com/listener: mc-listener
spec:
  ingressClassName: cluster1
  rules:
  - http:
      paths:
      - path: /App-B
        pathType: Prefix
        backend:
          service:
            name: app-b-svc
            port:
              number: 80
EOF
  <!--NeedCopy-->
Ingress resource to expose App-C in cluster2:
kubectl apply -f - <<EOF
apiVersion: networking.k8s.io/v1
kind: Ingress
metadata:
  name: app-c
  annotations:
    ingress.citrix.com/listener: mc-listener
spec:
  ingressClassName: cluster2
  rules:
  - http:
      paths:
      - path: /App-C
        pathType: Prefix
        backend:
          service:
            name: app-c-svc
            port:
              number: 80
EOF
  <!--NeedCopy-->