Deploy NetScaler Ingress Controller in OpenShift using NetScaler Operator
In this setup, NetScaler Ingress Controller configures NetScaler MPX or NetScaler VPX residing outside the OpenShift cluster.
Prerequisites
- Red Hat OpenShift Cluster (version 4.1 or later).
- Deploy NetScaler Operator. For information on how to deploy NetScaler Operator, see Deploy NetScaler Operator.
- Identify the IP address that NetScaler Ingress Controller needs to communicate with NetScaler. This IP address might be any one of the following IP addresses depending on the type of NetScaler deployment:
- NSIP (for standalone appliances) - The management IP address of a standalone NetScaler appliance. For more information, see IP Addressing in NetScaler.
- SNIP (for appliances in High Availability mode) - The subnet IP address. For more information, see IP Addressing in NetScaler.
- CLIP (for appliances in Cluster mode) - The cluster management IP (CLIP) address for a clustered NetScaler deployment. For more information, see IP addressing for a cluster.
-
The user name and password of NetScaler VPX or NetScaler MPX used as the ingress device. NetScaler must have a system user account (non-default) with certain privileges so that the NetScaler Ingress Controller can configure NetScaler VPX or NetScaler MPX. For instructions to create a system user account on NetScaler, see Create system user account for NetScaler NetScaler Ingress Controller in NetScaler.
You can directly pass the user name and password as environment variables to the controller, or use OpenShift secrets (recommended). To create a secret for the user name and password using the following command, modify the
<username>and<password>to required values:oc create secret generic nslogin --from-literal=username=<username> --from-literal=password=<password> <!--NeedCopy--> -
To export to any service monitor, install the service monitor CRD by using the following command:
 oc create -f https://raw.githubusercontent.com/prometheus-operator/prometheus-operator/refs/heads/main/example/prometheus-operator-crd/monitoring.coreos.com_servicemonitors.yaml
 <!--NeedCopy-->
Deploy NetScaler Ingress Controller as a standalone pod using NetScaler Operator
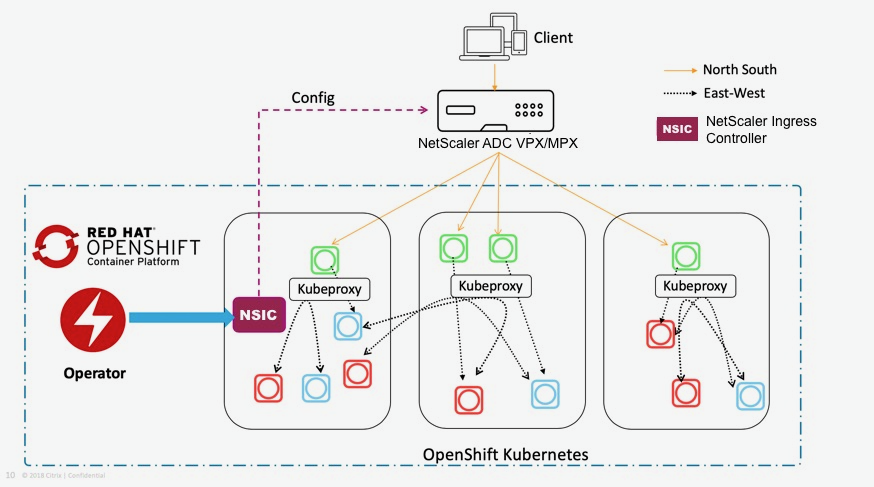
Using NetScaler Operator you can deploy NetScaler Ingress Controller as a standalone pod in an OpenShift cluster. NetScaler Ingress Controller configures NetScaler MPX or NetScaler VPX, which is deployed as an ingress device or router for an application running in the OpenShift cluster. The following diagram explains the topology:
Perform the following steps:
-
Log in to the OpenShift 4.x Cluster console.
-
Deploy an Apache application using the console.
-
Navigate to Workloads > Deployments > Create Deployment and use the following YAML file to create the deployment.
NOTE:
The Apache application is for the demonstration purpose only. You can modify the YAML file based on your requirement.
--- apiVersion: apps/v1 kind: Deployment metadata: name: apache labels: name: apache spec: selector: matchLabels: app: apache replicas: 2 template: metadata: labels: app: apache spec: containers: - name: apache image: httpd:latest ports: - containerPort: 80 --- <!--NeedCopy--> -
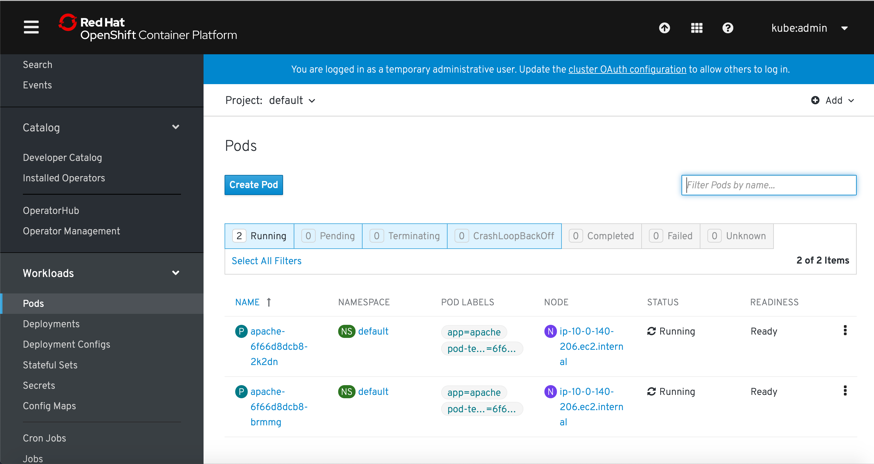
Navigate to Workloads > Pods section and ensure that the Apache application pods are up and running.
-
-
Create a service for the Apache application. Navigate to Networking > Services > Create Service and use the following YAML file.
apiVersion: v1
kind: Service
metadata:
  name: apache
spec:
  ports:
  - port: 80
    targetPort: 80
  selector:
    app: apache

<!--NeedCopy-->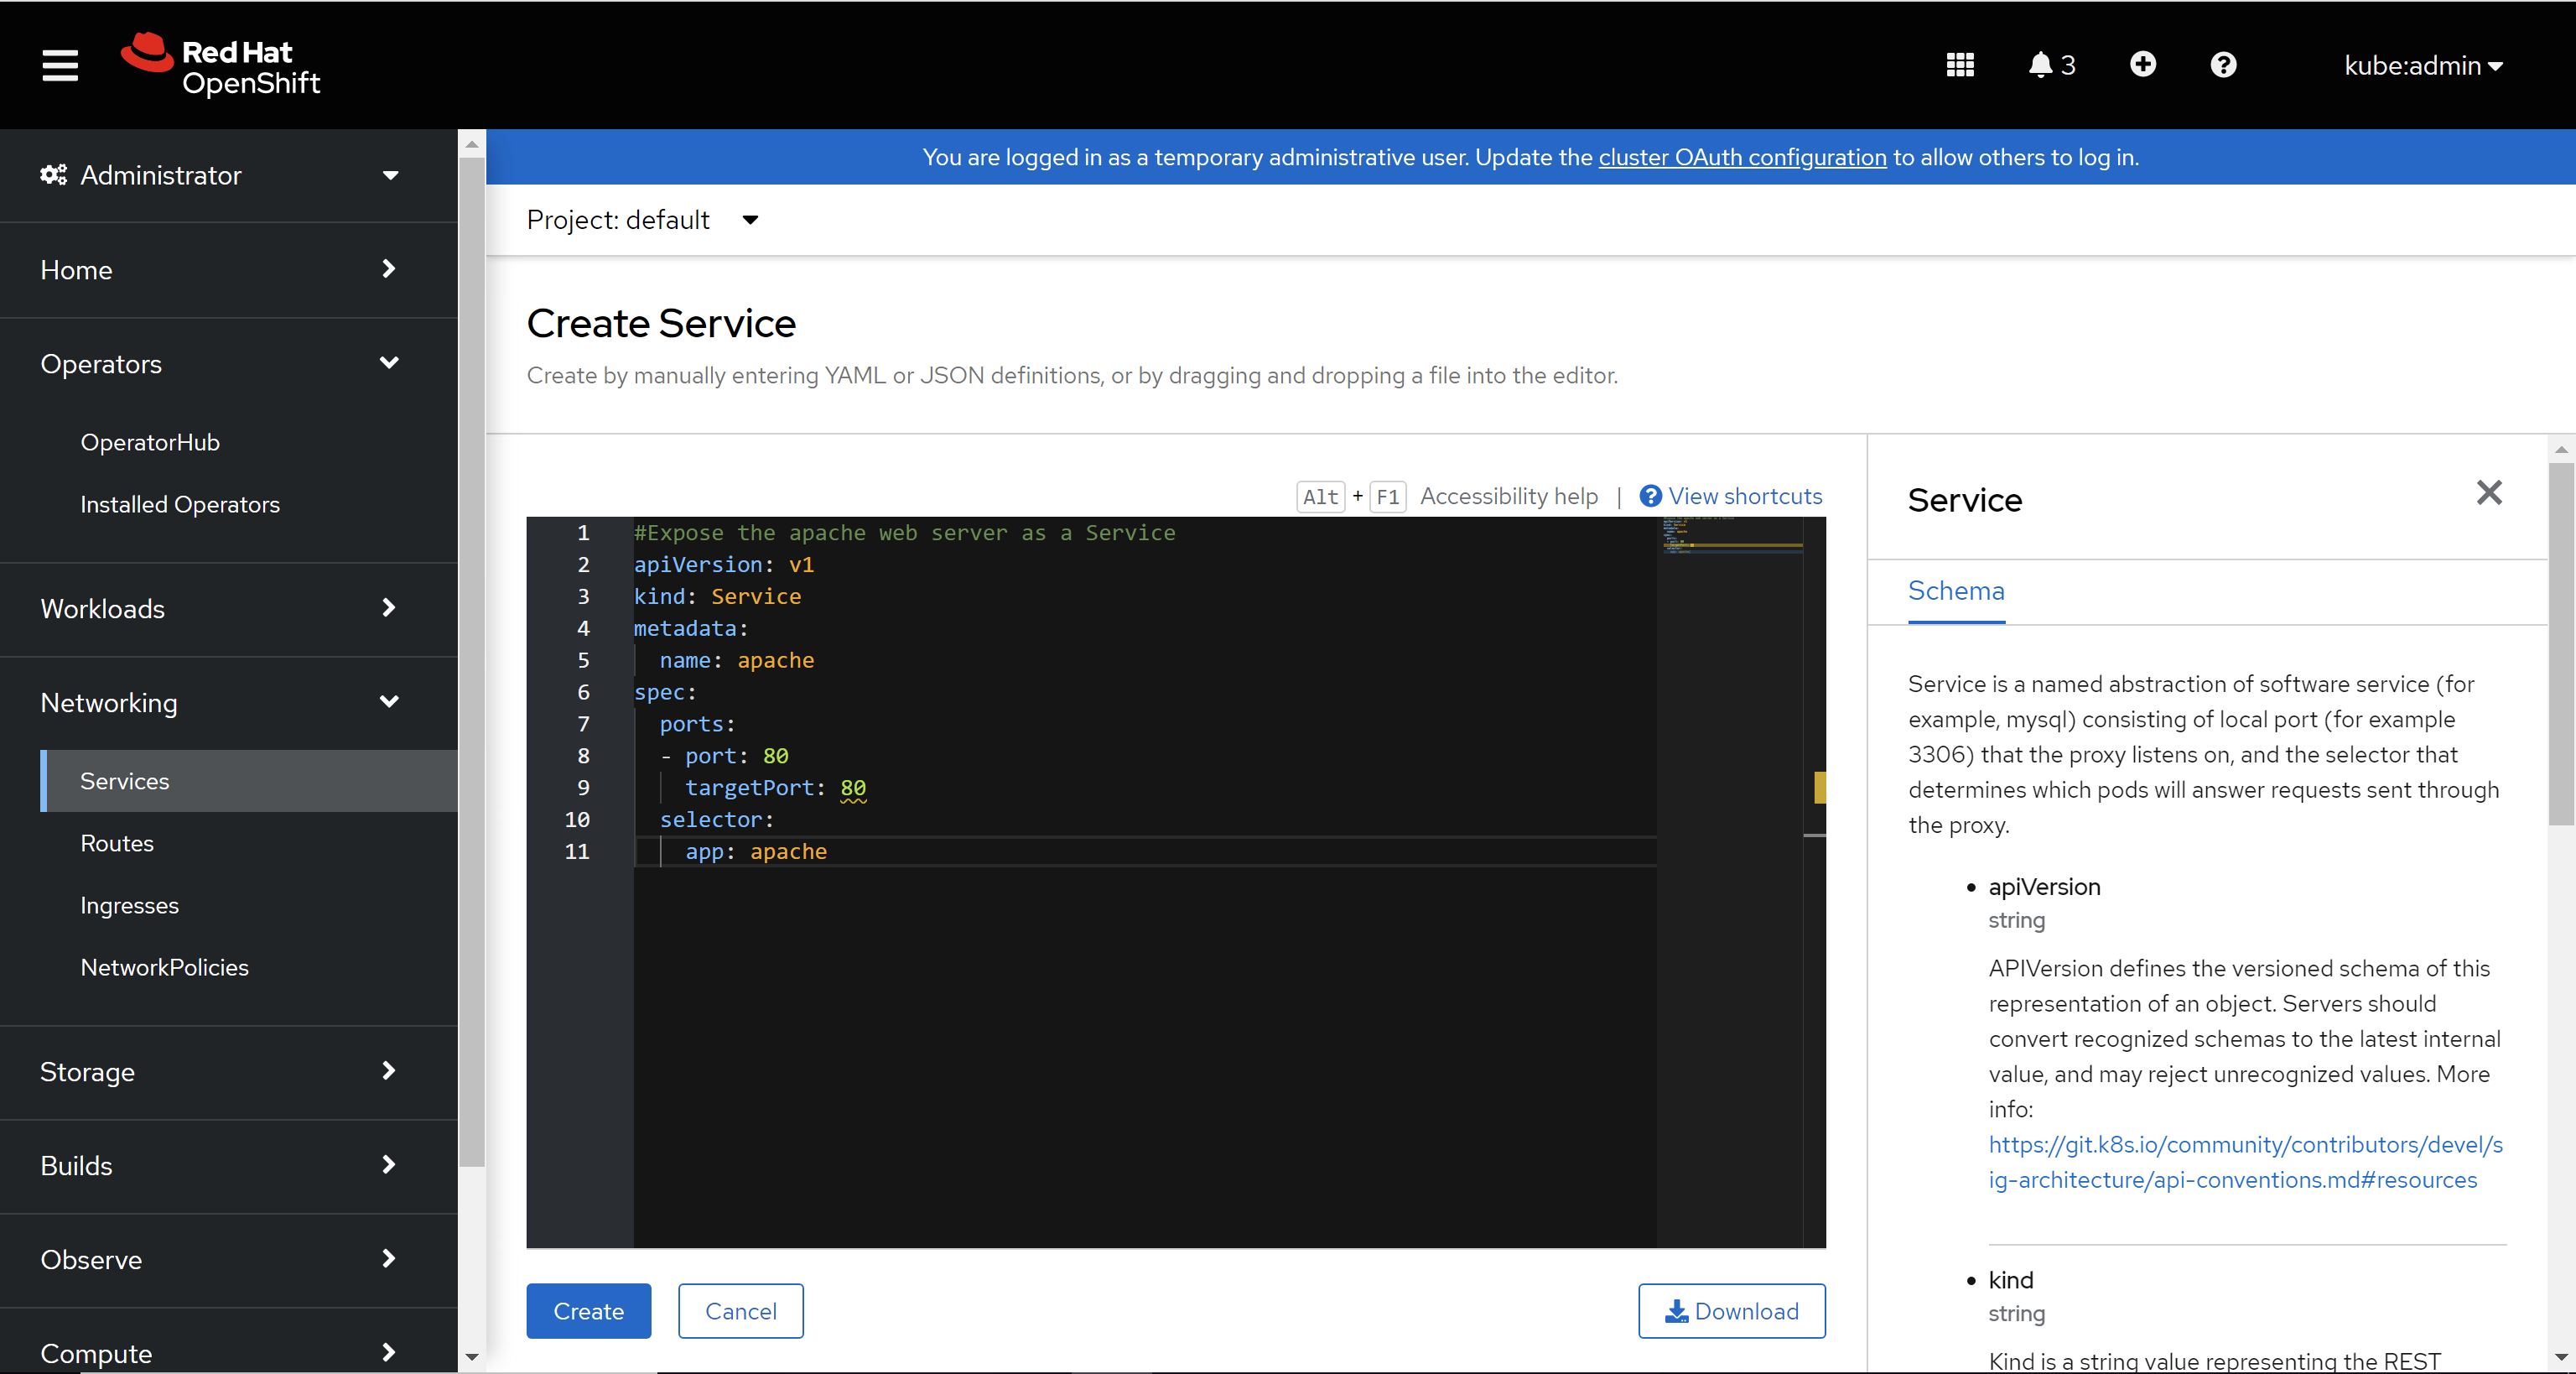
-
Create an ingress for the Apache application. Navigate to Networking > Ingress > Create Ingress and use the following YAML to create the ingress. Ensure that you update the VIP address of NetScaler VPX in the ingress YAML before applying it in the cluster.
apiVersion: networking.k8s.io/v1
kind: Ingress
metadata:
  annotations:
    ingress.citrix.com/frontend-ip: <NSVIP>
  name: vpx-ingress
  spec:
    ingressClassName: nsic-vpx
    rules:
    - host: citrix-ingress-operator.com
      http:
        paths:
        - backend:
            service:
              name: apache
              port:
                number: 80
          path: /
          pathType: Prefix
<!--NeedCopy-->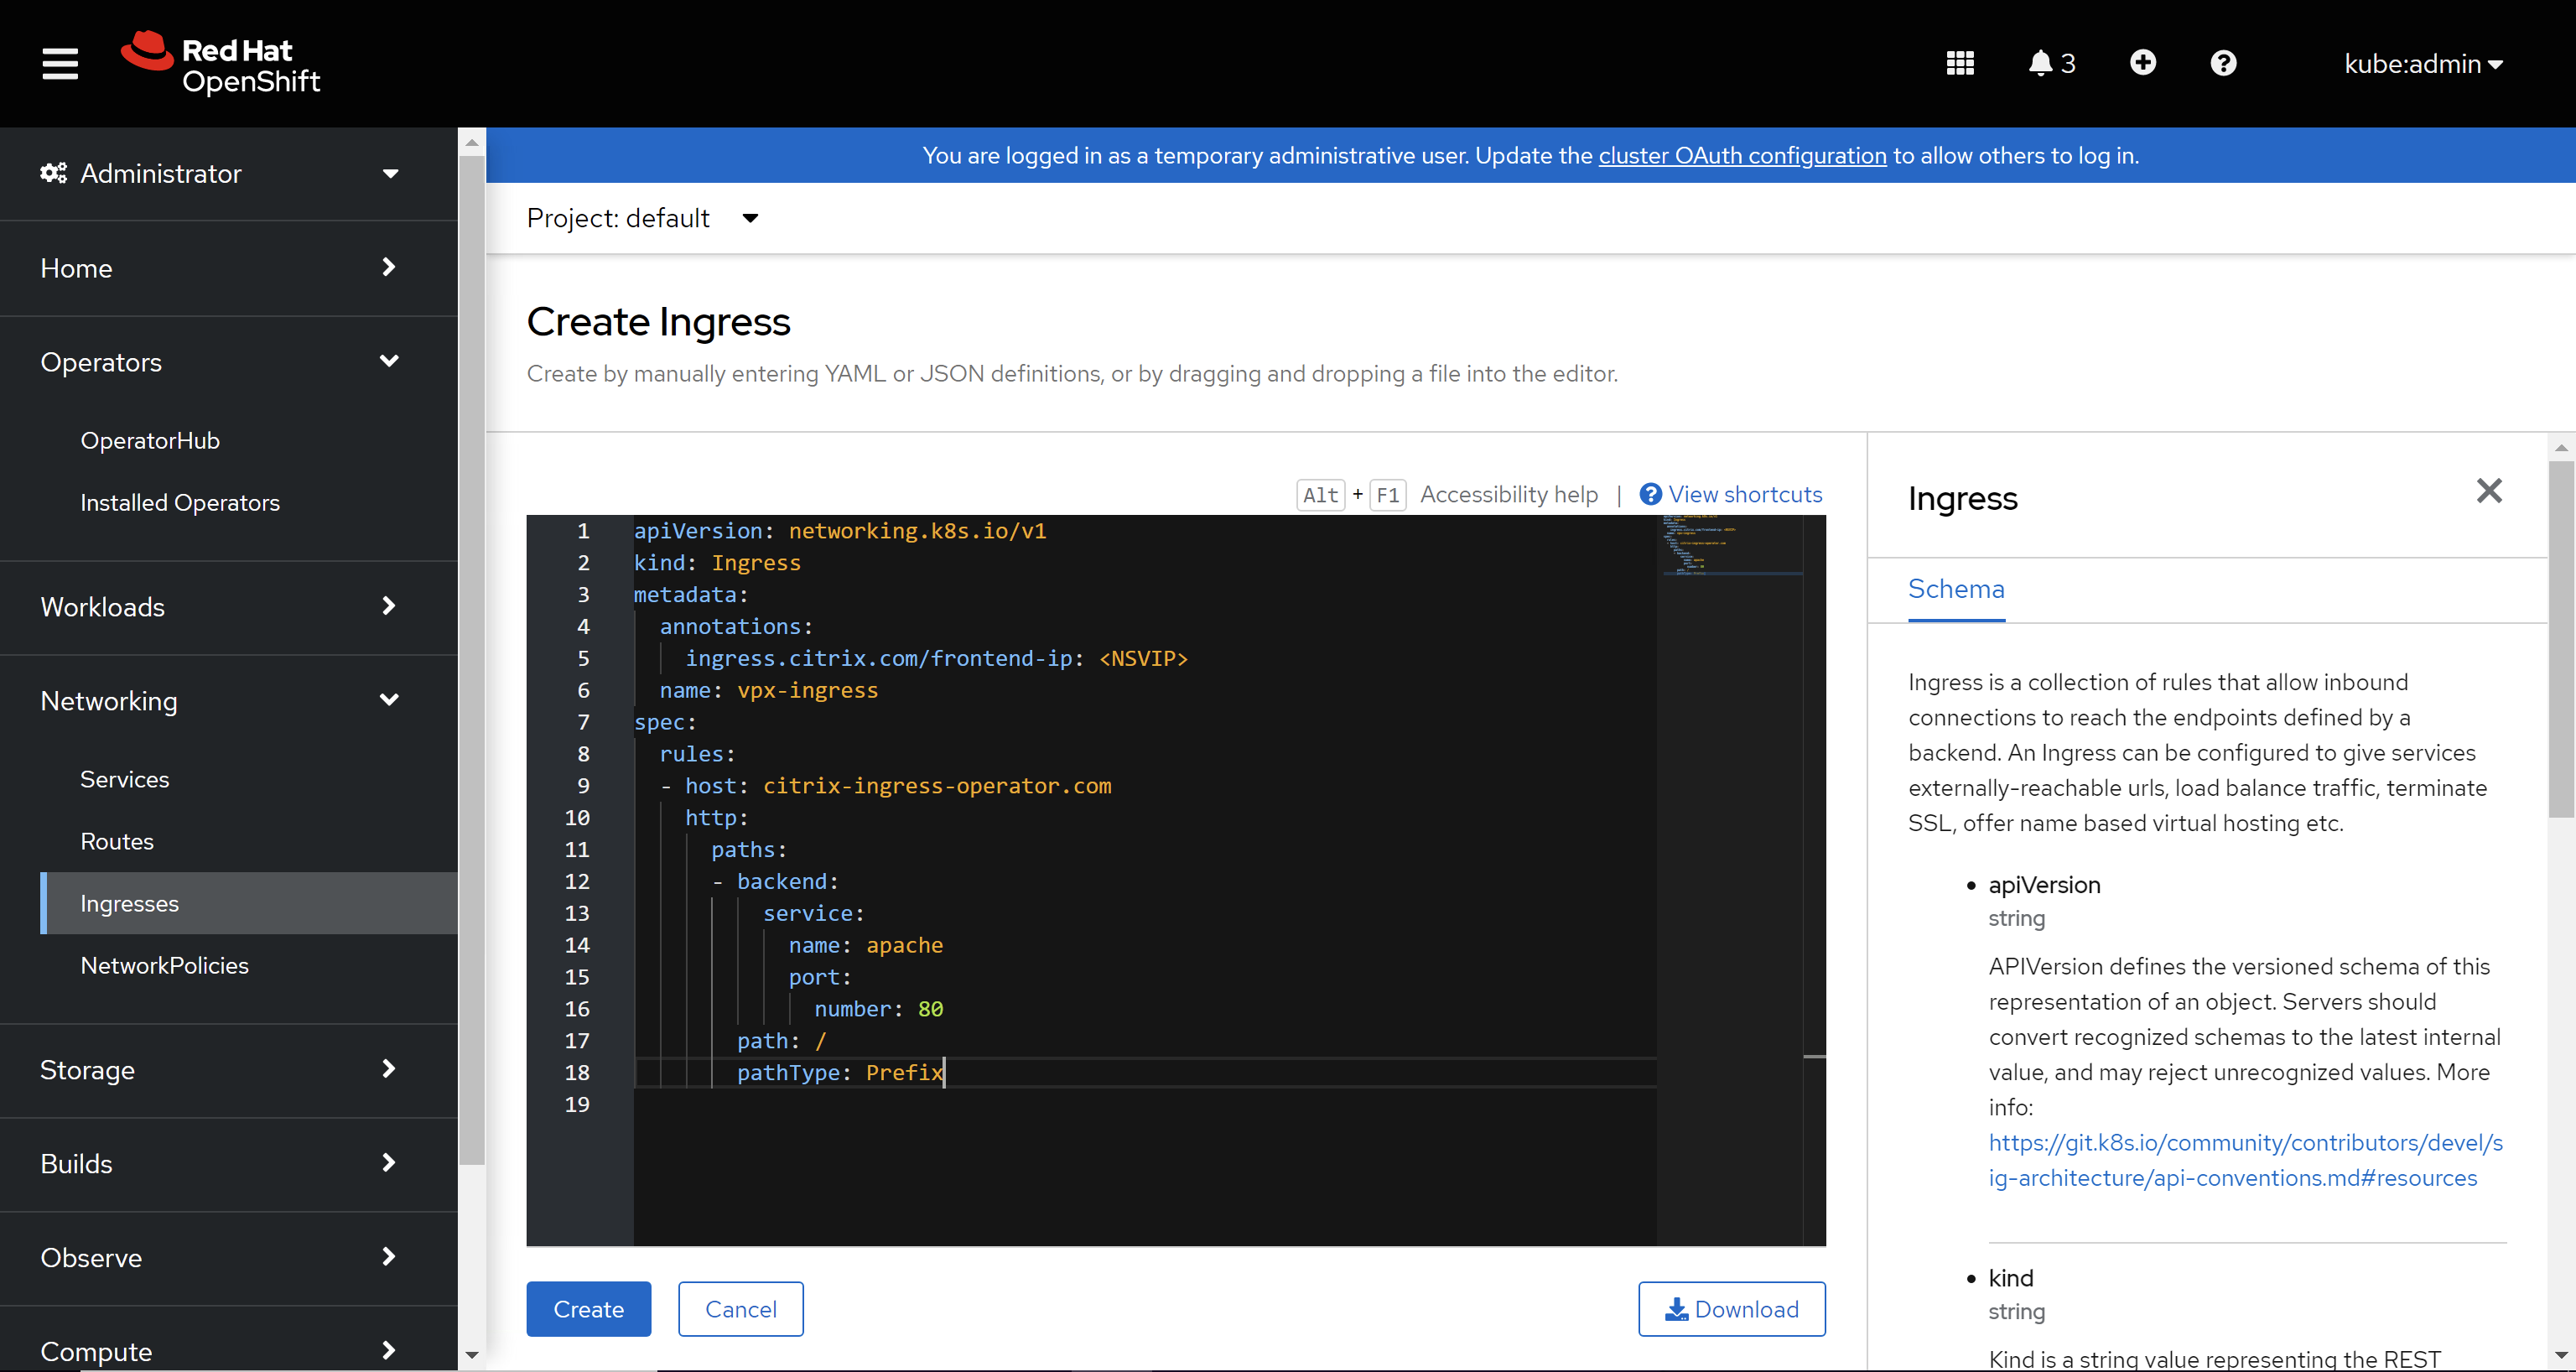
-
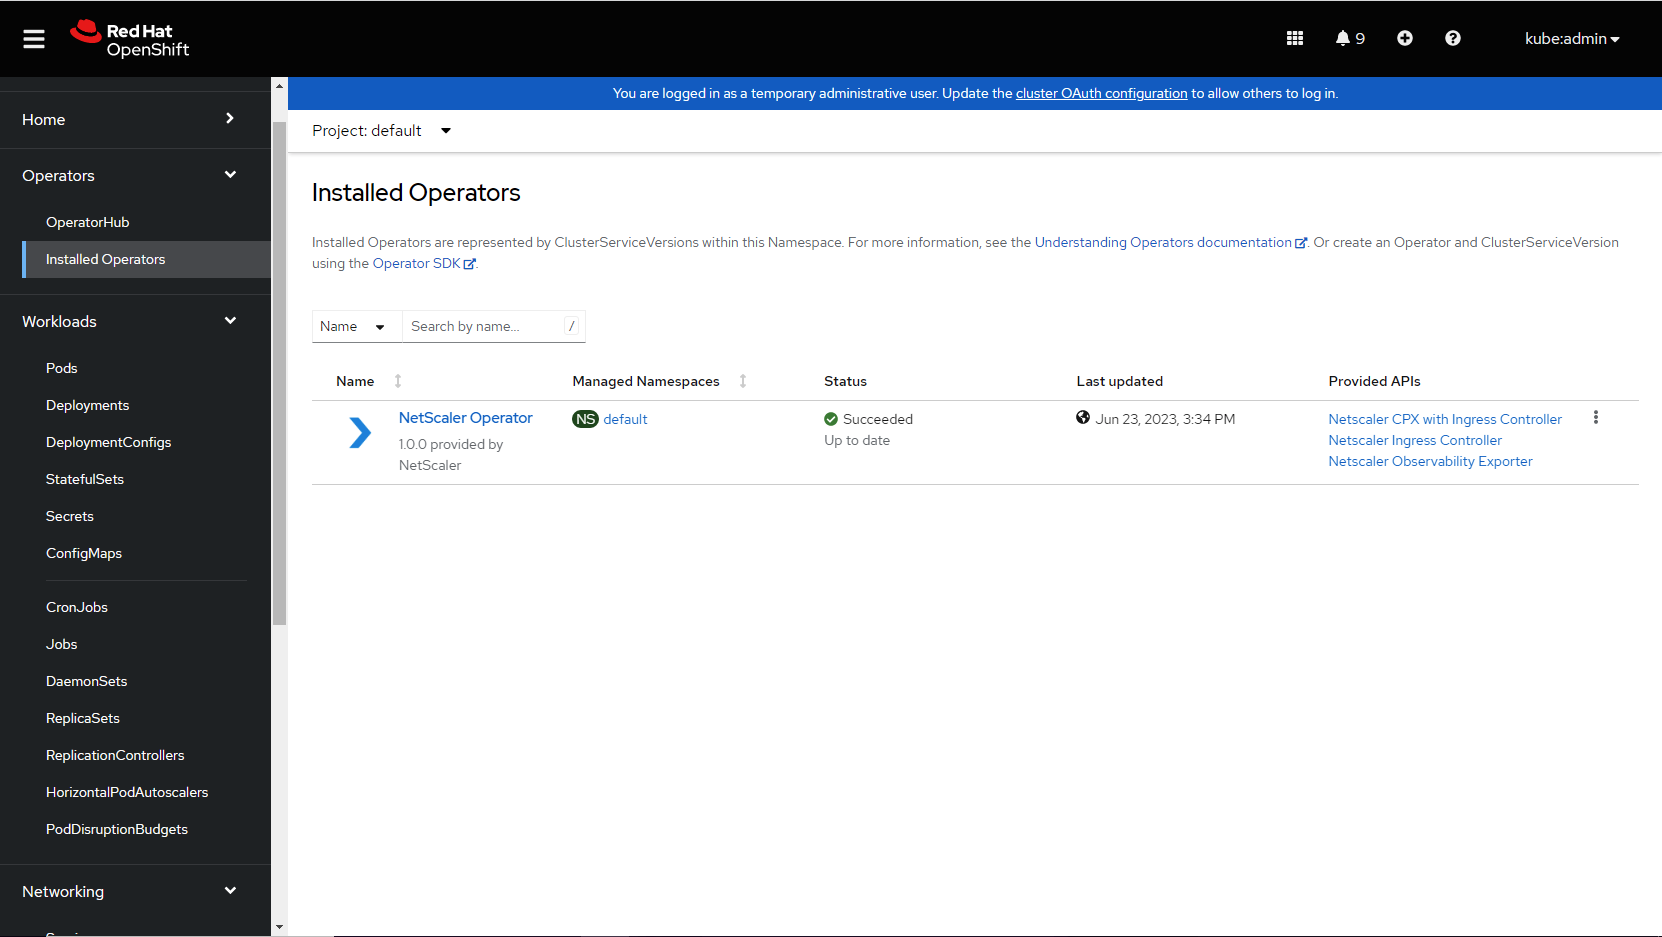
Navigate to Operators > Installed Operators and click NetScaler® Operator.
-
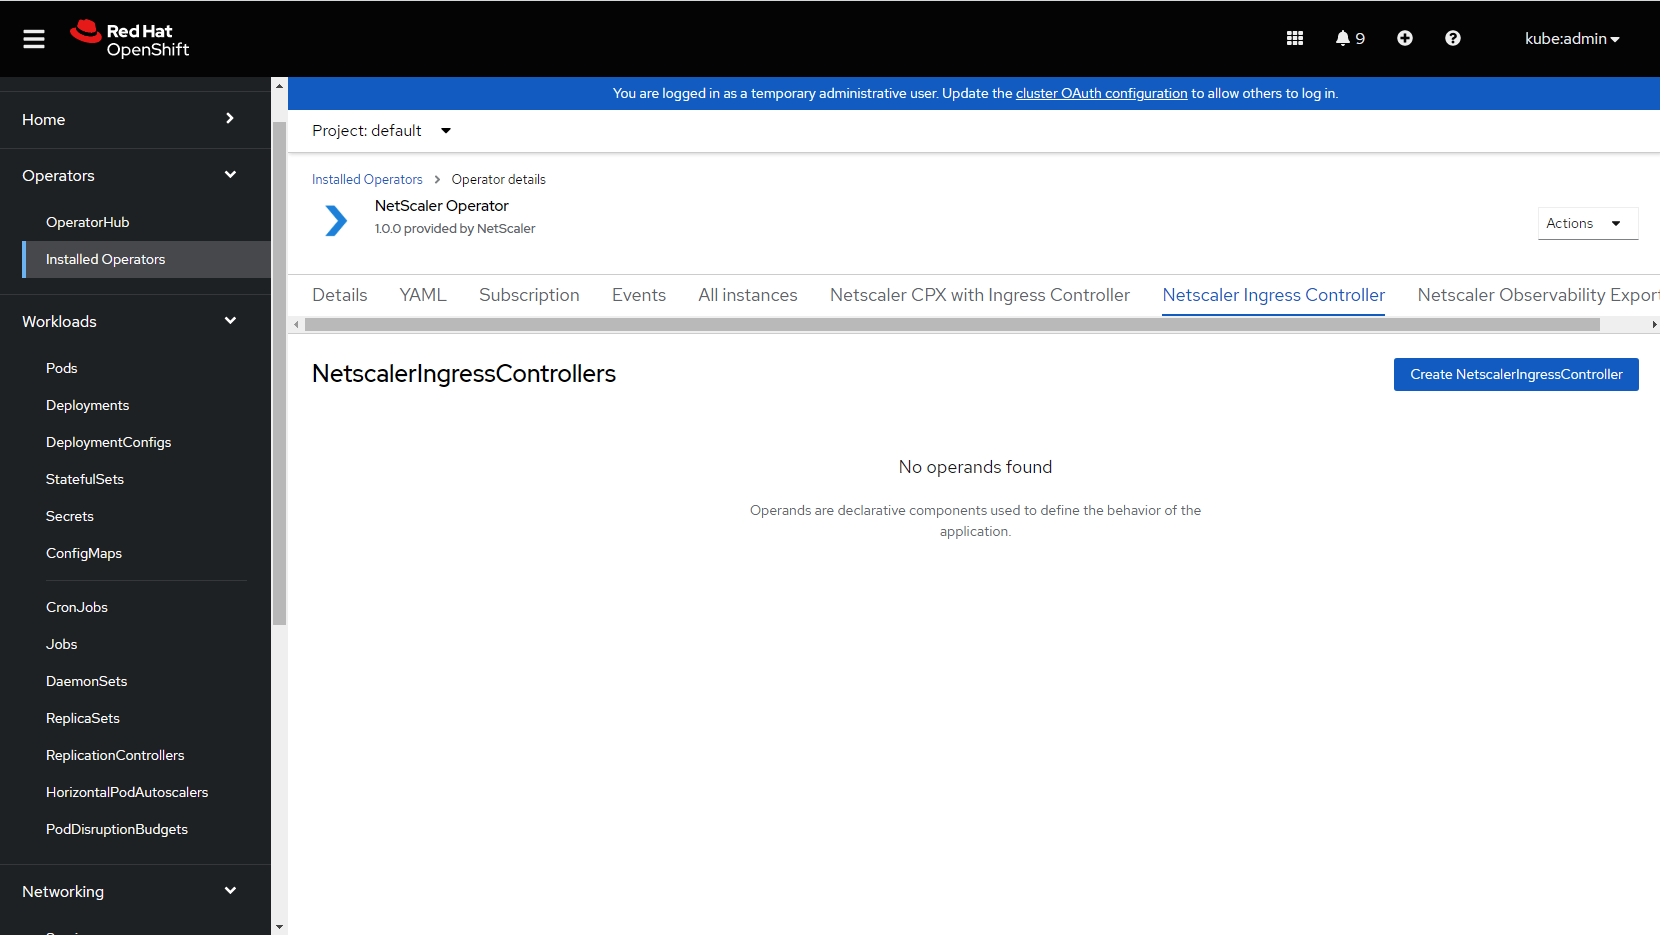
Click the NetScaler NetScaler Ingress Controller tab and select Create NetScalerIngressController.
The NetScaler NetScaler Ingress Controller YAML definition is displayed. Optionally, you can select
Form viewbutton and update the parameters in a form.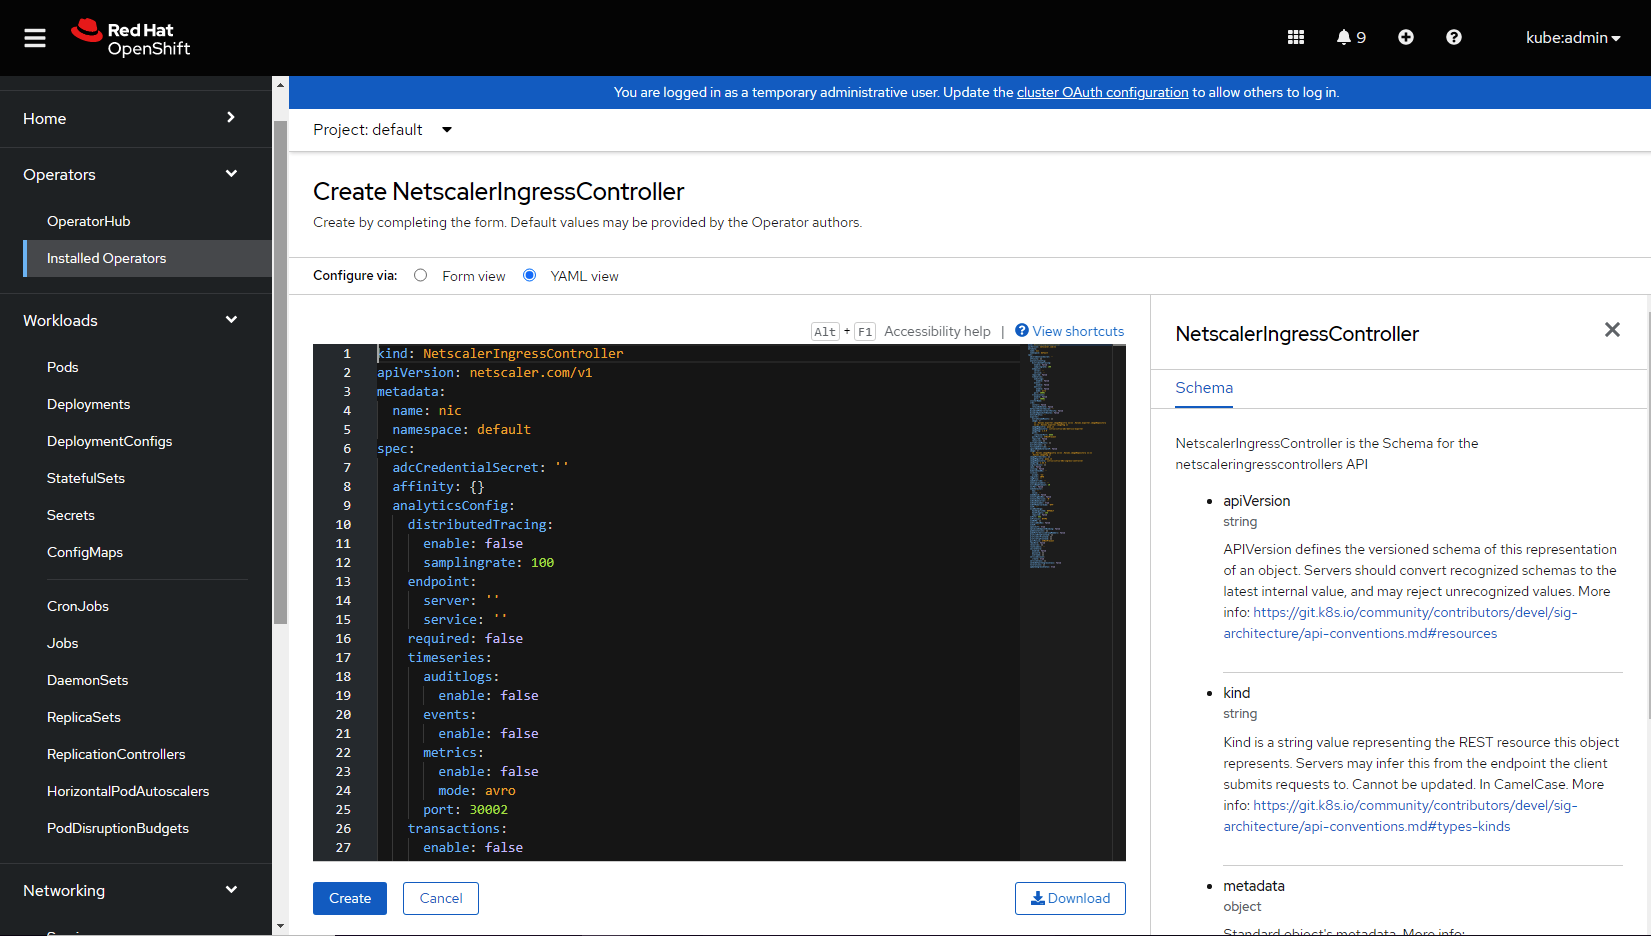
-
Refer the following table that lists the mandatory and optional parameters that you can configure during installation.
Note:
- Ensure that the
acceptLicenseparameter is set toYes. - Specify a unique value for
entityPrefix. - Provide the IP address of NetScaler VPX instance for
nsIPparameter and Kubernetes secret created using NetScaler VPX credentials inadcCredentialSecretparameter. - To associate NetScaler Ingress Controller with the ingress resource specified in this procedure, provide the ingress class name using the
ingressClassparameter asingressClass: [‘NSIC-vpx’].
- Ensure that the
Note:
Optionally, you can click the
form viewand set the parameters as required.
You can configure other available parameters depending on your use case.
| Parameters | Mandatory or Optional | Default value | Description |
|---|---|---|---|
| acceptLicense | Mandatory | no | Set this value to Yes to accept the NetScaler Ingress Controller EULA. |
| affinity | Optional | N/A | Affinity labels for pod assignment. |
| extraVolumes | Optional | N/A | Additional VolumeMounts to be mounted. |
| imagePullSecrets | Optional | N/A | List of Kubernetes secrets to be used for pulling the images from a private Docker registry or repository. For more information on how to create this secret, see Pull an Image from a Private Registry. |
| nodeSelector | Optional | N/A | The node label key:value pair to be used for nodeSelector option in NetScaler Ingress Controller deployment. |
| podAnnotations | Optional | N/A | Map of annotations to add to the pods. |
| tolerations | Optional | N/A | The tolerations for the NetScaler Ingress Controller deployment. |
| Parameter | Mandatory/Optional | Default value | Description |
|---|---|---|---|
| analyticsConfig | |||
| distributedTracing.enable | Optional | false | Set this value to true to enable OpenTracing in NetScaler. |
| distributedTracing.samplingrate | Optional | 100 | OpenTracing sampling rate in percentage. |
| required | Mandatory | false | Set this value to true if you want to configure NetScaler to send metrics and transaction records to the analytics server. |
| endpoint.metrics.service | Optional | N/A | The IP address or DNS address of the analytics server. Format: servicename.namespace, servicename.namespace.svc.cluster.local,namespace/servicename. |
| endpoint.transactions.service | Optional | N/A | An IP address or a service name with the namespace of the analytics service deployed in the Kubernetes environment. Format: namespace/servicename. |
| timeseries.port | Optional | 30002 | The port used to expose the analytics service outside the cluster for a time-series endpoint. |
| timeseries.auditlogs.enable | Optional | false | Set this value to true to export audit log data from NetScaler. |
| timeseries.events.enable | Optional | false | Set this value to true to export events from NetScaler. |
| timeseries.metrics.enable | Optional | false | Set this value to true to enable sending metrics from NetScaler. |
| timeseries.metrics.mode | Optional | Avro | Mode of the metric endpoint. |
| timeseries.metrics.exportFrequency | Optional | 30 | Time interval for exporting time-series data. Possible values range from 30 to 300 seconds. |
| timeseries.metrics.schemaFile | Optional | schema.json | Name of a schema file with the required NetScaler counters to be added and configured for metrics collector. A reference schema file reference_schema.json with all the supported counters is also available in the path /var/metrics_conf/. This schema file can be used as a reference to build a custom list of counters. |
| timeseries.metrics.enableNativeScrape | Optional | false | Set this value to true for native export of metrics. |
| transactions.port | Optional | 30001 | The port used to expose analytics service outside the cluster for a transaction endpoint. |
| transactions.enable | Optional | false | Set this value to true to export transactions from NetScaler. |
| Parameter | Mandatory/Optional | Default value | Description |
|---|---|---|---|
| exporter | |||
| extraVolumeMounts | Optional | N/A | Additional VolumeMounts to be mounted in the exporter container. |
| image | Optional | quay.io/netscaler/netscaler-adc-metrics-exporter@sha<sha value of the latest release>
|
The metrics exporter image hosted on Quay.io. |
| required | Optional | false | Set to true to run the Exporter for NetScaler Stats along with NetScaler Ingress Controller to pull metrics for the NetScaler MPX or NetScaler VPX. |
| pullPolicy | Optional | IfNotPresent | The exporter image pull policy. |
| ports.containerPort | Optional | 8888 | The exporter container port. |
| resources | Optional | N/A | CPU/memory resources for a metrics exporter container. |
| serviceMonitorExtraLabels | Optional | N/A | Extra labels for a service monitor when exporter is enabled. |
| Parameter | Mandatory/Optional | Default value | Description |
|---|---|---|---|
| ingressController | |||
| clusterName | Optional | N/A | A unique identifier of the Kubernetes cluster on which NetScaler Ingress Controller is deployed. |
| defaultSSLCertSecret | Optional | N/A | Kubernetes secret name that needs to be used as a default non-SNI certificate in NetScaler. |
| defaultSSLSNICertSecret | Optional | N/A | Kubernetes secret name that needs to be used as a default SNI certificate in NetScaler. |
| disableAPIServerCertVerify | Optional | false | Set this parameter to True for disabling API Server certificate verification. |
| disableOpenshiftRoutes | Optional | false | By default OpenShift routes are processed in the OpenShift environment. This parameter can be used to disable NetScaler Ingress Controller processing the OpenShift routes. |
| enableLivenessProbe | Optional | true | Set to false to disable liveness porbe settings for NetScaler Ingress Controller. |
| enableReadinessProbe | Optional | true | Set to false to disable readiness probe settings for NetScaler Ingress Controller. |
| entityPrefix | Optional | N/A | The prefix for the resources on NetScaler MPX or NetScaler VPX. |
| ignoreNodeExternalIP | Optional | False | While adding node IP address as a service group member for type LoadBalancer services or NodePort services, NetScaler Ingress Controller has a selection criteria where it chooses Node ExternalIP if available and Node InternalIP if Node ExternalIP is not available. But some users might want to use Node InternalIP over Node ExternalIP even if Node ExternalIP is present. If this variable is set to true, NSIC prioritizes the Node InternalIP to be used for service group members even if Node ExternalIP is present. |
| image | Mandatory | quay.io/netscaler/netscaler-k8s-ingress-controller@sha value of latest release |
The NetScaler Ingress Controller image hosted on Quay.io. |
| ingressClass | Optional | N/A | Parameter to associate a particular ingress resource with NetScaler Ingress Controller. For more information on ingress class, see Ingress class support. For Kubernetes version >= 1.19, this parameter creates an IngressClass object with the name specified here. |
| extraVolumeMounts | Optional | N/A | Additional VolumeMounts to be mounted in the NetScaler Ingress Controller container. |
| ipam | Optional | false | Set this paramter to true to use the IPAM controller to automatically allocate an IP address to the service of type LoadBalancer. |
| jsonLog | Optional | false | Set this argument to true if log messages are required in the JSON format. |
| kubernetesURL | Optional | N/A | The kube-apiserver url that NetScaler Ingress Controller uses to register the events. If the value is not specified, NetScaler Ingress Controller uses the internal kube-apiserver IP address. |
| livenessProbe | Optional | N/A | LivenessPorbe settings for NetScaler Ingress Controller. |
| logLevel | Optional | INFO | The log level to control the logs generated by NetScaler Ingress Controller. The supported log levels are: CRITICAL, ERROR, WARNING, INFO, DEBUG, TRACE, and NONE. |
| logProxy | Optional | N/A | Elasticsearch or Kafka or Zipkin endpoint for NetScaler observability exporter. |
| multiClusterPrefix | Optional | mc | The prefix for the shared resources on NetScaler MPX or NetScaler VPX for multicluster ingress feature. NetScaler Ingress Controllers that are collaboratively sharing the content switching virtual server IP address must be configured with the same value for multiclusterPrefix. For more information see this. |
| namespaceLabels | Optional | N/A | Provide the namespace labels selectors to be used by NetScaler Ingress Controller for routeSharding in the OpenShift cluster. |
| nodeLabels | Optional | ”” | If there are pods on nodes with node labels, NetScaler Ingress Controller configures NetScaler to advertise the VIP using BGP. |
| nodeWatch | Optional | false | Set the parameter to true if you want to automatically configure network route from NetScaler MPX or NetScaler VPX to the pods in the Kubernetes cluster. For more information, see Automatically configure route on the NetScaler instance. |
| nsncPbr | Optional | false | Set this parameter to true to inform NetScaler Ingress Controller that NetScaler Node Controller is configuring Policy Based Routes (PBR) on NetScaler. For more information, see NSNC-PBR-SUPPORT
|
| openShift | Optional | true | Set this parameter to false if the OpenShift environment is not being used. |
| optimizeEndpointBinding | Optional | false | Set this parameter to true to enable binding of back-end endpoints to a service group in a single API-call. Recommended when endpoints (pods) per application are large in number. Applicable only for NetScaler version >=13.0-45.7. |
| podIPsforServiceGroupMembers | Optional | false | By default, NetScaler Ingress Controller adds node IP address and node port as service group members while configuring type LoadBalancer Services and NodePort services. If set to True NetScaler Ingress Controller adds pod IP address and pod port instead of node IP address and node port. You can set this parameter to true if there is a route between NetScaler and K8s clusters internal pods either using feature-node-watch argument or using NetScaler Node Controller. |
| profileHttpFrontend | Optional | N/A | The front-end HTTP profile. For details, see Configuration using FRONTEND_HTTP_PROFILE |
| profileSslFrontend | Optional | N/A | The front-end SSL profile. For details, see Configuration using FRONTEND_SSL_PROFILE |
| profileTcpFrontend | Optional | N/A | The front-end TCP profile. For details, see Configuration using FRONTEND_TCP_PROFILE |
| pullPolicy | Mandatory | IfNotPresent | The NetScaler Ingress Controller image pull policy. |
| rbacRole | Optional | false | Set this parameter to true to deploy NetScaler Ingress Controller with RBAC role set rbacRole=true; by default NetScaler Ingress Controller gets installed with RBAC ClusterRole(rbacRole=false). |
| readinessProbe | Optional | N/A | Readiness probe settings of NetScaler Ingress Controller. |
| resources | Optional | N/A | CPU/memory resources for the NetScaler Ingress Controller container. |
| routeLabels | Optional | N/A | The route labels selectors to be used by NetScaler Ingress Controller for routeSharding in OpenShift cluster. |
| serviceClass | Optional | N/A | Parameter used to associate only specific services to NetScaler Ingress Controller if multiple ingress controllers are deployed. For more information on service class, see Service class support. |
| setAsDefaultIngressClass | Optional | False | Sets the IngressClass object as the default ingress class. New ingresses without an “ingressClassName” field specified will be assigned this ingress class. This parameter is applicable only for Kubernetes versions >= 1.19. |
| updateIngressStatus | Optional | true | Set this parameter if Status.LoadBalancer.Ingress field of the ingress resources managed by NetScaler Ingress Controller needs to be updated with allocated IP addresses. For more information see this. |
| Parameter | Mandatory/Optional | Default value | Description |
|---|---|---|---|
| netscaler | |||
| adcCredentialSecret | Mandatory | NA | Secret required for NetScaler Ingress Controller to connect to NetScaler. |
| nitroReadTimeout | Optional | 20 | The nitro read timeout in seconds. |
| nsConfigDnsRec | Optional | false | Set to true to enable DNS address record addition in NetScaler through ingress. |
| nsCookieVersion | Optional | 0 | The persistence cookie version (0 or 1). |
| nsDnsNameserver | Optional | N/A | DNS nameservers in NetScaler. |
| nsHTTP2ServerSide | Optional | OFF | Set this parameter to ON for enabling HTTP2 for NetScaler service group configurations. |
| nsIP | Mandatory | N/A | NetScaler IP address. |
| nsLbHashAlgo.required | Optional | false | The load balancing consistent hashing algorithm. |
| nsLbHashAlgo.hashFingers | Optional | 256 | The number of fingers to be used for the hashing algorithm. Possible values are from 1 to 1024. |
| nsLbHashAlgo.hashAlgorithm | Optional | default | The supported algorithm. The supported algorithms are default, jarh, and prac. |
| nsPort | Optional | 443 | The port used by NetScaler Ingress Controller to communicate with NetScaler. You can use port 80 for HTTP. |
| nsProtocol | Optional | HTTPS | The protocol used by NetScaler Ingress Controller to communicate with NetScaler. You can use HTTP on port 80. |
| nsSNIPS | Optional | N/A | The list of subnet IP addresses on the NetScaler, which is used to create PBR routes instead of static routes PBR support |
| nsSvcLbDnsRec | Optional | false | Set this parameter to true to enable DNS address record addition in NetScaler through yype LoadBalancer Service. |
| nsVIP | Optional | N/A | The virtual IP address on NetScaler. |
-
After updating the values for the required parameters, click Create.
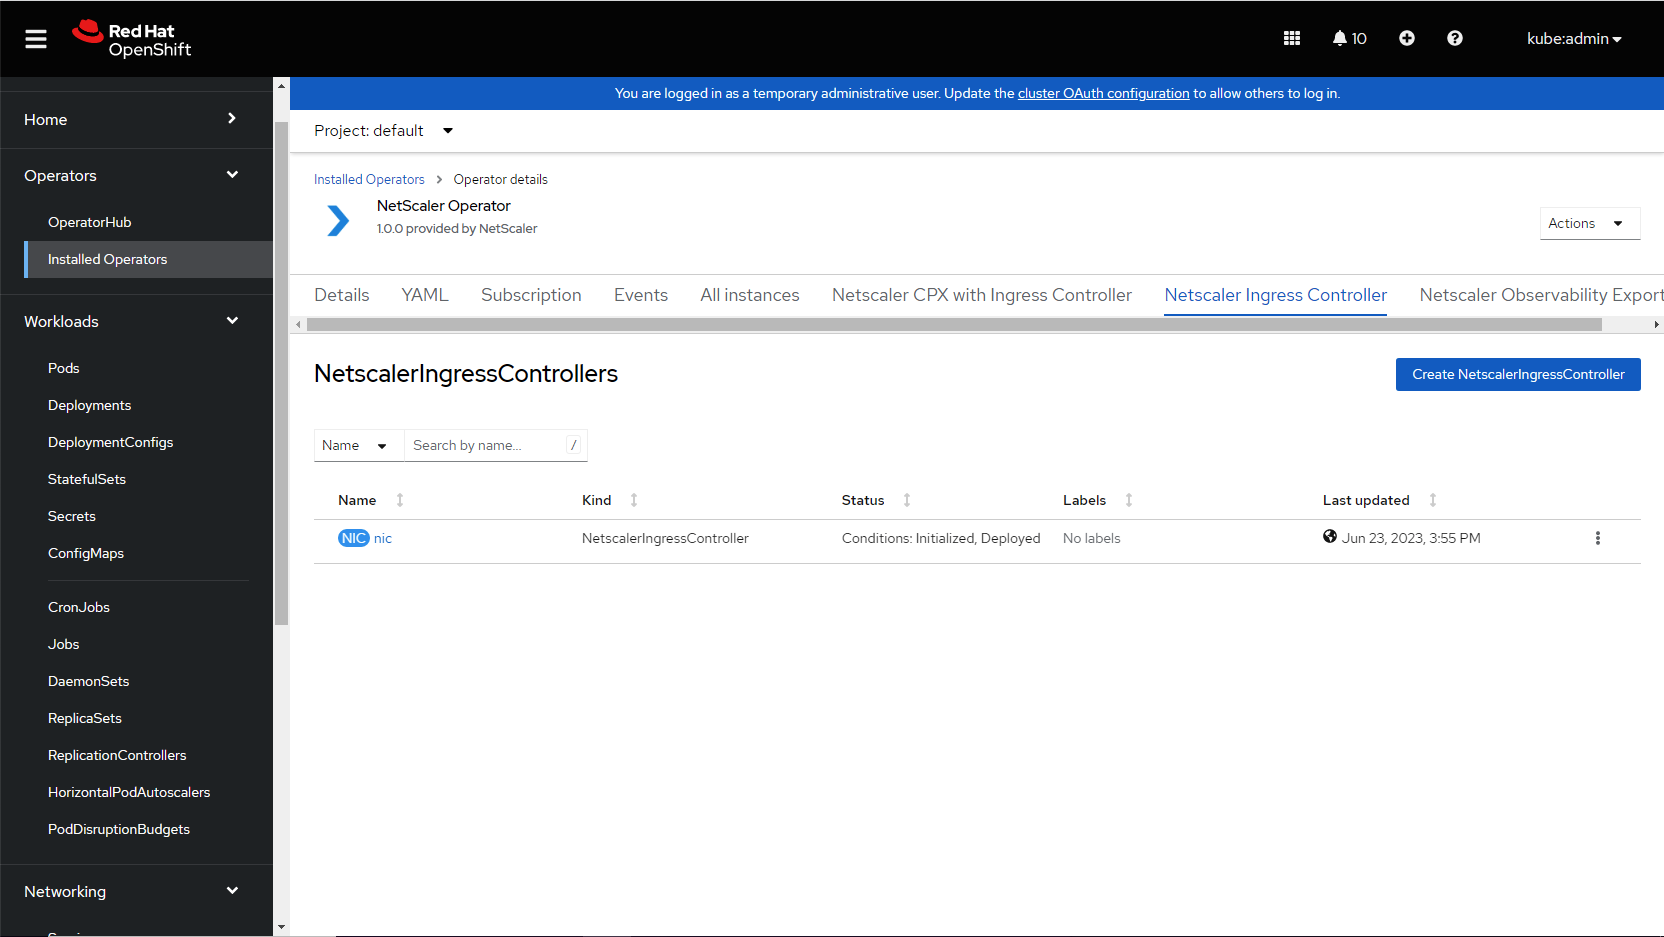
Ensure that NetScaler Ingress Controller is successfully deployed and initialized.
-
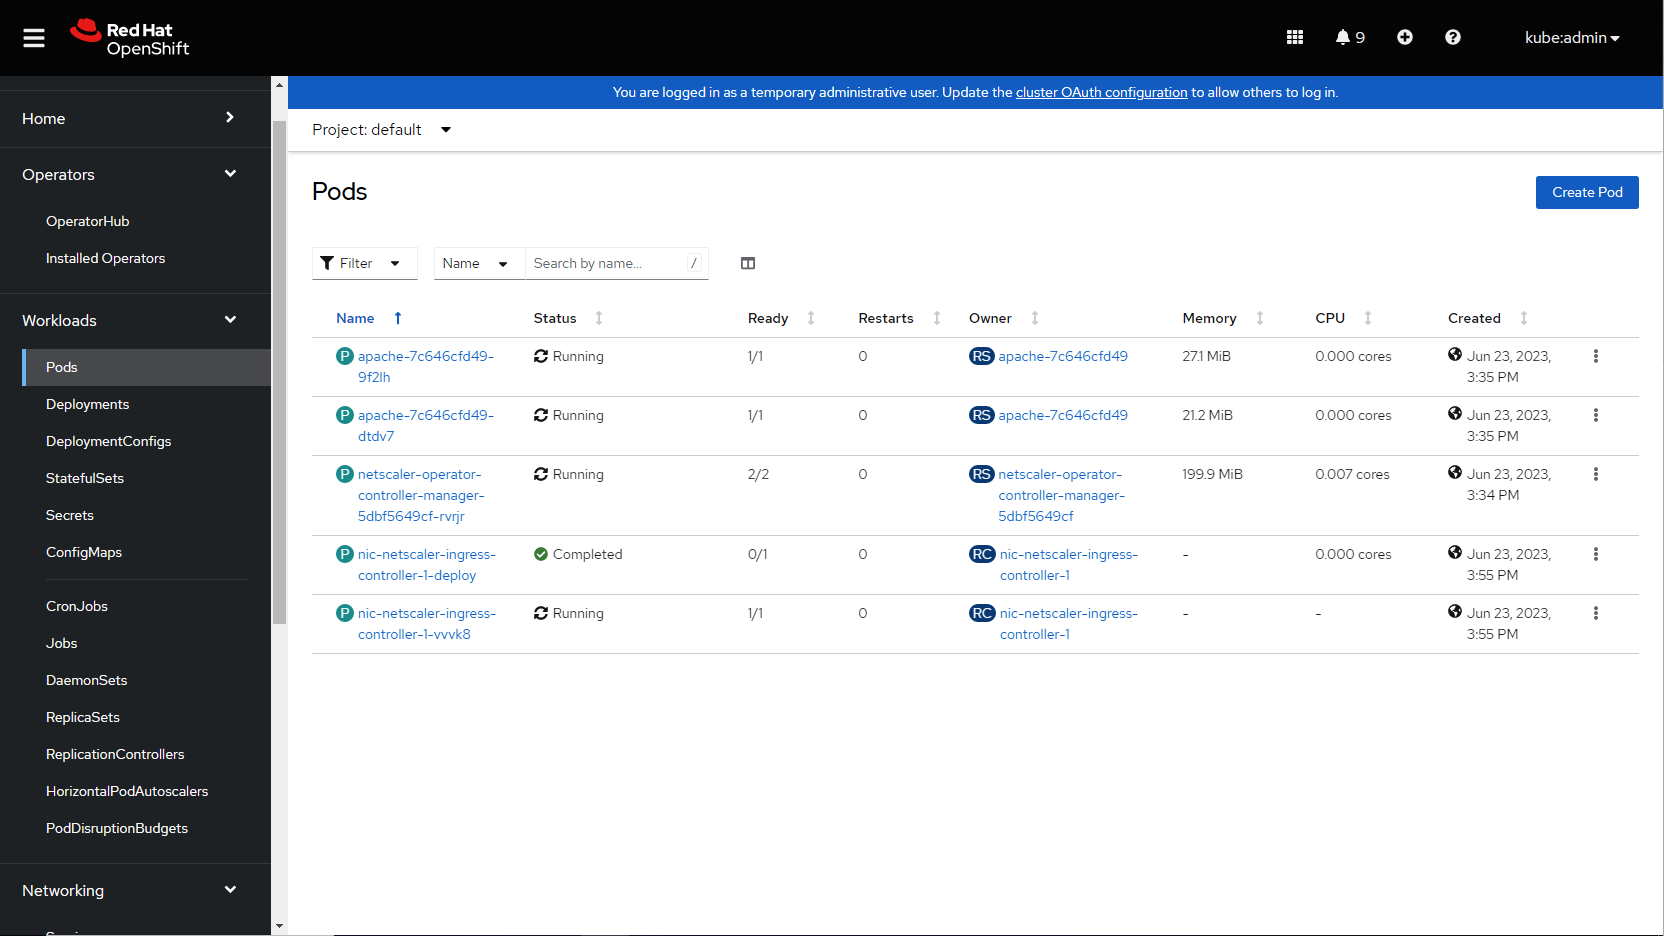
Navigate to Workloads > Pods section and verify whether the NetScaler NetScaler Ingress Controller pod is up and running.
-
Verify the deployment by sending traffic:
curl http://citrix-ingress-Operator.com --resolve citrix-ingress-Operator.com:80:<VIP>
<!--NeedCopy-->
The previous curl command should return the following:
<html><body><h1>It works!</h1></body></html>
<!--NeedCopy-->
Note:
- Ensure that the pod network in OpenShift cluster is reachable from NetScaler VPX or NetScaler MPX if you are using a service of type ClusterIP for your application. To configure static route automatically using NetScaler Ingress Controller, see Configure static route.
References
- For information about how to deploy NetScaler Observability Exporter using NetScaler Operator, see Deploy NetScaler Observability Exporter using NetScaler Operator.
- For information about how to deploy NetScaler Agent Operator, see Install a NetScaler agent operator using the OpenShift console.
- Alternatively, you can deploy NetScaler Ingress Controller using Helm charts. See Deploy the NetScaler NetScaler Ingress Controller using Helm charts.