Dual-tier ingress
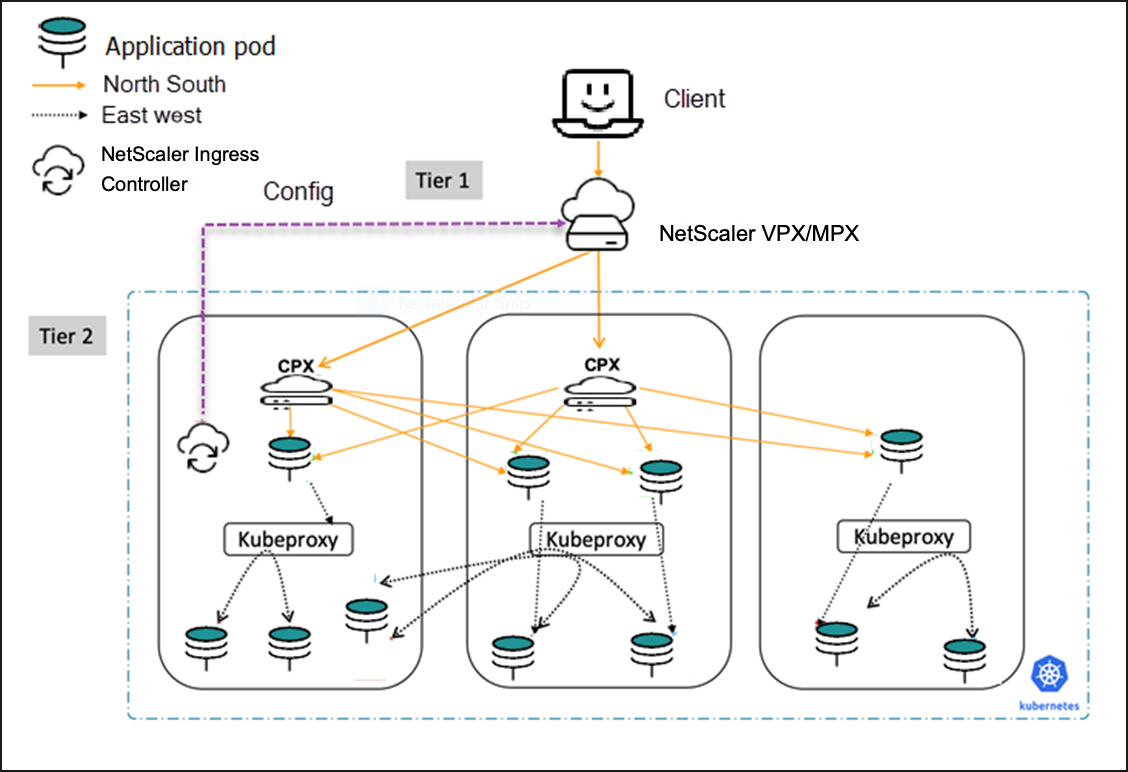
In a dual-tier deployment, NetScaler VPX or NetScaler MPX is deployed outside the Kubernetes cluster (tier-1) and NetScaler CPXs are deployed inside the Kubernetes cluster (tier-2).
NetScaler MPX or NetScaler VPX devices in tier-1 proxy the traffic (North-South) from the client to NetScaler CPXs in tier-2. The tier-2 NetScaler CPX then routes the traffic to the microservices in the Kubernetes cluster. NetScaler Ingress Controller deployed as a standalone pod configures the tier-1 NetScaler. And, the sidecar NetScaler Ingress Controller in one or more NetScaler CPX pods configures the associated NetScaler CPX in the same pod.
The dual-tier deployment can be set up on Kubernetes in a bare metal environment or on public clouds such as AWS, GCP, or Azure.
Dual-tier ingress deployment
Prerequisites
- Create a Kubernetes cluster in cloud or on-premises. The Kubernetes cluster in the cloud can be a managed Kubernetes (for example: GKE, EKS, or AKS) or a custom created Kubernetes deployment.
Dual-tier Ingress deployment
-
Deploy NetScaler MPX or NetScaler VPX on a multi-NIC deployment mode outside the Kubernetes cluster.
-
For instructions to deploy NetScaler MPX, see NetScaler documentation.
-
For instructions to deploy NetScaler VPX, see Deploy a NetScaler VPX instance.
-
-
Deploy a standalone NetScaler Ingress Controller to configure NetScaler VPX to direct the client requests to a CPX service in the Kubernetes cluster.
For information on how to deploy a standalone NetScaler Ingress Controller, see Unified Ingress. Set the
ingressClassfor this NSIC instance asnsic-vpxbecause the ingress resource deployed to configure NetScaler VPX in step 8 uses the same ingress class. -
In cloud deployments, enable MAC-Based Forwarding mode on the tier-1 NetScaler VPX. As NetScaler VPX is deployed in multi-NIC mode, it does not have the return route to reach the POD CNI network or the client network. Hence, you must enable MAC-Based Forwarding mode on the tier-1 NetScaler VPX to handle this scenario.
-
Deploy a sample microservice by using the following command:
kubectl apply -f - <<EOF apiVersion: apps/v1 kind: Deployment metadata: name: cnn-website labels: name: cnn-website app: cnn-website spec: selector: matchLabels: app: cnn-website replicas: 2 template: metadata: labels: name: cnn-website app: cnn-website spec: containers: - name: cnn-website image: quay.io/sample-apps/cnn-website:v1.0.0 ports: - name: http-80 containerPort: 80 - name: https-443 containerPort: 443 --- apiVersion: v1 kind: Service metadata: name: cnn-website labels: app: cnn-website spec: type: NodePort ports: - name: http-80 port: 80 targetPort: 80 - name: https-443 port: 443 targetPort: 443 selector: name: cnn-website EOF <!--NeedCopy--> -
Deploy NetScaler CPX as tier-2 ingress with NetScaler Ingress Controller as a sidecar.
-
Add the NetScaler Helm chart repository to your local registry by using the following command.
helm repo add netscaler https://netscaler.github.io/netscaler-helm-charts/ <!--NeedCopy--> -
Install NetScaler CPX with NetScaler Ingress Controller by using the following command.
helm install netscaler-cpx-with-ingress-controller netscaler/netscaler-cpx-with-ingress-controller --set license.accept=yes,serviceType.nodePort.enabled=True,ingressClass[0]=cpx
<!--NeedCopy-->
Note:
You can also use a
values.yamlfile in thehelm installcommand to specify the values of the configurable parameters instead of providing each parameter as a command-line argument. For example,helm install netscaler-cpx-with-ingress-controller netscaler/netscaler-cpx-with-ingress-controller -f values.yaml <!--NeedCopy-->For information about the mandatory and optional parameters that you can configure during CPX with NSIC installation, see Configuration.
-
-
Create a Kubernetes secret using a certificate to copy the certificate to NetScaler when an ingress object is deployed. You can use the same secret in the ingress resource for both CPX and VPX. In this procedure, we’ll use
tls-secret. For information on how to generate Kubernetes secret, see Generate Kubernetes secret. -
Create an ingress object to route traffic from NetScaler VPX or NetScaler MPX to NetScaler CPX in the Kubernetes cluster by using the following command:
kubectl apply -f - <<EOF apiVersion: networking.k8s.io/v1 kind: Ingress metadata: annotations: ingress.citrix.com/frontend-ip: <NSVIP> # vserver IP ingress.citrix.com/secure_backend: "True" name: vpxingress spec: tls: - secretName: tls-secret ingressClassName: nsic-vpx rules: - host: cnnwebsite.com http: paths: - backend: service: name: netscaler-cpx-with-ingress-controller-cpx-service port: number: 443 path: / pathType: Prefix --- apiVersion: networking.k8s.io/v1 kind: IngressClass # If Helm chart is used to deploy NSIC, you need not create IngressClass metadata: name: nsic-vpx spec: controller: citrix.com/ingress-controller <!--NeedCopy--> -
Create an ingress object for the tier-2 NetScaler CPX to route the traffic to the microservice application by using the following command:
kubectl apply -f - <<EOF apiVersion: networking.k8s.io/v1 kind: Ingress apiVersion: networking.k8s.io/v1 metadata: annotations: name: cpxingress spec: tls: - secretName: tls-secret ingressClassName: cpx rules: - host: cnnwebsite.com http: paths: - path: / pathType: Prefix backend: service: name: cnn-website port: number: 80 --- apiVersion: networking.k8s.io/v1 kind: IngressClass # If Helm chart is used to deploy CPX with NSIC, you need not create IngressClass metadata: name: cpx spec: controller: citrix.com/ingress-controller EOF <!--NeedCopy--> -
To send traffic to the
cnn-websiteapplication, perform the following steps:For Windows:
-
Open NotePad as an administrator.
-
Add
VIP cnnwebsite.comentry inc:\Windows\System32\Drivers\etc\hosts.
For MAC or Linux:
-
Open the host files in a file editor using the following command:
sudo nano /etc/hosts. -
Add
VIP cnnwebsite.comentry.
-
-
Send the traffic using the following command:
  curl  -kv https://cnn-website
  <!--NeedCopy-->
Warning:
Do not create NSIC pod replicas in the Kubernetes cluster. When you create replicas of an NSIC pod by specifying
replicatset>1, an unexpected behavior is observed with NSIC/VPX because the same APP_PREFIX is shared among the NSIC PODs and each instance tries to configure the same resources.