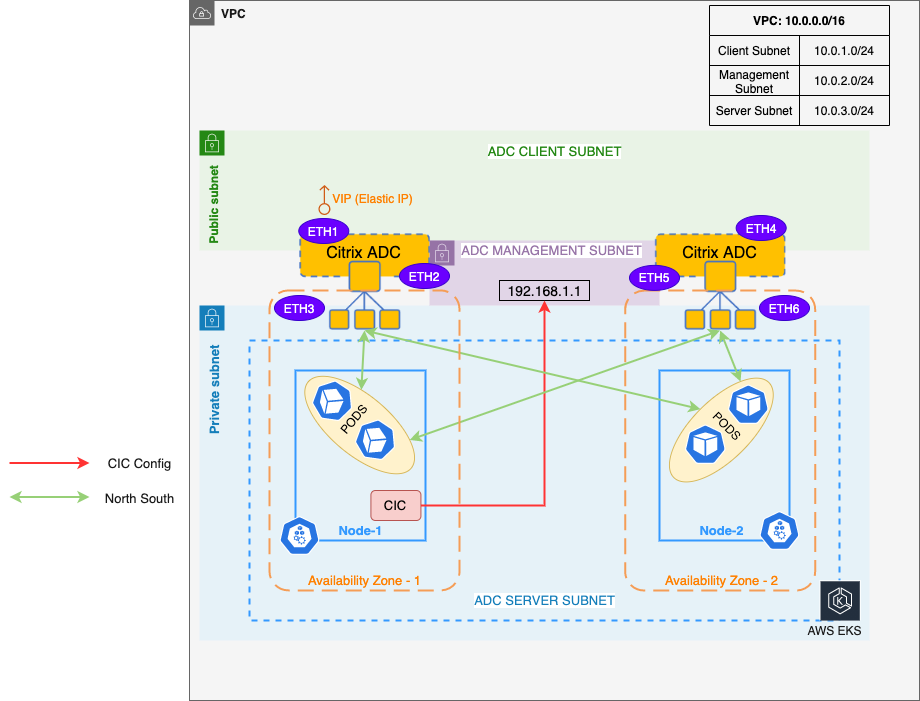
NetScaler VPX in High Availability INC mode as ingress for Amazon EKS
You can deploy NetScaler VPX in a high availability (High Availability) INC (Independent Network Configuration) mode in the Amazon EKS (Elastic Kubernetes Service).
In a typical high availability deployment, both the NetScaler VPX instances in a high availability pair reside on the same subnet. A high availability deployment can also consist of two VPX instances in which each VPX is in a different network.
When the appliances in a high availability pair reside on two different networks, the secondary NetScaler VPX must have an independent network configuration. This means that NetScaler VPXs on different networks cannot share subnet IP address (SNIP), virtual IP address (VIP), or network routes. This type of configuration, in which the NetScaler VPXs in a high availability pair have different configuration parameters, is known as Independent Network Configuration (INC).
As the management IP address or NSIP of both the NetScaler VPX instances are different and they cannot share a subnet IP address, an IP address that does not belong to the VPC CIDR is selected. An AWS Route table is then configured for this IP address pointing to the ENI of the primary VPX instance. Whenever, the NetScaler VPX fails over (it becomes secondary), the Route table is automatically updated to point to the ENI of the new primary VPX (earlier the secondary VPX). This IP address is used as the NS_IP environment variable in NetScaler Ingress Controller to configure the NetScalers. For more information, see VPX HA pair with private IP address.
Prerequisites
- Ensure that you have installed Terraform. For information, see Terraform installation.
- Ensure that you have installed and configured the AWS command line utility
az. Use theaws configurecommand login. - Ensure that you have installed the Kubernetes control command line utility
kubectl.
Deploy NetScaler VPX in high availability INC mode as ingress in Amazon EKS
-
Clone the NetScaler Terraform repository using the following command:
git clone https://github.com/citrix/terraform-cloud-scripts.git cd terraform-cloud-scripts/terraform-cloud-scripts/aws/cloud_native -
Create a Terraform variable file.
The following is a sample Terraform variable:
aws_region="ap-south-1"
aws_availability_zones=["ap-south-1a", "ap-south-1b"]
aws_access_key="XXXXXXXXXX"
aws_secret_key="XXXXXXXXXX"
vpc_cidr_block="192.168.0.0/16"
management_subnet_cidr_blocks=["192.168.1.0/24", "192.168.2.0/24"]
client_subnet_cidr_blocks=["192.168.3.0/24", "192.168.4.0/24"]
server_subnet_cidr_blocks=["192.168.5.0/24", "192.168.6.0/24"]
controlling_subnet="17.5.7.8/32"
naming_prefix="cn-terraform"
vpx_ami_map={"ap-south-1"="ami-05db944a73aa7c765"}
ns_instance_type="m4.xlarge"
aws_ssh_key_name="cn-terraform"
aws_ssh_public_key="ssh-rsa XXXXXXXX"
reset_password=true
new_password="XXXXXXXXXXXX"
cic_config_snip="10.10.10.10"
The following table provides variables and their description:
Variables and description
| Variable | Description |
|---|---|
aws_region |
Specify the AWS region. |
aws_availability_zones |
Specify the availability zones to be used in the region. Provide the availability zones in a list format. |
aws_access_key |
Specify the AWS Access Key. |
aws_secret_key |
Specify the AWS Secret Key. |
vpc_cidr_block |
Specify the CIDR block to be used for the VPC. |
management_subnet_cidr_blocks |
Specify the CIDRs for the management subnet. Provide the CIDRs in a list format. |
client_subnet_cidr_blocks |
Specify the CIDRs for the client subnet. Provide the CIDRs in a list format. |
server_subnet_cidr_blocks |
Specify the CIDRs for the server subnet. Provide the CIDRs in a list format. |
controlling_subnet |
Specify the CIDR that access to the deployed NetScaler instances. |
naming_prefix |
(Optional) Specify a name that is used as prefix in all the created resource names. |
vpx_ami_map |
Specify the AMI map for NetScaler VPX. |
ns_instance_type |
Specify the NetScaler instance type. |
aws_ssh_key_name |
Specify the AWS SSH key name. |
aws_ssh_public_key |
Specify the SSH Public key to use. |
reset_password |
Specify if the NetScaler password has to be reset. Set this value to true always. |
new_password |
Specify a strong NetScaler VPX password. |
cic_config_snip |
Specify an IP address that is used as SNIP in the NetScaler. This IP address should be outside of the VPC CIDR range (vpc_cidr_block). |
Make sure input values in the file in accordance with your deployment topology.
Note:
After creating a variable file in accordance with your requirements, ensure to name the file with the suffix
.auto.tfvars. For example,my-vpx-ha-deployment.auto.tfvars.
-
Initialize the Terraform deployment using the following command:
terraform initIt initializes the Terraform and installs all the modules that the Terraform requires.
-
Start the Terraform deployment using the following commands:
terraform plan
terraform apply -auto-approve
It takes a few minutes to complete the deployment. After the Terraform deployment is complete, you can use the following curl command to see the initialized Terraform in action.
$ curl http://$(terraform output -raw frontend_ip) -H "Host: $(terraform output -raw example_application_hostname)"

<html><body><h1>It works!</h1></body></html>
This response is from the Apache microservice that is deployed inside the EKS cluster. The NetScaler VPX HA pair has load balanced the HTTP request to the Apache microservice and relayed the response back.
This is an example on how to expose a microservice using the NetScaler VPX HA pair as Ingress. You can use the same for your microservice applications. You can also use the advanced features of NetScaler Ingress Controller such as SSL termination, URL rewrite, Application Security and so on. For more information on NetScaler Ingress Controller, see NetScaler Ingress Controller.
Workloads on Amazon EKS
You can see the Kubernetes workloads that the Terraform deployed on Amazon EKS. Use the following command to download the kubeconfig of the newly created EKS cluster. This kubeconfig file is saved to the default kubeconfig location.
aws eks --region $(terraform output -raw aws_region) update-kubeconfig --name $(terraform output -raw cluster_name)
After the kubeconfig file is saved, you can use the normal kubectl commands to see the workloads and other configurations in the Amazon EKS cluster.
For information on the Terraform scripts, see Configuration scripts.
For a high level information on the entities that this Terraform created, see Configuration Entities.
For information about VPX high availability pair, see Cloud Native Deployment with VPX HA across availability zones and VPX high availability pair across AWS availability zones.