Deploy NetScaler VPX in active-active high availability in EKS environment using Amazon ELB and NetScaler Ingress Controller
The topic covers a solution to deploy NetScaler VPX in active-active high availability mode on multiple availability zones in AWS Elastic Container Service (EKS) platform. The solution combines AWS Elastic load balancing (ELB) and NetScaler VPX to load balance the Ingress traffic to the microservices deployed in EKS cluster. AWS ELB handles the Layer 4 traffic and the NetScaler VPXs provides advanced Layer 7 functionalities such as, advanced load balancing, caching, and content-based routing.
Solution overview
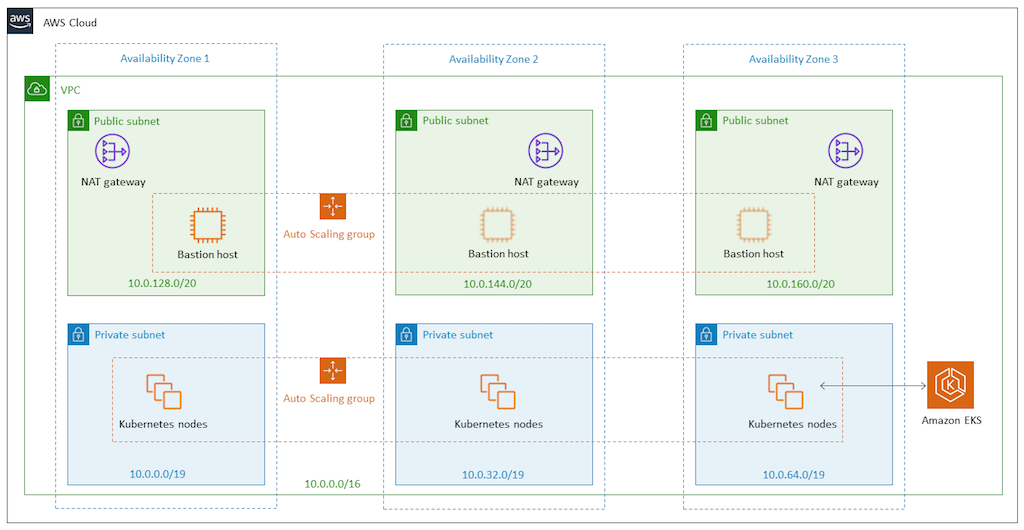
A basic architecture of an EKS cluster would include three public subnet and three private subnets deployed across three availability zones as shown in the following diagram:
With the solution, the architecture of the EKS cluster would be as shown in the following diagram:
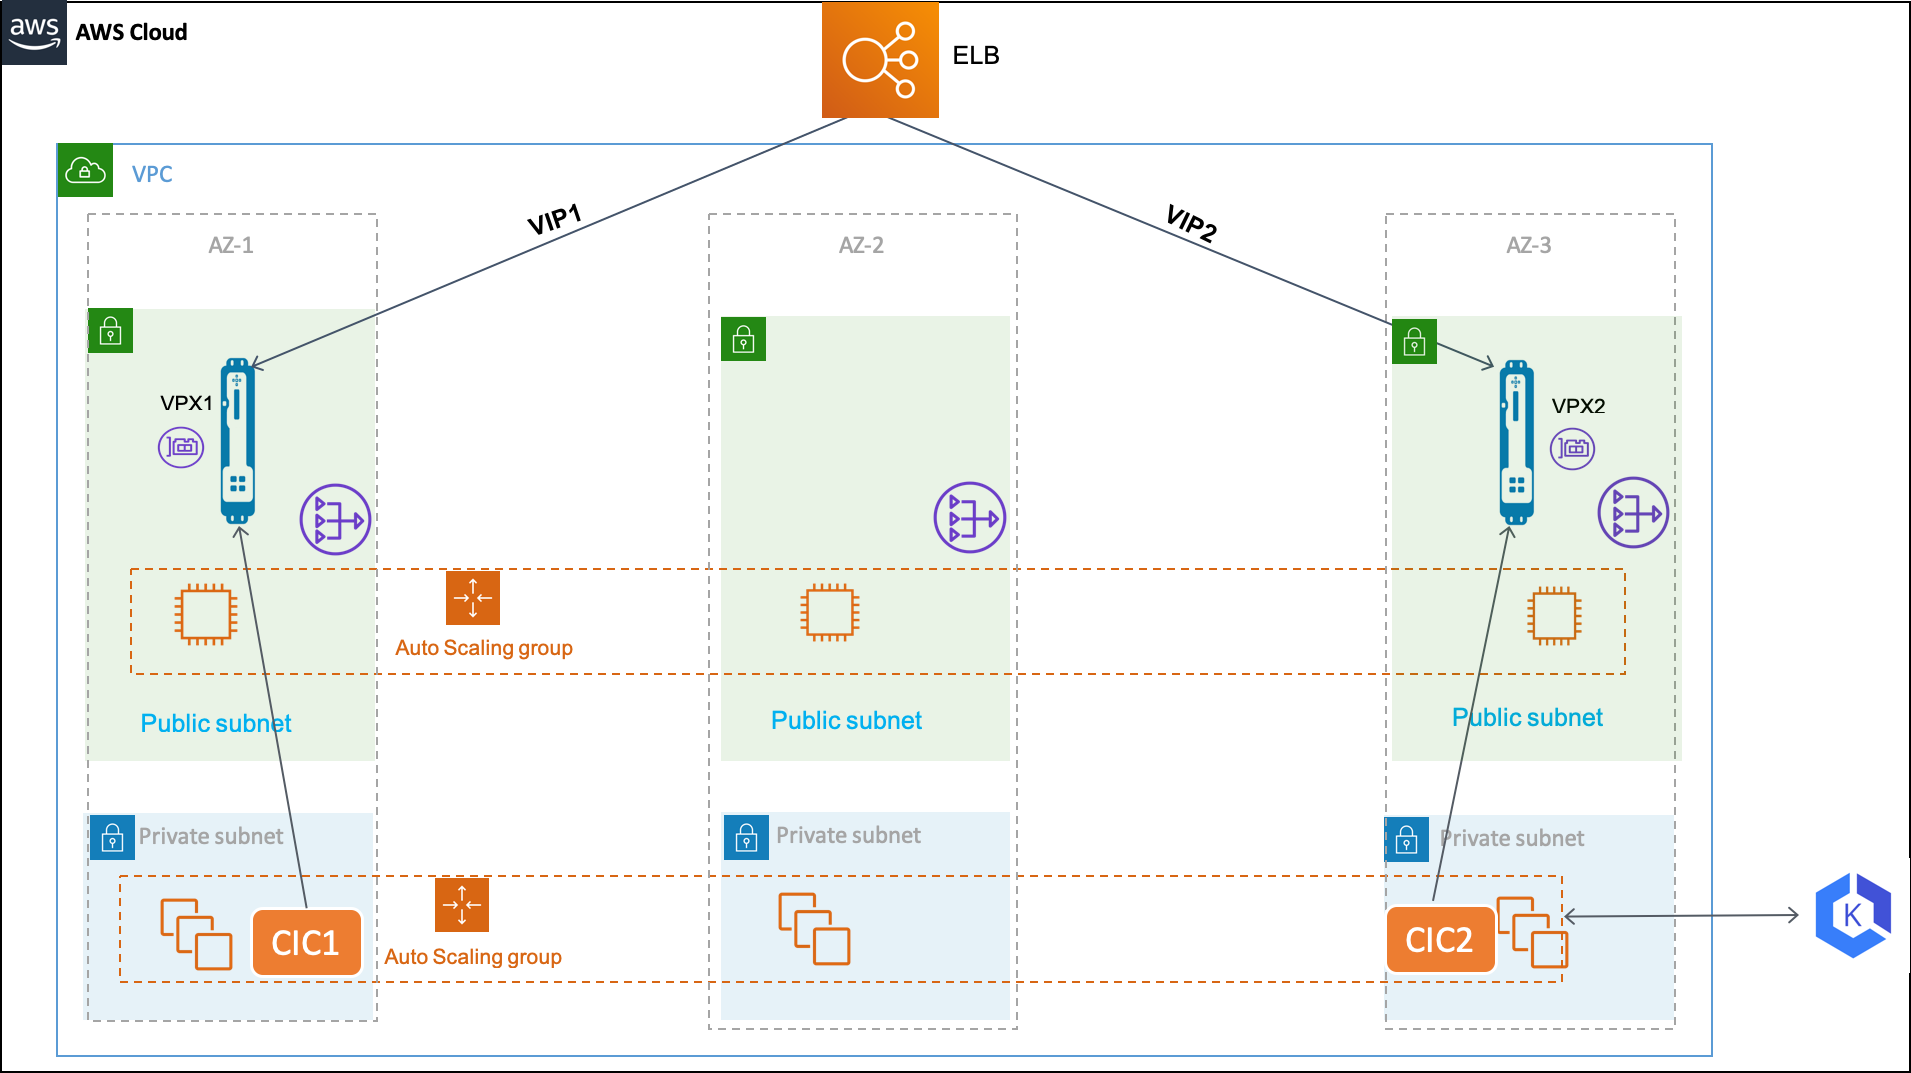
In the AWS cloud, AWS Elastic Load Balancing handles the Layer 4 TCP connections and load balances the traffic using a flow hash routing algorithm. The ELB can be either Network Load Balancer or a Classic Load Balancer.
AWS ELB listens for incoming connections as defined by its listeners. Each listener forwards a new connection to one of the available NetScaler VPX instances. The NetScaler VPX instance load balances the traffic to the EKS pods. It also performs other Layer 7 functionalities such as, rewrite policy, responder policy, SSL offloading and so on provided by NetScaler VPX.
A NetScaler Ingress Controller is deployed in the EKS cluster for each NetScaler VPX instance. The NetScaler Ingress Controllers are configured with the same ingress class. And, it configures the Ingress objects in the EKS cluster on the respective NetScaler VPX instances.
AWS Elastic Load Balancing (ELB) has a DNS name to which an IP address is assigned dynamically. The DNS name can be added as Alias A record for your domain in Route53 to access the application hosted in the EKS cluster.
Deployment process
Perform the following to deploy the solution:
-
Set up Amazon Elastic Load Balancing. You can either set up Network Load Balancer or Classic Load Balancer.
Deploy NetScaler VPX instances
NetScaler VPX is available as CloudFormation Template. The CloudFormation template deploys an instance of NetScaler VPX with single ENI on a given subnet. It also configures the NSIP, VIP, and SNIP for the NetScaler VPX instance.
For this solution you need to deploy two instances of NetScaler VPX. Deploy the NetScaler VPX instances on two availability zones by specifying the same NetScaler VPX and different public subnet.
After you deploy the NetScaler VPX instances, you can verify the deployment by reviewing the output of the CloudFormation template as shown in the following screenshot. The output must show the various IP addresses (VIP, SNIP, and NSIP) configured for the NetScaler VPX instances:

Note:
The CloudFormation template deploys the NetScaler VPX instance with primary IP address of the NetScaler VPX EC2 instance as VIP and secondary IP address as management IP address.
After the NetScaler VPX instances are successfully deployed, you must edit the security groups to allow traffic from EKS node group security group. Also, you must change the EKS node group security group to allow traffic from VPX instances.
Deploy NetScaler Ingress Controller
Deploy separate instance of NetScaler Ingress Controller for each NetScaler VPX instance. Follow the deployment instructions to deploy NetScaler Ingress Controller.
After the NetScaler VPX instance is up, you must set up a system user account on the NetScaler VPX instances. The system user account is used by NetScaler Ingress Controller to log into the NetScaler VPX instances. For instruction to set up the system user account, see Create System User Account for CIC in NetScaler.
-
Edit the NetScaler Ingress Controller deployment YAML (citrix-ingress-controller.yaml).
Replace
NS_IPwith thePrivate NSIPaddress of the respective NetScaler VPX instance. Also, provide the system user account user name and password that you have created on the NetScaler VPX instance. Once you edited thecitrix-ingress-controller.yamlfile, deploy the updated YAML file using the following command:kubectl apply -f citrix-ingress-controller .yaml -
Perform Step 1 on the second NetScaler Ingress Controller instance.
-
Ensure that both the pods are UP and running. Also, verify if NetScaler Ingress Controller is able to connect to the respective NetScaler VPX instance using the logs:
kubectl logs <cic_pod_name>
After the NetScaler Ingress Controller pods are deployed and running in the EKS cluster. Any, Kubernetes Ingress resource configured with the citrix ingress class is automatically configured on both the NetScaler VPX instances.
Setup elastic load balancing
Depending upon your requirement you can configure any of the following load balancers:
- Network Load Balancers
- Classic Load Balancers
Set up network load balancer
Network Load Balancer (NLB) is a good option for handling TCP connection load balancing. In this solution, NLB is used to accept the incoming traffic and route it to one of the NetScaler VPX instances. NLB load balances using the flow hash algorithm based on the protocol, source IP address, source port, destination IP address, destination port, and TCP sequence number.
To set up NLB:
-
Log on to the AWS Management Console for EC2.
-
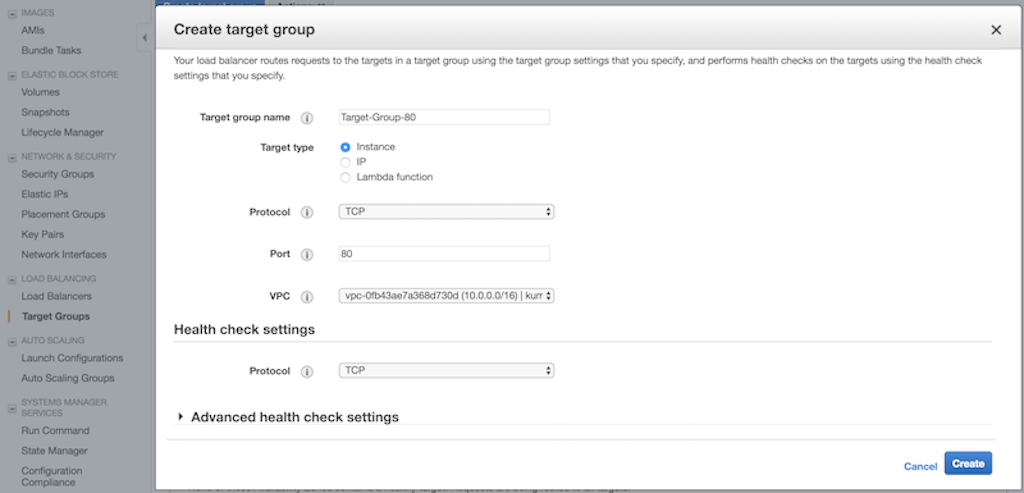
In the left navigation bar, click Target Group. Create two different target groups. One target group (Target-Group-80) for routing traffic on port 80 and the other target group (Target-Group-443) for routing traffic on 443 respectively.
-
Create a target group named, *Target-Group-80. Perform the following:
- In the Target group name field, enter the target group name as Target-Group-80.
- In the Target type field, select Instance.
- From the Protocol list, select TCP.
- In the Port field, enter 80.
- From the VCP list, select you VPC where you deployed your EKS cluster.
- In the Health check settings section, use TCP for health check.
-
Optional. You can modify the Advance health check settings to configure health checks.
-
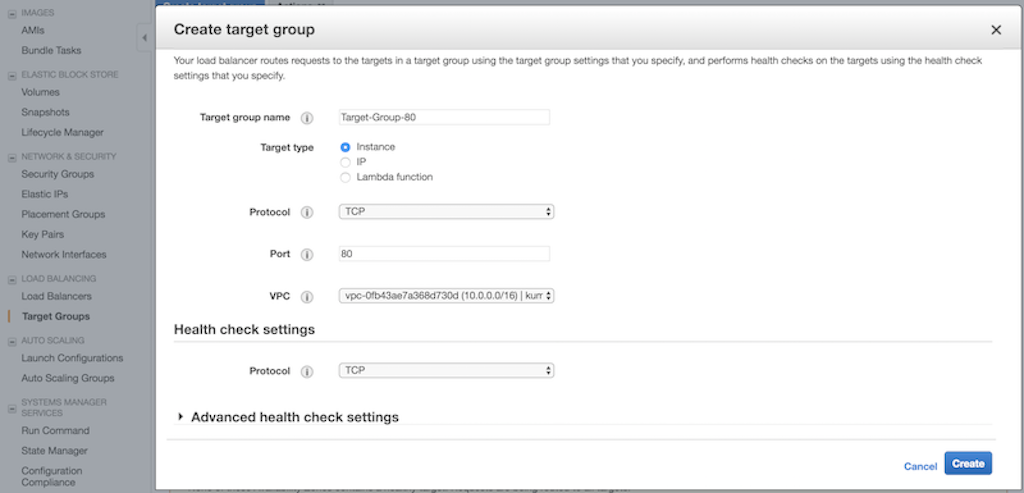
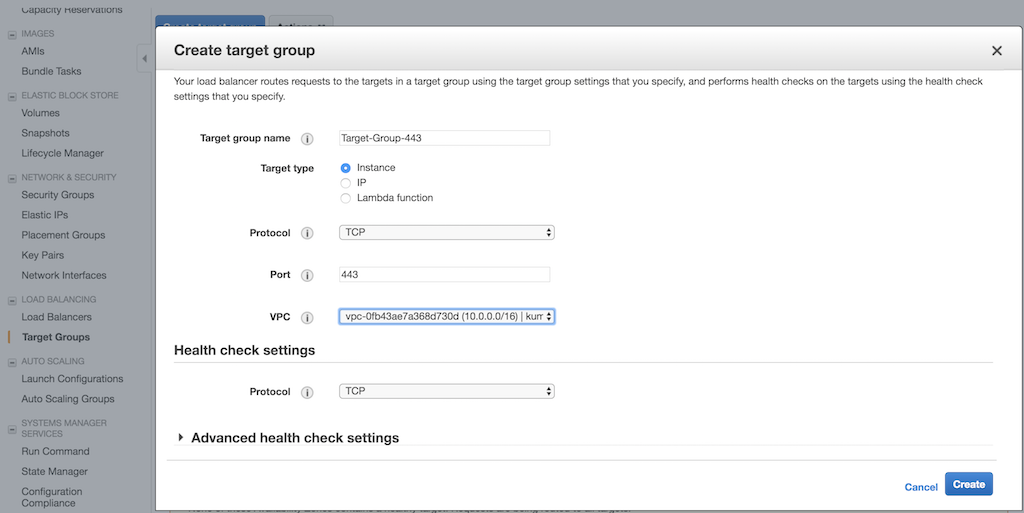
Create a target group named, *Target-Group-443. Perform the following:
- In the Target group name field, enter the target group name as Target-Group-443.
- In the Target type field, select Instance.
- From the Protocol list, select TCP.
- In the Port field, enter 443.
- From the VCP list, select you VPC where you deployed your EKS cluster.
- In the Health check settings section, use TCP for health check.
-
Optional. You can modify the Advance health check settings to configure health checks.
- Once you have created the target groups, you must register the target instances.
- Select the created target group in the list page, click the Target tab, and select edit.
- In the Instances tab, select the two NetScaler VPX instances and click Add to registered.
-
Repeat Step 5 for the other target group that you have created.
-
Create Network Load Balancer.
- In the left navigation bar, select Load Balancers, then click Create Load Balancer.
-
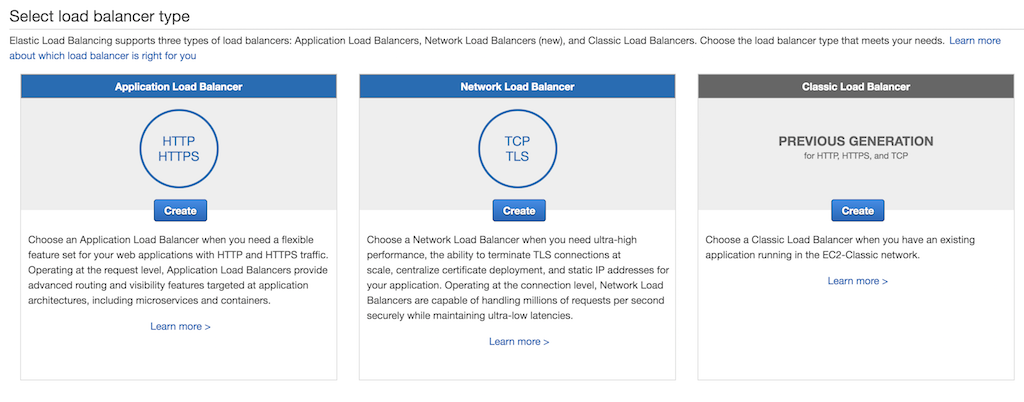
In the Select load balancer type window, click Create in the Network Load balancer panel.
-
In the Configure Load Balancer page, do the following:
- In the Name field, enter a name for the load balancer.
- In the Scheme field, select internet-facing.
-
In the Listeners section, click Add listener and add two entries with
TCPas the load balancer protocol and80and443as the load balancer port respectively as shown in the following image: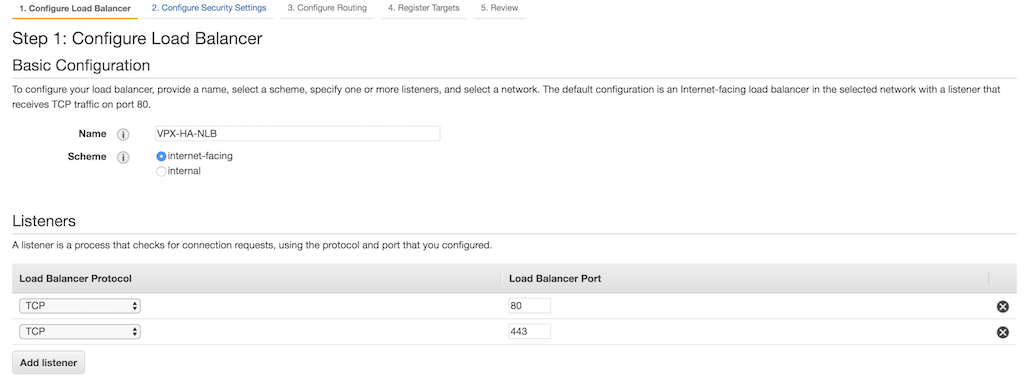
-
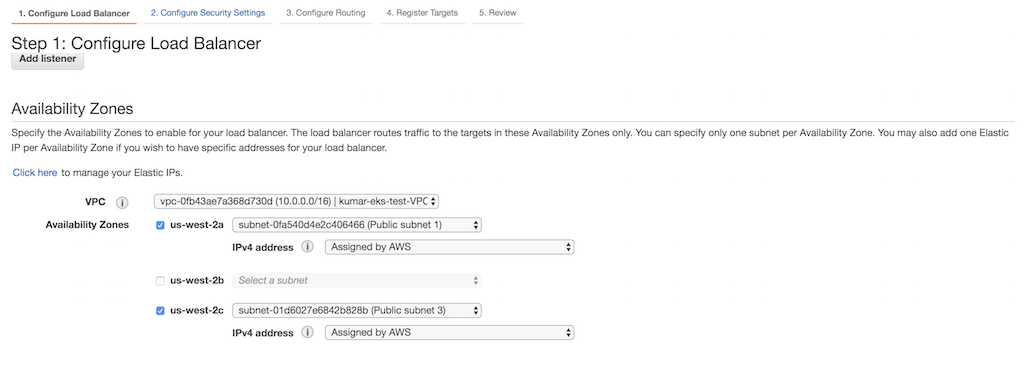
In the Availability Zones section, select the VPC, availability zones, and subnets where the NetScaler VPX instances are deployed.
-
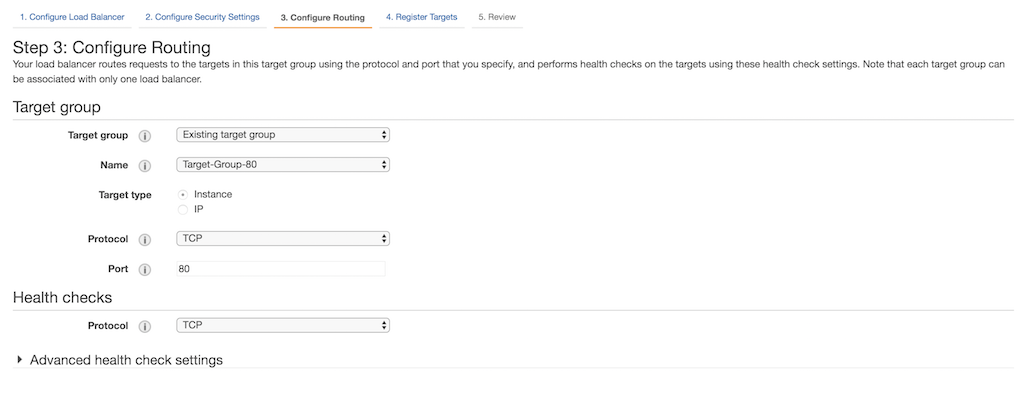
In the Configure routing page. do the following:
- In the Target group list, click Existing target group.
- In the Name field, enter Target-Group-80.
- In the Target type field, select Instance.
- In the Protocol list, select TCP.
- In the Port field, enter 80.
-
Select TCP from the Protocol list in the Health checks section as shown in the following image:
-
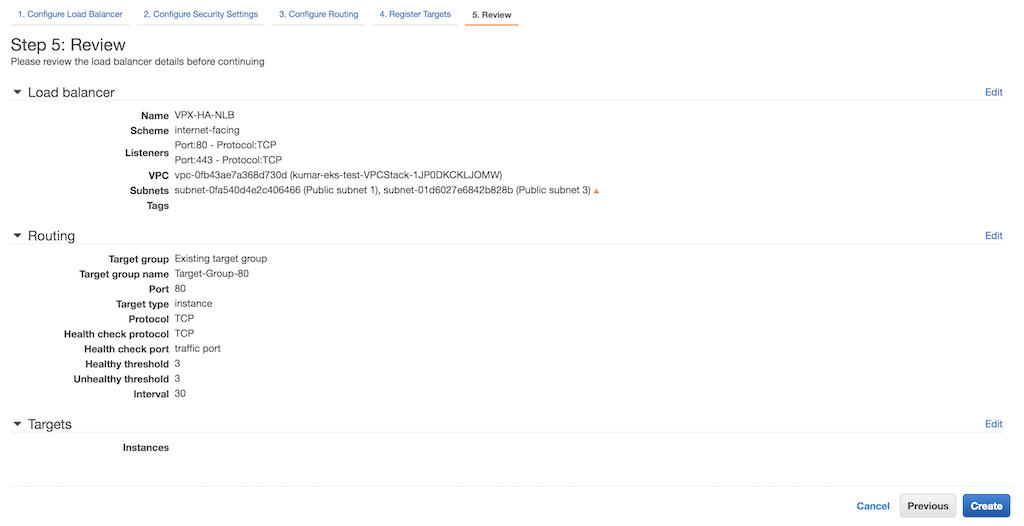
In the Review page, review your configuration and click Create.
-
After the Network load balancer is created, select the load balancer that you have created for the list page. Select Listeners tab, select TCP : 444 and then click Edit.

-
In the Listeners page, delete the default action and then select Target-Group-443 in the Forward to list.
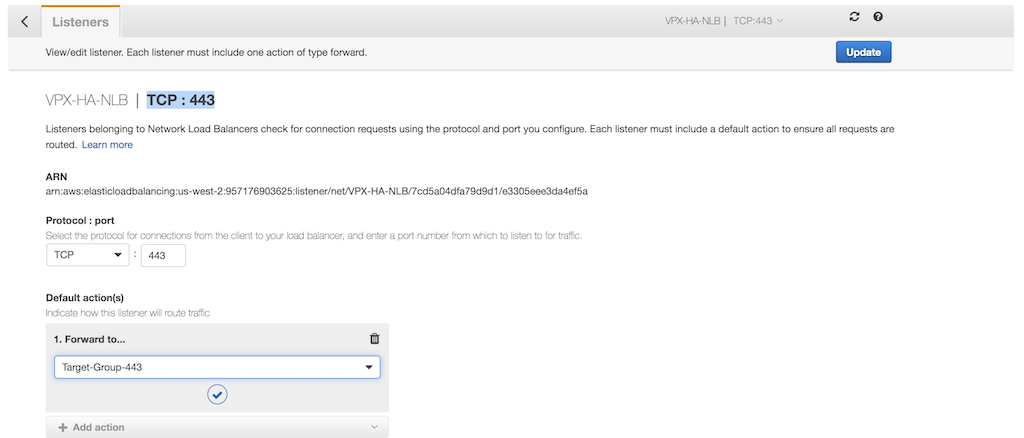
- Click Update.
Set up classic load balancer
Alternative to Amazon Network load balancer, you can set up Classic Load Balancer (CLB) as Tier 1 TCP load balancer.
-
Log on to the AWS Management Console for EC2.
-
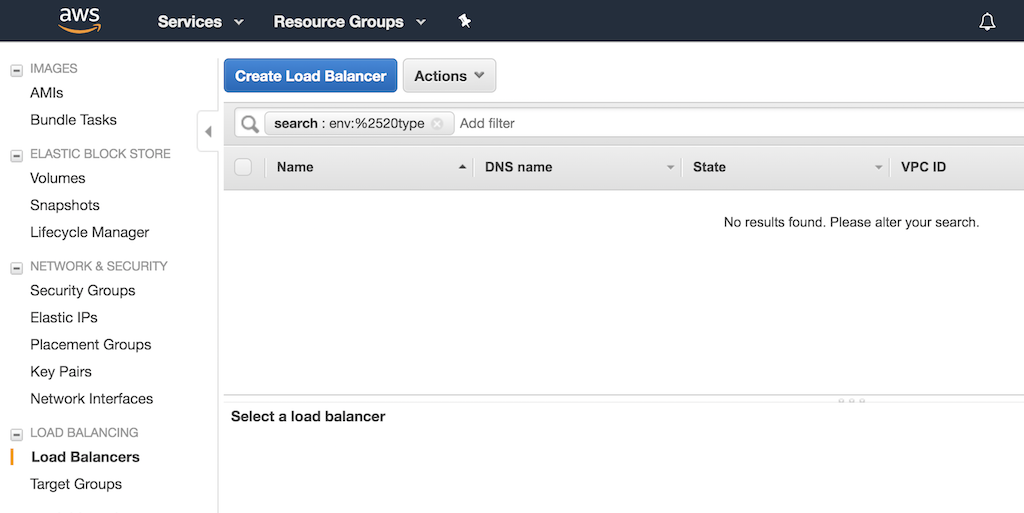
In the left navigation bar, select Load Balancers, then click Create Load Balancer.
-
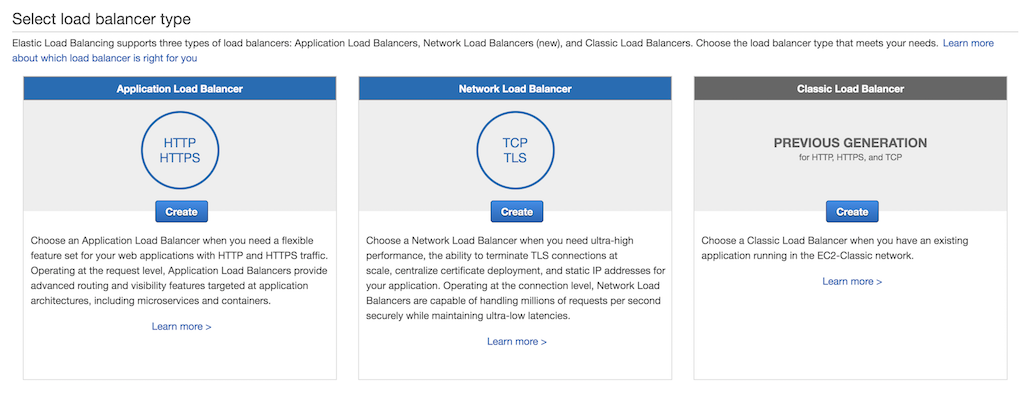
In the Select load balancer type window, click Create on the Classic Load balancer panel.
-
In the Define Load Balancer page, do the following:
-
In the Load Balancer name field, enter a name for the load balancer.
-
In the Create LB Inside list, select your NetScaler VPX.
-
In the Listener Configuration section, click Add and add two entries with
TCPas the load balancer protocol and80and443as the load balancer port respectively. Also, selectTCPas instance protocol and80and443as the instance port respectively as shown in the following image: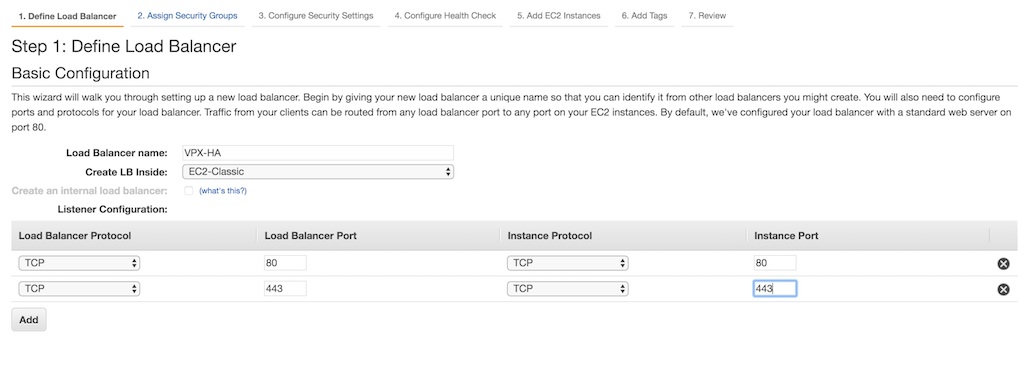
-
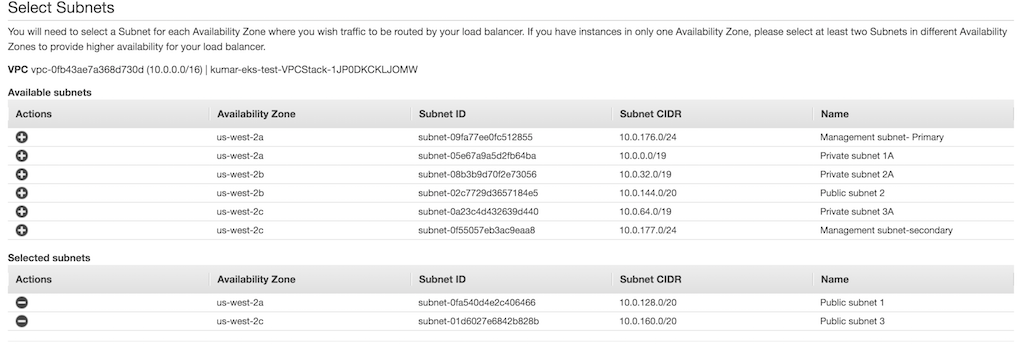
In the Select Subnets section, select two public subnets in two different availability zones for the Classic Load balancer to route the traffic. These subnets are same as where you have deployed the NetScaler VPX instances.
-
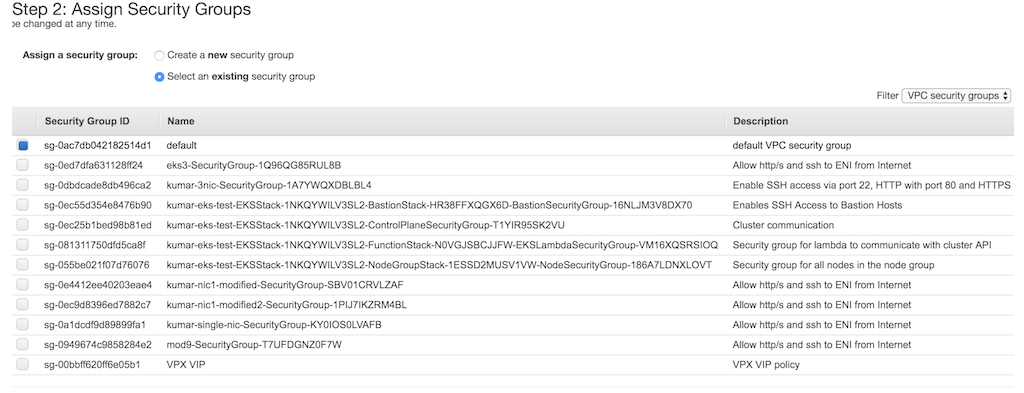
In the Assign Security Groups page, select a security group for the ELB instance. The security group can be same as the security group attached to NetScaler VPX ENI or it can be a new security group. If you are using a new security group, make sure that you allow traffic to the NetScaler VPX security group from the ELB security group and conversely.
-
In the Configure Health Check page, select the configuration for the health check. By default health check is set as
TCPon port80, optionally you can do the health check on port443as well.
-
In the Add EC2 Instances page, select two NetScaler VPX instances that were deployed earlier.
 -
In the Add Tags page, add tags as per your requirement.
-
In the Review page, review your configurations.
-
Click Create.
-
Verify the solution
After you have successfully deployed NetScaler VPX, AWS ELB, and NetScaler Ingress Controller, you can verify the solution using a sample service.
Perform the following:
-
Deploy a sample service and ingress using app.yaml.
kubectl apply -f app.yaml -
Log on to the NetScaler VPX instance and verify if the Content Switching vserver are successfully configured on both the NetScaler VPX instance. Do the following:
- Log on to the NetScaler VPX instance. Perform the following:
-
Use an SSH client, such as PuTTy, to open an SSH connection to the NetScaler VPX instance.
-
Log on to the instance by using the administrator credentials.
-
-
Verify if the Content Switching (cs) vserver is configured on the instance using the following command:
sh cs vserverOutput:
1) k8s-10.0.139.87:80:http (10.0.139.87:80) - HTTP Type: CONTENT State: UP Last state change was at Fri Apr 12 14:24:13 2019 Time since last state change: 3 days, 03:09:18.920 Client Idle Timeout: 180 sec Down state flush: ENABLED Disable Primary Vserver On Down : DISABLED Comment: uid=NNJRYQ54VM2KWCXOERK6HRJHR4VEQYRI7U3W4BNFQLTIAENMTHWA==== Appflow® logging: ENABLED Port Rewrite : DISABLED State Update: DISABLED Default: Content Precedence: RULE Vserver IP and Port insertion: OFF L2Conn: OFF Case Sensitivity: ON Authentication: OFF 401 Based Authentication: OFF Push: DISABLED Push VServer: Push Label Rule: none Listen Policy: NONE IcmpResponse: PASSIVE RHIstate: PASSIVE Traffic Domain: 0 -
Access the application
test.example.comusing the DNS name of the ELB instance.# curl -H 'Host: test.example.com' <DNS name of the ELB>Example:
% curl -H 'Host: test.example.com' http://VPX-HA-829787521.us-west-2.elb.amazonaws.com -
To delete the deployment, use the following command:
kubectl delete -f app.yaml
- Log on to the NetScaler VPX instance. Perform the following:
Troubleshooting
| Problem | Resolution |
|---|---|
| CloudFormation stack failure | Ensure that the IAM user or role has sufficient privilege to create EC2 instances and Lambda configurations. |
| Ensure that you haven’t exceeded the resource quota. | |
| NetScaler Ingress Controller unable to communicate with the NetScaler VPX instances. | Ensure that user name and password is correct in citrix-ingress-controller.yaml file. |
Ensure that the NetScaler VPX security group allows the traffic on port 80 and 443 from the EKS node group security group. |
|
| The services are DOWN in the NetScaler VPX instances. | Ensure that the NetScaler VPX traffic can reach the EKS cluster. Modify the security group of EKS node group to allow traffic from NetScaler VPX security group. |
| Traffic not routing to NetScaler VPX instance from ELB. | Ensure that security group of NetScaler VPX allows traffic from the ELB security group. |