
IP address management using the IPAM controller
The IPAM controller is a container provided by NetScaler for IP address management and it runs in parallel to NetScaler Ingress Controller as a pod in the Kubernetes cluster. For services of type LoadBalancer, you can use the IPAM controller to automatically allocate IP addresses to services from a specified IP address range. You can specify this IP range in the YAML file while deploying the IPAM controller using YAML. NetScaler Ingress Controller configures the IP address allocated to the service as a virtual IP address (VIP) in NetScaler MPX or VPX. Using this IP address, you can externally access the service.
Overview of services of type LoadBalancer
In a Kubernetes environment, a microservice is deployed as a set of pods that are created and destroyed dynamically. Since the set of pods that refer to a microservice are constantly changing, Kubernetes provides a logical abstraction known as service to expose your microservice running on a set of pods. A service defines a logical set of pods, and policies to access them.
A service of type LoadBalancer is the simplest way to expose a microservice inside a Kubernetes cluster to the external world. Services of type LoadBalancer are natively supported in Kubernetes deployments on public clouds such as, AWS, GCP, or Azure. In cloud deployments, when you create a service of type LoadBalancer, a cloud managed load balancer is assigned to the service. The service is then exposed using the load balancer.
NetScaler IPAM solution for services of type LoadBalancer
There may be several situations where you want to deploy your Kubernetes cluster on bare metal or on-premises rather than deploy it on public cloud. When you are running your applications on bare metal Kubernetes clusters, it is much easier to route TCP or UDP traffic using a service of type
LoadBalancer than using ingress. Even for HTTP traffic, it is sometimes more convenient than ingress. However, there is no load balancer implementation natively available for bare metal Kubernetes clusters. NetScaler provides a way to load balance such services using the NetScaler Ingress Controller and NetScaler.
In the NetScaler solution for services of type
LoadBalancer, NetScaler Ingress Controller deployed inside the Kubernetes cluster configures a NetScaler deployed outside the cluster to load balance the incoming traffic. Using the NetScaler solution, you can load balance the incoming traffic to the Kubernetes cluster regardless of whether the deployment is on bare metal, on-premises, or public cloud. Since the NetScaler Ingress Controller provides flexible IP address management that enables multi-tenancy for NetScalers, you can use a single NetScaler to load balance multiple services as well as to perform ingress functions. Hence, you can maximize the utilization of load balancer resources and significantly reduce your operational expenses.
IP address management using the IPAM controller
NetScaler IPAM controller requires the VIP CRD provided by NetScaler. The VIP CRD contains fields for service-name, namespace, and IP address. The VIP CRD is used for internal communication between the NetScaler Ingress Controller and the IPAM controller.
The following diagram shows a deployment of service type load balancer where the IPAM controller is used to assign an IP address to a service.
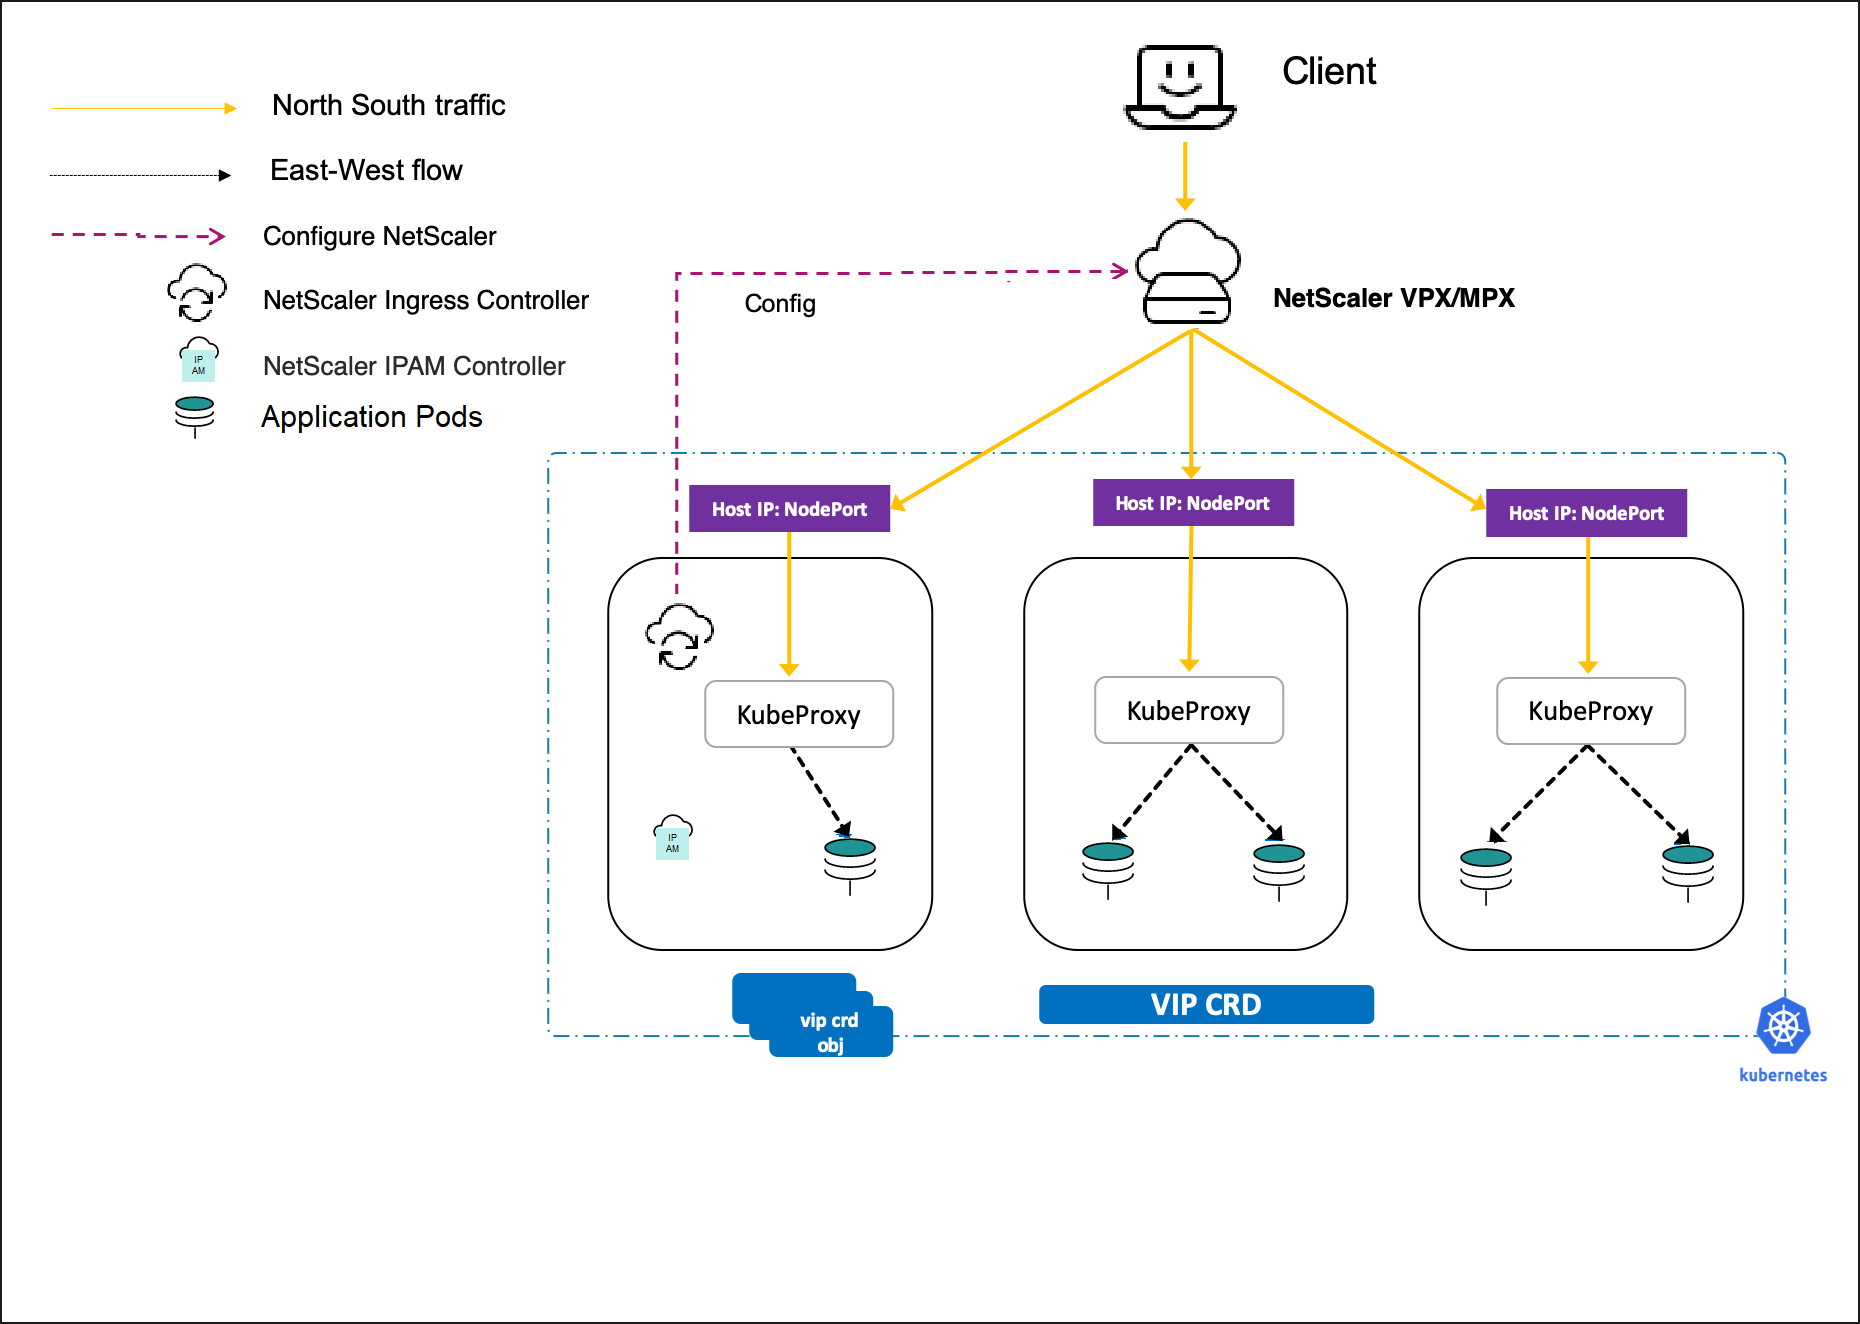
When a new service of type
Loadbalancer is created, the following events occur:
-
The NetScaler Ingress Controller creates a VIP CRD object for the service whenever the
loadBalancerIPfield in the service is empty. -
The IPAM controller assigns an IP address for the VIP CRD object.
-
Once the VIP CRD object is updated with the IP address, the NetScaler Ingress Controller automatically configures the NetScaler.
Note:
Custom resource definitions (CRDs) offered by NetScaler also support services of type
LoadBalancer. That means, you can specify a service of type LoadBalancer as a service name when you create a CRD object and apply the CRD to the service.
Expose services of type LoadBalancer with IP addresses assigned by the IPAM controller
This topic provides information on how to expose services of type LoadBalancer with IP addresses assigned by the IPAM controller.
To expose a service of type load balancer with an IP address from the IPAM controller, perform the following steps:
Deploy NetScaler Ingress Controller
Perform the following steps to deploy the NetScaler Ingress Controller with the IPAM controller argument.
-
Add the NetScaler® Helm chart repository to your local registry using the following command.
helm repo add netscaler https://netscaler.github.io/netscaler-helm-charts/ -
Install NetScaler Ingress Controller using the following command.
helm install netscaler-ingress-controller netscaler/netscaler-ingress-controller --set nsIP=<NS_IP>,license.accept=yes,adcCredentialSecret=<>,ingressClass[0]=netscaler,serviceClass[0]=netscaler,ipam=true -n netscalerFor detailed information about deploying and configuring NetScaler Ingress Controller using Helm charts, see the Helm chart repository.
Deploy IPAM controller
-
Add the NetScaler Helm chart repository to your local registry using the following command.
helm repo add netscaler https://netscaler.github.io/netscaler-helm-charts/ -
Install NetScaler IPAM controller using the following command.
helm install netscaler-ipam-controller netscaler/netscaler-ipam-controller --set vipRange='[{"Prod": ["10.1.2.0 - 10.1.2.255"]}]' -n netscaler
Deploy a sample application
Perform the following steps to deploy an
apache application in your Kubernetes cluster.
Note:
In this example, an
apache application is used. You can deploy a sample application of your choice.
-
Deploy a sample application using the following command:
  kubectl apply -f - <<EOF
   apiVersion: apps/v1
   kind: Deployment
   metadata:
     name: apache
     namespace: netscaler
     labels:
       name: apache
   spec:
     selector:
       matchLabels:
         app: apache
     replicas: 2
     template:
       metadata:
         labels:
           app: apache
       spec:
         containers:
         - name: apache
           image: httpd:latest
           ports:
           - name: http
             containerPort: 80
           imagePullPolicy: IfNotPresent
     EOF
     ```
-
Verify if the pods are running using the following command:
kubectl get pods
Expose the sample application using service of type LoadBalancer
Perform the following steps to create a service of type
LoadBalancer:
-
Deploy a service to expose
apacheapplication, for which the IP address is allocated from theProdVIP range specified during the IPAM installation.kubectl apply -f - <<EOF
apiVersion: v1
kind: Service
metadata:
name: apache
namespace: netscaler
labels:
name: apache
annotations:
service.citrix.com/class: 'netscaler'
service.citrix.com/ipam-range: 'Prod'
spec:
externalTrafficPolicy: Local
type: LoadBalancer
ports:
- name: http
port: 80
targetPort: http
selector:
app: apache
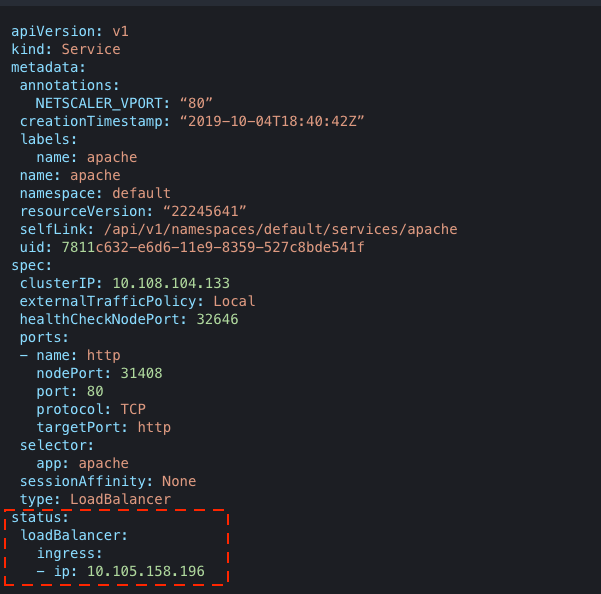
EOFWhen you create the service, the IPAM controller assigns an IP address to theapacheservice from the IP address range you had defined in the IPAM controller deployment. The IP address allocated by the IPAM controller is provided in thestatus.loadBalancer.ingress:field of the service definition. NetScaler Ingress Controller configures the IP address allocated to the service as a virtual IP address (VIP) in NetScaler. -
View the service using the following command:
kubectl get service apache --output yaml
Output:
Access the service
You can access the
apache service using the IP address assigned by the IPAM controller to the service. You can find the IP address in the status.loadBalancer.ingress: field of the service definition. Use the following curl command to access the service:
curl <IP_address>
The response should be:
<html><body><h1>It works!</h1></body></html>
Stop publishing the VIP in the service status
By default, NetScaler Ingress Controller writes the VIP that it configures on NetScaler into the
status.loadBalancer.ingress field of each service of type LoadBalancer that it manages. This field is shown in the EXTERNAL-IP column of kubectl get service. Some CNIs, such as OVN-Kubernetes, send in-cluster traffic for this address straight to the back-end pods, so traffic from clients inside the cluster does not go through NetScaler.
Starting with NetScaler Ingress Controller 4.3.22, you can stop publishing the VIP in the service status. NetScaler is configured in the same way, and NetScaler Ingress Controller records the VIP in the
service.citrix.com/lb-ip annotation of the service instead.
To stop publishing the VIP, set
updateServiceStatus to False in the Helm values of the netscaler-ingress-controller chart:
updateServiceStatus: False
If NetScaler Ingress Controller already published the VIP in the status of your services, also set
clearStaleServiceStatus to True. At startup, NetScaler Ingress Controller then removes the VIP that it published earlier. clearStaleServiceStatus has an effect only together with updateServiceStatus: False. While both values are set, the chart uses the Recreate deployment strategy, so no controller runs for a short time during the rollout.
updateServiceStatus: False
 clearStaleServiceStatus: True
After the VIP is removed from the service status, set
clearStaleServiceStatus back to False.
If you deploy NetScaler Ingress Controller by using a YAML file, add the following arguments to the NetScaler Ingress Controller container. Add
--clear-stale-service-status only for the one-time removal. The ClusterRole of NetScaler Ingress Controller must allow the patch verb on services, so that NetScaler Ingress Controller can record the annotation.
args:
   - --update-service-status
     no
   - --clear-stale-service-status
     yes
To see the VIP that NetScaler Ingress Controller recorded for a service, run the following command:
kubectl get service <service-name> -o jsonpath='{.metadata.annotations.service\.citrix\.com/lb-ip}'
Tools that read the
EXTERNAL-IP of a service no longer see the VIP. For example, for external-dns, add the VIP to the service in the external-dns.alpha.kubernetes.io/target annotation:
metadata:
   annotations:
     external-dns.alpha.kubernetes.io/target: <VIP>
Note:
-
This setting needs NetScaler Ingress Controller 4.3.22 or later. An earlier version ignores it and keeps publishing the VIP.
-
If you use GSLB, upgrade NetScaler GSLB Controller to the same release. It reads the
service.citrix.com/lb-ipannotation to create the global service entry when the service status is empty. -
Argo CD reports a service of type LoadBalancer without a status address as
Progressing. Add a health check override in Argo CD for such services. -
For the
netscaler-cpx-with-ingress-controllerchart, onlyupdateServiceStatusis available. To remove a VIP that was published earlier, runkubectl patch service <service-name> -n <namespace> --subresource=status --type=merge -p '{"status":{"loadBalancer":{}}}'after the upgrade.