
Tracing the packets of a NetScaler cluster
The NetScaler operating system provides a utility called ns trace to get a dump of the packets that are received and sent out by an appliance. The utility stores the packets in trace files. You can use these files to debug problems in the flow of packets to the cluster nodes. The trace files must be viewed with the Wireshark application.
Some salient aspects of the ns trace utility are:
-
Can be configured to trace packets selectively by using classic expressions and default expressions.
-
Can capture the trace in multiple formats: ns trace format (.cap) and TCP dump format (.pcap).
-
Can aggregate the trace files of all cluster nodes on the configuration coordinator.
-
Can merge multiple trace files into a single trace file (only for.cap files).
You can use the ns trace utility from the NetScaler command line or the NetScaler shell.
To trace packets of a standalone appliance
Run the start ns trace command on the appliance. The command creates trace files in the /var/nstrace/\<date-timestamp\> directory. The trace file names are of the form nstrace\<id\ >.cap.
You can view the status by running the show ns trace command. You can stop tracing the packets by running the stop ns trace command.
Note
You can also run the ns trace utility from the NetScaler shell by running the nstrace.sh file. However, it is recommended that you use the ns trace utility through the NetScaler command line interface.
To trace packets of a cluster
You can trace the packets on all the cluster nodes and obtain all the trace files on the configuration coordinator.
Run the start ns trace command on the cluster IP address. The command is propagated and run on all the cluster nodes. The trace files are stored in individual cluster nodes in the /var/nstrace/
<date-timestamp> directory. The trace file names are of the form nstrace\<id\>\_node\<id\ >.cap.
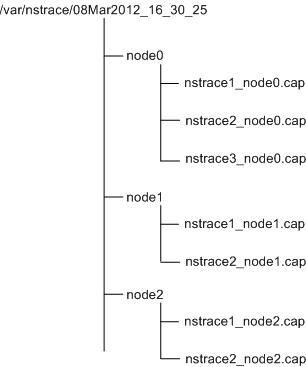
You can use the trace files of each node to debug the nodes operations. But if you want the trace files of all cluster nodes in one location, you must run the stop ns trace command on the cluster IP address. The trace files of all the nodes are downloaded on the cluster configuration coordinator in the /var/nstrace/
<date-timestamp> directory as follows:
Merge multiple trace files
You can prepare a single file from the trace files (supported only for. Cap files) obtained from the cluster nodes. The single trace files give you a cumulative view of the trace of the cluster packets. The trace entries in the single trace file are sorted based on the time the packets were received on the cluster.
To merge the trace files, at the NetScaler shell, type:
> nstracemerge.sh -srcdir \<DIR\> -dstdir \<DIR\> -filename \<name\> -filesize \<num\>
Where,
-
srcdiris the directory from which the trace files are merged. All trace files within this directory are merged into a single file. -
dstdiris the directory where the merged trace file is created. -
Filenameis the name of the trace file that is created. -
Filesizeis the size of the trace file.
Examples
Following are some examples of using the ns trace utility to filter packets.
-
To trace the packets on the backplane interfaces of three nodes:Using classic expressions:
> start nstrace -filter "INTF == 0/1/1 && INTF == 1/1/1 && INTF == 2/1/1"Using default expressions:> start nstrace -filter "CONNECTION.INTF.EQ("0/1/1") && CONNECTION.INTF.EQ("1/1/1") && CONNECTION.INTF.EQ("2/1/1")" -
To trace the packets from a source IP address 10.102.34.201 or from a system whose source port is greater than 80 and the service name is not "s1":Using classic expressions
> start nstrace -filter "SOURCEIP == 10.102.34.201 || (SVCNAME != s1 && SOURCEPORT > 80)"Using default expressions> start nstrace -filter "CONNECTION.SRCIP.EQ(10.102.34.201) || (CONNECTION.SVCNAME.NE("s1") && CONNECTION.SRCPORT.GT(80))"
Note
For more information about filters used in ns trace, see ns trace.
Capturing SSL Session Keys During a Trace
When you run the "start ns trace" command, you can set the new
capsslkeys parameter to capture the SSL master keys for all SSL sessions. If you include this parameter, a file named nstrace.sslkeys is generated along with the packet trace. This file can be imported into Wireshark to decrypt the SSL traffic in the corresponding trace file.
This functionality is similar to web browsers exporting session keys that can later be imported into Wireshark for decrypting SSL traffic.
Advantages of using SSL session keys
Following are the advantages of using SSL session keys:
-
Generates smaller trace files that do not include the extra packets created by the SSLPLAIN mode of capturing.
-
Provides the ability to view plaintext \[SP(1\] from the trace and choose whether to share the master keys file or protect sensitive data by not sharing it.
Limitations of using SSL session keys
Following are the limitations of using SSL session keys:
-
SSL sessions cannot be decrypted if the initial packets of the session are not captured.
-
SSL sessions cannot be captured if the Federal Information Processing Standard (FIPS) mode is enabled.
To capture SSL session keys by using the command line interface (CLI)
At the command prompt, type the following commands to enable or disable SSL session keys in a trace file and verify trace operation.
> start nstrace -capsslkeys ENABLED
 > show nstrace
 Example
 > start nstrace -capsslkeys ENABLED
 > show nstrace
       State:  RUNNING          Scope:  LOCAL            TraceLocation:  "/var/nstrace/04May2016_17_51_54/..."
       Nf:  24                  Time:  3600              Size:  164               Mode:  TXB NEW_RX
       Traceformat:  NSCAP      PerNIC:  DISABLED        FileName:  04May2016_17_51_54 Link:  DISABLED
       Merge:  ONSTOP           Doruntimecleanup:  ENABLED TraceBuffers:  5000      SkipRPC:  DISABLED
       SkipLocalSSH:  DISABLED  Capsslkeys:  ENABLED     InMemoryTrace:  DISABLED
  Done
To configure SSL session keys by using the NetScaler GUI
-
Navigate to Configuration > System > Diagnostics > Technical Support Tools and click Start new Trace to start tracing encrypted packets on an appliance.
-
On the Start Trace page, select the Capture SSL Master Keys check box.
-
Click OK and Done.
To import the SSL Master Keys into Wireshark
On the Wireshark GUI, navigate to Edit > Preferences > Protocols > SSL > (Pre)-Master-Secret log filename and specify the master key files obtained from the appliance.