Configure Management IP Address
To enable remote access to an SD-WAN appliance, you must specify a unique Management IP Address for the appliance. To do so, you must first connect the appliance to a PC. You can then open a browser on the PC and connect directly to the Management Web Interface on the appliance, where you can set the Management IP Address for that appliance. The Management IP Address must be unique for each appliance.
Citrix SD-WAN™ appliances support both IPv4 and IPv6 protocols. You can configure IPv4, IPv6, or both (dual stack). When both IPv4 and IPv6 protocols are configured, the IPv4 protocol takes precedence over the IPv6 protocol.
NOTE
To configure an IPv4 or IPv6 address in feature specific configurations, ensure that the same protocol is enabled and configured as the management interface protocol. For example, if you want to configure an IPv6 address for an SMTP server, ensure that an IPv6 address is configured as the management interface address.
Link-local addresses (IPv6 addresses starting with “fe80”) are not allowed.
To configure an IPv6 address, you must have a router in the network that advertises IPv6 address.
The procedures are different for setting the Management IP Address for a hardware SD-WAN Appliance and a VPX Virtual Appliance (Citrix SD-WAN VPX-SE). For instructions for configuring the address for each type of appliance, see the following:
- SD-WAN VPX Virtual Appliance – See the sections, [Configuring the Management IP Address for the SD-WAN VPX-SE and Differences Between an SD-WAN VPX-SE and SD-WAN WANOP VPX Installation.
To configure the Management IP Address for a hardware SD-WAN Appliance, do the following:
Note
You must repeat the following process for each hardware appliance you want to add to your network.
-
If you are configuring a hardware SD-WAN appliance, physically connect the appliance to a PC.
- If you have not already done so, connect one end of an Ethernet cable to the Management Port on the appliance, and the other end to the default Ethernet port on the PC.
Note
Ensure that the Ethernet port is enabled on the PC you are using to connect to the appliance.
-
Record the current Ethernet port settings for the PC you are using to set the appliance Management IP Address.
You must change the Ethernet port settings on the PC before you can set the appliance Management IP Address. Be sure to record the original settings so you can restore them after configuring the Management IP Address.
-
Change the IP Address for the PC.
On the PC, open your network interface settings and change the IP Address for your PC to the following:
- 192.168.100.50
-
Change the Subnet Mask setting on your PC to the following:
- 255.255.0.0
-
On the PC, open a browser and enter the default IP Address for the appliance. Enter the following IP Address in the address line of the browser:
- 192.168.100.1
Note
It is recommended that you use Google Chrome browser when connecting to an SD-WAN appliance.
Ignore any browser certificate warnings for the Management Web Interface.
This opens the SD-WAN management web interface login screen on the connected appliance.
-
Enter the administrator user name and password, and click Login.
-
Default administrator user name: admin
-
Default administrator password: password
Note
It is recommended that you change the default password. Be sure to record the password in a secure location, as password recovery might require a configuration reset.
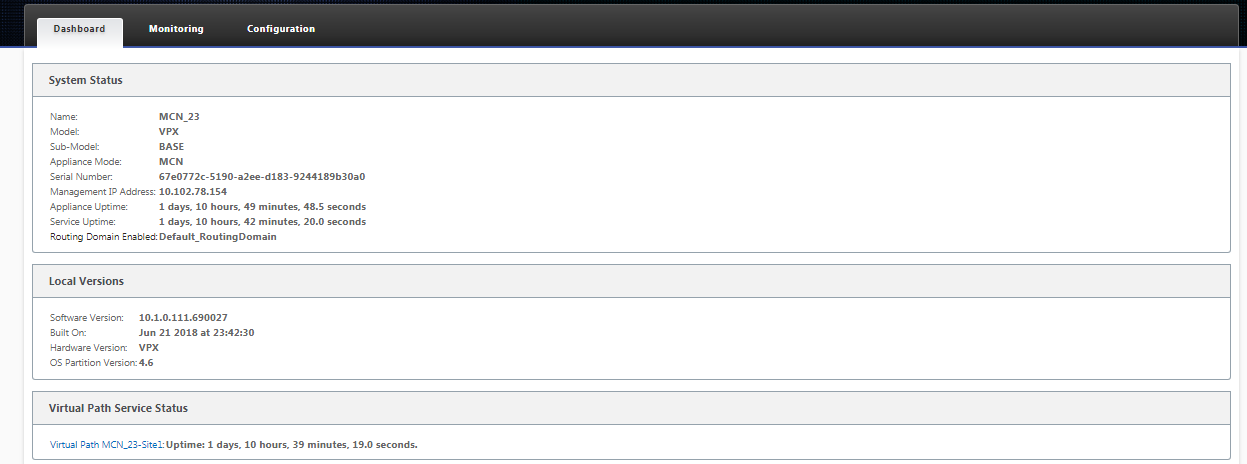
After you have logged into the management web interface, the Dashboard page displays, as shown below.

The first time you log into the management web interface on an appliance, the Dashboard displays an Alert icon (goldenrod delta) and alert message indicating that the SD-WAN Service is disabled, and the license has not been installed. For now, you can ignore this alert. The alert will be resolved after you have installed the license, and completed the configuration and deployment process for the appliance.
-
-
In the main menu bar, select the Configuration section tab.
This displays the Configuration navigation tree in the left pane of the screen. The Configuration navigation tree contains the following three primary branches:
- Appliance Settings
- Virtual WAN
- System Maintenance
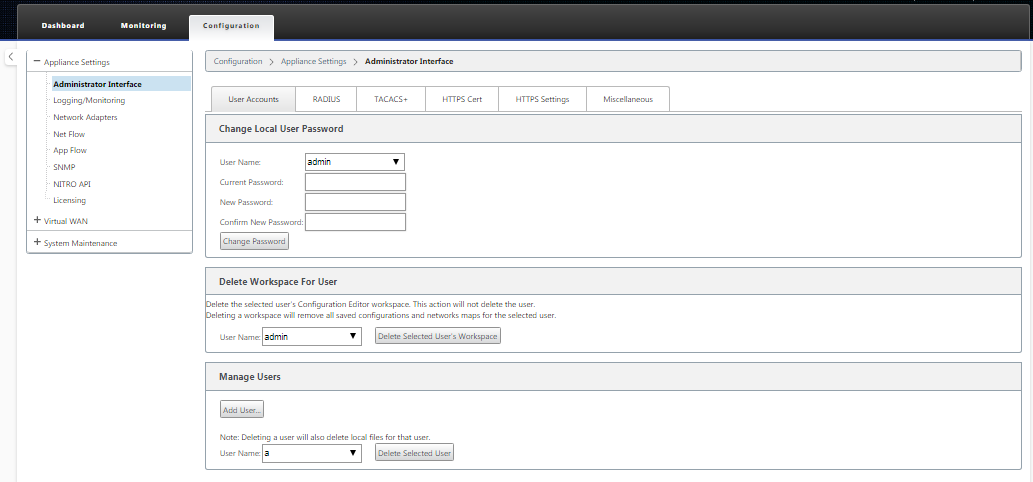
When you select the Configuration tab, the Appliance Settings branch automatically opens, with the Administrator Interface page preselected by default, as shown in the below figure.

-
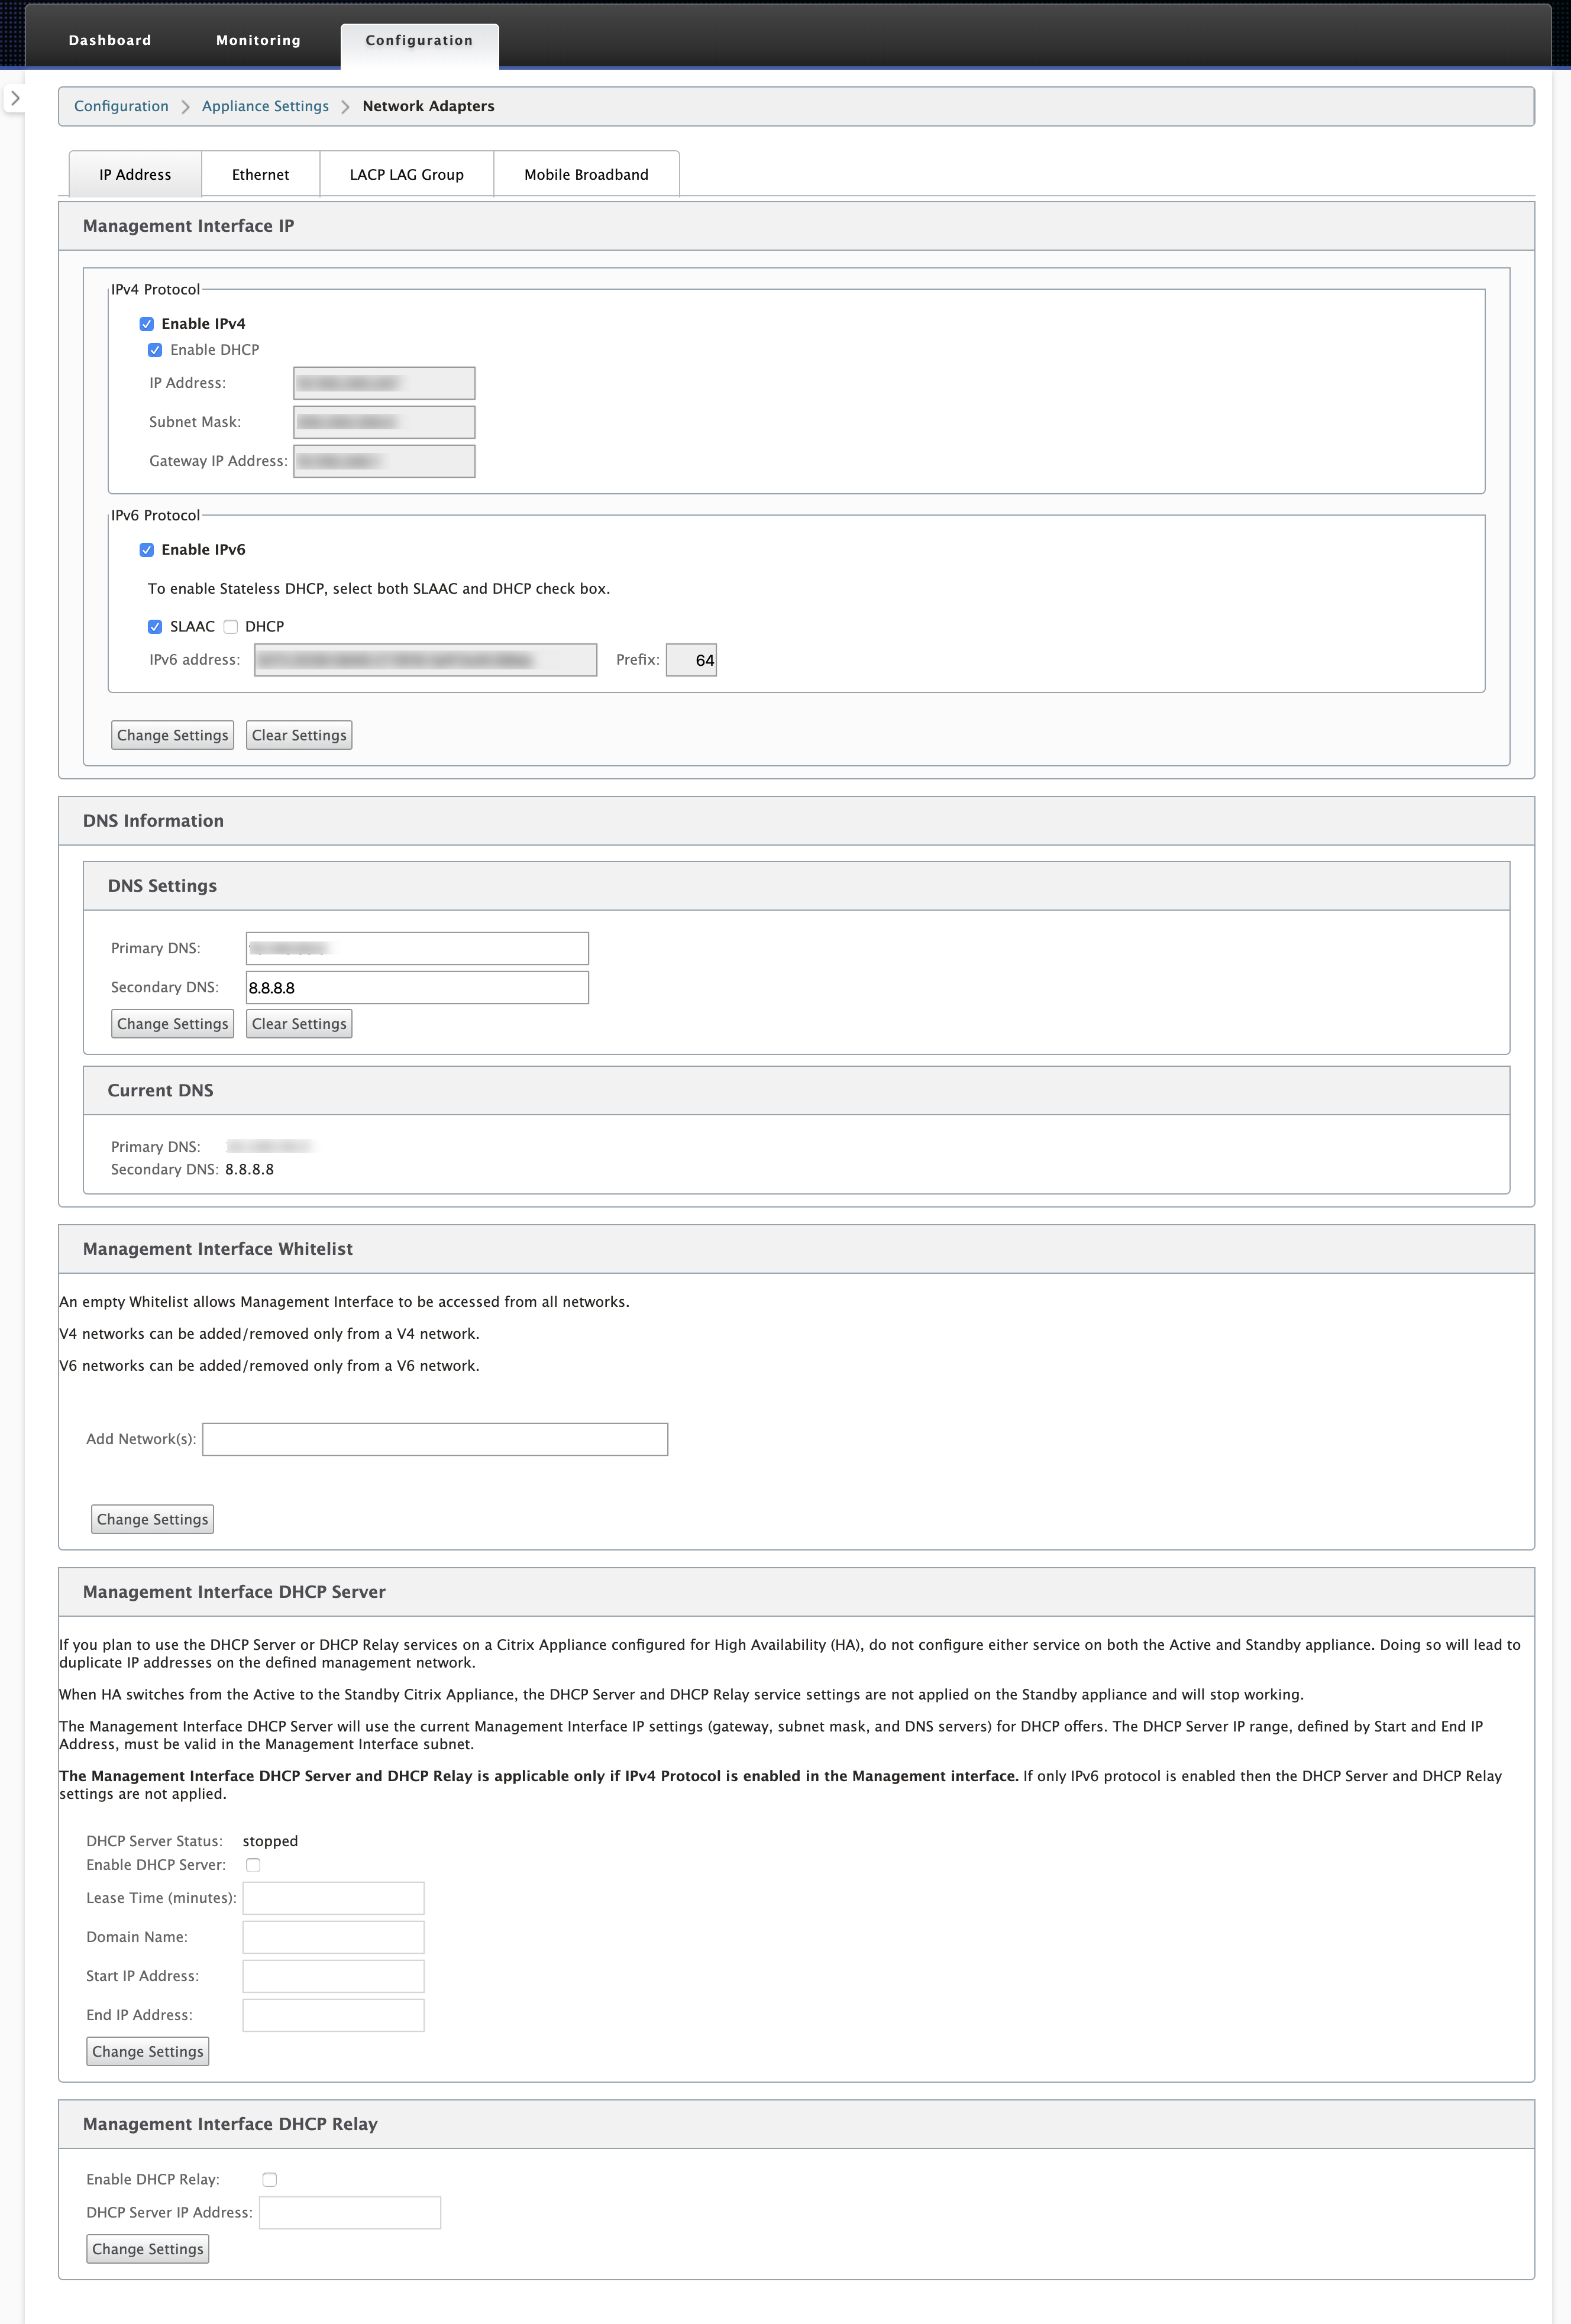
In the Appliance Settings branch of the navigation tree, select Network Adapters. This displays the Network Adapters settings page with the IP Address tab preselected by default, as shown in the below figure.

-
In the IP Address tab, enable one of the following:
-
IPv4 Protocol: To enable IPv4 address, select the Enable IPv4 check box. Dynamic Host Control Protocol (DHCP) assigns an IP address and other network configuration parameters dynamically to each device on the network. Select Enable DHCP for assigning IP address dynamically. To configure the IP address manually, provide the following details:
- IP Address
- Subnet Mask
- Gateway IP Address
-
IPv6 Protocol: To enable IPv6 address, select Enable IPv6 check box. You can configure IPv6 address manually or enable DHCP or SLAAC to assign IP address automatically.
To configure manually, provide the following details:
- IP Address
- Prefix
To configure SLAAC, select the SLAAC check box. SLAAC automatically assigns an IPv6 address to each device on the network. SLAAC enables an IPv6 client to generate its own addresses using a combination of locally available information and information advertised by routers through Neighbor Discovery Protocol (NDP).
To configure DHCP, select the DHCP check box. To enable stateless DHCP, select both SLAAC and DHCP check boxes.
- Both IPv4 and IPv6 Protocols: Select both Enable IPv6 and Enable IPv4 check boxes to enable both IPv4 and IPv6 protocols. In such scenarios, the SD-WAN appliance has one IPv4 management IP address and one IPv6 management address.
NOTE
- The management IP address must be unique for each appliance.
- The Management Interface DHCP Server and DHCP Relay sections on the IP Address tab are applicable only if IPv4 Protocol is enabled in the Management interface.
- When the management interface acts as the DHCP client, the host name is used in DHCP client messages as option 12. From Citrix SD-WAN release 11.2.3 onwards and up to release 11.4.1, the host name was set as sdwan. From Citrix SD-WAN release 11.4.1 onwards, the host name is the same as the site name. If the site name is changed or configured for the first time, then until the configuration update is completed and the virtual WAN service is up, the old site name or sdwan is used as the host name in DHCP client messages. After the configuration update is completed and the virtual WAN service is up, the subsequent DHCP client messages use the new site name.
-
IPv4 Protocol: To enable IPv4 address, select the Enable IPv4 check box. Dynamic Host Control Protocol (DHCP) assigns an IP address and other network configuration parameters dynamically to each device on the network. Select Enable DHCP for assigning IP address dynamically. To configure the IP address manually, provide the following details:
-
Click Change Settings. A confirmation dialog box displays, prompting you to verify that you want to change these settings.
-
Click OK.
-
Change the network interface settings on your PC back to the original settings.
Note
Changing the IP address for your PC automatically closes the connection to the appliance, and terminates your login session on the management web interface.
-
Disconnect the appliance from the PC and connect the appliance to your network router or switch. Disconnect the Ethernet cable from the PC, but do not disconnect it from your appliance. Connect the free end of the cable to your network router or switch.
The SD-WAN appliance is now connected to and available on your network.
-
Test the connection. On a PC connected to your network, open a browser and enter the Management IP Address you configured for the appliance in the following format:
For IPv4 address:
https://<IPv4 address>Example:
https://10.10.2.3For IPv6 address:
https://<[IPv6 address]>Example:
https://[fd73:xxxx:yyyy:26::9]If the connection is successful, this displays the Login screen for the SD-WAN management web interface on the appliance you configured.
Tip
After verifying the connection, do not log out of the management web interface. You are using it to complete the remaining tasks outlined in the subsequent sections.
You have now set the management IP address of your SD-WAN appliance, and can connect to the appliance from any location in your network.
Management interface allow list
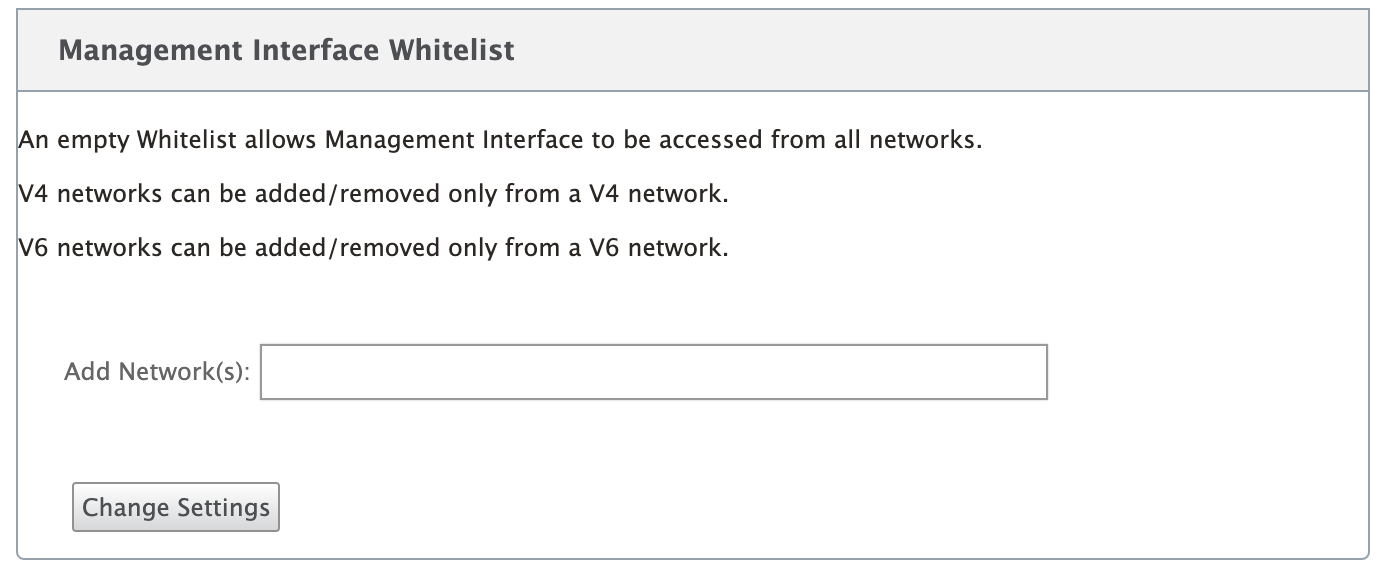
Allowed list is an approved list of IP addresses or IP domains that have permission to access your management interface. An empty list allows Management Interface to be accessed from all networks. You can add IP addresses to ensure that the management IP address is accessible only by the trusted networks.
To add or remove an IPv4 address to the allowed list, you must access the SD-WAN appliance management interface using an IPv4 address only. Similarly, to add or remove an IPv6 address to the allowed list, you must access the SD-WAN appliance management interface using an IPv6 address only.
