-
Software installation and upgrade
-
Virtual WAN software upgrade to 9.3.5 with working Virtual WAN deployment
-
USB reimage utility
-
-
-
-
This content has been machine translated dynamically.
Dieser Inhalt ist eine maschinelle Übersetzung, die dynamisch erstellt wurde. (Haftungsausschluss)
Cet article a été traduit automatiquement de manière dynamique. (Clause de non responsabilité)
Este artículo lo ha traducido una máquina de forma dinámica. (Aviso legal)
此内容已经过机器动态翻译。 放弃
このコンテンツは動的に機械翻訳されています。免責事項
이 콘텐츠는 동적으로 기계 번역되었습니다. 책임 부인
Este texto foi traduzido automaticamente. (Aviso legal)
Questo contenuto è stato tradotto dinamicamente con traduzione automatica.(Esclusione di responsabilità))
This article has been machine translated.
Dieser Artikel wurde maschinell übersetzt. (Haftungsausschluss)
Ce article a été traduit automatiquement. (Clause de non responsabilité)
Este artículo ha sido traducido automáticamente. (Aviso legal)
この記事は機械翻訳されています.免責事項
이 기사는 기계 번역되었습니다.책임 부인
Este artigo foi traduzido automaticamente.(Aviso legal)
这篇文章已经过机器翻译.放弃
Questo articolo è stato tradotto automaticamente.(Esclusione di responsabilità))
Translation failed!
USB reimage utility
The SD-WAN USB reimage utility allows repurposing of hardware by installing a clean factory image from a bootable USB stick. Citrix provides a USB stick Field Replaceable Unit (FRU) with a preloaded SD-WAN software image. Use the USB FRU to reimage the appliance to the required supported editions (SE/PE/AE). The appliance license/ configuration used determines the appliance edition.
The following table provides details on the available USB FRU images and the editions supported by SD-WAN appliances.
| Appliance | USB FRU image | Supported Editions |
|---|---|---|
| Citrix SD-WAN 110 | 11.1.1.39 | SE |
| Citrix SD-WAN 210 | 10.2.7.17 | SE, AE |
| Citrix SD-WAN 410 | 10.2.3.32 | SE |
| Citrix SD-WAN 1100 | 10.2.7.17 | SE, PE, AE |
| Citrix SD-WAN 2100 | 10.2.7.17 | SE, PE |
| Citrix SD-WAN 4100 | 10.2.7.17 | SE |
| Citrix SD-WAN 5100 | 10.2.7.17 | SE, PE |
| Citrix SD-WAN 6100 | 10.2.7.17 | SE, PE |
To perform a USB reimage:
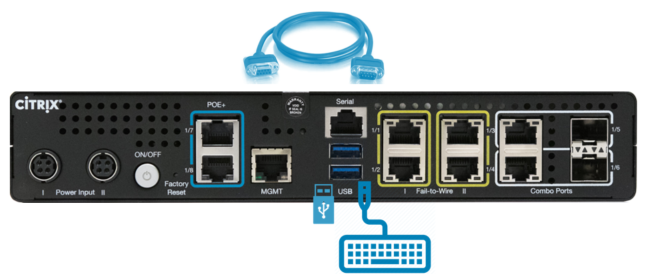
- Insert the USB stick provided by Citrix® into one of the USB ports of the appliance.
-
Connect a USB Keyboard to another USB port.
Tip
If there is a single USB port on the appliance, use a USB splitter to connect both the USB stick and the USB keyboard.

- Log into the serial console as an administrator and issue the reboot appliance command through the CLI.
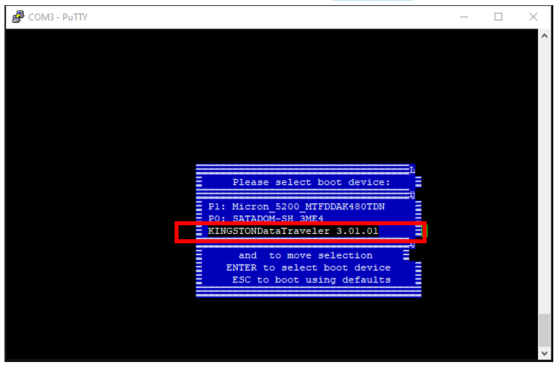
- On boot up continuously press the F11 key on the USB connected keyboard or SHFT+ESC+1 via serial console connection.
-
Select the USB drive from the boot device menu and press Enter.

-
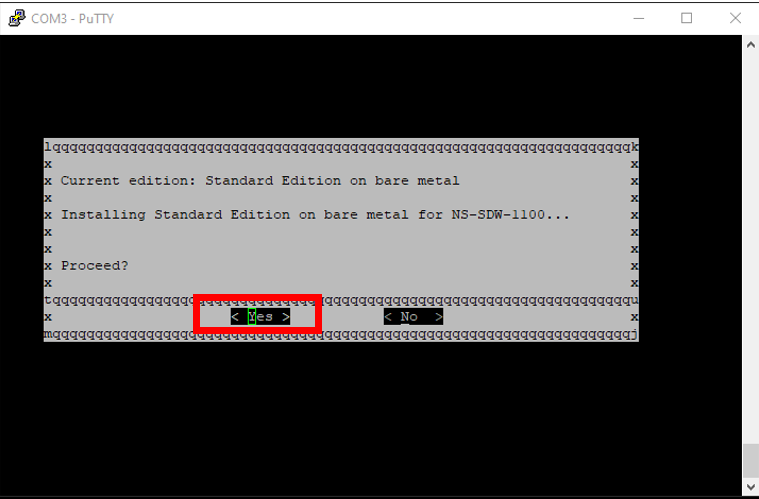
Depending on the Edition supported for the platform a screen appears requesting permission to proceed with the installation. Select Yes.

Note
For PE and AE reimage, the appliance may appear in the GUI as Standard Edition until the appropriate OS and PE/AE license installation is done.
The installation takes 30 minutes to complete. Do not power off the appliance during the reimaging process. It may reboot several times.
-
The factory image has DHCP enabled by default. The default management IP address on all platforms is 192.168.100.1. Use it to access the SD-WAN GUI.
You can also manually configure the management IP from the serial console by issuing the following commands:
Issue command ‘management_ip’
Issue command ‘set interface 192.168.100.1 255.255.255.0 192.168.100.254’
Issue command ‘apply’
-
The software, by default, is upgrade to SE. Install the PE, or AE license as required depending on the editions supported by the appliance.
Note
You can configure and manage AE capabilities through the SD-WAN Orchestrator only. For more information see, Edge security.
Share
Share
In this article
This Preview product documentation is Cloud Software Group Confidential.
You agree to hold this documentation confidential pursuant to the terms of your Cloud Software Group Beta/Tech Preview Agreement.
The development, release and timing of any features or functionality described in the Preview documentation remains at our sole discretion and are subject to change without notice or consultation.
The documentation is for informational purposes only and is not a commitment, promise or legal obligation to deliver any material, code or functionality and should not be relied upon in making Cloud Software Group product purchase decisions.
If you do not agree, select I DO NOT AGREE to exit.