NetScaler virtual CPU licensing
Important:
File based licensing system (also referred to as manually managed entitlements), traditionally used for activating various on-premises components, will be End of Life (EOL) on April 15, 2026. License Activation Service (LAS) is the next generation technology for product activations across the suite of Citrix products. LAS will be the only way to activate and license NetScaler instances after April 15, 2026, supporting NetScaler Flexed licenses (CPL/UHMC), legacy NetScaler Pooled licenses, and NetScaler Fixed term Bandwidth licenses. To remain supported, your NetScaler and NetScaler Console deployments must be on a LAS compatible version.
The minimum required NetScaler® versions that are LAS compatible are:
NetScaler ADCs: 14.1 51.x, 13.1 60.x, 13.1 37.x (FIPS)
NetScaler SVM: 14.1 51.x, 13.1 60.x
NetScaler Console Service: will support LAS from early September.
All the other forms of legacy NetScaler licenses such as Pooled vCPU, CICO, perpetual will not be supported with LAS. NetScaler instances leveraging perpetual licenses without an active maintenance will become unlicensed upon upgrade to the above mentioned software versions.
LAS based licenses may not be available to customers where prohibited by law or regulations.
If you have questions or concerns, contact Customer Care. Citrix may limit or suspend your Citrix Maintenance for non-compliance with these requirements without liability in addition to any other remedies Citrix may have at law or equity. These requirements don’t apply where prohibited by law or regulation.
Read the following note before procededing further.
Note:
vCPU license is no longer available for purchase. For more information, see Licensing.
Data center administrators like you are moving to newer technologies that simplify network functions while offering lower costs and greater scalability. Newer data center architecture must include the following features in the least:
- Software-defined networking (SDN)
- Network functions virtualization (NFV)
- Network virtualization (NV)
- Micro-services
Such a movement also needs the software requirements to be dynamic, flexible, and agile to meet the ever-changing business needs. Licenses are also expected to be managed by a central management tool with full visibility into the usage.
Virtual CPU licensing for NetScaler VPX
Earlier, NetScaler VPX licenses were allocated based on the bandwidth consumption by the instances. A NetScaler VPX is restricted to use a specific bandwidth and other performance metrics based on the license edition that it is bound to. To increase the available bandwidth, you must upgrade to a license edition that provides more bandwidth. In certain scenarios, the bandwidth requirement might be less, but the requirement is more for other L7 performance such as SSL TPS, compression throughput, and so on. Upgrading the NetScaler VPX license might not be suitable in such cases. But you might still have to buy a license with large bandwidth to unlock the system resources required for CPU-intense processing. NetScaler ADM now supports allocating licenses to NetScaler instance based on the virtual CPU requirements.
In the virtual CPU-usage-based licensing feature, the license specifies the number of CPUs that a particular NetScaler VPX is entitled to. So, the NetScaler VPX can check out licenses for only the number of virtual CPUs running on it from the license server. NetScaler VPX checks out licenses depending on the number of CPUs running in the system. NetScaler VPX does not consider the idle CPUs while checking out the licenses.
Similar to pooled license capacity and CICO licensing functionalities, the NetScaler ADM license server manages a separate set of virtual CPU licenses. Here also, the three editions managed for virtual CPU licenses are Standard, Advanced, and Premium. These editions unlock the same set of features as those unlocked by the editions for bandwidth licenses.
There might be a change in the number of virtual CPUs or when there is a change in the license edition. In such a case, you must always shut down the instance before you initiate a request for a new set of licenses. Restart the NetScaler VPX after checking out the licenses.
To configure licensing server in NetScaler VPX using GUI:
-
In NetScaler VPX, navigate to System > Licenses and click Manage Licenses.
-
On the License page, click Add New License.
-
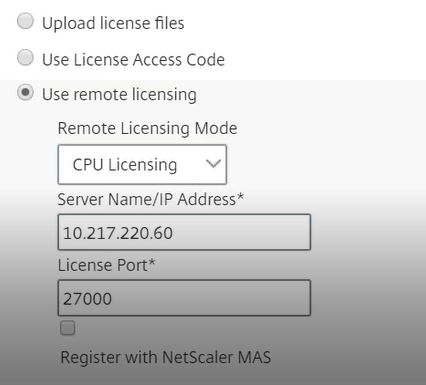
On the Licenses page, select the Use remote licensing option.
-
Select CPU licensing from the Remote Licensing Mode list.
-
Type the IP address of the license server and the port number.
-
Click Continue.

Note
You must always register NetScaler VPX instance with NetScaler ADM. If not done already, enable Register with NetScaler ADM and type NetScaler ADM login credentials.
-
In the Allocate licenses window, select the type of license. The window displays the total and the available virtual CPUs and also the CPUs that can be allocated. Click Get Licenses.
-
Click Reboot on the next page to apply for the licenses.

Note
You can also release the current license and check out from a different edition. For example, you are already running Standard edition license on your instance. You can release that license and then check out from Advanced edition.
Configuring licensing server in NetScaler VPX license using CLI
In the NetScaler VPX console, type the following commands for the following two tasks:
-
To add the licensing server to the NetScaler VPX:
add licenseserver <IP address of the license server> <!--NeedCopy--> -
To apply for the licenses:
set capacity -vcpu - edition premium
<!--NeedCopy-->
When prompted, reboot the instance by typing the following command:
reboot -w
<!--NeedCopy-->
Update a licensing server IP address
You can update the licensing server IP address in the VPX instance, without any impact on the allocated license bandwidth on the instance and data loss. To update the licensing server IP address, type the following command on the VPX instance:
add licenseserver <licensing server IP address> -forceUpdateIP
This command connects to the new server and release the resources associated with the previous licensing server.
Managing virtual CPU licenses on NetScaler ADM
-
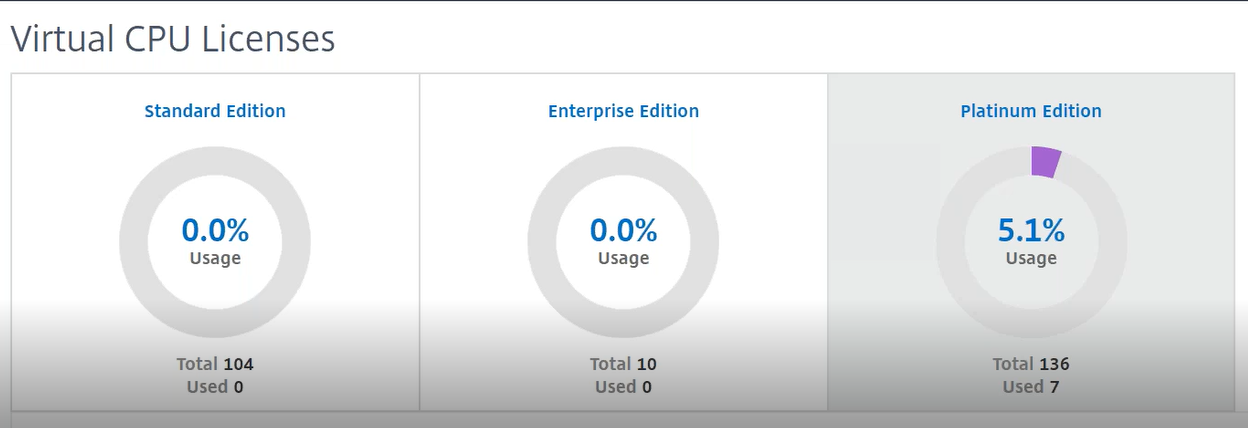
In NetScaler ADM, navigate to Infrastructure > Pooled Licensing > Pooled VCPU.
-
The page displays the licenses allocated for each type of license edition.
-
Click the number within each donut to view the NetScaler instances that are using this license.

Virtual CPU licensing for NetScaler CPX
While provisioning the NetScaler CPX instance, you can configure the NetScaler CPX instance to check out licenses from the license server depending on the CPU usage on the instance.
NetScaler CPX relies on the license server, running on NetScaler ADM, to manage the licenses. NetScaler CPX checks out the licenses from the license server when it is starting up. The licenses are checked in back to the license server when the NetScaler CPX shuts down.
You can download the NetScaler CPX image from the Quay container registry using the ‘docker pull’ command and deploy it on your environment.
There are three license types available for CPX licensing:
-
Virtual CPU subscription licenses supported for CPX and VPX
-
Pooled Capacity licenses
-
CP1000 licenses that support single to multiple vCPUs for CPX only
To configure vCPU subscription licenses while provisioning the NetScaler CPX instance:
Specify the number of vCPU licenses that the NetScaler CPX instance uses.
-
This value is entered as an environment variable through Docker, Kubernetes, or Mesos/Marathon.
-
The target variable is “CPX_CORES.” The CPX can support from 1 to 16 cores.
To specify 2 cores, you can perform the docker run command as follows:
docker run -dt -P --privileged=true --ulimit core=-1 -v<host_dir>:/cpx -e EULA=yes -e CPX_CORES=2
<!--NeedCopy-->
While provisioning a NetScaler CPX instance, define the NetScaler Licensing Server as an environmental variable in the docker run command as shown below:
docker run -dt -P --privileged=true --ulimit core=-1 -v<host_dir>:/cpx -e EULA=yes -e CPX_CORES=2 -e LS_IP=<LS_IP_ADDRESS> -e LS_PORT=<LS_PORT> cpx:11.1
<!--NeedCopy-->
Where,
-
<LS_IP_ADDRESS> is the IP address of the NetScaler Licensing Server.
-
<LS_PORT> is the port of the NetScaler Licensing Server. By default, the port is 27000.
Note
By default, the NetScaler CPX instance checks out the license from the vCPU subscription pool. The CPX instance checks out an “n” number of licenses if the instance is running with “n” CPUs.
To configure NetScaler Pooled Capacity or CP1000 licenses while provisioning the NetScaler CPX instance:
If you want to check out licenses for the CPX instance using the pooled licensing (bandwidth-based) or the CPX private pool (CP1000 or private-pool-based), you must provide the environment variables accordingly.
For example,
docker run -dt -P --privileged=true --ulimit core=-1 -v<host_dir>:/cpx -e EULA=yes -e CPX_CORES=2 -e LS_IP=<LS_IP_ADDRESS> -e LS_PORT=<LS_PORT> -e PLATFORM=CP1000 cpx:11.1
<!--NeedCopy-->
CP1000. This command triggers the checkout from CP1000 pool (CPX private pool). The NetScaler CPX instance then retrieves “n” number of instances for “n” number of cores specified for CPX_CORES. The most common use case is to specify n = 1 for a checkout of a single instance. Multicore CPX use cases check out “n” vCPUs (where “n” is from 1 to 7).
docker run -dt -P --privileged=true --ulimit core=-1 -v<host_dir>:/cpx -e EULA=yes -e CPX_CORES=2 -e LS_IP=<LS_IP_ADDRESS> -e LS_PORT=<LS_PORT> -e BANDWIDTH=2000 cpx:11.1
<!--NeedCopy-->
Pooled capacity. This command checks out one license from the instance pool and consumes 1000 Mbps of bandwidth from the Premium bandwidth pool yet enables CPX to run up to 2000 Mbps. In Pooled Licensing, the first 1000 Mbps is not charged.
Note
Specify the corresponding number of vCPUs for the desired target bandwidth when checking out from the bandwidth pool as detailed in the following table:
Number of cores (vCPU) Maximum bandwidth 1 1000 Mbps 2 2000 Mbps 3 3500 Mbps 4 5000 Mbps 5 6500 Mbps 6 8000 Mbps 7 9300 Mbps