Deploy Citrix SD-WAN™ Standard Edition instance on Azure
Citrix SD-WAN Standard Edition (SE) for Azure logically bonds multiple network links into a single secure logical virtual path. The solution enables organizations to use connections from different service providers including Broadband, MPLS, 4G/LTE, Satellite, and point-to-point links to get high resiliency virtual WAN paths. Citrix SD-WAN for Azure enables organizations to have a direct secure connection from each branch to the applications hosted in Azure, eliminating the need to backhaul cloud bound traffic through a data center. Some of the benefits of using Citrix SD-WAN in Azure are:
- Create direct connections from every location to Azure.
- Ensure an always-on connection to Azure.
- Extend your secure perimeter to the cloud.
- Evolve to a simple, easy to manage branch network.
For more details on topology, use case and manually provisioning an SD-WAN SE instance on Azure, see Deploy Citrix SD-WAN Standard Edition Instance on Azure.
Citrix SD-WAN Orchestrator service allows deploying a Citrix SD-WAN instance in Azure quickly and easily. Citrix SD-WAN Orchestrator service automates the process of provisioning a virtual machine in Azure while defining a cloud site. A new and unique resource group, specified by the user, is created in Azure for every cloud site. You can either choose the existing VNets/subnets under the resource group or create VNets/subnets used for provisioning. You can use a virtual machine instance template to deploy Citrix SD-WAN VPX directly from Citrix SD-WAN Orchestrator service. The interfaces and WAN link configurations are auto populated on the Orchestrator configuration based on the resources created in Azure. You can then stage and activate the configuration on the VPX instance through Citrix SD-WAN Orchestrator service.
As a prerequisite for deploying SD-WAN VPX instance on Azure, ensure that you have a Citrix SD-WAN Orchestrator service subscription and a Microsoft Azure service subscription.
To deploy an SD-WAN VPX instance on Azure:
-
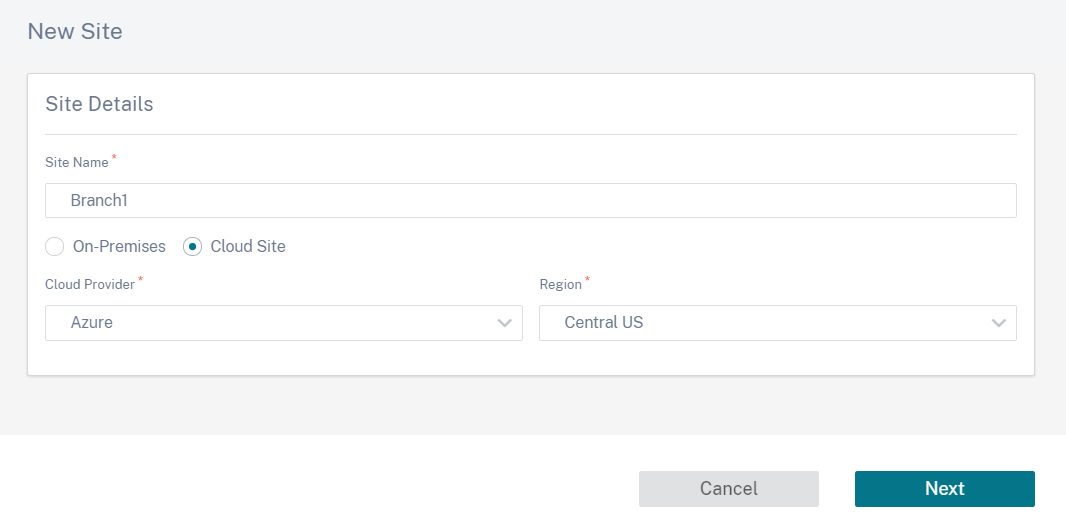
On the Network Dashboard, click + New site to create a cloud site. Provide a name for the site and select Cloud Site. Select Azure as the Cloud Provider and select the Azure Region where you want to deploy the SD-WAN instance.
-
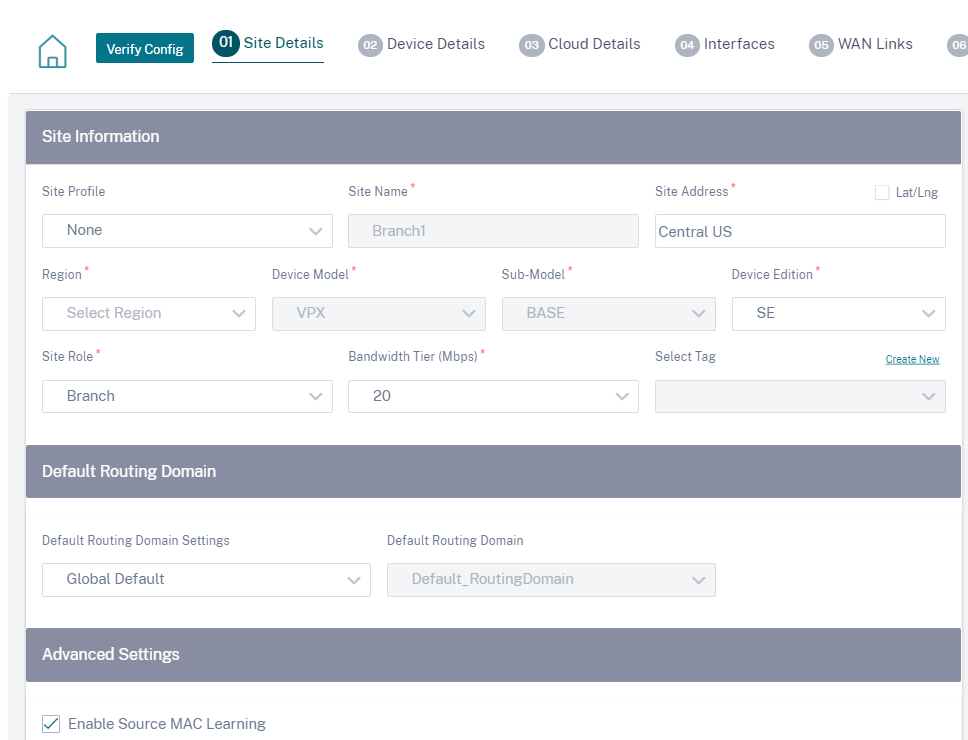
Provide the site details. For more details on site roles and advanced settings, see Site details.
Note
The Enable Source MAC Learning option stores the source MAC address of the received packets so that outgoing packets to the same destination can be sent to the same port.
-
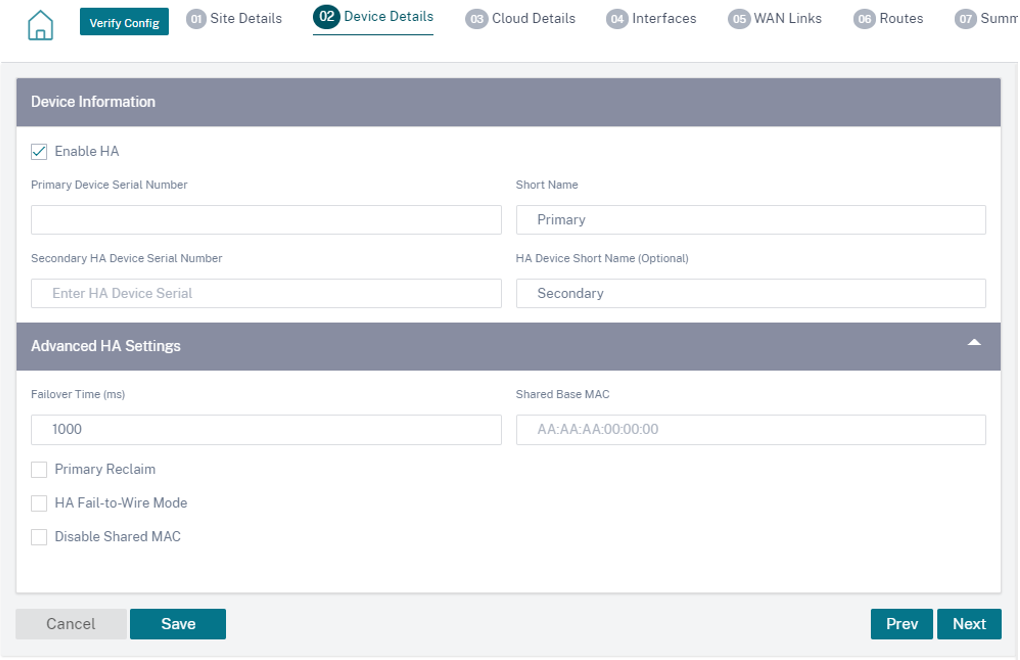
Enable High Availability (HA), if necessary. If HA is enabled, two virtual machines, a primary and a secondary virtual machine is created on Azure. You do not have to provide the device serial numbers. The device serial numbers are fetched automatically during provisioning. For more details on Advanced HA settings, see Device details. To allow traffic through HA on the Azure portal, see Internet breakout for Azure HA site.
-
Provide the Cloud service subscription details and the virtual machine configuration parameters.
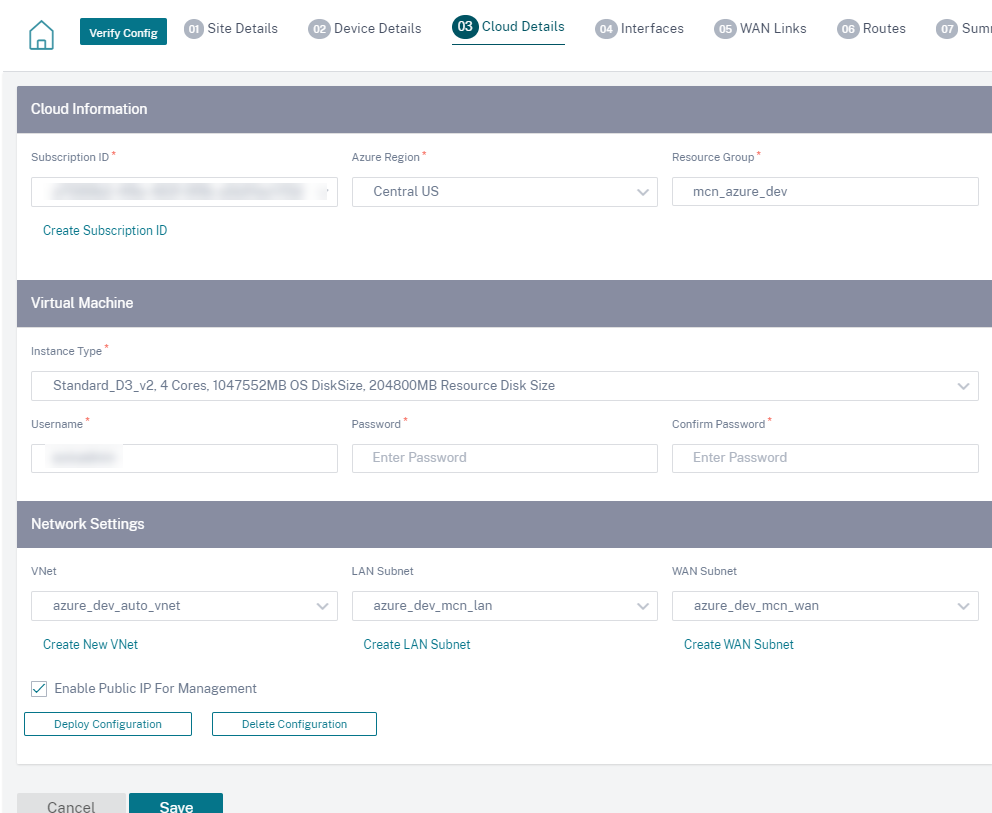
a. Click Create subscription ID. Provide the Subscription ID, Tenant ID, Application ID, and Secret key as available on your Azure portal. For information on where to find the subscription details on the Azure portal, see Identify Ids.
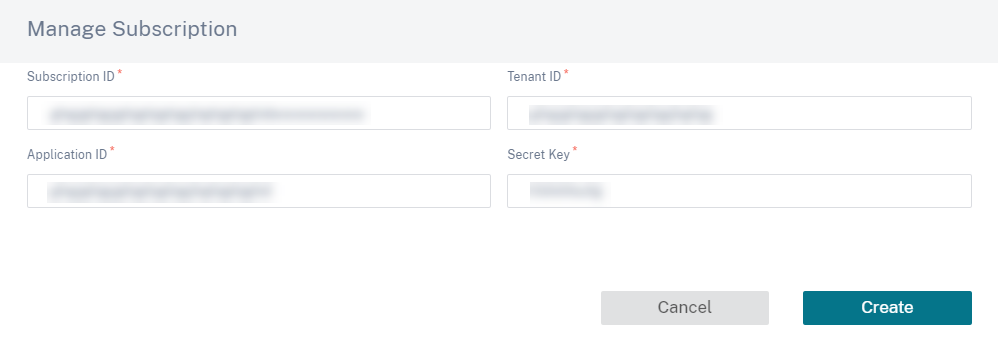
You can add multiple subscriptions. After the subscription details are saved, you can select a subscription ID. Specify the Azure region where you want to deploy the instance and provide a name for the new Resource Group.

b. Select one of the following virtual machine instance types as per your requirement and provide the login credentials. - Instance type D3_V2 for max uni-directional throughput of 200 Mbps with 16 max virtual paths/branches. - Instance type D4_V2 for max uni-directional throughput of 500 Mbps with 16 max virtual paths/branches. - Instance type F8 standard for max uni-directional throughput of 1 Gbps with 64 max virtual paths/branches. - Instance type F16 standard for max uni-directional throughput of 1 Gbps with 128 max virtual paths/branches.

Note
You cannot provision the instance with the user name admin, as it is a reserved name. However, to get admin access after provisioning the instance, use admin as the user name and the password created while provisioning the instance. If you use the user name created while provisioning the instance, you get read-only access.
Guidelines for user name:
- User name must only contain letters, numbers, hyphens, and underscore and must not start with a hyphen or number.
- User names must not include reserved words.
- The value is in between 1 and 64 characters long.
Guidelines for Password:
- The value must not be empty.
- Password must have three of the following:
- One lower case character
- One upper case character
- One Special character
- The value is in between 12 and 72 characters long.
c. Create a New VNet or select an existing VNet. Existing VNets are displayed based on the selected cloud subscription. For the selected VNet you can either select existing LAN and WAN subnets or create subnets. Ensure that the Enable public IP for Management option is selected and click Save.
Note
The LAN and WAN subnets must not be the same.

d. Click Deploy Configuration to create an SD-WAN VPX instance in Azure with the specified virtual machine and network settings. This would take about 10-15 minutes. The deployment status is displayed in the UI.
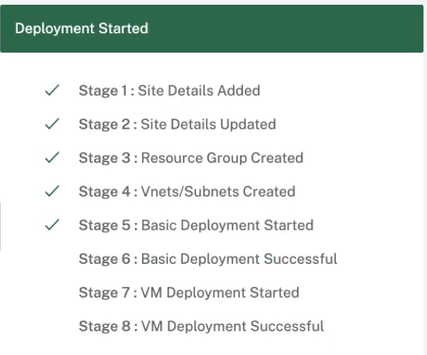
Note
- After the instance is created in Azure, proceed with the Stage and Activate process to upgrade the Azure VPX to the desired software version and configuration as defined in Orchestrator.
- After the deployment is initiated, you cannot make any changes to the Cloud site settings such as resource-group, VNets, subnets, user name, and password for VPX. If the deployment fails, you can provide revised settings before initiating the deployment.
- To remove the SD-WAN VPX instance from Azure and proceed with a clean deployment, click Delete Configuration. This does not delete the site from Citrix SD-WAN Orchestrator service. It only removes the SD-WAN VPX instance. You can provide revised cloud site details and proceed with deploying the configuration.
- To delete the virtual machine on Azure and free up resources, click Delete Configuration.
-
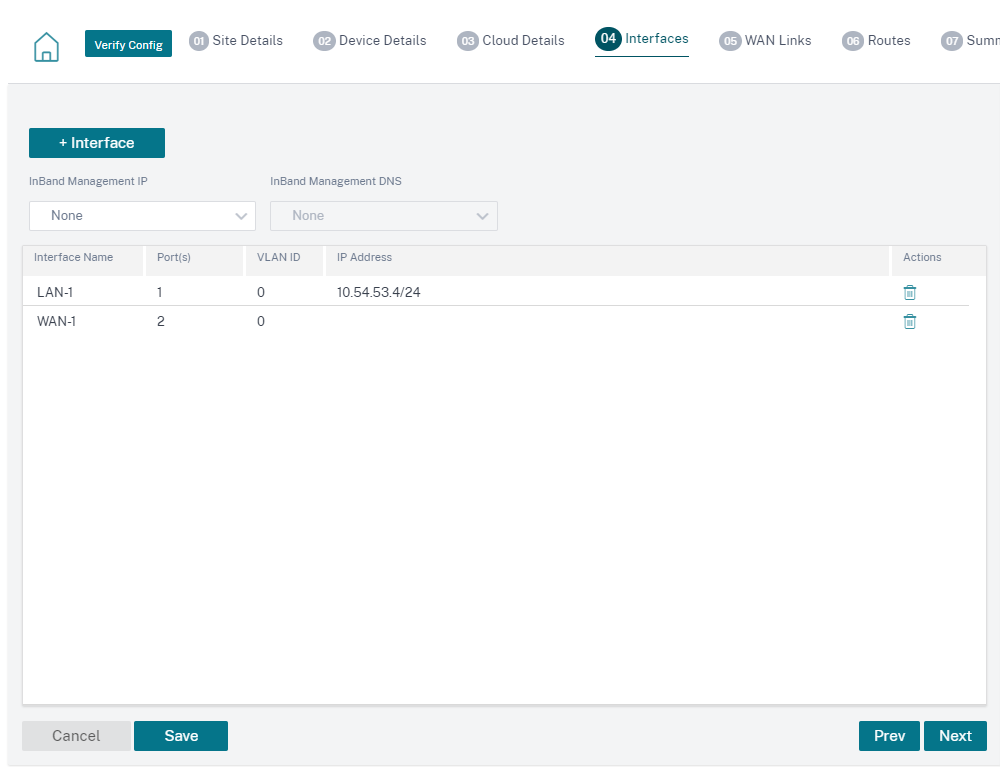
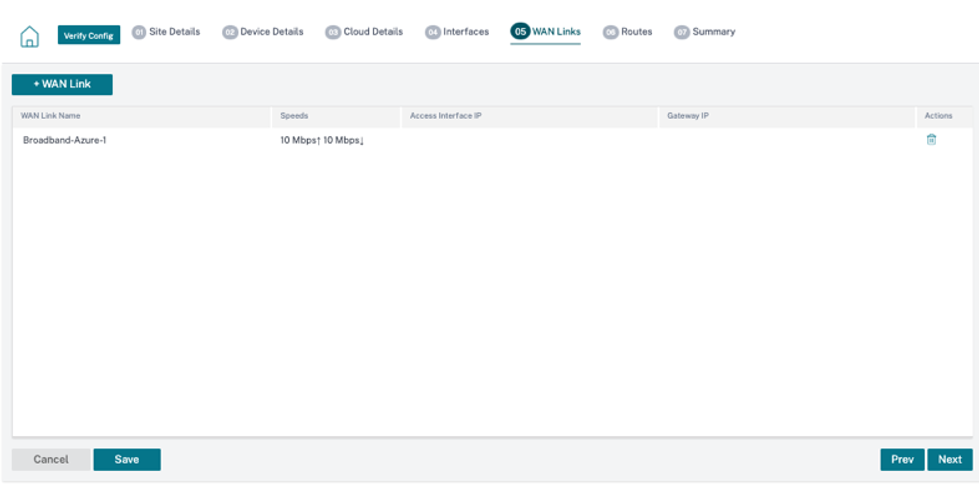
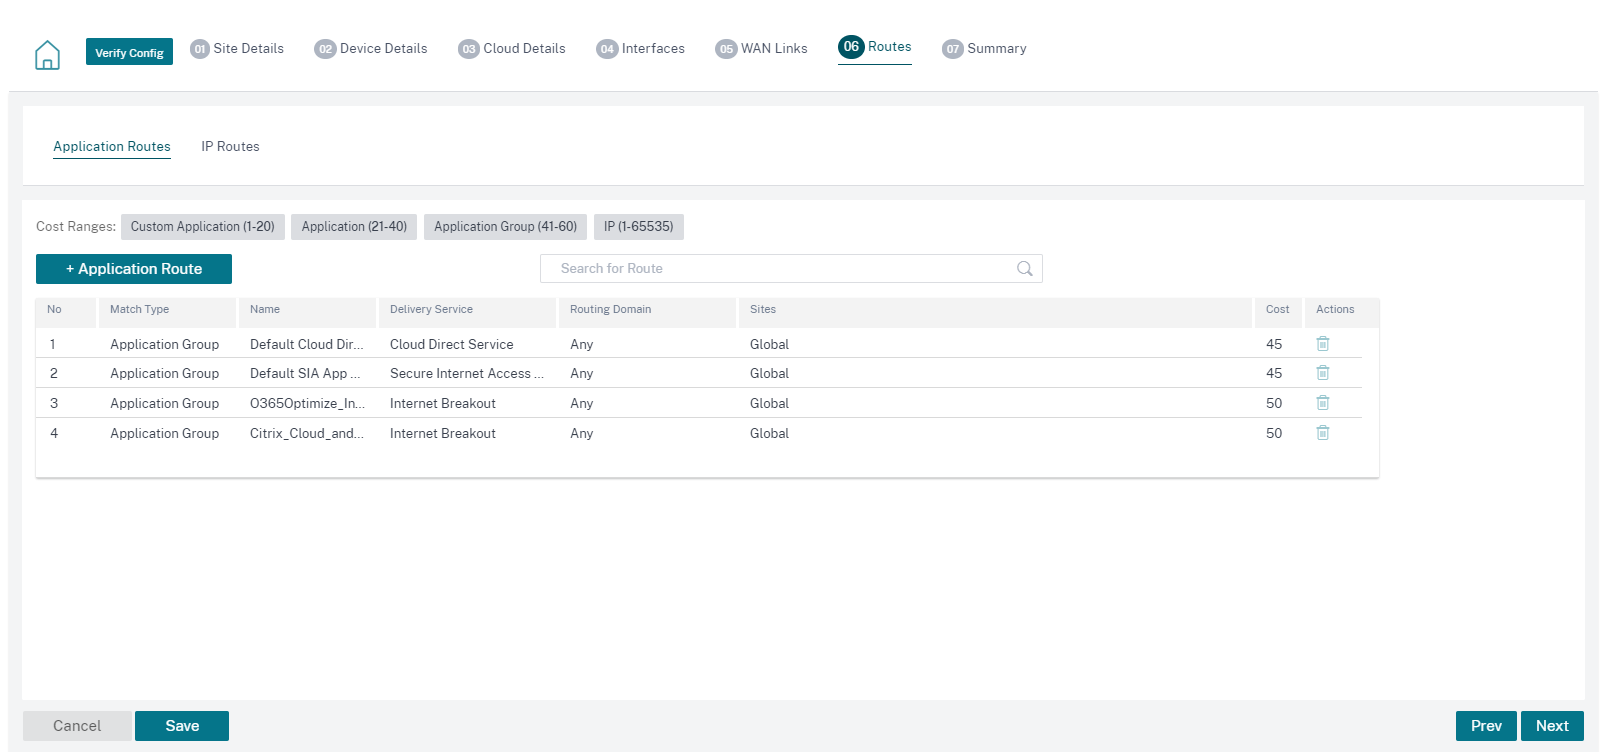
The interfaces, WAN links, and routes are auto-created based on the resources provisioned on Azure. You can navigate to the Interfaces, WAN links, and Routes tab to view the settings.
Note IPv4 addresses are used for the LAN, WAN, and access interface settings. IPv6 addresses are not yet supported.
-
After the virtual machine is deployed successfully, it takes about 5–10 min for the virtual machine to be up and running.
The Summary section provides a summary of the site details, interface details, and WAN link details. Click Save. Click Verify Config to populate the device serial number.
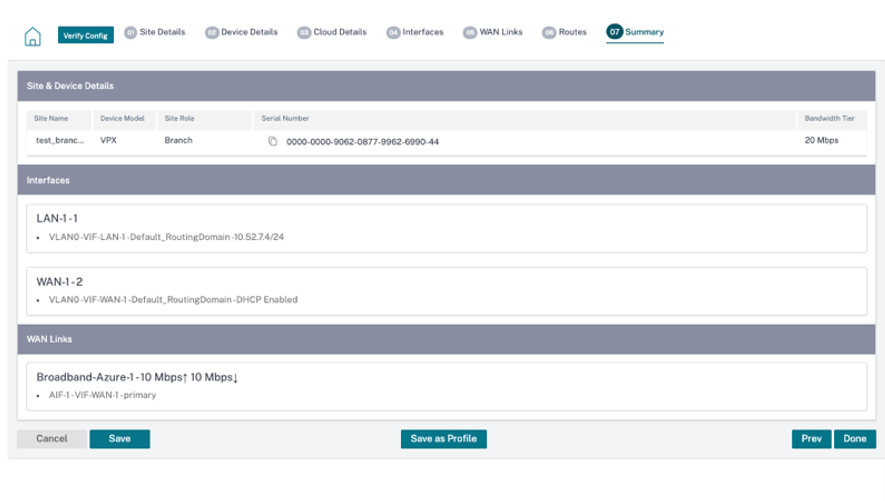
The Azure virtual machine is created and the configuration is ready. However, the configuration is not applied to the SD-WAN instance.
-
To push the configuration to the provisioned SD-WAN instance in Azure, navigate to Network Configuration: Home. Select the required software version and click Deploy Config / Software. For more details on staging and activation see, Deployment tracker.

After the Staging and Activation process is complete and the virtual paths are established. You can now manage and monitor the instance using Citrix SD-WAN Orchestrator service.
Create a service principal for deploying VPX in Azure
For the Citrix SD-WAN Orchestrator service to authenticate through Azure APIs and enable automated connectivity, a registered application must be created and identified with the following authentication credentials:
- Subscription ID
- Client ID
- Client Secret
- Tenant ID
Note
After creating the service principal to allow Azure API communication, ensure to associate appropriate roles at the subscription level. Otherwise, Citrix SD-WAN Orchestrator service will not have sufficient permissions to authenticate and deploy resources using Azure APIs that enable automated connectivity.
Perform the following steps to create an application registration:
- In the Azure portal, navigate to Azure Active Directory.
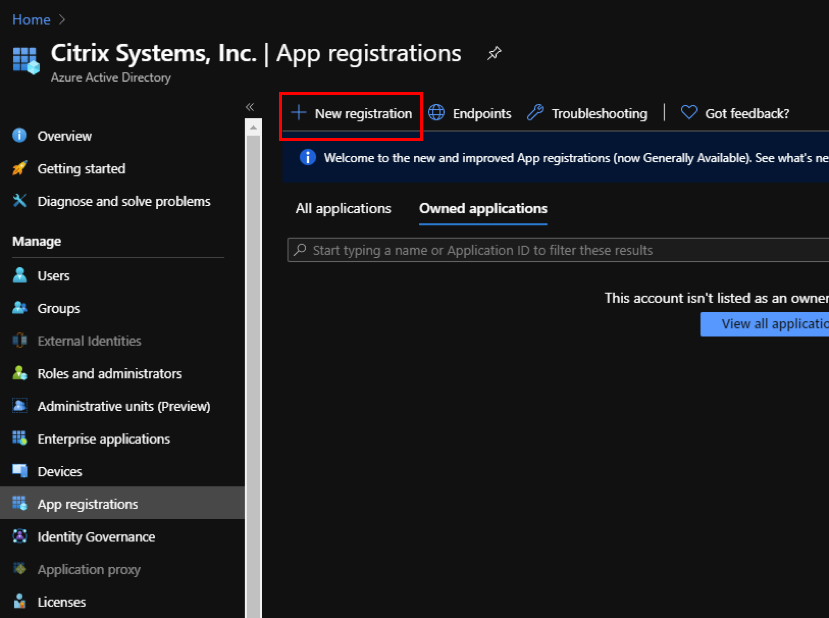
- Under Manage, select App registration.
-
Click + New registration.
-
Provide values for the following fields to register an application:
- Name – Provide the name for the application registration.
- Supported account types – select Accounts in this organizational directory only (* - Single tenant) option.
- Redirect URI (optional) – select Web from the drop-down list and enter a random, unique URL (for example, https:// localhost: 4980)
- Click Register.
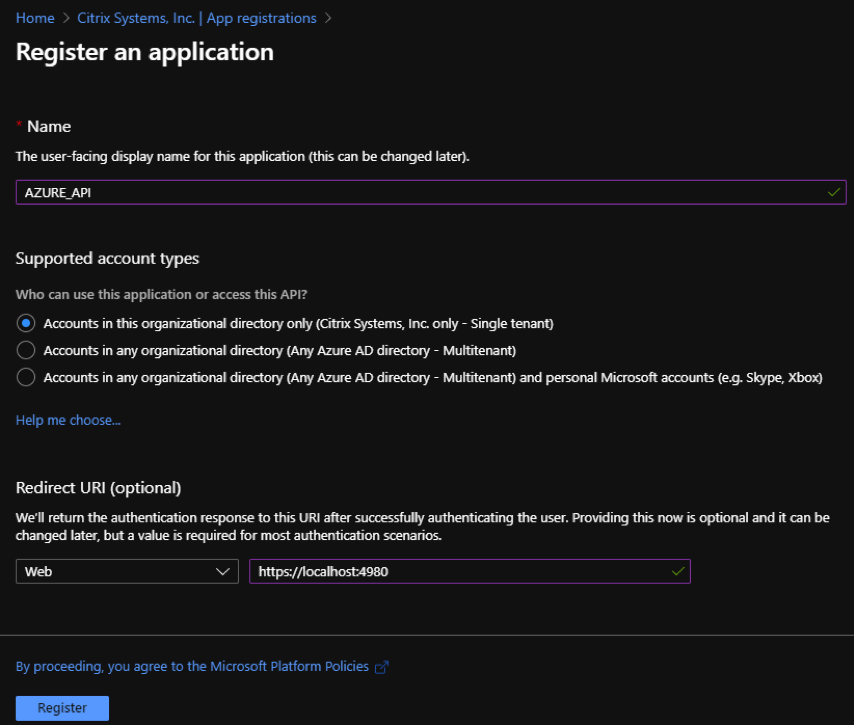
You can copy and store the Application (client) ID and the Directory (tenant) ID that can be used in the Citrix SD-WAN Orchestrator service for authentication to the Azure subscription for usage of the API.

The next step for the application registration, create a service principal key for authentication purposes.
To create the service principal key, perform the following steps:
- In the Azure portal, navigate to Azure Active Directory.
- Under Manage, navigate to App registration.
- Select the registered application (created previously).
- Under Manage, select Certificates & secrets.
-
Under Client secrets, click + New client secret.
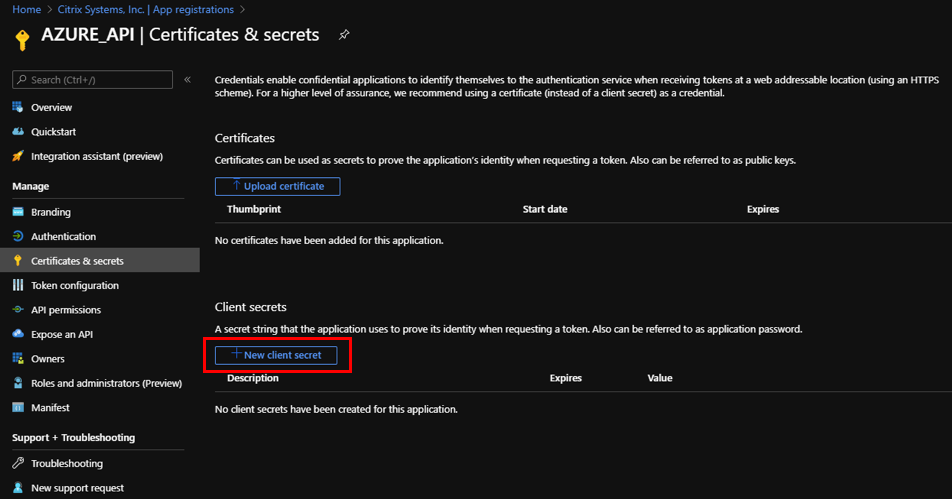
- To add a client secret, provide values for the following fields:
- Description: Provide a name for the service principal key.
- Expires: Select the duration for expiration as needed.
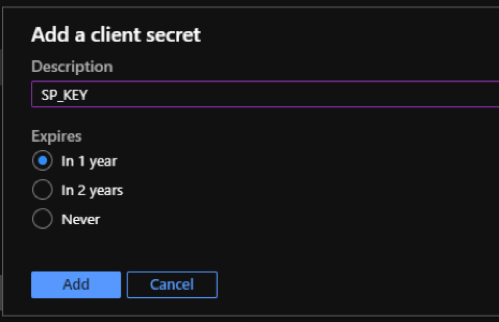
- Click Add.
-
The client secrete is disabled in the Value column. Copy the key to your clipboard. This is the Client Secret that you must enter into the Citrix SD-WAN Orchestrator service.
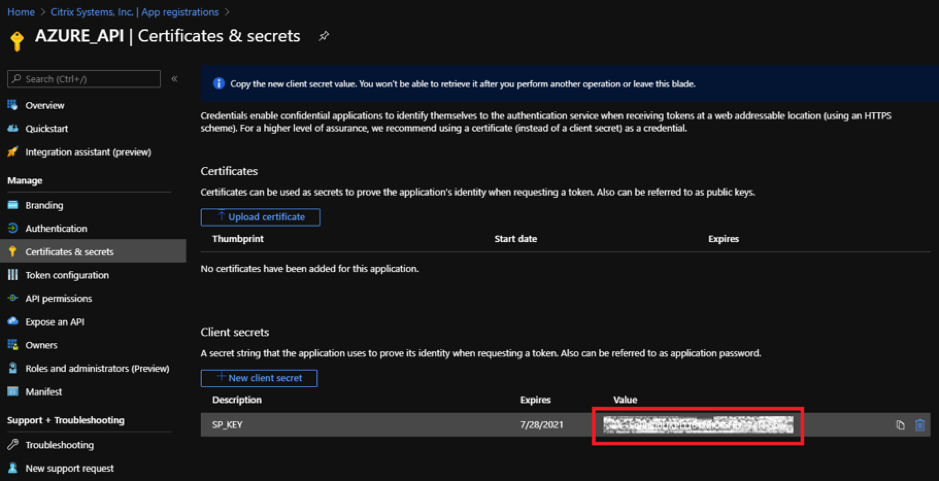
Note
Copy and store the secret key value before reloading the page because, it will no longer be displayed afterwards.
Role assignments
You can assign appropriate roles for an authentication purpose at the subscription-level. Perform the following steps for role assignment:
-
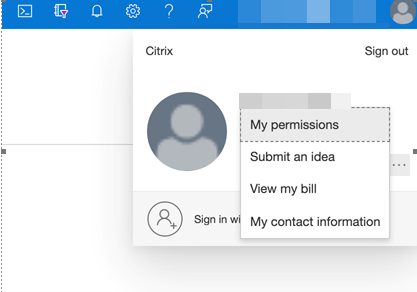
On the Azure portal, navigate to the profile name. Right-click the profile name and select My permissions.
-
On the My permissions page, select the Click here to view complete access details for this subscription link.

-
On the left navigation section go to Access control (IAM) and select the Role assignments tab and click +.

-
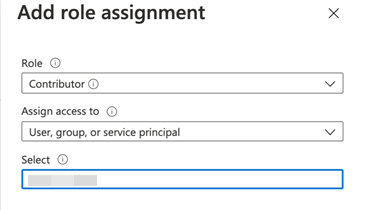
For “Add role assignment”, pick role = “Contributor”, Assign access to = “User,group or service principal” and for third drop-down list for Select = Azure App name and then “Save”. This grants enough privileges for making API call to Azure using service principal.
-
On the Add role assignment page, select the following options:
- Role: Contributor
- Assign access to: User, group, or service principal
- Select: Provide the name of the Azure app.
-
Click Save. These steps grant enough privileges for Citrix SD-WAN Orchestrator service to make an API call to Azure using service principal.
Internet breakout for Azure HA site
To configure internet breakout for Azure HA site:
- In the site appliance, configure DHCP IP on the WAN interface with Public IP configured for the WAN link.
- Configure Internet service on the Site.
- Add an Outbound Dynamic port restricted NAT with the inside service as Internet.
-
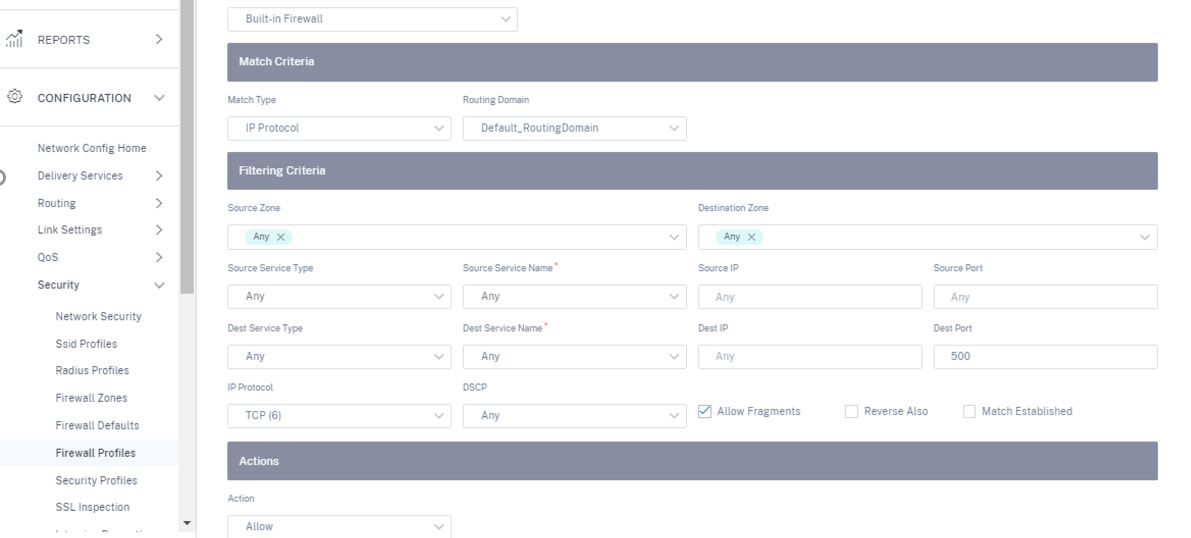
Add a firewall policy on the site to allow Azure load balancer health probes on port number 500.
-
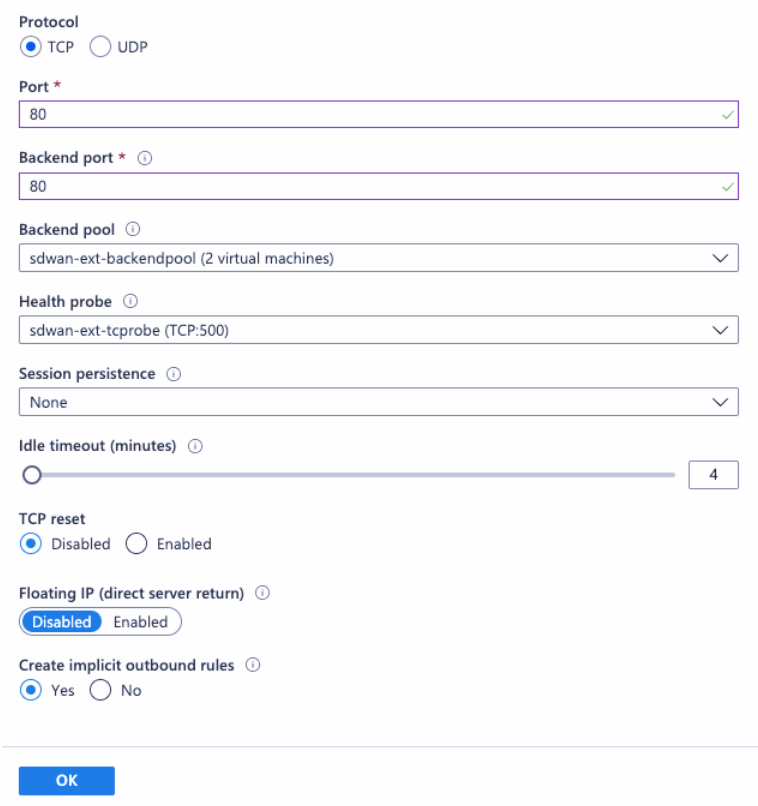
Add another load-balancing rule on the Azure external load balancer for TCP on port number 80, with direct server return disabled.
- On the end client machine that must breakout to the internet, set the route next hop IP address to the Internal Load Balancer private IP address. The load balancer IP address is configured as LAN VIP in the site.