Configure groups
In NetScaler ADM, a group can have both feature-level and resource-level access. For example, one group of users might have access to only selected NetScaler instances; another group with only a selected few applications, and so on.
When you create a group, you can assign roles to the group, provide application-level access to the group, and assign users to the group. All users in that group are assigned the same access rights in NetScaler® ADM.
You can manage a user access in NetScaler ADM at the individual level of network function entities. You can dynamically assign specific permissions to the user or group at the entity level.
NetScaler ADM treats virtual server, services, service groups, and servers as network function entities.
-
Virtual server (Applications) - Load Balancing(lb), GSLB, Context Switching (CS), Cache Redirection (CR), Authentication (
Auth), and NetScaler Gateway (VPN) - Services - Load balancing and GSLB services
- Service Group - Load balancing and GSLB Service groups
- Servers - Load balancing Servers
Create a user group
-
In NetScaler ADM, navigate to Settings > Users & Roles > Groups.
-
Click Add.
The Create System Group page is displayed.
-
In the Group Name field, enter the name of the group.
-
In the Group Description field, type in a description of your group. Providing a good description of the group helps you to understand the role and function of the group in a better way at a later point.
-
In the Roles section, add or move one or more roles to the Configured list.
Note:
Under the Available list, you can click New or Edit and create or modify roles. Alternatively, you can navigate to Settings > Users & Roles > Users and create or modify users.
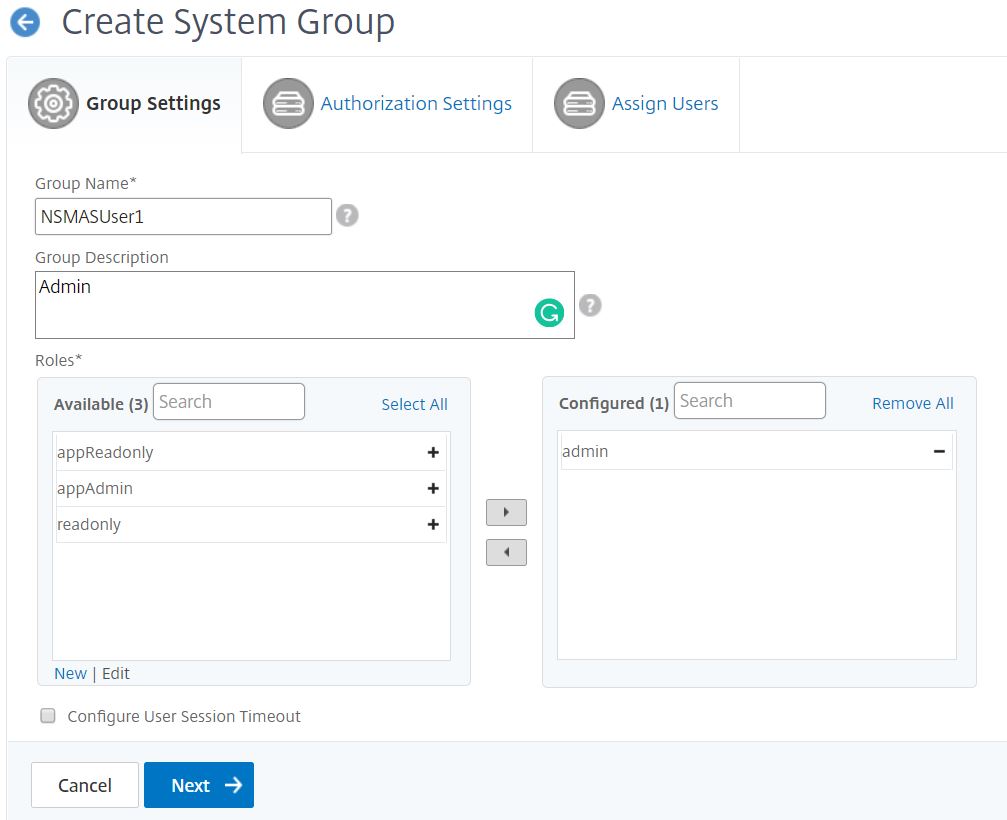
-
Click Next. On the Authorization Settings tab, you can provide authorization settings for the following resources:
- Autoscale™ Groups
- Instances
- Applications
- Configuration Templates
- StyleBooks
- Configpacks
- Domain Names
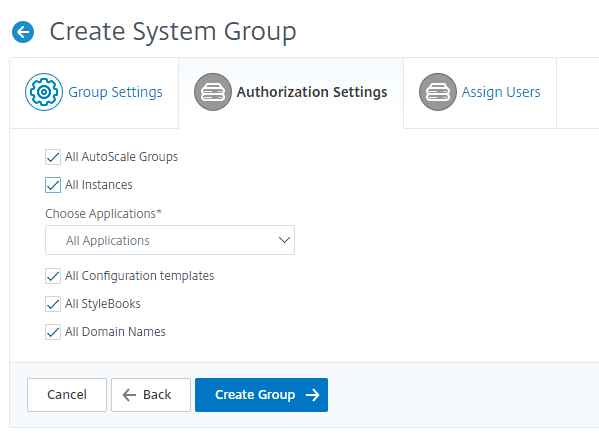
You might want to select specific resources from the categories to which users can have access.
Autoscale Groups:
If you want to select the specific Autoscale groups that a user can view or manage, perform the following steps:
-
Clear the All AutoScale Groups check box and click Add AutoScale Groups.
-
Select the required Autoscale groups from the list and click OK.
Instances:
If you want to select the specific instances that a user can view or manage, perform the following steps:
-
Clear the All Instances check box and click Select Instances.
-
Select the required instances from the list and click OK.

Applications:
The Choose Applications list allows you to grant access to a user for the required applications.
You can grant access to applications without selecting their instances. Because applications are independent of their instances to grant user access.
When you grant a user access to an application, the user is authorized to access only that application regardless of instance selection.
This list provides you the following options:
-
All Applications: This option is selected by default. It adds all the applications that are present in the NetScaler ADM.
-
All Applications of selected instances: This option appears only if you select instances from the All Instances category. It adds all the applications present on the selected instance.
-
Specific Applications: This option allows you to add the required applications that you want users to access. Click Add Applications and select the required applications from the list.
-
Select Individual Entity Type: This option allows you to select a specific type of network function entity and corresponding entities.
You can either add individual entities or select all entities under the required entity type to grant access to a user.
The Apply on bound entities also option authorizes the entities that are bound to the selected entity type. For example, if you select an application and select Apply on bound entities also, NetScaler ADM authorizes all the entities that are bound to the selected application.
Note:
Ensure you have selected only one entity type if you want to authorize bound entities.
You can use regular expressions to search and add the network function entities that meet the regex criteria for the groups. The specified regex expression is persisted in NetScaler ADM. To add regular expression, perform the following steps:
-
Click Add Regular Expression.
-
Specify the regular expression in the text box.
The following image explains how to use regular expression to add an application when you select the Specific Applications option:

The following image explains how to use regular expression to add network function entities when you choose the Select the Individual Entity Type option:
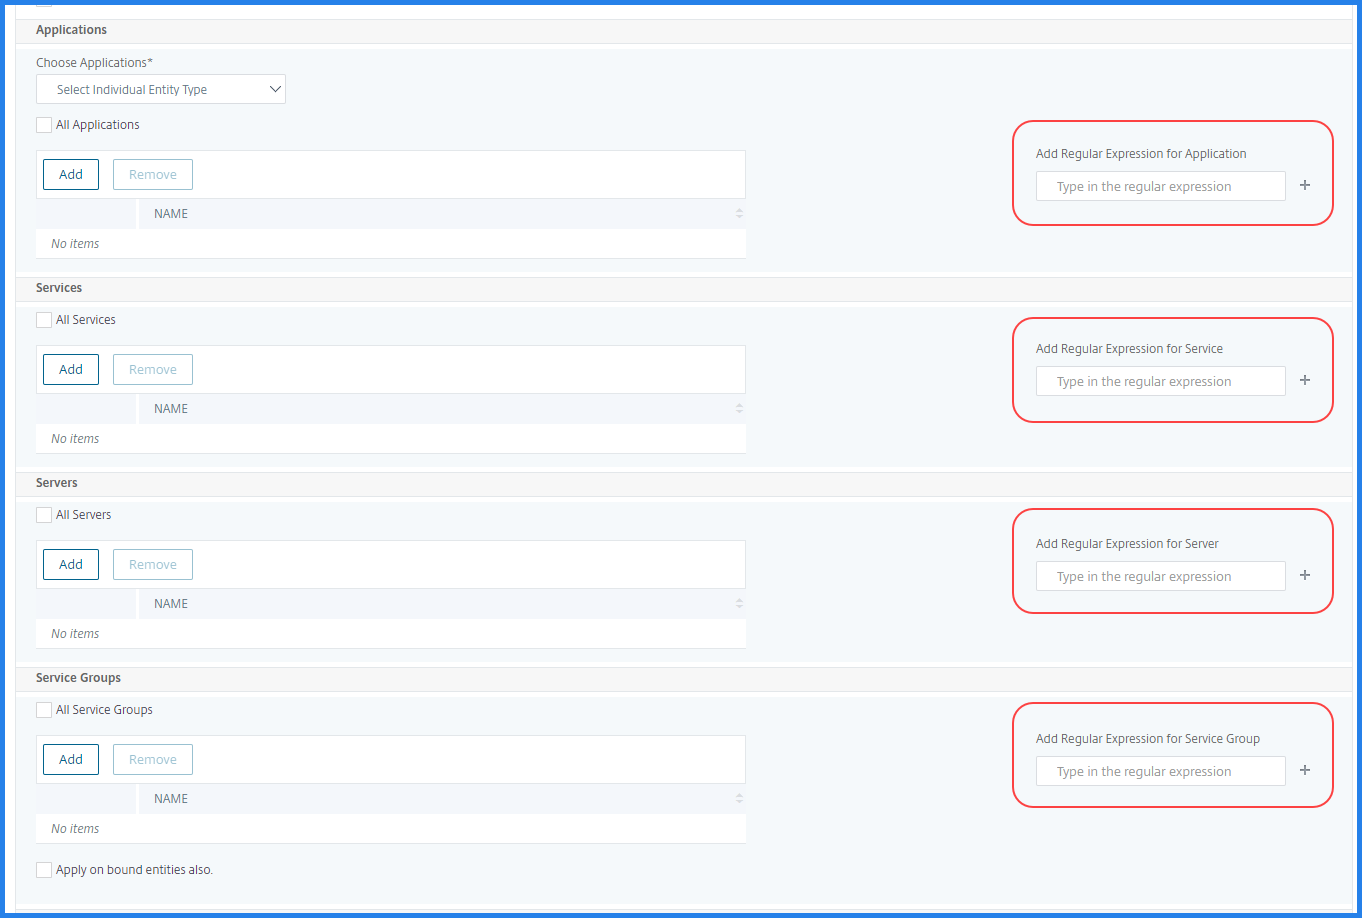
If you want to add more regular expressions, click the + icon.
Note:
The regular expression only matches the server name for the Servers entity type and not the server IP address.
If you select the Apply on bound entities also option for a discovered entity, a user can automatically access the entities that are bound to the discovered entity.
The regular expression is stored in the system to update the authorization scope. When the new entities match the regular expression of their entity type, NetScaler ADM updates the authorization scope to the new entities.
Configuration Templates:
If you want to select the specific configuration template that a user can view or manage, perform the following steps:
-
Clear the All Configuration templates check box and click Add Configuration Template.
-
Select the required template from the list and click OK.
StyleBooks:
If you want to select the specific StyleBook that a user can view or manage, perform the following steps:
-
Clear the All StyleBooks check box and click Add StyleBook to Group. You can either select individual StyleBooks or specify a filter query to authorize StyleBooks.
If you want to select the individual StyleBooks, select the StyleBooks from the Individual StyleBooks pane and click Save Selection.
If you want to use a query to search StyleBooks, select the Custom Filters pane. A query is a string of key-value pairs where keys are
name,namespace, andversion.You can also use regular expressions as values to search and add StyleBooks that meet regex criteria for the groups. A custom filter query to search StyleBooks supports both
AndandOroperation.Example:
name=lb-mon|lb AND namespace=com.citrix.adc.stylebooks AND version=1.0
<!--NeedCopy-->
This query lists the StyleBooks that meet the following conditions:
- StyleBook name is either
lb-monorlb. - StyleBook namespace is
com.citrix.adc.stylebooks. - StyleBook version is
1.0.
Use an
Oroperation between value expressions that is defined to the key expression.Example:
- The
name=lb-mon|lbquery is valid. It returns the StyleBooks having a name eitherlb-monorlb. - The
name=lb-mon | version=1.0query is invalid.
Press
Enterto view the search results and click Save Query.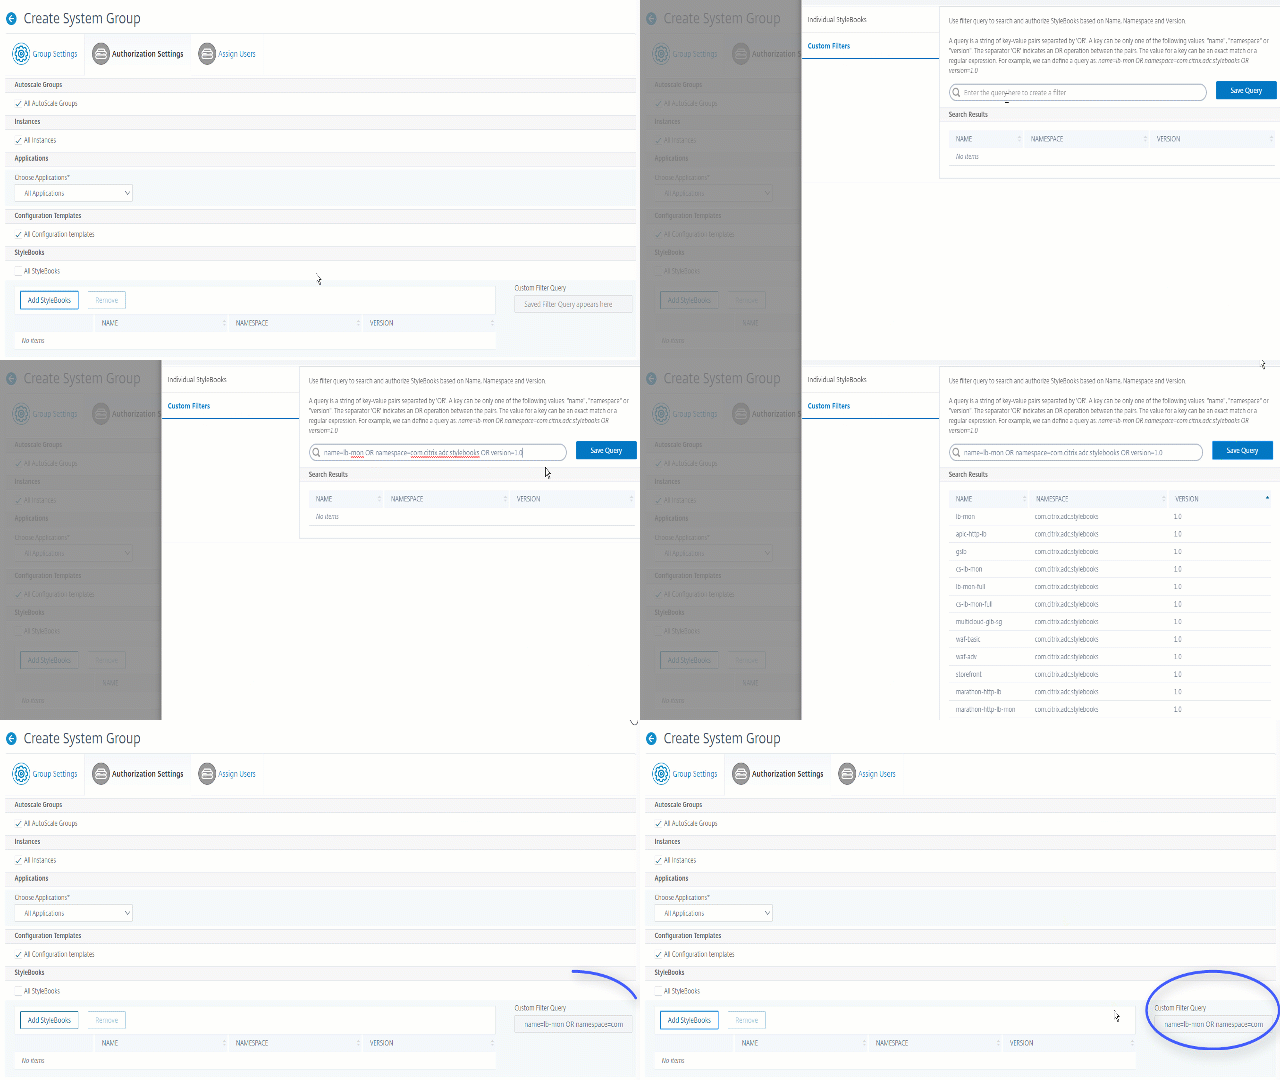
The saved query appears in the Custom Filters Query. Based on the saved query, the ADM provides user access to those StyleBooks.
- StyleBook name is either
-
Select the required StyleBooks from the list and click OK.
You can select the required StyleBooks when you create groups and add users to that group. When your user selects the permitted StyleBook, all dependent StyleBooks are also selected.
Configpacks:
In Configpacks, select one of the following options:
-
All Configrations: This option is selected by default. It adds all the configuration packs that are in ADM.
-
All Configrations of the selected StyleBooks: This option adds all the configuration packs of the selected StyleBook.
-
Specific Configurations: This option allows you to add the required cofiguration packs.
You can select the required configuration packs when you create groups and add users to that group.
Domain Names:
If you want to select the specific domain name that a user can view or manage, perform the following steps:
-
Clear the All Domain Names check box and click Add Domain Name.
-
Select the required domain names from the list and click OK.
-
Click Create Group.
-
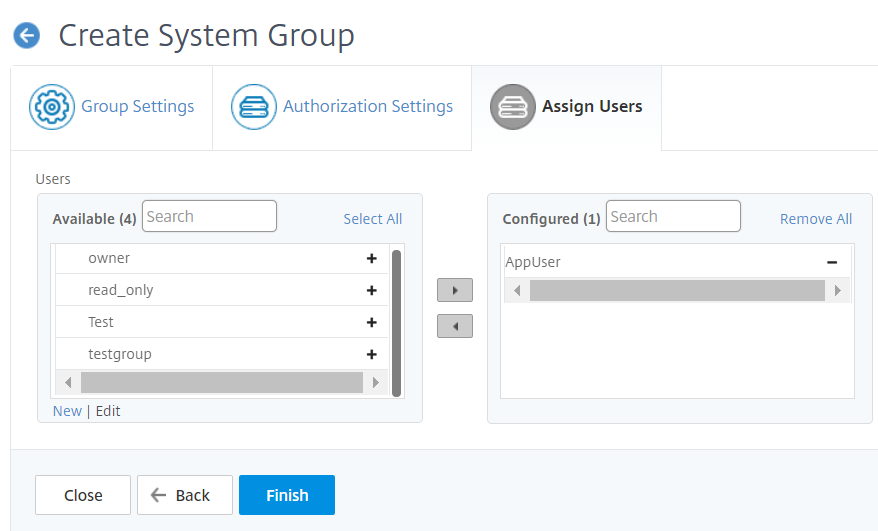
In the Assign Users section, select the user in the Available list, and add the user to the Configured list.
Note:
You can also add users by clicking New.
-
Click Finish.
Manage user access across multiple network function entities
As an administrator, you can manage user access at the individual level of network function entities in NetScaler ADM. And, you can dynamically assign specific permissions to the user or a group at the entity level by using the regular expression filter.
This document describes how to define user authorization at the entity level.
Before you begin, create a group. See Configure groups on NetScaler ADM for more information.
Usage scenario:
Consider a scenario where one or more applications (virtual servers) are hosted on the same server. A super administrator (George) wants to grant Steve (an application administrator) access only to App1 and not to the hosting server.
The following table illustrates this environment, where Server-A hosts applications App-1 and App-2.
| Host Server | Application (virtual server) | Service | Service group |
|---|---|---|---|
| Server A | App1 | App-service-1 | App-service-group-1 |
| Server A | App2 | App-service-2 | App-service-group-2 |
Note
NetScaler ADM treats virtual server, services, service groups, and servers as network function entities. The entity type virtual server is referred as an application.
To assign user permissions to network function entities, George defines the user authorization as follows:
-
Navigate to Account > User Administration > Groups and add a group.
-
In the Authorization Settings tab, select Choose Applications.
-
Choose Select Individual Entity Type.
-
Select the All Applications entity type and add the App-1 entity from the available list.
-
Click Create Group.
-
In Assign users, select the users who require the permission. For this scenario, George selects Steve’s user profile.
-
Click Finish.
With this authorization setting, Steve can manage only App-1 and not other network function entities.
Note:
Ensure the Apply on bound entities also option is cleared. Otherwise, NetScaler ADM grants access to all network function entities that are bound to App-1. As a result, grants access to the hosting server as well.
A super administrator can specify the regular expressions (regex) for each entity type. The regular expression is stored in the system to update the user authorization scope. When new entities match the regular expression of their entity type, NetScaler ADM can dynamically grant users access to the specific network function entities.
To grant user permissions dynamically, the super administrator can add regular expressions in the Authorization Settings tab.
In this scenario, George adds App* as a regular expression for the Applications entity type and the applications that match the regex criteria appear in the list. With this authorization setting, Steve can access all the applications that match the App* regex. However, his access is limited only to the applications not to the hosted server.
How user access changes based on the authorization scope
When an administrator adds a user to a group that has different access policy settings, the user is mapped to more than one authorization scopes and access policies.
In this case, the ADM grants the user access to applications depending on the specific authorization scope.
Consider a user who is assigned to a group that has two policies Policy-1 and Policy-2.
-
Policy-1 – View only permission to applications.
-
Policy-2 – View and Edit permission to applications.
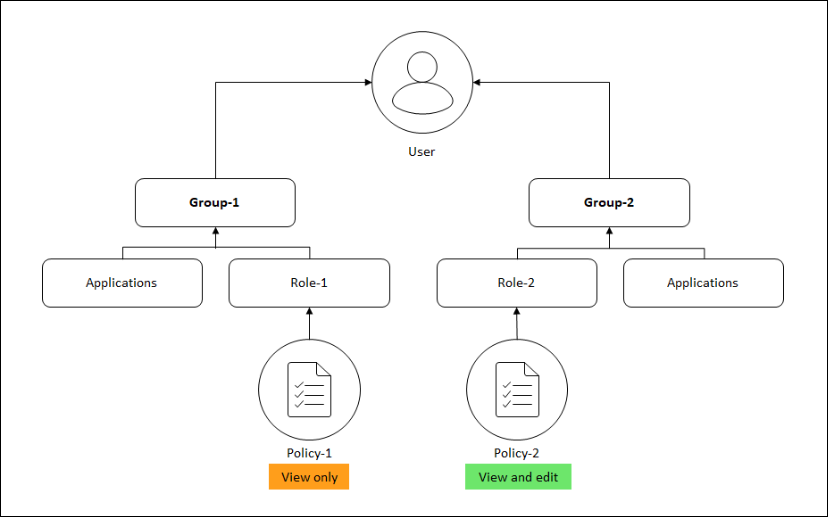
The user can view the applications specified in Policy-1. Also, this user can view and edit the applications specified in Policy-2. The edit access to Group-1 applications are restricted as it is not under Group-1 authorization scope.
Mapping of RBAC when upgrading NetScaler ADM from 12.0 to later releases
When you upgrade NetScaler ADM from 12.0 to 13.1, you do not see the options to provide “read-write” or “read” permissions while creating groups. These permissions have been replaced by “roles and access policies,” which give you more flexibility to provide role-based permissions to the users. The following table shows how the permissions in release 12.0 are mapped to release 13.1:
| 12.0 | Allow Applications Only | 13.1 |
|---|---|---|
| admin read-write | False | admin |
| admin read-write | True | appAdmin |
| admin read-only | False | readonly |
| admin read-only | True | appReadonly |