Edge security
The Citrix SD-WAN™ Edge security capabilities enable advanced security on Citrix SD-WAN branch appliances. It simplifies information security management for protecting the branch network from internet threats by providing a single management and reporting pane for various security functionalities along with SD-WAN. It eliminates the need for multiple branch solutions, by consolidating routing, SD-WAN, and security capabilities on a single appliance and reduces network complexity and costs. The Edge Security stack includes the following security functionality:
- Web filtering
- Anti-Malware
- Intrusion Prevention
Edge Security functionality is available on Citrix SD-WAN Advanced Edition appliances. For more information on Editions, see Citrix SD-WAN Platform Editions and Citrix SD-WAN Platform software support. For more information on supported appliances, see the Citrix SD-WAN Data Sheet.
Note
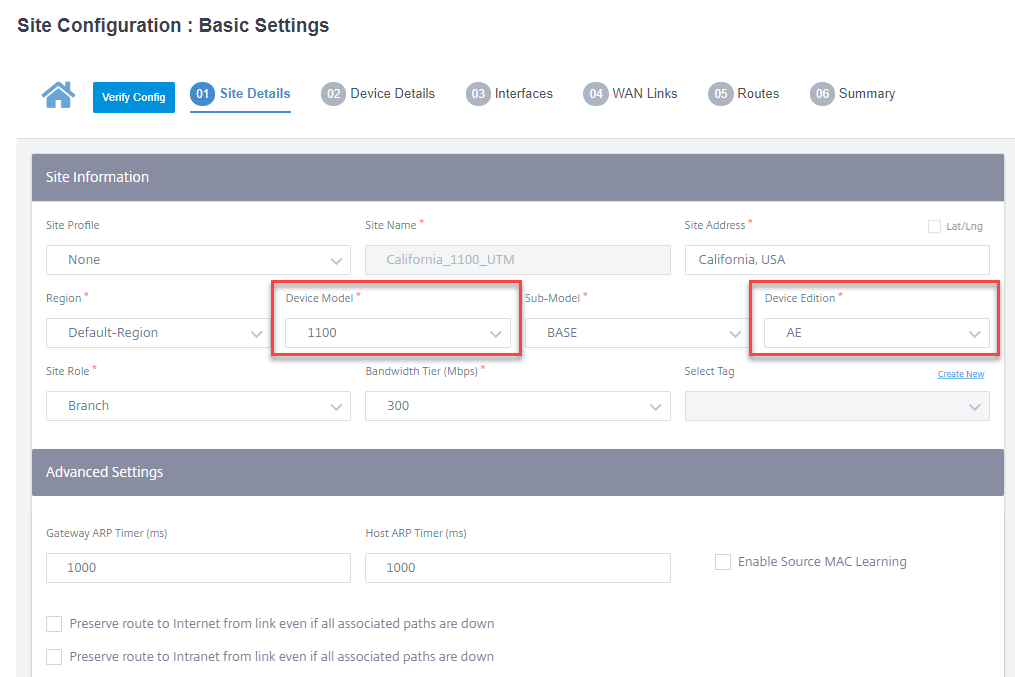
The Citrix SD-WAN Advanced Edition is supported on the Citrix SD-WAN 1100 appliance only.
Since the Edge Security feature is compute sensitive, Citrix® advises to use the Advanced Edition appliance only at branch sites that do not already have a next generation firewall solution.
While configuring a branch site with Edge Security capabilities, ensure that a Device Model that supports Advanced Edition is selected and the Device Edition is AE. For more details on adding and configuring a site, see Site Configuration.
Citrix SD-WAN Orchestrator for On-premises allows you to define security profiles for Edge Security capabilities and associate these security profiles with firewall policies. The firewall policies are enhanced to accept security profiles parameters that specify the advanced security capabilities.
Note
You can create security profiles and configure Edge Security features through the Citrix SD-WAN Orchestrator for On-premises only.
Security profiles
A security profile is a set of specific edge security options that is applied to a specific segment of traffic define by a firewall policy. The intention is to protect the traffic from security threats. For example, you can define security profiles with different levels of security and access rights for different segments of your network. You can enable and configure Web filtering, Anti-Malware, and Intrusion Prevention settings for each security profile.
The security profiles are then associated to firewall policies to set the criteria for the traffic to be inspected. For example, in an organization, you can create different security profiles for employee subnets and guest firewall zones. You can then assign the security profile to an appropriate firewall policy that matches employee and guest traffic respectively.
To create a security profile, at the network level navigate to Configuration > Security > Security Profile and click New Security Profile.

Provide a name and a description for the security profile. Enable and configure Web filtering, Anti-Malware, and Intrusion Prevention settings as required.
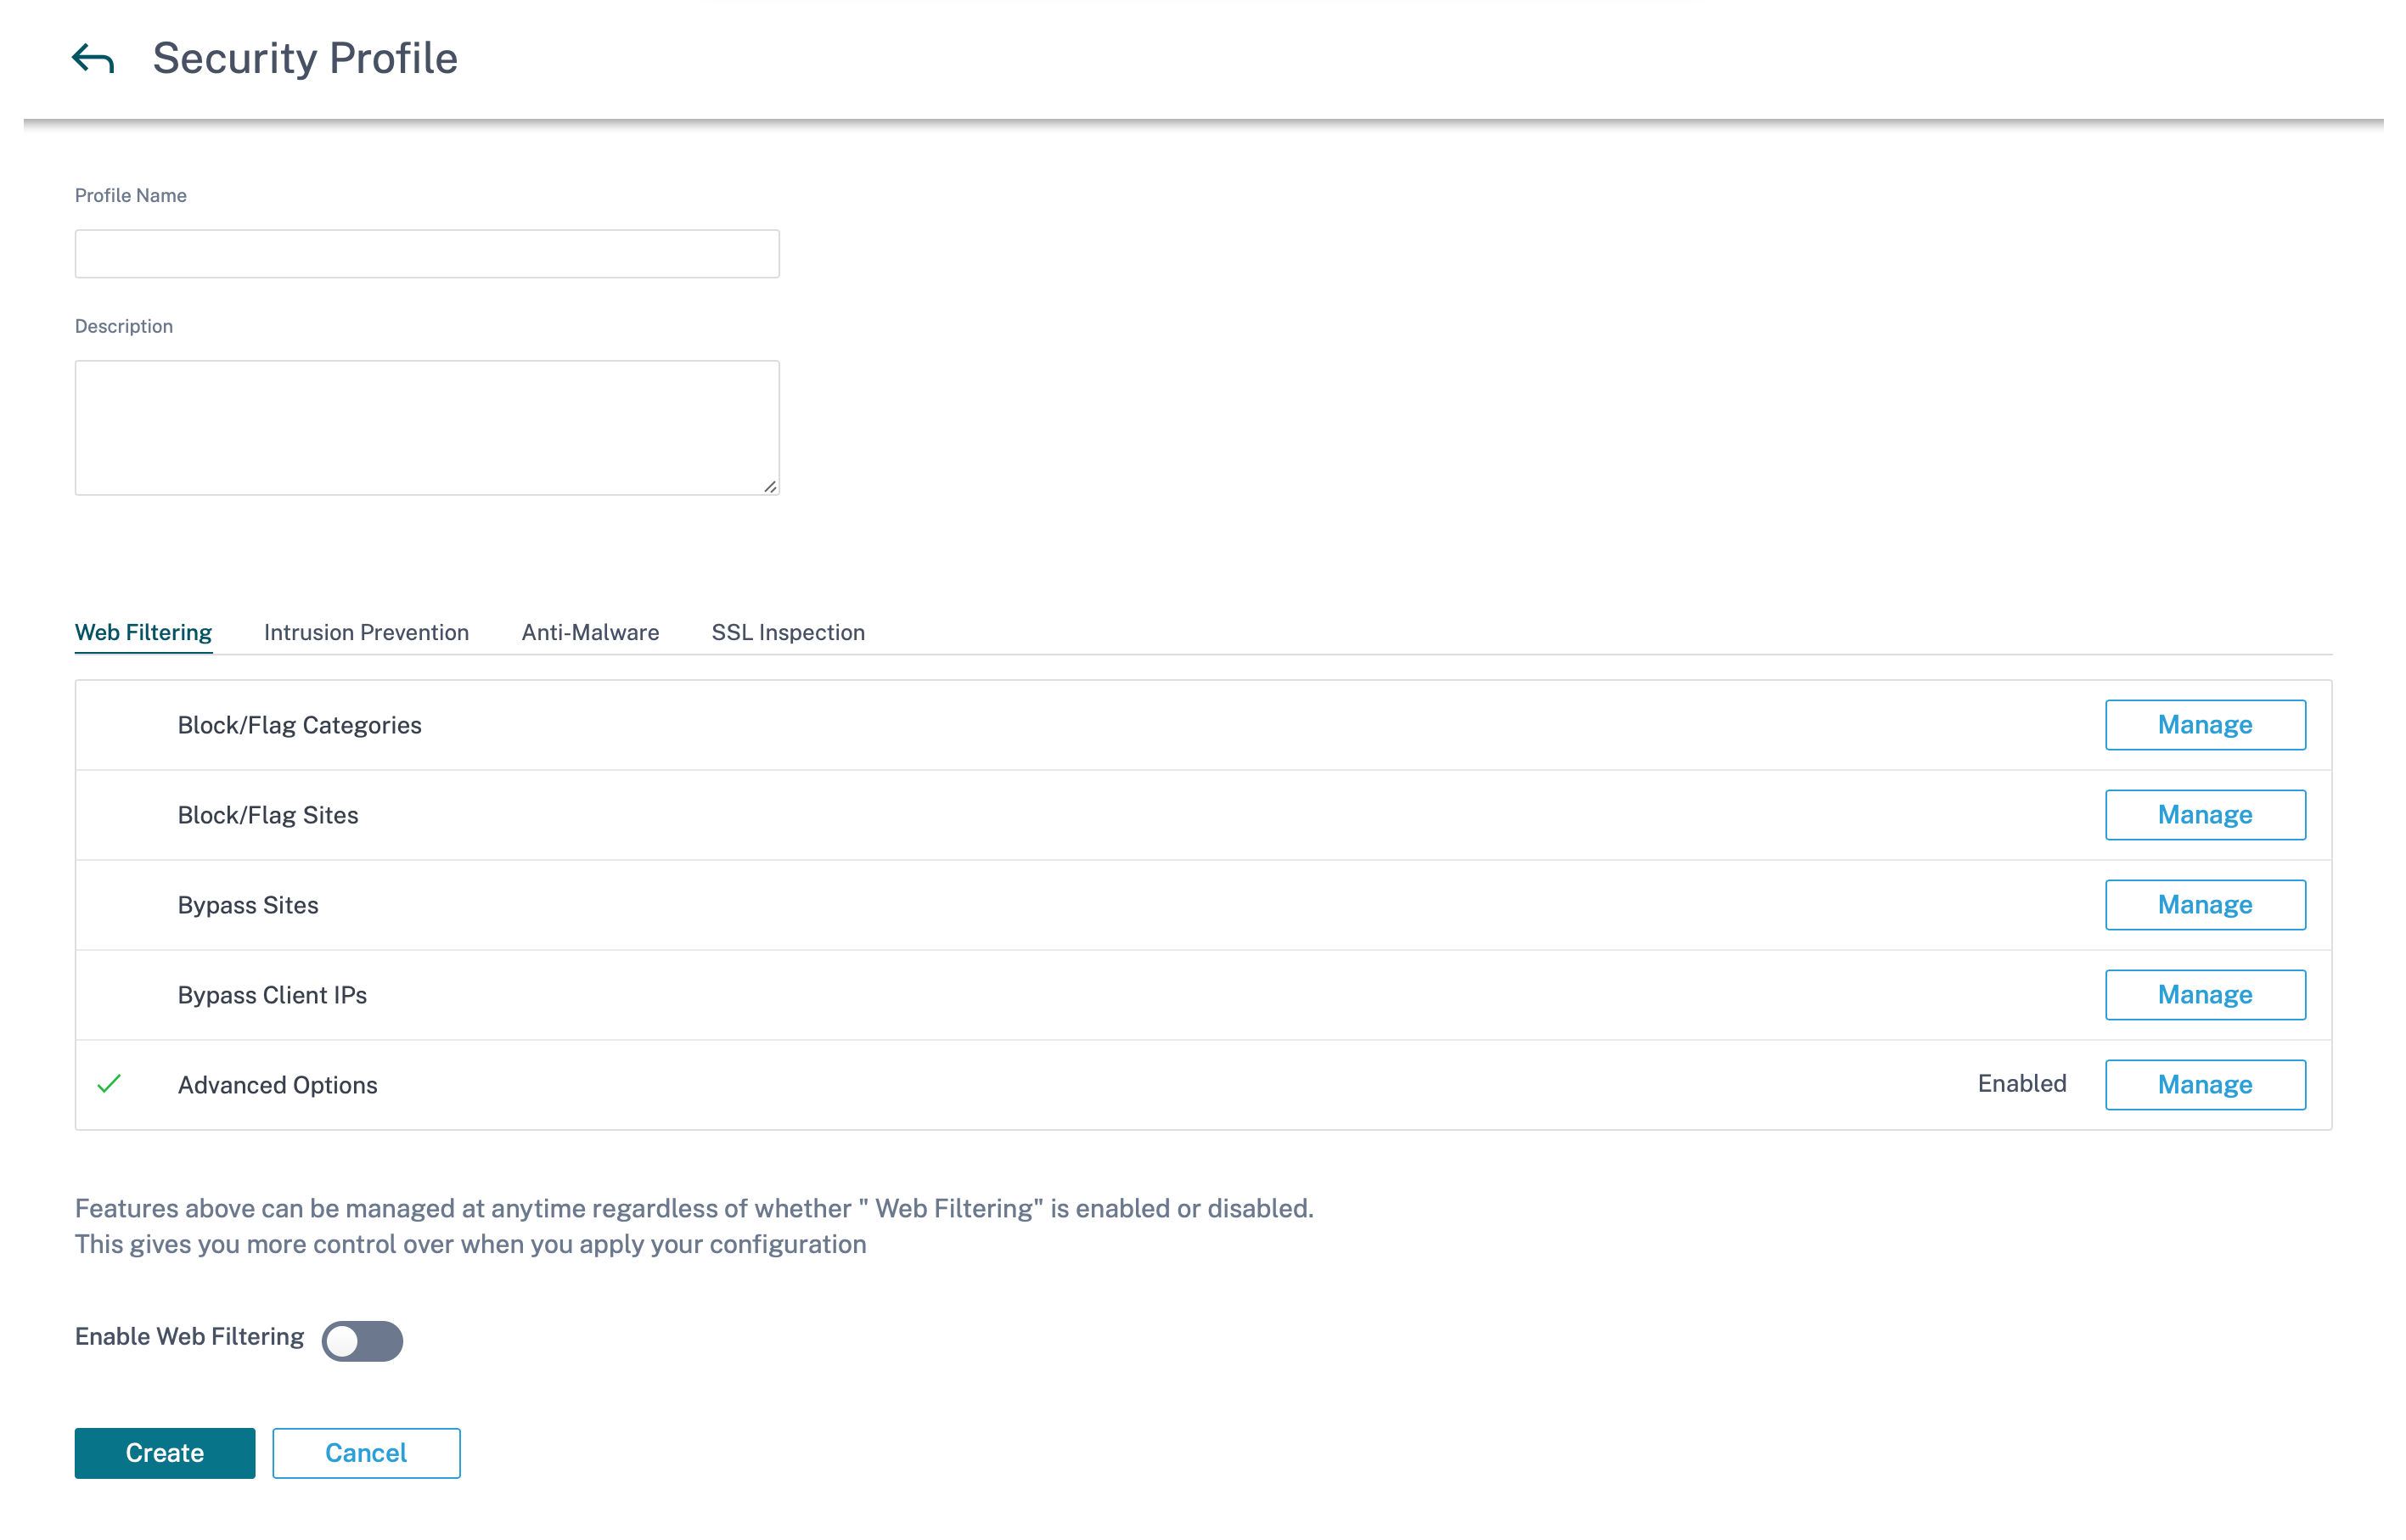
Web filtering
Web filtering allows you to filter the websites your network users access through a categorization database which includes about 32 billion URLs and 750 million domains. It can prevent the exposure to inappropriate sites, spyware, phishing, pharming, website redirection, and other Internet threats. It can also enforce internet policies, preventing access to social media, peer to peer communication, gambling, and other sites frequently disallowed by corporate policies. Web Filter monitors internet traffic on your network and filters it by logging web activities and flagging or also blocking inappropriate content.
When you visit a website and web filtering is enabled, the URL is sent to a cloud database for categorization.
Note
Configure a valid DNS server and enable HTTPS internet access through the SD-WAN management interface. This makes the cloud database reachable so that web filtering can work.
The categorization result is then cached on the SD-WAN appliance to increase the processing speed of future requests. The result is then used to flag, block, or allow websites without increasing the load time. You can add rules to block or bypass sites that are either uncategorized or mis-categorized, or to configure exceptions. You can also bypass web filtering for specific user IPs or subnets.
Block/flag category
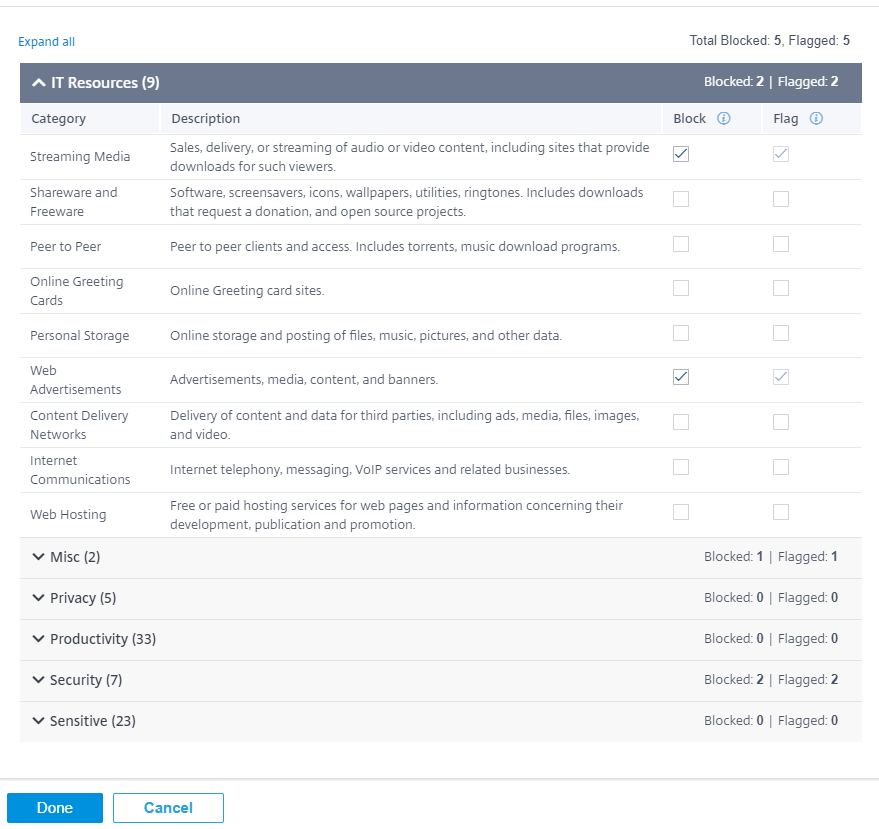
You can flag or block different categories of websites. Web filtering classifies URLs into six category groups, IT resources, Misc, Privacy, Productivity, Security, and Sensitive. Each of these groups has different URL categories. When you choose the block option it implicitly flags the website as well. When you try to access a website of a category that is blocked, it is flagged as a violation and the website is blocked. Categories that are flagged allow you to access the websites, but the event is flagged as a violation. You can view the details in the security logs or reports.
Block/flag sites
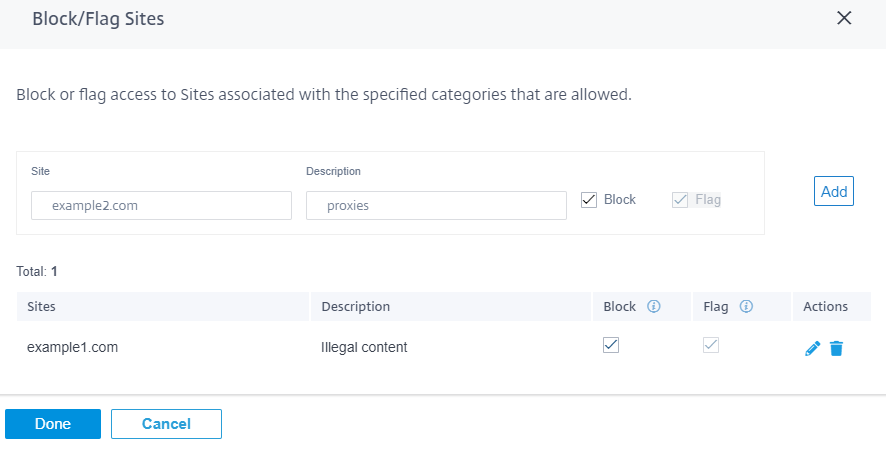
You can add rules to block or flag specific sites that are allowed by the settings in the categories section. You can also block/flag uncategorized or miss-categorized sites. Enter the domain name provide a description and select Block or Flag. The decisions for URLs in the Block/Flag Sites list take precedence over the decisions based on the site category.
Note
- You can only add fully qualified domain names (FQDNs), for example - somedomain.com. You cannot add URL paths, for example - somedomain.com/path/to/file.
- Any domain added to block/flag sites also includes its subdomains. For instance, adding domain.com will block/flag subdomain1.domain.com, subdomain2.domain.com, and subdomainlevel2.subdomainlevel1.domain.com.
Bypass URLs
You can add rules to allow specific sites within categories that are blocked. Any domain added to the Bypass URL list is allowed, even if it is blocked by category or by individual URL. Enter the domain name and provide a description. Select Active to allow the URL.
Note
- You can only add fully qualified domain names (FQDNs), for example - somedomain.com. You cannot add URL paths, for example - somedomain.com/path/to/file.
- Any domain added to bypass URLs also includes its subdomains. For instance, adding domain.com bypasses subdomain1.domain.com, subdomain2.domain.com, and subdomainlevel2.subdomainlevel1.domain.com.
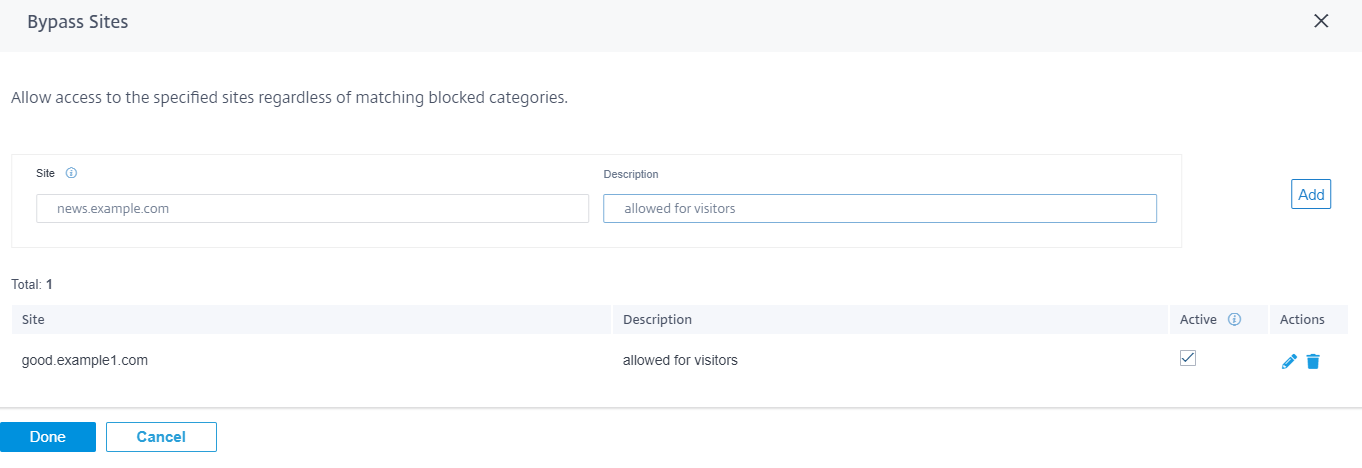
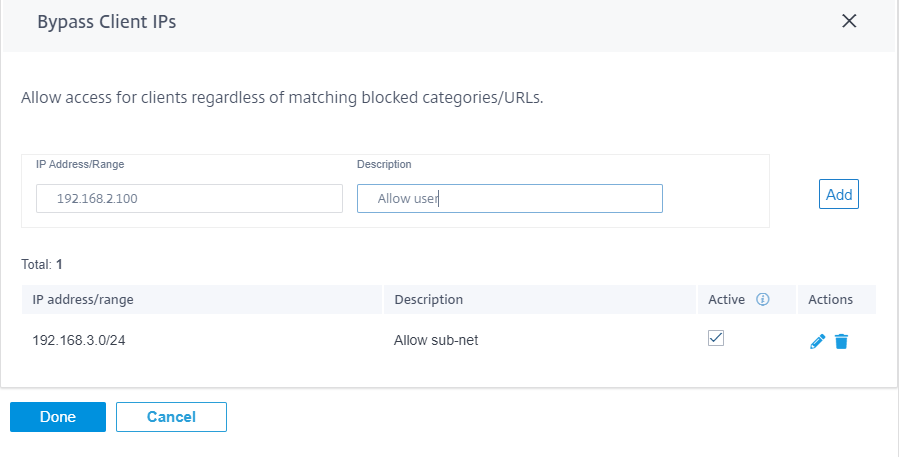
Bypass client IPs
You can add rules to bypass web filtering for specific IP addresses or subnets. You can provide either an IP address or subnet CIDR notation and a meaningful description. The web filter does not block any traffic, regardless of the blocked categories or sites. Select Active to allow traffic from these IP addresses.
Note
Since DHCP IPs can change, use this feature only for clients with static IPs or subnets.
Advanced options
Process HTTPS Traffic by SNI (Server Name indication)
SNI is an extension to the Transport Layer Security (TLS) protocol by which a client indicates the name of the website that the user is trying to connect to at the start of the secure connection handshake process. This not only enables the server to provide the right certificate, but also the SD-WAN appliance to identify the target website and determine its URL category, even if the end-to-end communication is encrypted. If this option is enabled, HTTPS traffic is categorized using the SNI in the HTTPS data stream, if present.
Note
The Process HTTPS traffic by SNI option is enabled by default.
Block Options
-
Block QUIC (UDP port 443): The firewall blocks any outgoing communication on UDP port 443, which is typically used for the QUIC protocol, which cannot be processed by the web filtering module. Blocking QUIC results in the browser falling back to TCP based HTTP(S) communication.
-
Pass if referrer matches any Bypass Sites: If a page containing external content is allowed through Bypass URL, the external content is passed regardless of other block policies.
Note
Although this option allows you to access the external websites, it exposes a security risk. The referrer option in the HTTP header can be overwritten by browser add-ons and plug-ins. Citrix advises you to use this option judiciously.
-
Close connection for blocked HTTPS sessions without redirecting to block page: The SD-WAN appliance issues an HTTP redirect to a custom block page in case the URL is blocked. However, this redirect is not possible for HTTPS sessions without resulting in a Man-in-the-Middle (MitM) session termination, displaying an invalid certificate browser warning page. This option results in the HTTPS session being terminated instead, to prevent a false warning about a potential attack on the target website.
Note
This option is enabled by default.
-
Custom URL for Block: Set an external server location to redirect users when they are denied access to a website by Web Filter. If a custom URL is configured, the following query string variables are passed so that the receiving system can customize its content.
-
reason: The reason the user was denied access. This is the Category name Web-based+Email, and a longer category description. For example, Sites+offering+web+based+email+and+email+clients (the “space” characters are replaced with “+”) in case the site was blocked due to its category. Otherwise, if blocked due to “block URLs” it is empty.
-
appname: The application that is responsible for the denial (Web filtering).
-
appid: The application identifier, an internal identifier for web-filtering which can be ignored).
-
host: the domain-name of the URL that the end-user was denied access to.
-
clientAddress: The IP address of the end-user that was denied access.
-
url: The requested URL that was denied access.
-
Note
If you do not use your own webpage to process the denial, the built-in denial issues a redirect to a non-routable IP address.

You can view detailed web filtering reports on the Citrix SD-WAN Orchestrator for On-premises. For more details, see Reports – Web filtering
Intrusion Prevention
Intrusion Prevention detects and prevents malicious activity in your network. It includes a database of over 34,000 signature detections and heuristic signatures for port scans allowing you to effectively monitor and block most suspicious requests. You can choose to enable or disable Intrusion Prevention while defining a security profile, but Intrusion Prevention rules are common across all security profiles. You can create and manage rules, from Configuration > Security > Intrusion Prevention. For more information, see Intrusion Prevention.
Note
Intrusion Prevention only detects malicious traffic over the traffic captured by the respective Firewall policies.
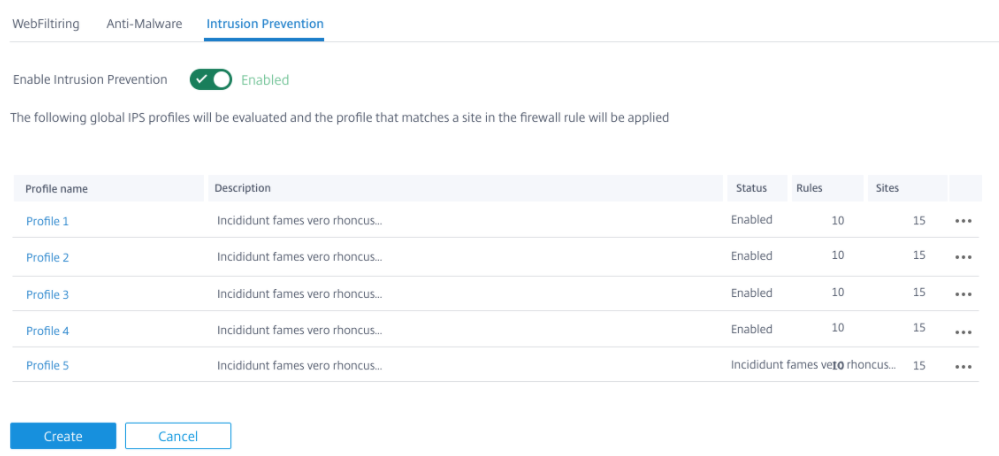
You can view detailed Intrusion Prevention reports on the Citrix SD-WAN Orchestrator for On-premises. For more details, see Reports – Intrusion Prevention.
Anti-Malware
The Edge Security Anti-Malware scans and eradicates viruses, trojans, and other malware. Anti-Malware can scan HTTP, FTP, and SMTP traffic at your network and examine it against a database of known signatures and file patterns for infection. If no infection is detected, the traffic is sent to the recipient. If an infection is detected, Anti-Malware deletes or quarantines the infected file and notifies the user.
Anti-Malware uses Bitdefender’s engine to scan the downloaded files using a combination of signature database, heuristics for suspicious patterns and dynamic emulator analysis. The download files are blocked if any of these tests fails.
Bypass URLs without scanning
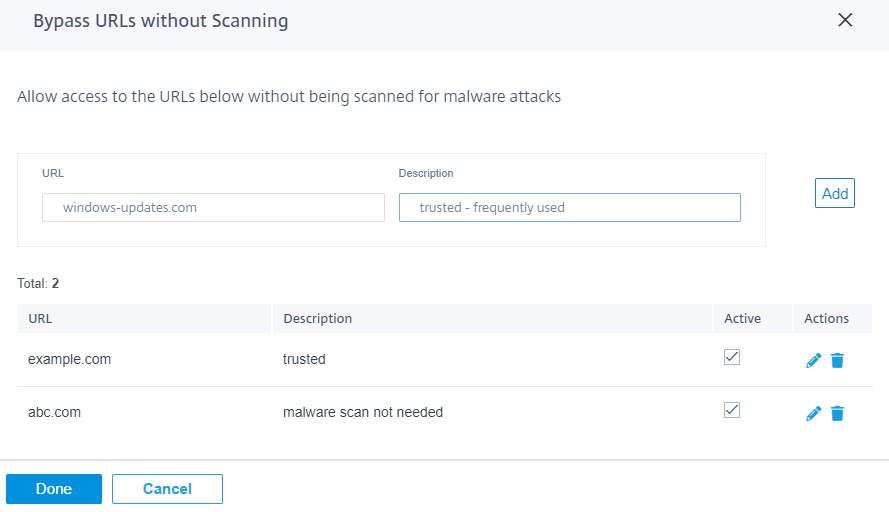
You can bypass Anti-Malware scanning for trusted internal sites or external sites that are used for regular updates, generate more traffic, and are considered safe. By allowing trusted sites to pass through without scanning, you can reduce the resource spent on scanning these sites.
Enter the URL, provide a brief description, and add the URL to the bypass URL list.
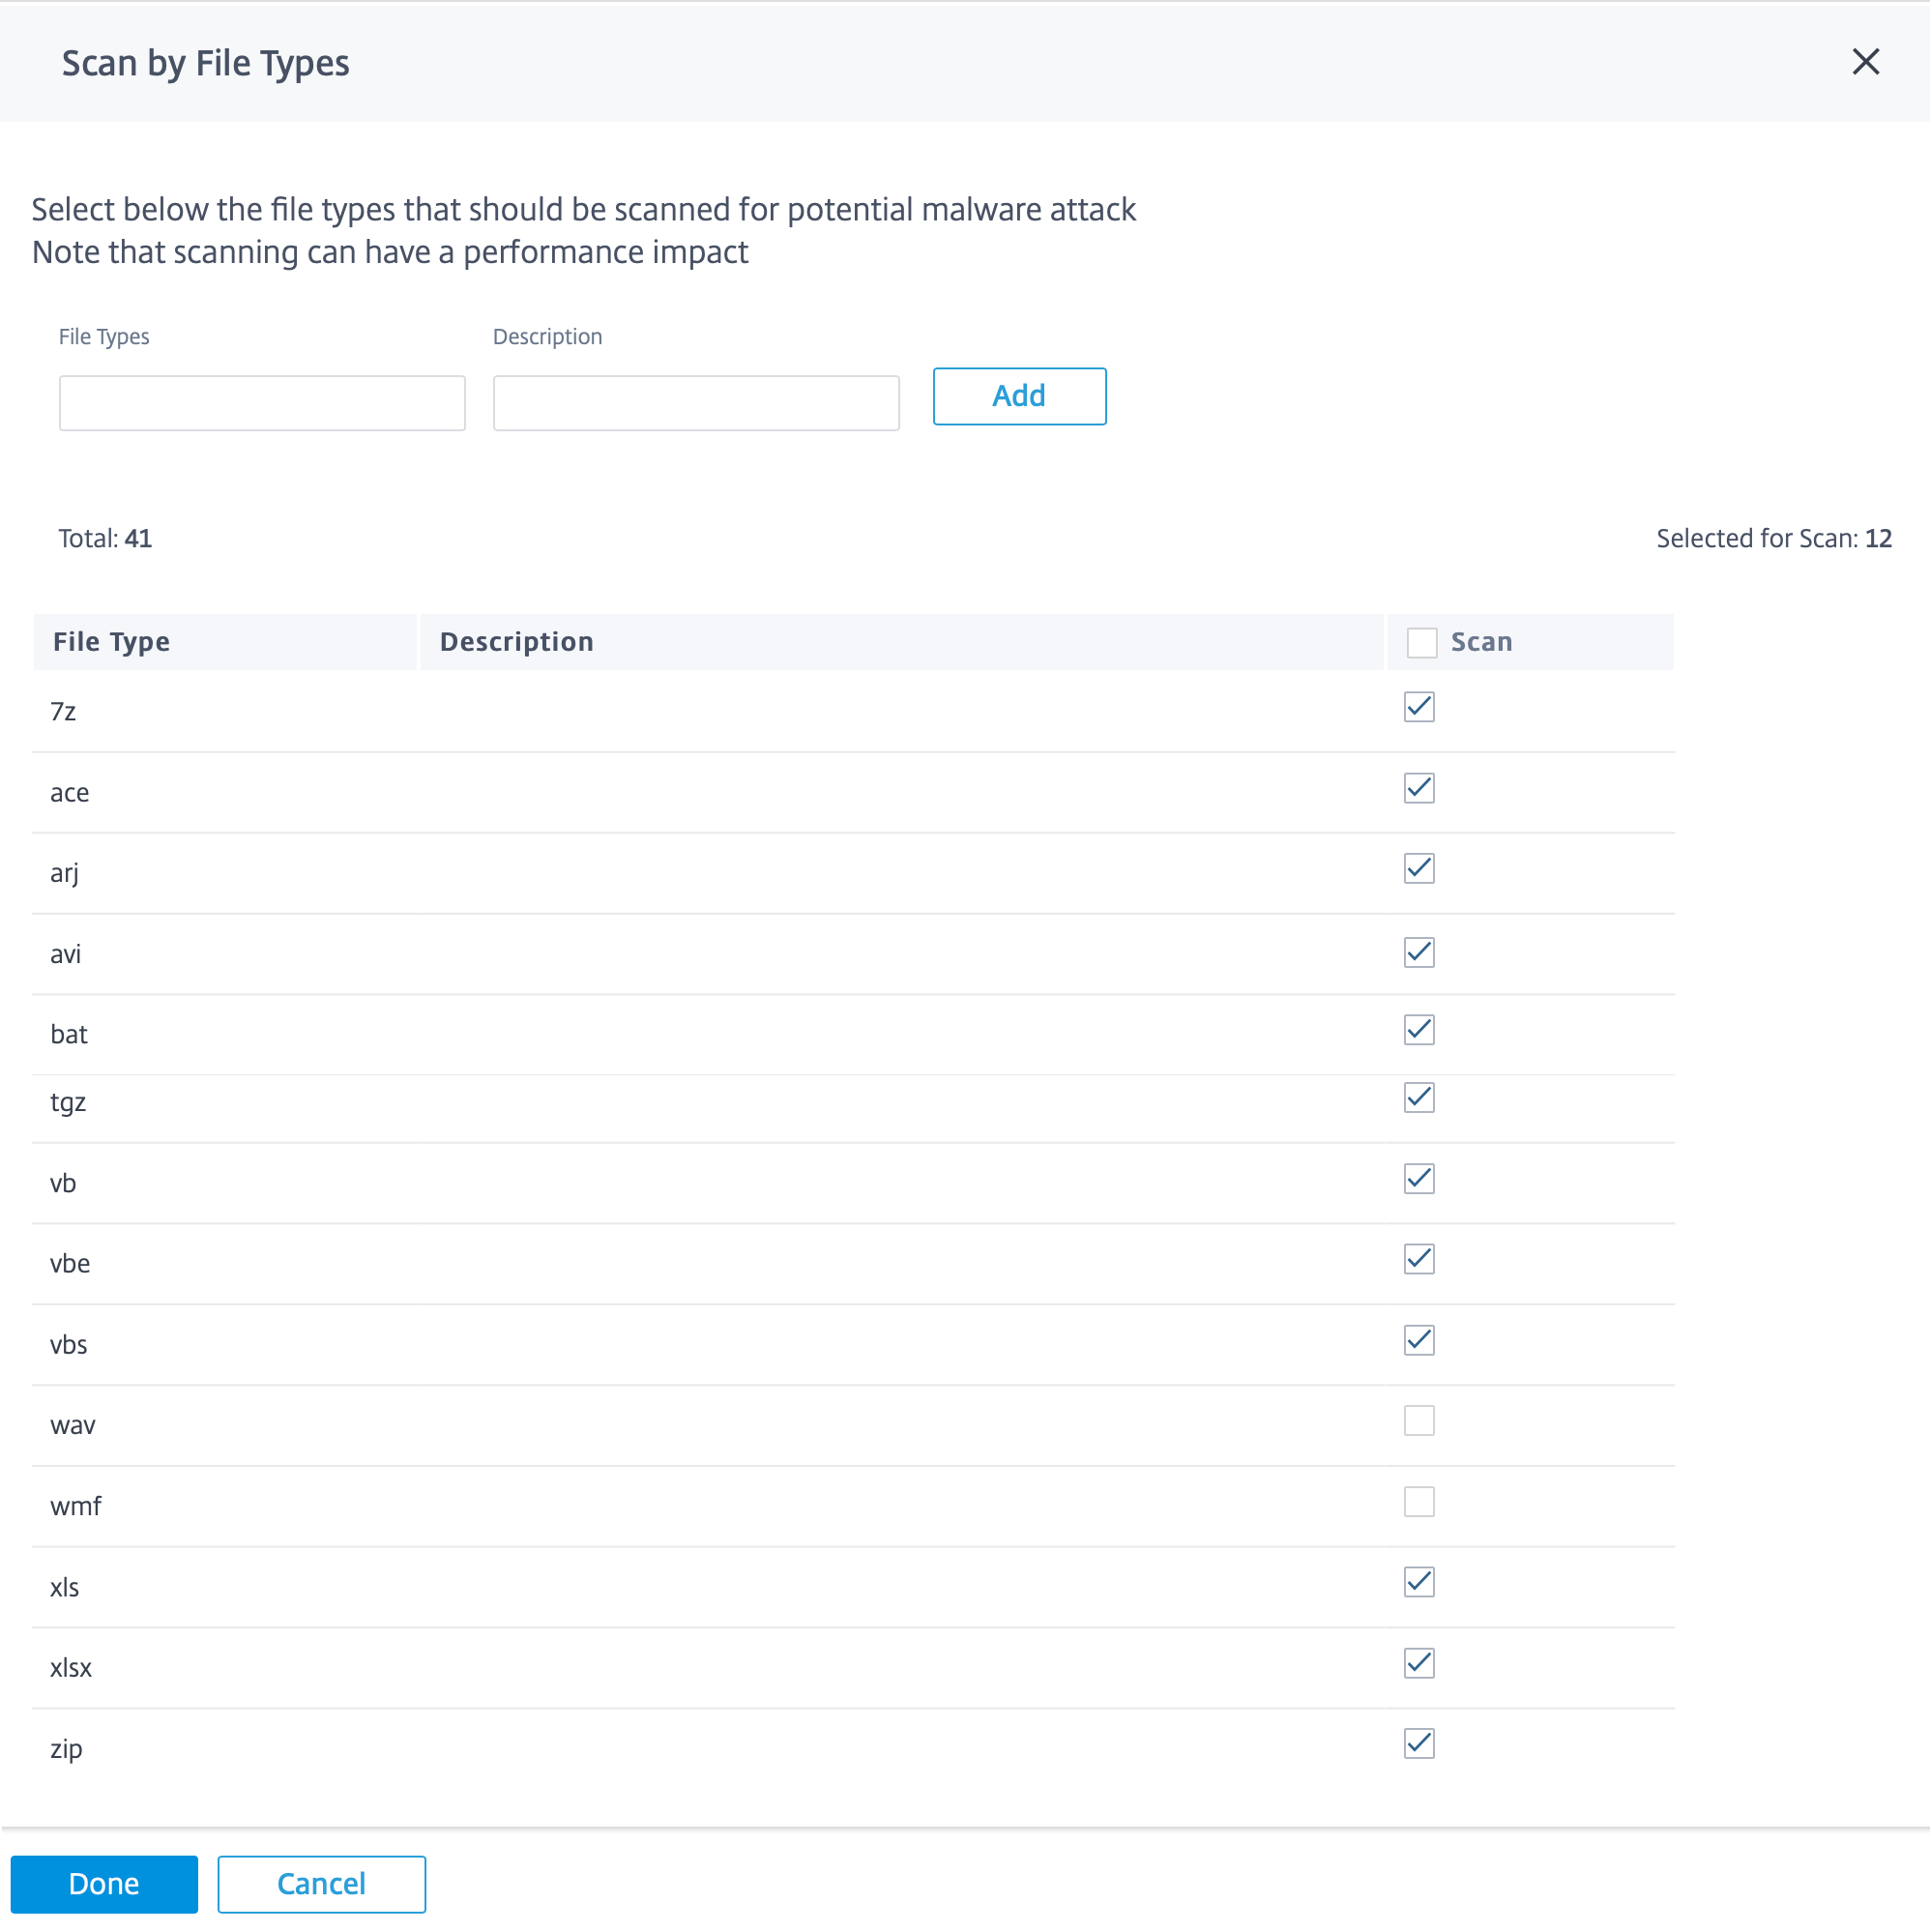
Scan by file types
Anti-Malware by default supports scanning of 41 file-type extensions in HTTP traffic. Anti-Malware scanning involves in depth analysis through signatures, heuristics, and emulation, making it a compute sensitive process. You can choose to exclude certain file name extensions from Anti-Malware scanning. Clear the file types that do not have to be scanned.
Note
The file-types selected by default strike a balance between Anti-Malware effectiveness and system performance. Enabling more file types increase the Edge Security processing load and compromises the overall system capacity.
Scan by MIME types
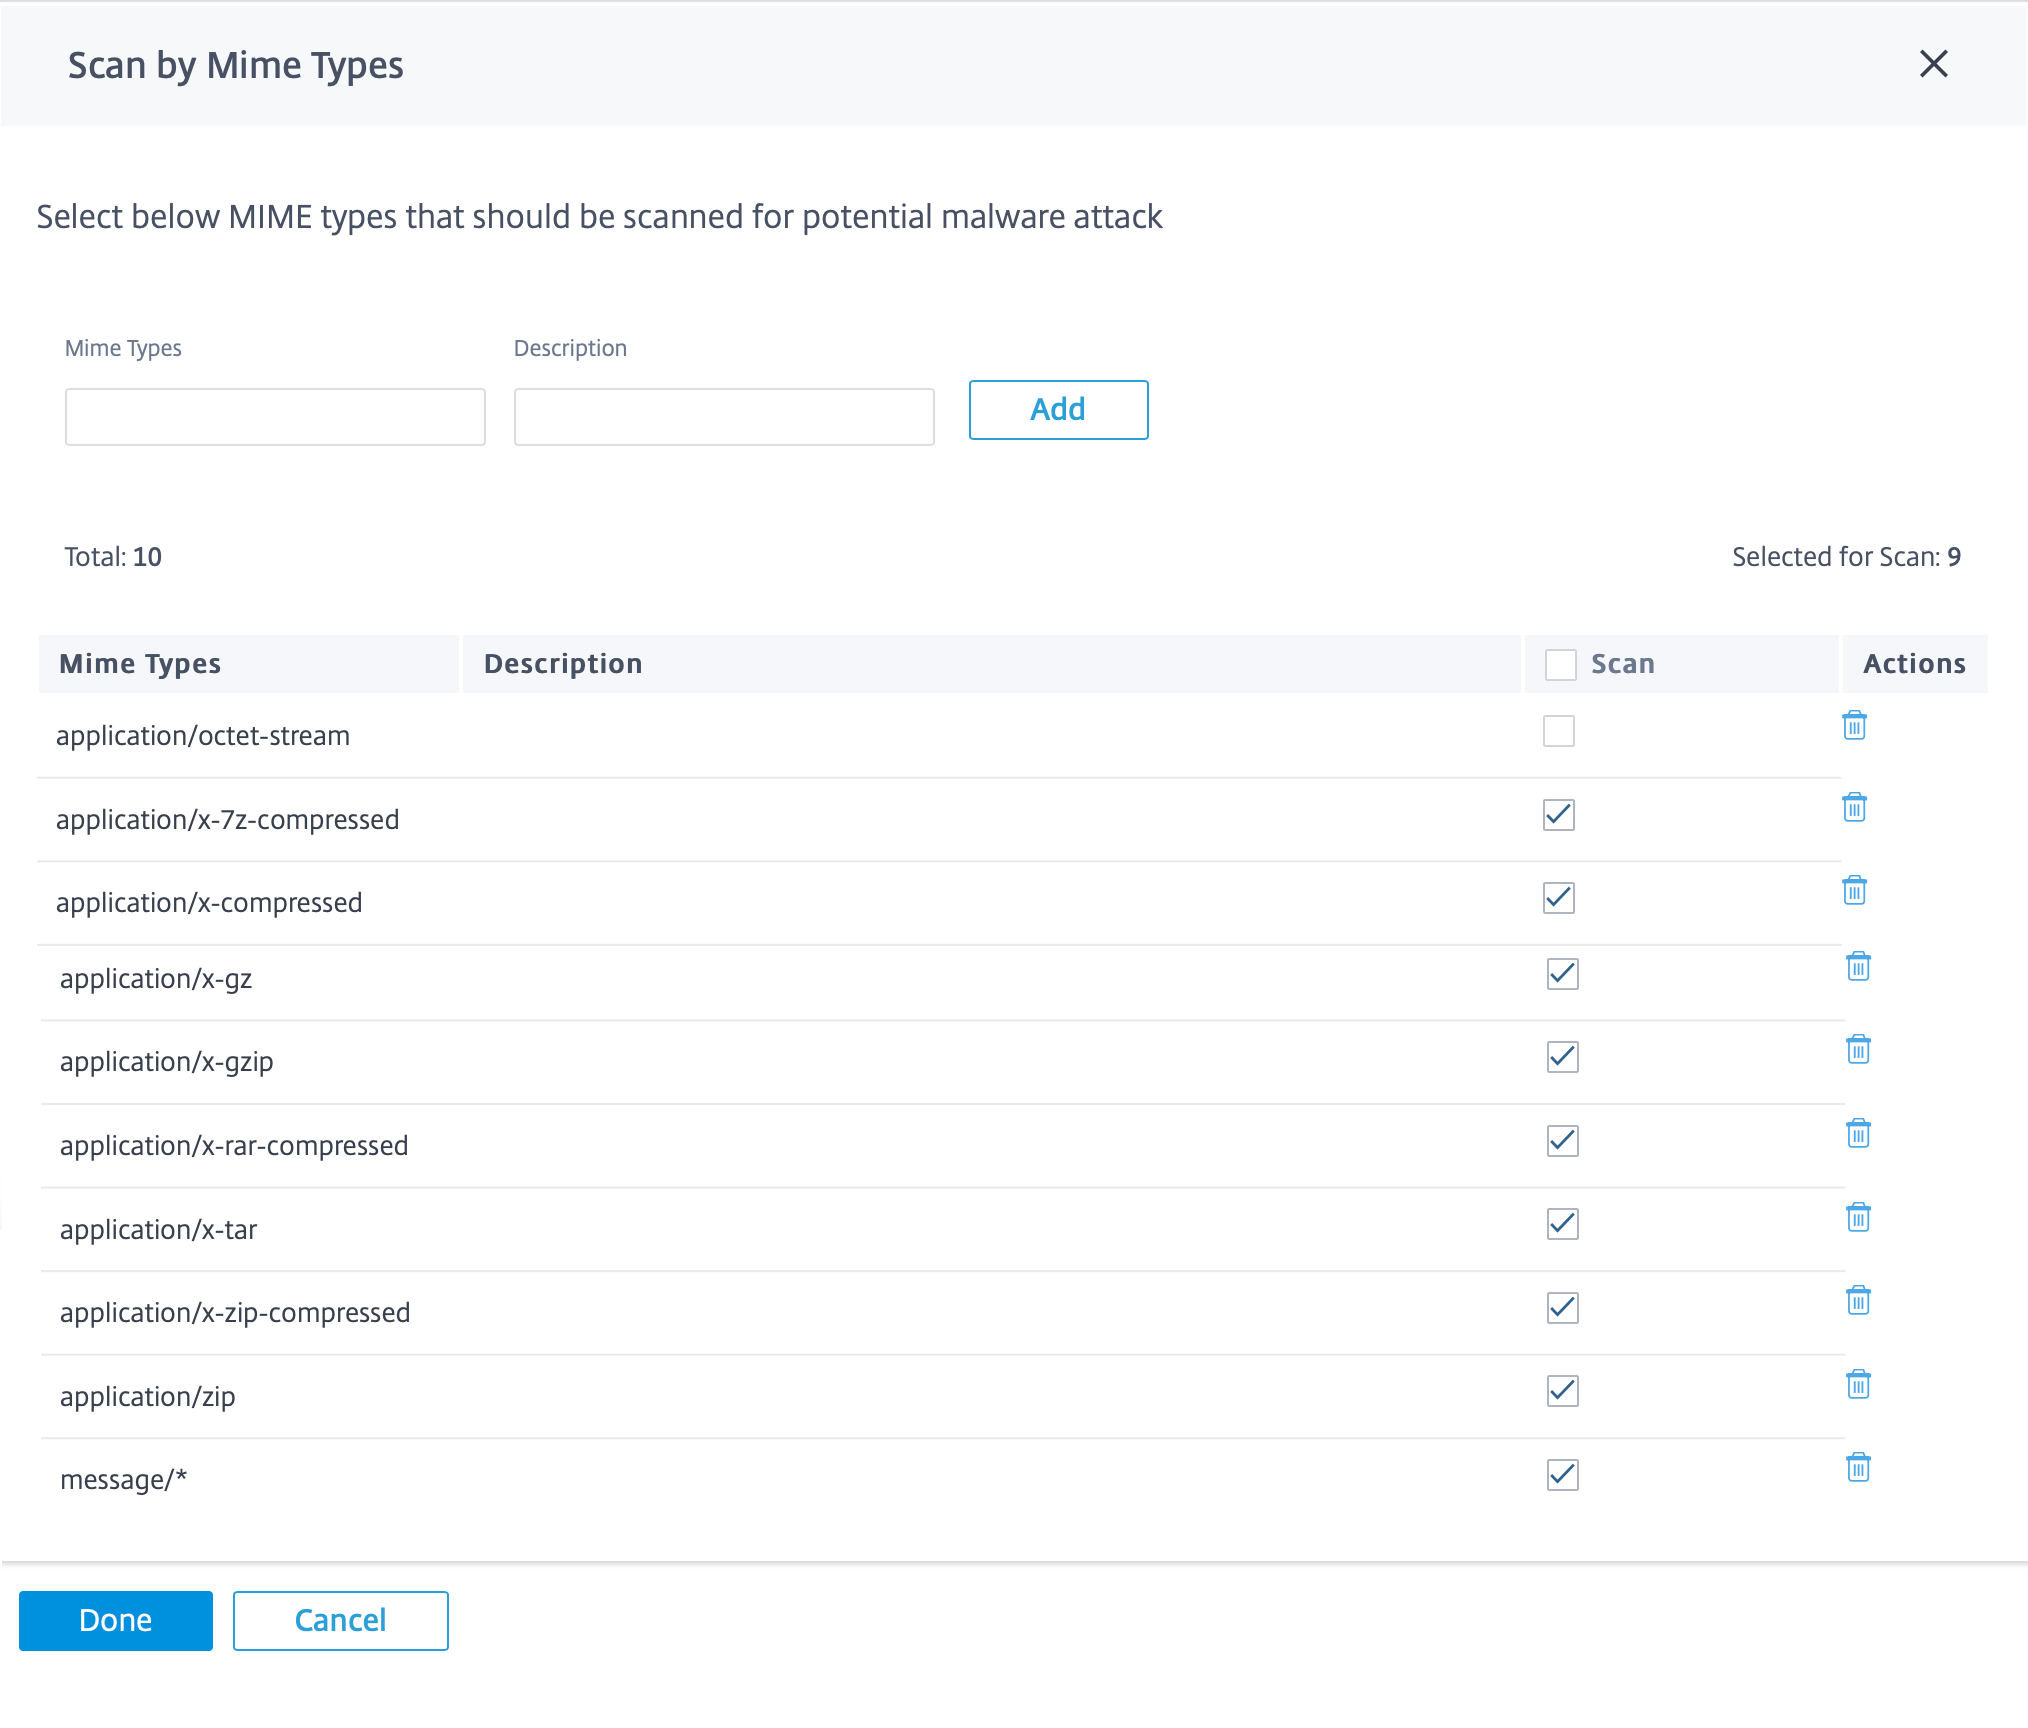
A multipurpose internet mail extension (MIME) type is an internet standard that describes the content of an internet file based on the nature and format. Similar to file types, you can choose to exclude certain MIME types from Anti-Malware scanning. You can choose to exclude certain MIME types from scanning by clearing them.
Note
The MIME types selected by default are chosen to strike a balance between anti-malware effectiveness and system capacity. Enabling more file types increase the Edge Security processing load and compromises the overall system capacity.
Other scan options
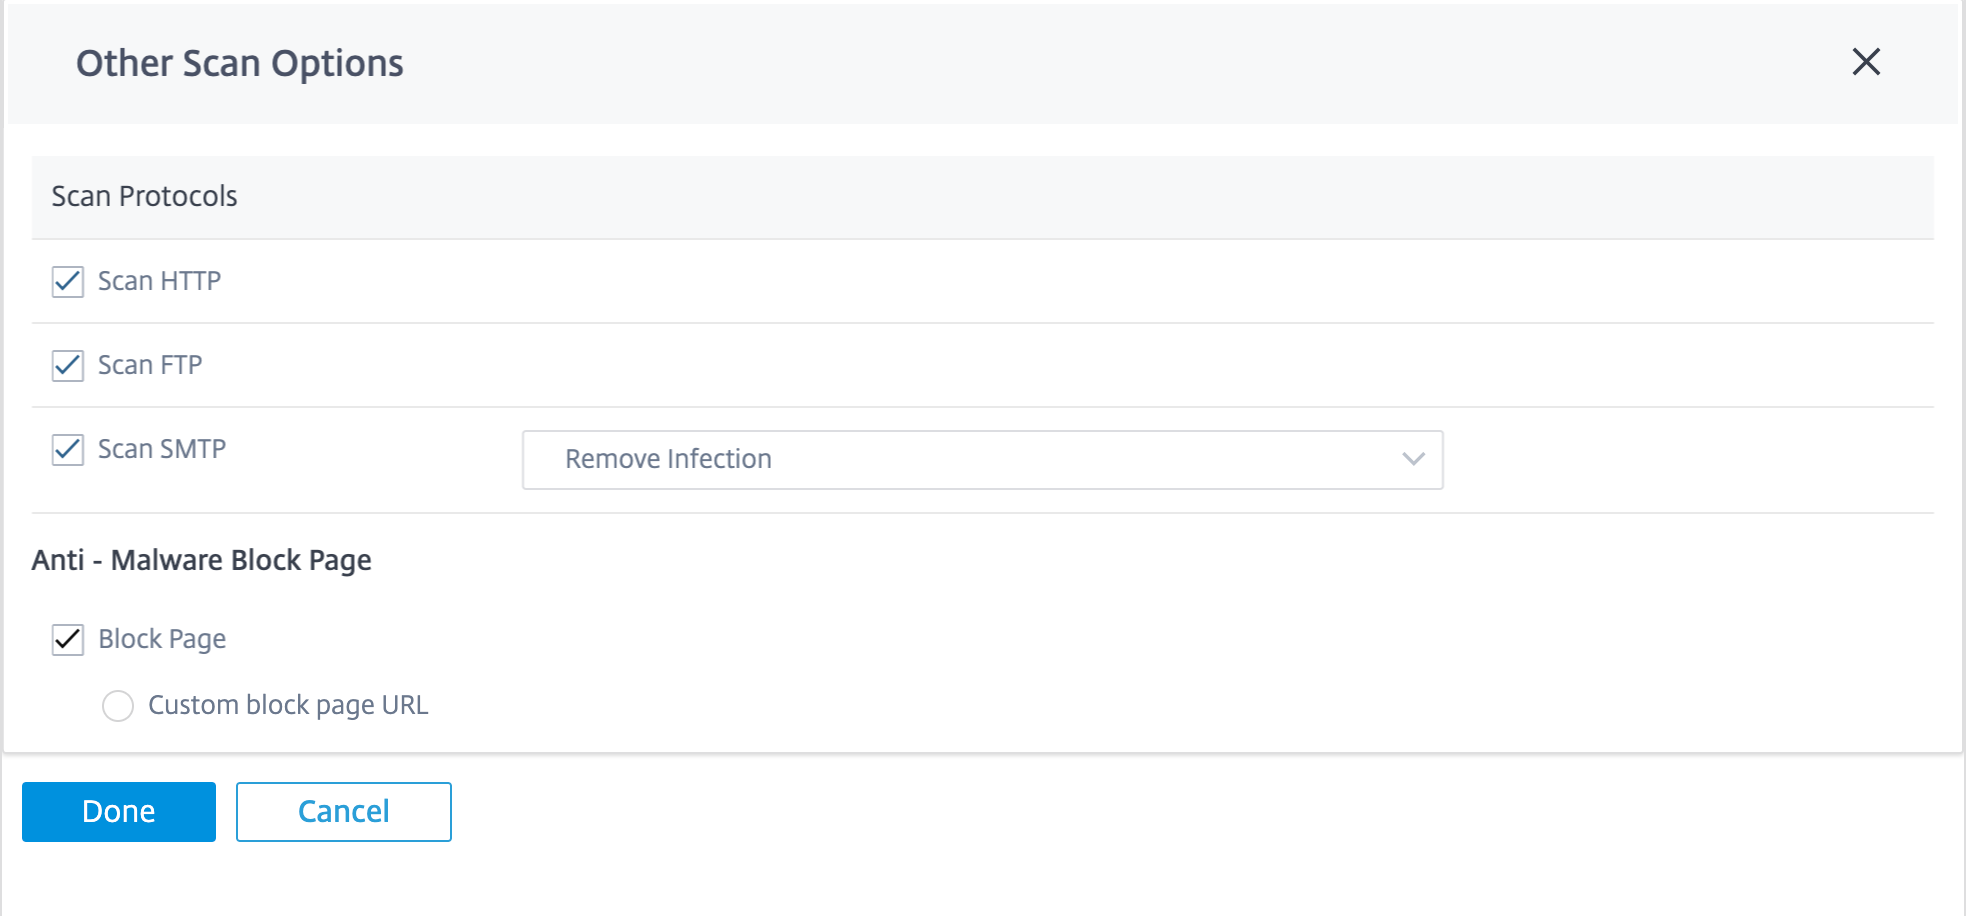
You can choose to enable or disable Anti-Malware scans on the following internet protocols:
-
Scan HTTP: Enable Anti-Malware scanning on HTTP traffic.
-
Scan FTP: Enable Anti-Malware scanning on FTP downloads.
-
Scan SMTP: Enable Anti-Malware scanning on SMTP message attachments and choose the action to be performed.
-
Remove Infection: The infected attachment is removed and the email is delivered to the recipient.
-
Pass Message: The email is delivered to the recipient with the attachment intact.
Note
For Remove Infection and Pass Message actions the email subject line is prepended with “[VIRUS]”.
-
Block Message: The email is blocked and not delivered to the recipient.
-
You can view detailed Anti-Malware scan reports on the Citrix SD-WAN Orchestrator for On-premises. For more details, see Reports – Anti-Malware.
Edge security firewall policy
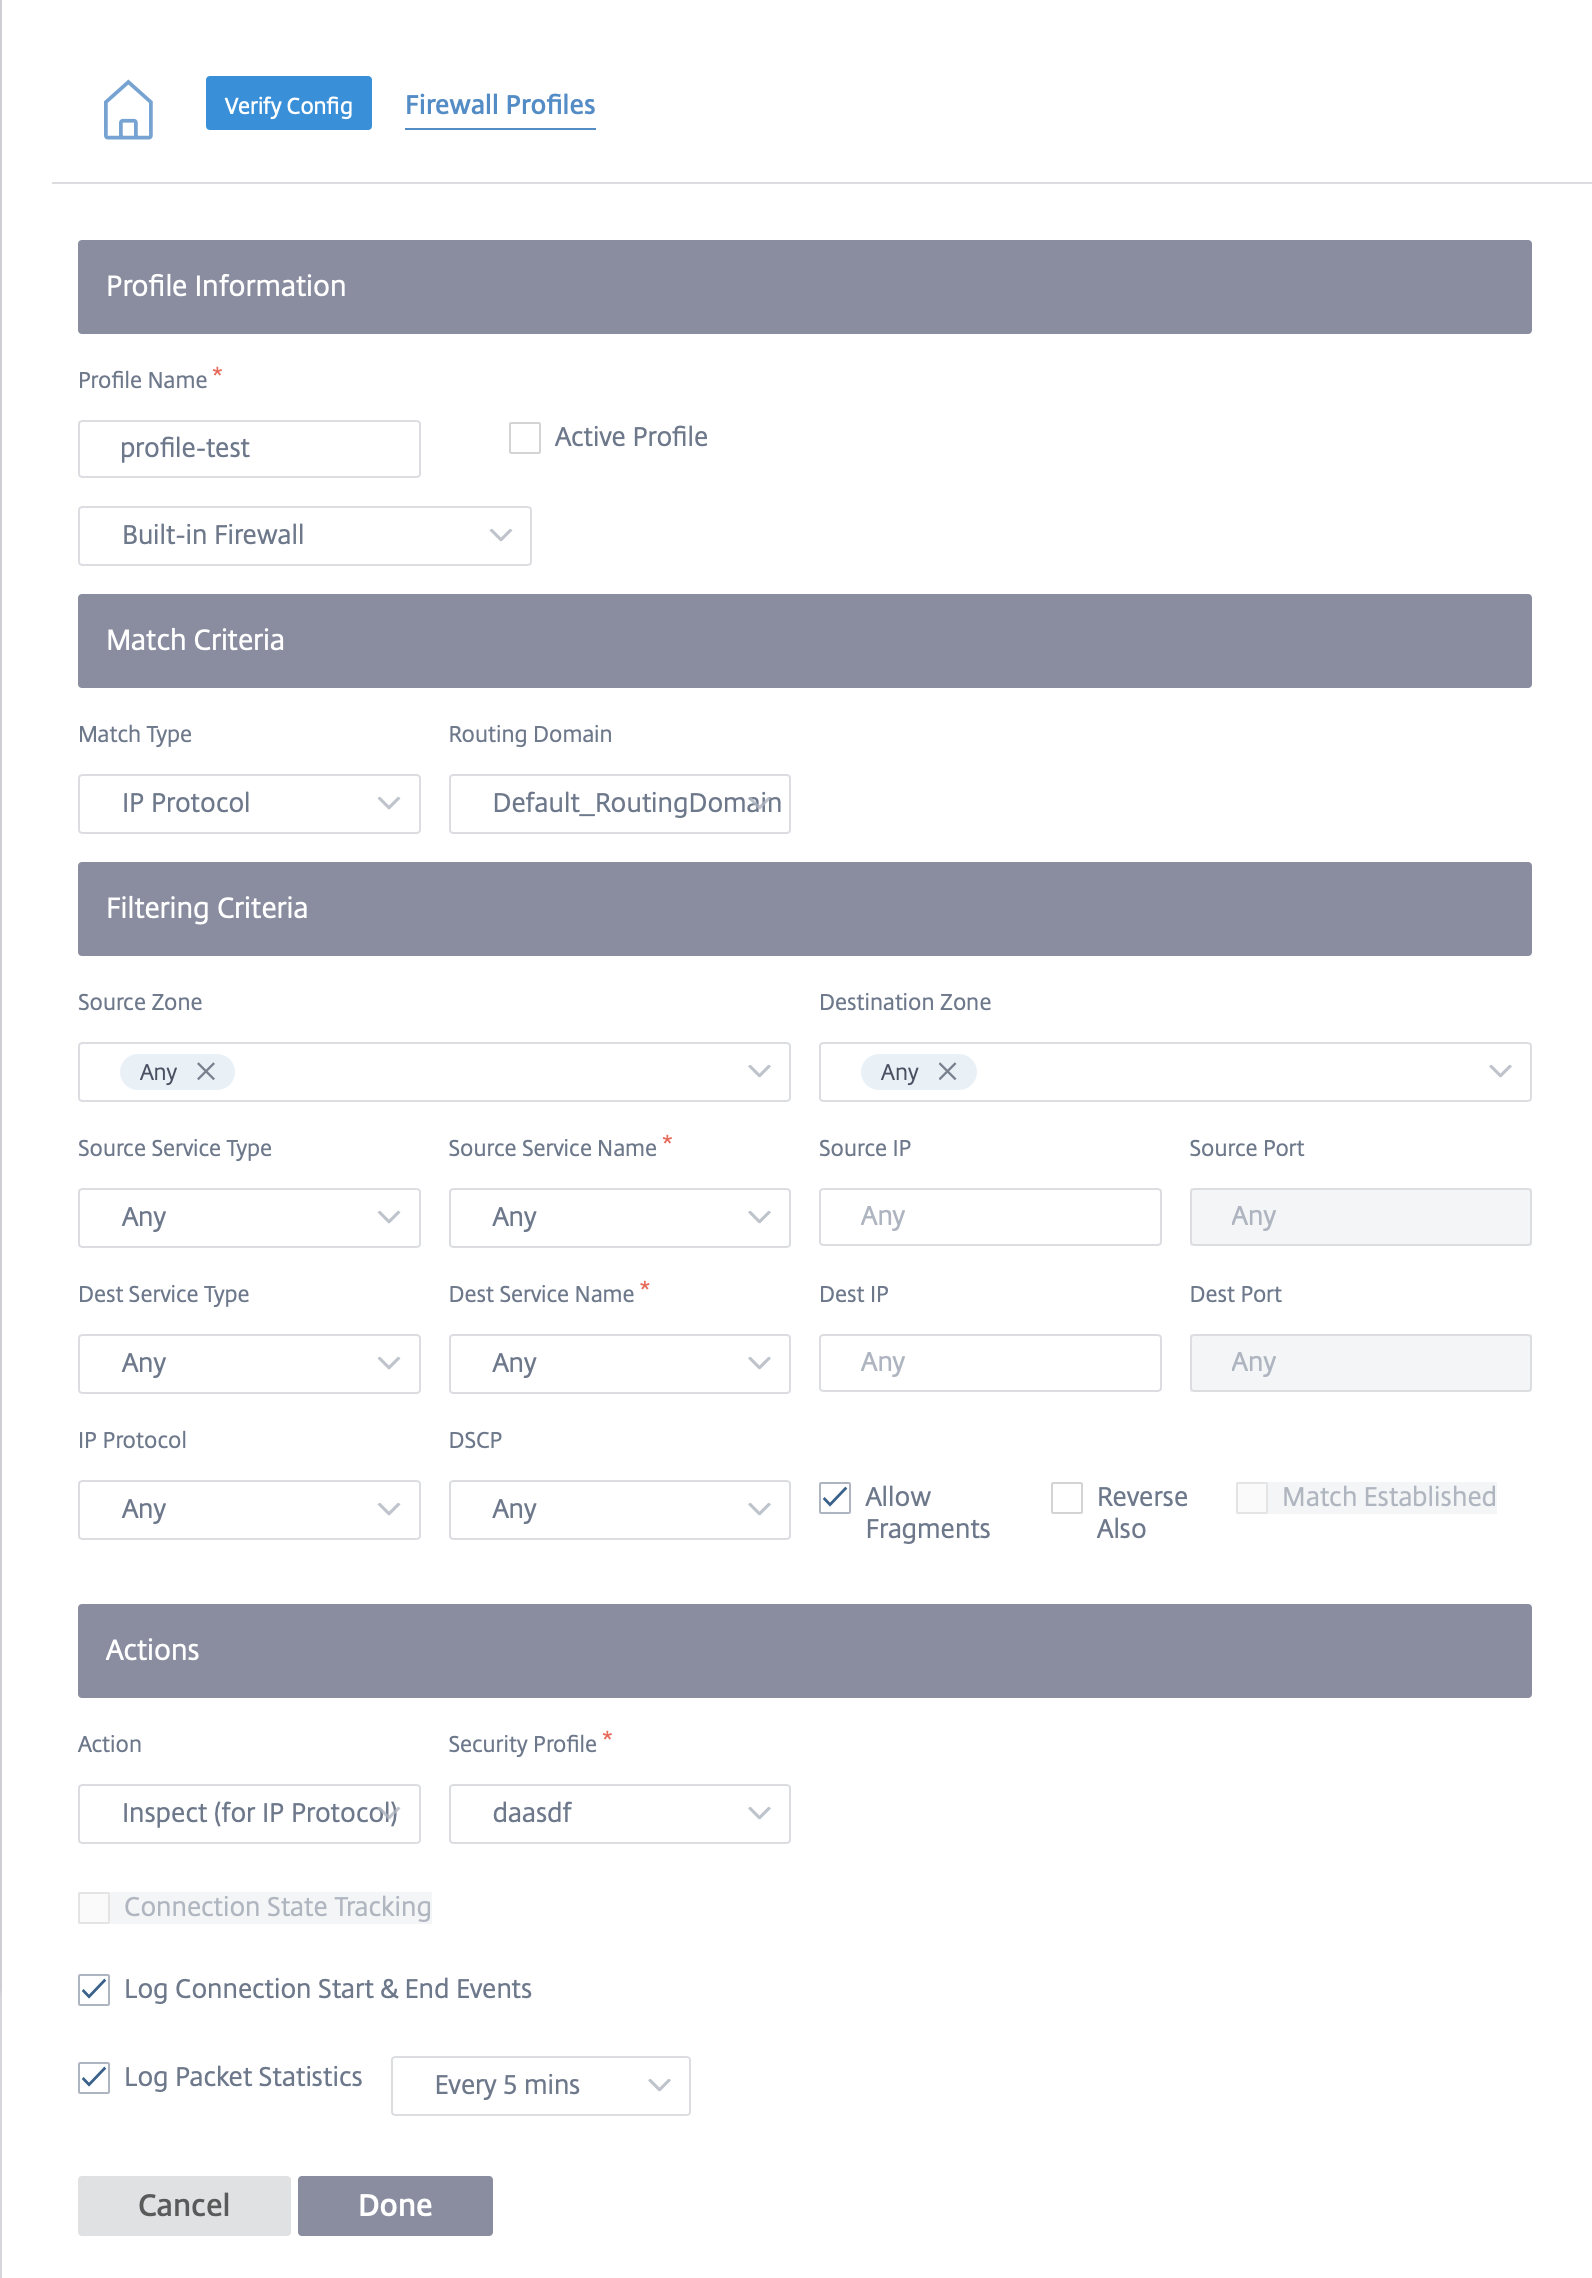
The Edge Security capabilities are triggered using firewall policies. You can define a firewall policy for the match type IP Protocol and map to it a security profile. If the incoming traffic matches the filtering criteria, an inspect action is triggered and the security capabilities, configured as per the selected security profile, are applied.
Citrix SD-WAN evaluates firewall policies in a “first-match” manner, where the first matching policy determines the action. Firewall policies must be configured in the following order:
- IP protocol, Office 365, and DNS app firewall policies with non-inspect action
- Edge security firewall policies (IP protocol firewall policies with inspect action)
- Application firewall policies
To configure a firewall policy and enable edge security, navigate to Configuration > Security > Firewall Policies and click Create New Rule.
Select the Match Type as IP Protocol and configure the filtering criteria. For more information, see Firewall policies. Select the Inspect (for IP Protocol) action and select a security profile.
Note
While there is no limit on the number of security profiles you can create, you can only assign up to 32 Inspect firewall policies to a site.