Citrix SD-WAN™ VPXL
Citrix SD-WAN VPXL-SE is an enhanced version of the SD-WAN VPX-SE platform. Depending on the RAM/CPU/Disk configuration, the VPX platform can be operated either as VPX-SE or VPXL-SE. It is available on all VPX-SE platforms including Azure and AWS.
The Citrix SD-WAN VPXL-SE platform can handle up to 256 virtual paths when provisioned as an MCN/RCN.
Following are the configuration requirements for the VPXL-SE platform.
- 16 GB memory and 16 CPU cores.
- 250 GB of HDD.
The number of virtual paths and dynamic virtual paths that the SD-WAN VPXL-SE platform can handle, irrespective of the appliance role (MCN, RCN, or Client) is as follows:
| Memory | Less than 16 GiB | More than 16 GiB |
|---|---|---|
| Virtual Path | 16 | 256 |
| Dynamic Virtual Path | 8 | 32 |
Interface specifications
The SD-WAN VPXL-SE interface specifications are as follows:
- SD-WAN VPXL-SE supports a maximum number of eight interfaces.
- The first interface is reserved to be used as the Management IP Address for the Virtual Appliance.
- Before powering up the new VM for the SD-WAN VPXL-SE Virtual Appliance, you must configure and assign more interfaces (one each) for the LAN and WAN.
- For SD-WAN VPXL-SE, bridges are not created by default for the data interface (for example, eth1 and eth2).
Configuring Citrix SD-WAN VPXL-SE
To configure SD-WAN VPXL-SE:
- Import the SD-WAN VPX-SE base image (.ova or.xva template). Do not Power ON the Virtual machine.
- Modify the VM resources for Memory to 16 GB RAM, CPU to 16vCPUs and hard disk size to 250 GB.
- Add the required NIC interfaces to the VM (for LAN and WAN interfaces).
- Power ON the VM.
- Now, SD-WAN VPX-SE would operate as a VPXL-SE platform model.
- In case the VM is already Powered ON, before modifying the VM resources, you must perform Reimage Virtual WAN Appliance Software under Configuration > System Maintenance> Update Software, and use the cb-vw_CBVPXL_version.tar.gz image file.
Note
Ensure to clear options that mention to Power on the Virtual machine, after the VM provisioning/import process is complete.
Converting VPX to VPXL
To convert Citrix SD-WAN VPX to Citrix SD-WAN VPXL:
- Power off the existing VPX site.
- Modify the allocated resource of the VPX site from VPX to VPXL (this can be achieved by changing the vCPU and RAM to 8 GB and 16 GB, respectively.
- Login to the management console (Citrix SD-WAN Orchestrator™ service UI or Citrix SD-WAN appliance UI) and change the site type from VPX to VPXL.
- Activate this new configuration by performing a change management if your SD-WAN network is managed by an MCN, or by performing a deployment if it is managed by Citrix SD-WAN Orchestrator.
If your network is managed by the MCN, follow the additional steps provided below:
- Once the change management is completed by the MCN, download the latest Local Change Management (LCM) package for the VPXL converted site.
- Power on the VPXL converted site, and login to the Citrix SD-WAN appliance UI. Navigate to Configuration > Virtual WAN > Local Change Management and activate the downloaded zip file.
-
Once the activation is completed, navigate to Configuration > Virtual WAN > Enable/Disable purge flows to enable the virtual WAN service.
Note
You might notice a stale entry of the older site in the change management configuration. It can be removed by performing another round of change management.
How to upgrade VPX-SE to VPXL-SE
To upgrade VPX-SE to VPXL-SE:
- The VPX-SE should have been installed with an SD-WAN base release version of 9.3.0 or higher.
- Backup and save your existing configuration, if the VPX-SE you are upgrading is an MCN.
Important
A VPX-SE appliance provisioned with an SD-WAN release version 9.2 image cannot be upgraded to a VPXL-SE appliance.
To use the VPXL-SE platform, upgrade SD-WAN release version 9.2. to 9.3 using the change management procedure in the SD-WAN web GUI.
Deploying VPXL-SE in Microsoft Azure and AWS
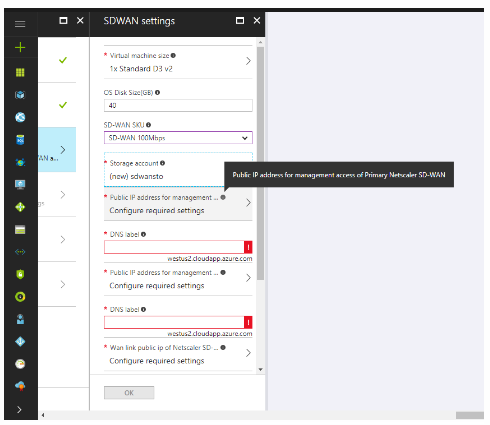
The steps to configure and deploy VPXL-SE in Microsoft Azure are similar to the steps to deploy the VPX-SE appliance in Azure. The only difference in the configuration steps is to choose hard disk space as 250 GB and instance as F8 for the VPXL-SE appliance to be successfully deployed in Azure.

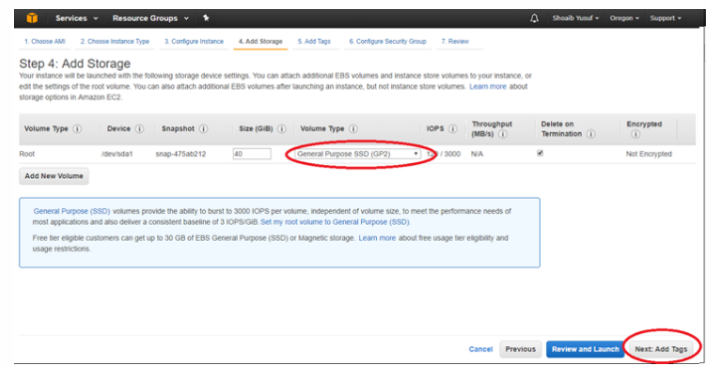
Similarly, the steps to configure and deploy VPXL-SE in AWS is similar to the steps for deploying VPX-SE appliance in AWS with the only difference of selecting disk size of 40 GB and instance of m4.4x large.

Related information
- Installing SD-WAN Virtual Appliances on VMware ESXi
- Installing SD-WAN Virtual Appliances on Microsoft Hyper-V Platform
- Installing SD-WAN Virtual Appliances on Amazon Web Services
- Installing SD-WAN Virtual Appliances on Microsoft Azure
- SD-WAN Standard Edition Virtual Appliance (VPX) high availability Support for AWS
- SD-WAN Standard Edition Virtual Appliance (VPX) high availability Support for Microsoft Azure