Installing SD-WAN SE Virtual Appliances (VPX) in Linux-KVM Platform
- To set up SDWAN VPX-SE for the Linux-KVM platform:
- Use the graphical Virtual Machine Manager (Virtual Manager) application. Or,
- Use the virsh program Linux-KVM command line.
- The host Linux operating system must be installed on suitable hardware by using virtualization tools such as KVM Module and QEMU. The number of virtual machines (VMs) that can be deployed on the hypervisor depends on the application requirement and the chosen hardware.
- The.qcow2 file has to be unique for each of the NetScaler VPX instance provisioned. It is a virtual hard disk (VHD) that is attached to VM.
Prerequisites:
- Install Ubuntu 16.04 on the bare metal appliance which supports Virtualization. The following are the steps to check if the bare metal appliance supports Virtualization.
- 64-bit x86 processors with the hardware virtualization feature included in the AMD-V and Intel VT-X processors.
- To test whether your CPU of Linux host supports virtualization, enter the following command at the host Linux shell prompt:
egrep -c '(vmx|svm)' /proc/cpuinfo, this output must be more than 0. - Alternative to step 2, install a package/tool called “cpu-checker” (sudo apt-get install cpu-checker), enter the following command:
kvm-ok, the output must be “KVM acceleration can be used.”
- To test whether your CPU of Linux host supports virtualization, enter the following command at the host Linux shell prompt:
- On the hosting hypervisor, run
cat /proc/cpuinfo | grep flagscommand and verify whether the following CPU flags are present:popcnt, sse, sse2, pni, ssse3, sse4_1, and sse4_2. - Minimum hardware requirements: As the SDWAN-Virtual WAN (guest OS) requires 4 vCPUs, 4 GB RAM and 40 GB (VHD). You must have a host with these specifications which can satisfy this.
- Software requirements: Ubuntu 16.04.2 LTS (GNU/Linux 4.4.0-78-generic x86_64)
Install qemu-kvm, libvirt-bin, virt-manager: sudo apt-get install qemu-kvm libvirt-bin virt-manager bridge-utils. Execute this command to obtain all the required packages/software.
Provisioning the SD-WAN VPX appliances by using Virtual Machine Manager (VMM):
- Open the Virtual Machine Manager. Go to Application > System Tools > Virtual Machine Manager, and provide the logon credentials in the Authenticate window.
- Once the VMM opens, you must see QEMU/KVM which indicates that the VMM is not connected to the QEMU Virtualization. NIC ordering for SD-WAN VPX-SE provisioning must be in the following order; Management, LAN, and WAN.

- Select New Virtual Machine. Add new VMM
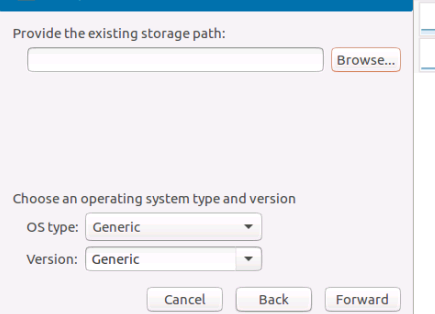
- Select the VHD, the VHD used by one machine cannot be shared. Unique VHD is required for every Virtual Machine. Browse the image and select the path where it is downloaded.
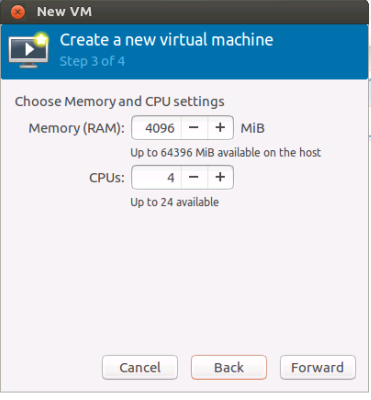
- Provide RAM as 4,096 MB and CPU as 4.
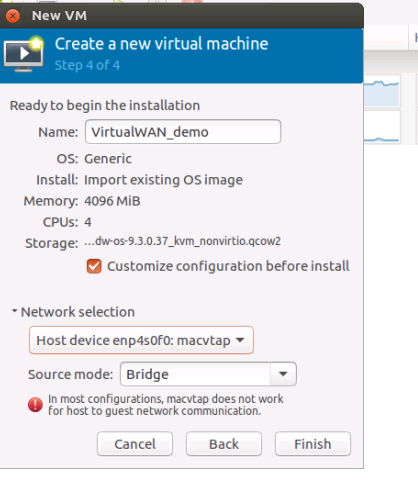
- Name the VM as needed and select Customize configuration before Install. As by default one NIC gets selected to the Virtual Machine, you can see the Network selection option. In this setup enp4s0f0 is the Management Network for the Host machine, and if you want to use this NIC, sharing same NIC between guests and host for Management access. Source Mode is Bridge since it is shared between VMs.
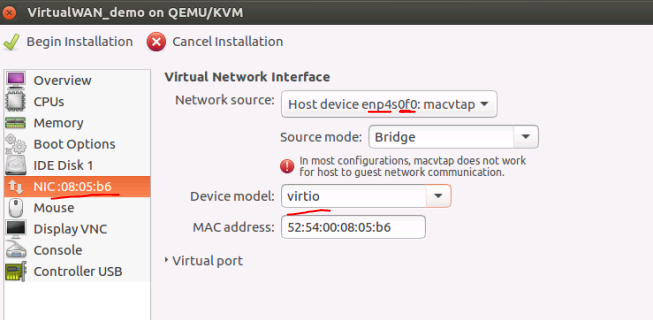
- After clicking Finish, ensure you select customize configuration before install for further configuration. For the NIC that is assigned, in this example “enp4s0f0: MacVTap” select the Device model as “virtio.” The model that is supported for communication.
- Add more NICs for LAN and WAN with Add Hardware at the bottom left side corner. For good Performance, it is recommended to use Source Mode as Pass-through (Only one VM can use the Lower NIC and hence it cannot be shared across VMs). For LAN and WAN interfaces use “Pass-through” Mode and Device Model must be “virtio.”
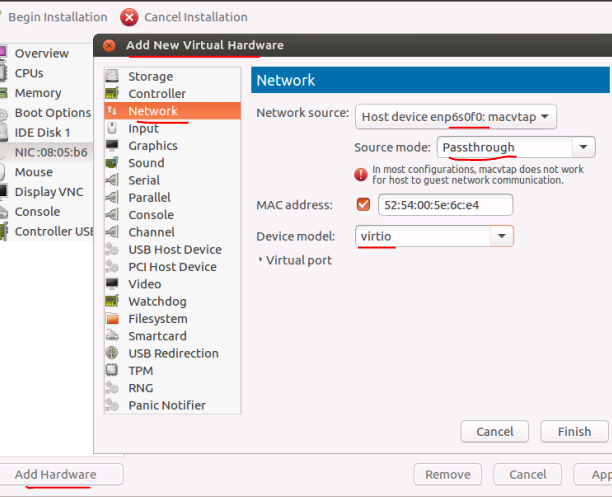
- Select Begin Installation for the installation process to start and you can see the console of the appliance.
- Use management_ip command to set the IP address.
How to deploy SD-WAN appliances in Linux-KVM hypervisor platform instance on the same host
Deploying SD-WAN appliances in high availability mode on the same host requires sharing physical interface across SD-WAN VPX appliances. For example. The eth3 of physical hypervisor (host) is used for WANLink-1 for Primary VM, the same interface must be used for secondary appliance, so that if primary appliance becomes inactive, the secondary appliance can respond to the ARP requests for shared MAC.
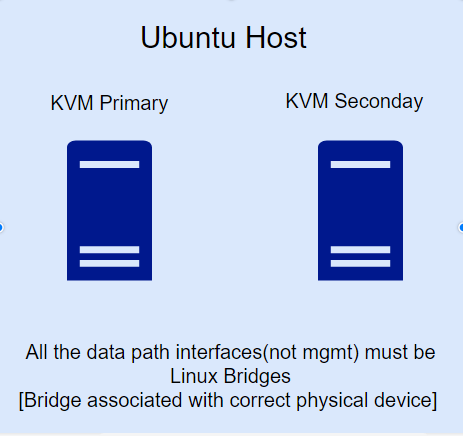
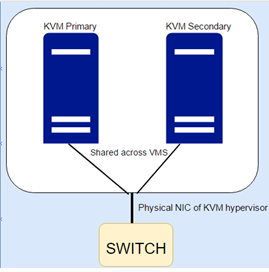
For sharing the Physical NIC between the VMs which are on the same host, the source modes that can be used according to KVM networking is MACVTAP Bridge or Linux Bridge.
How to use linux bridge
- Create Bridge using “brctl” on the Host (KVM Hypervisor level).
- Associate the required Physical NIC to the bridge created (using brctl commands).
- These bridges created at the Hypervisor level must be now associated to the SD-WAN VM.
- Primary and Secondary VMs are now associated with the Linux bridges created.
To create linux bridge and associate it with virtual machine:
- Adding bridge,
brctl addbr ha-brwan1 - Associating physical NIC to the bridge
ha-brwan1:brctl addif ha-brwan1 eth3 - Associating the bridge “ha-brwan1” to the SD-WAN-SE (Virtual WAN) (both Physical and Secondary)
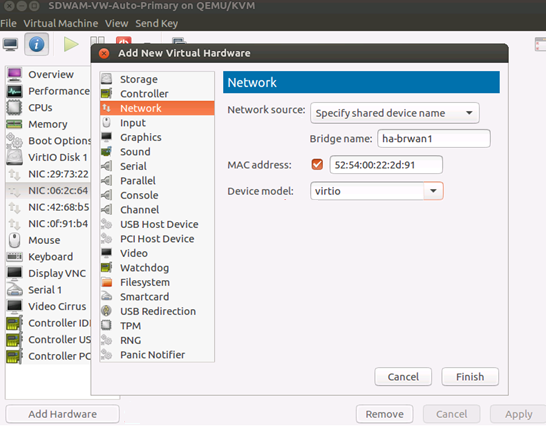
- When adding network interface, select Network source as “Specify shared device name.”
- Under Bridge Name, provide the name of the bridge created.
- Device Model must always be “virtio.”
Create bridges for LAN and WAN interfaces. The following snapshot depicts the way to associate interface to SDWAN-SE using Virtual Machine Manager.
Note
These steps must be followed only when both Primary and Secondary high availability node is present on the same KVM Hypervisor/Host. In case, if high availability nodes are present on different Hypervisors then MACVTAP: Passthrough source mode can be used.
Limitation with MacVTap bridge mode type
With interface associated to Virtual Machines as MacVTap Bridge mode type there are issues with shared MAC communication. SD-WAN Virtual WAN uses shared MAC (AA: AA: AA: 00:00: XX). When MacVTap Bridge mode is used, ARP resolution does not occur for shared Mac. So MacVTap Bridge is not a recommended option.
NOTE
From 10.2.6 and 11.0.3 release onwards, it is mandatory to change the default admin user account password while provisioning any SD-WAN appliance or deploying a new SD-WAN SE VPX. This change is enforced using both CLI and UI.
A system maintenance account - CBVWSSH, exists for development and debugging and has no external login permissions. The account can only be accessed through a regular administrative user’s CLI session.