Installing SD-WAN Virtual Appliances on VMware ESX
Warning
Ensure that you enable the promiscuous mode on VM Network only. Do not enable the promiscuous mode on the Virtual Switch setting. Note
VMware vSphere Client operation details might change with new releases of the vSphere software. For the most complete and current vSphere Client installation and operation instructions, also see your VMware documentation. The instructions in this chapter are intended to provide the most basic and essential guidelines, only, for installing an SD-WAN VPX-SE Virtual appliance on the ESXi platform.
The following summarizes the top-level steps for installing and deploying an SD-WAN VPX-SE. Perform these procedures in the exact order listed.
- Install the VMware vSphere Client.
- Install and deploy the SD-WAN VPX-SE OVF Template.
- Configure the SD-WAN VPX-SE Management IP Address.
- Connect and test the deployment.
This chapter provides step-by-step instructions for installing, configuring, and deploying the SD-WAN VPX-SE. This includes basic instructions for installing the VMware vSphere Client, which you use to create and deploy the SD-WAN VPX-SE virtual machine.
Before you begin installing a virtual appliance, do the following:
- Install VMware ESX version 5.5 or ESXi 6.0, or later, on hardware that meets the minimum requirements.
- Install the VMware vSphere client on a management workstation that meets the minimum system requirements.
- Download the SD-WAN VPX-SE set up files.
- Obtain SD-WAN VPX-SE license files.
Also, before installing an SD-WAN VPX-SE virtual appliance, label all the interfaces that you plan to assign to VPX virtual appliances, in a unique format. In large deployments, labeling these interfaces in a unique format helps in quickly identifying them between other interfaces used by other virtual machines, such because Windows and Linux virtual machines. Such labeling is especially important if different types of virtual machines share interfaces.
SD-WAN VPX-SE requires non-default networking options. Between other things, you create two new virtual switches (vswitch0 and vswitch1) for the accelerated bridge, which must be assigned to two different virtual switches.
Installing the VMware vSphere Client
This section provides basic instructions for downloading and installing the VMware vSphere client you use to create and deploy the SD-WAN VPX-SE virtual machine.
Note
See also your VMware vSphere Client documentation for additional information.
- Open a browser and navigate to the ESXi server that hosts your vSphere Client and SD-WAN VPX-SE virtual machine (VM) instance. The VMware ESXi Welcome page displays.
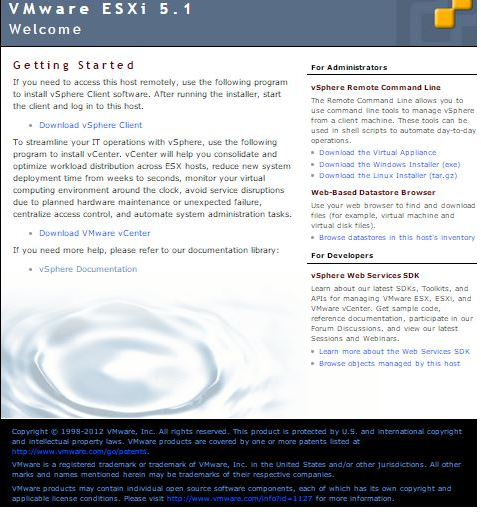
- Choose the Download vSphere Client link to download the vSphere Client installation file.
- Install the vSphere Client. Run the vSphere Client installer file that you downloaded, and accept each of the default options whether prompted.
- After the installation completes, start the vSphere Client program. The VMware vSphere Client login screen displays, prompting you for the ESXi server login credentials.
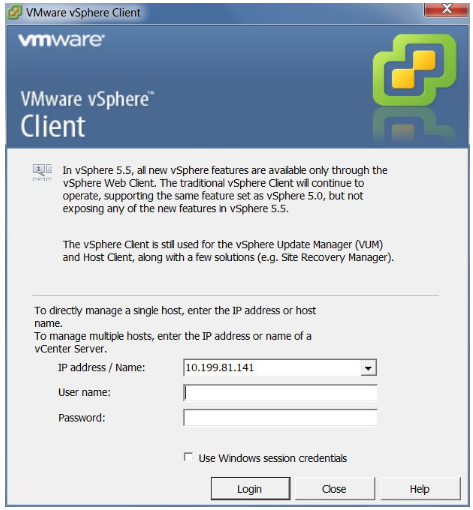
- Type the ESXi server login credentials. Type the following:
- IP address / Name: Type the IP Address or Fully Qualified Domain Name (FQDN) for the ESXi server that hosts your SD-WAN VPX-SE VM instance.
- User name: Type the server administrator account name. The default is root.
- Password: Type the password associated with this administrator account.
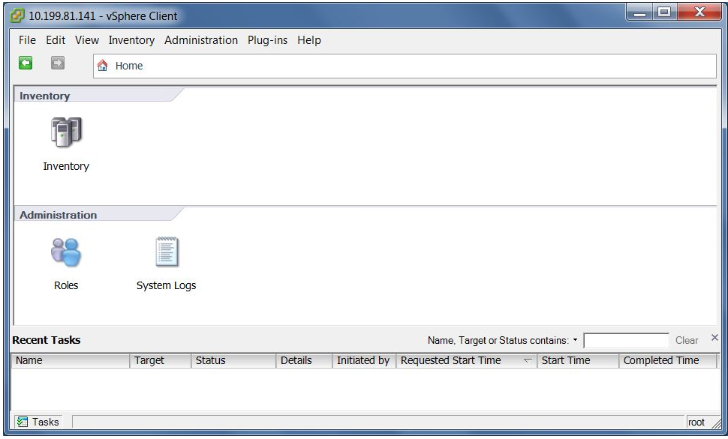
- Choose Login. This appears the vSphere Client main page.
The next step is to install and deploy the SD-WAN VPX-SE OVF template and set up the virtual machine. The following section provides instructions for these procedures.
Installing and deploying the SD-WAN VPX-SE OVF Template
This section provides instructions for installing the SD-WAN VPX-SE OVF template and creating the SD-WAN VPX-SE virtual machine.
- When you have not already done so, download the SD-WAN VPX-SE OVF template file (.ova file) to the local PC. Download or copy the SD-WAN VPX-SE OVF template to the local PC you are using to connect to the ESXi server that hosts your SD-WAN VPX-SE. The OVF template file has a file name using the following naming convention: cb-vwc-version_number-vmware.ova
Where:
version_number is the SD-WAN VPX-SE release version number.
.ova is the file name suffix indicating that this is an OVF template file.
Note
For additional information, please see Downloading the Software Packages section.
- Continuing in the vSphere Client, choose File and then choose Deploy OVF Template… from the drop-down menu. This appears the first page of the Deploy OVF Template wizard, the Source page.
- Choose the SD-WAN VPX-SE OVF template (.ova file) you want to install. Browse to the location of the .ova file you downloaded earlier to the local PC, and choose it.
- Choose Next. This imports the selected .ova file and appears the OVF Template Details page.
- The next page appears some basic information regarding the OVF template you imported.
- Choose Next. This proceeds to the EULA page.
- Choose accept, and then choose Next. This proceeds to the Name and Location page.
- Type a unique name for the new VM (or accept the default). The name must be unique within the current Inventory folder, and can be up to 80 characters in length.
- Choose Next. This proceeds to the Storage page.
- Choose a datastore that has sufficient space available for the VM. The SD-WAN VPX-SE virtual machine requires 39.1 GB of disk space.
- Choose Next. This appears the Disk Format page.
- Accept the default settings, and choose Next. This proceeds to the Network Mapping page.
- Accept the default (VM Network) and choose Next. This proceeds to the Ready to Complete page.
- Choose Finish to create the VM. This appears the Deploying NetScaler® SD-WAN VPX-SE status dialog box. Depending on the conditions present on your server, the deployment can take from several minutes to a few hours to complete. When the SD-WAN VPX-SE virtual machine has been successfully created, a success message displays.
- Choose close. This closes the Deploy OVF Template wizard and returns to the vSphere Client main window. When this is the first VM you have created using this vSphere Client, the vSphere Client home page displays. When you have previously created one or more VMs, the Inventory page displays.
The next step is to configure the SD-WAN VPX-SE Management IP Address. The following section provides instructions for this procedure.
Configuring the Management IP address for the SD-WAN VPX-SE
There are two methods for assigning the Management IP Address to the SD-WAN VPX-SE virtual machine:
- When you are not using DHCP: You must manually assign a static Management IP Address for the SD-WAN VPX-SE Virtual Appliance.
- When you are using DHCP: By default, all SD-WAN -VW Virtual Appliances use DHCP to acquire the Management IP Address. To use DHCP, the DHCP server must be present and available in the Virtual WAN.
For more information see, Configuring the management IP.
Manually configuring a static Management IP address for the VPX
When you are not using DHCP, or want to set a static Management IP Address for the SD-WAN VPX-SE Virtual Appliance VM, you must do this manually. To do so, you use the console for the virtual machine you created, in the vSphere Client.
To set the Management IP Address manually, do the following:
Note
DHCP is enabled by default for the SD-WAN VPX-SE Management IP Address.
- Continuing in the vSphere client Inventory page, choose the new SD-WAN VPX-SE VM in the Inventory tree (left pane). This appears the Inventory page for the new VM, with the Getting Started tab preselected.
- Power on the new virtual machine. In the Basic Tasks section of the Getting Started tab page, choose Power on the virtual machine (green play mouse button) to power on the new SD-WAN VPX-SE VM.
- Click the Console tab in the Inventory page tab bar. The Console tab is located in Inventory page tab bar at the top of the main page area. Selecting this tab appears and enables access to the CLI console for the VM. Because the new VM starts up, a series of status messages are displayed in the console. When the startup process completes, the console login prompt displays.
- Choose anywhere inside the console area to type console mode. This turns control of your pointing device cursor more than to the VM console, and enables console mode.
- Log into the VM console. The default login credentials for the new SD-WAN VPX-SE VM are because follows: Login: Admin Password: password This appears the console Welcome screen.
- Type the following command line at the console prompt:
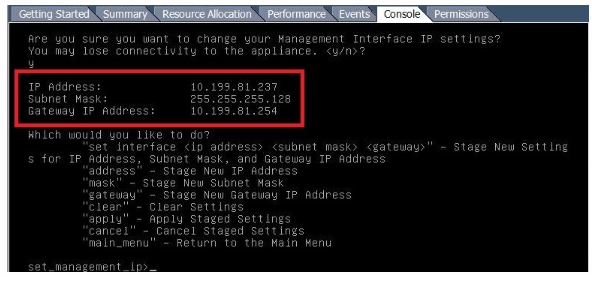
management_ipThis switches to themanagement_ipCLI in the console, and appears theset_management_ipprompt. - Configure the interface settings for the VM. Type the following command line at the set_management_ip prompt:
set interface <ipaddress> <subnetmask> <gateway>Where:-
<ip>is the Management IP Address for the SD-WAN VPX-SE Virtual Appliance. -
<subnetmask>is the subnet mask used to define the network in which the SD-WAN VPX-SE Virtual Appliance resides. -
<gateway>is the Gateway IP Address the SD-WAN VPX-SE Virtual Appliance uses to communicate with external networks. This stage but does not apply the interface settings.
-
- Apply the staged settings for the VM interface. Do the following:
- Type the following command at the set_management_ip prompt: Apply
- When prompted to confirm the apply operation, type Y. This applies the staged interface settings for the VM, and appears the results.
- Type exit and press Return at the prompt to exit the management_ip CLI.
- Exit the console. Type exit and press Return at the console prompt, and then press Ctrl+Alt to regain control of the cursor.
- Shutdown and start the VM. Do the following:
- Choose the Getting Started tab to display the Basic Tasks options.
- In the Basic Tasks section, choose shutdown the virtual machine (red check box icon). You are prompted to confirm that you want to end the guest operating system for the VM.
- Choose Yes to confirm. This shuts down the guest operating system and powers off the VM. When the shutdown completes, the Power on the virtual machine option (green play mouse button) becomes available.
- Start the virtual machine. Choose Power on the virtual machine (green right-arrow) to start the VM. You can view the progress of the start-up process in the Console tab page for the VM.
When the startup process completes, the login prompt displays. You can now proceed to the final step, Connecting to the SD-WAN VPX-SE and Testing the Deployment.
NOTE
From 10.2.6 and 11.0.3 release onwards, it is mandatory to change the default admin user account password while provisioning any SD-WAN appliance or deploying a new SD-WAN SE VPX. This change is enforced using both CLI and UI.
A system maintenance account - CBVWSSH, exists for development and debugging and has no external login permissions. The account can only be accessed through a regular administrative user’s CLI session.