Provisioning the Appliance
After assigning an IP address to the management service, you are ready to provision the NetScaler® and accelerator instances. When you log on to the appliance, the configuration wizard appears.
When using the configuration wizard, keep the following points in mind:
- The following procedure assumes that you have already filled out the configuration worksheet.
- If you change the IP addresses of the Management Network, or change the default gateway to an address not on the Management Network, you lose connectivity to the appliance unless you are on the same Ethernet segment as the management port.
- When using the configuration wizard, check your entries carefully. The wizard has no Back button. If you need to modify the previous screen, use the Back button on your browser. This takes you to the logon page, then to the previous screen.
- The configuration wizard is displayed only when you log on to the appliance for the first time to configure the appliance. After you finish configuring the appliance, this wizard becomes inaccessible, and will reappear only after a factory reset. Check your entries carefully.
This wizard walks you through a fresh configuration of the appliance.
Note:
If you receive a #SESS_CORRUPTED error at any time during these procedures, click Logout, clear your browser cache, close your browser, and open it again.
To configure the appliance by using the configuration wizard:
-
On the Welcome page, click Get Started.
Note:
All pages after the Get Started page have a heading that says, “Deployment Mode: Inline/L2 Mode,” but this wizard is used for all deployment modes.
- Follow these steps to configure a fully 7.3-compliant system:
- Acquire the following release 7.3 software distributions from the release 7.3 downloads page on My Citrix:
- Management service (as a .tgz file)
- NetScaler VM (as an.xva file)
- Accelerator VM (as an.xva file)
- Upgrade bundle (as a.upg) file
- Navigate to the System > Configuration > Management Service \ > Software Images page, and then select Upload from the Action list.
- Upload a release 7.3 Management Service image (distributed as a .tgz file).
- Navigate to the System > Configuration > NetScaler \ > Software Images page, and then upload a release 7.3 NetScaler XVA image.
- Navigate to the System > Configuration > SD-WAN \ > Software Images page, and then upload the accelerator XVA image.
- Navigate to the System > Configuration \ > Management Service page, and then click the Upgrade Management Service link.
- Select the management service image that you recently uploaded and click OK.
- When the lower left-hand corner of the screen displays “Management Service Updated Successfully,” log off and clear your browser cache. Log on after the management service restarts (a few minutes).
- On the Welcome screen, click Get Started.
- Acquire the following release 7.3 software distributions from the release 7.3 downloads page on My Citrix:
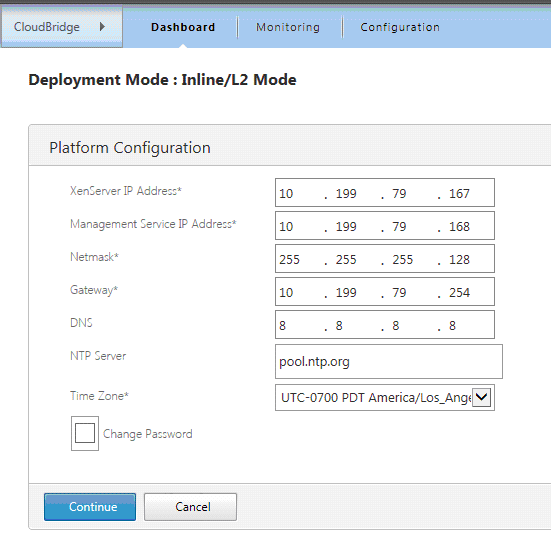
- For Management Access Settings, specify values for the various fields according to the network settings. The following screenshot displays sample values used in this documentation. Enter values as follows:
- XenServer® IP Address—(Item M4 on your worksheet, or H4 if this is the second appliance in a high availability pair.) The management address of the built-in XenServer hypervisor. This must be a valid address on the management network.
- Management Service IP Address—(Item M5 on your worksheet, or H5 if this is the second appliance in a high availability pair). The address of the Management Service VM that you use to perform most system management tasks. This must be a valid address on the management network.
- Netmask—(Item M3 on your worksheet). The subnet mask of the management network.
- Gateway— (Item M2 on your worksheet). The default gateway for the management network.
- DNS Server—The IP address of the DNS server. This is a mandatory parameter.
-
NTP Server—IP or FQDN address of your time server. This will be used by all the virtual machines in the appliance. > Note that if you use advanced CIFS or MAPI acceleration, the system time of the appliance must be close to that of the Windows domain server, so choose an NTP server that maintains a close relationship to the time on your Windows domain server.
Note:
Unless the NTP server is specified as an IP address, it is not used by the accelerator.
- Time Zone—Select your time zone from the pull-down menu.
-
Change Password—Select this check box and type in a new nsroot password, two times, to change the password. This same password is used on the management service and the NetScaler instance for account nsroot, and on the accelerator for the admin account. If the password is not changed, it remains set to nsroot (the default).
Figure 1.Sample Values for the Fields in Management Access Settings Page of the Configuration
- Check your settings and click Continue.
- In the Manage Licenses section, see if an appropriate license is already listed in the Name field. If so, select it and skip to step 8.
- Click Upload in the Update Licenses section.
- Navigate to the folder that contains the license file and open the file.
- Click Add License and upload the license file provided by Citrix. The license is added to the appliance, as shown in the following figure.
Figure 2. Sample License Added to the Appliance on the Manage License Files Page of the Configuration Wizard
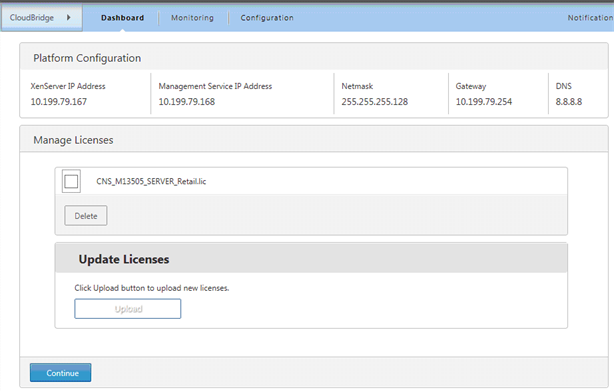 You can also get a license file from the Citrix.com website by clicking the here link and using your My Citrix credentials.
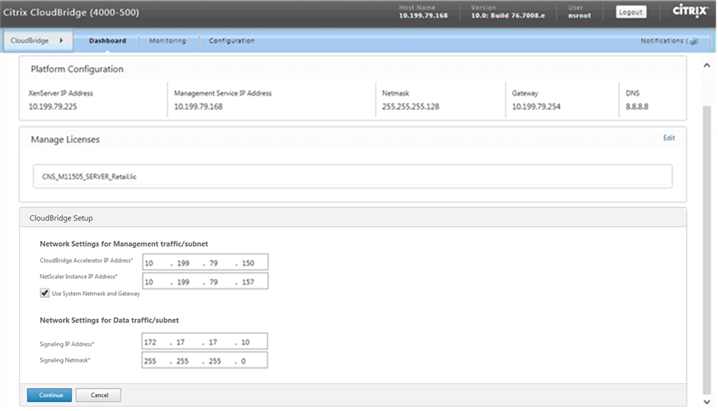
 - Select the license in the Name field and click Continue. The SD-WAN Setup page appears. Fill in the fields as follows:
-
Network Settings—This section informs the accelerators of the management network.
- SD-WAN Accelerator IP Address—Enter the value of M6 from your worksheet. This is the IP address of the accelerator
- NetScaler IP Address—Enter the value of M7 from your worksheet. This is the IP address of the NetScaler GUI.
- Use System Netmask and Gateway—Select this option if you want to use the network mask and gateway IP addresses you had specified in the Platform Configuration page.
- Netmask—Enter the value of M3 from your worksheet. This is the subnet mask (netmask) of the management network (note that you have entered this already, on a previous page).
- Gateway—Enter the value of M2 from your worksheet again.
- Signaling IP Address—Enter the value of T4 from your worksheet. This is the external signaling IP address of the accelerator, used by SD-WAN Plug-ins to connect to the appliance.
- Signaling Netmask—Enter the value of T2 from your worksheet. This is the subnet mask (netmask) of the external traffic network.
-
XVA Files—This section allows you to specify previously uploaded XVA files (Xen® virtual machines) for the NetScaler and accelerator instances. Select the XVA images that you uploaded as part of step 2. Figure 3. SD-WAN Setup Page
-
Network Settings—This section informs the accelerators of the management network.
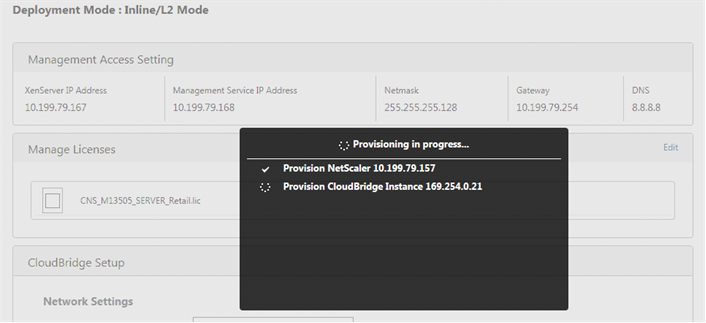
- Click Continue. The wizard starts provisioning the required instances, as shown in the following figure.
Figure 4. Provisioning Progress Indicator
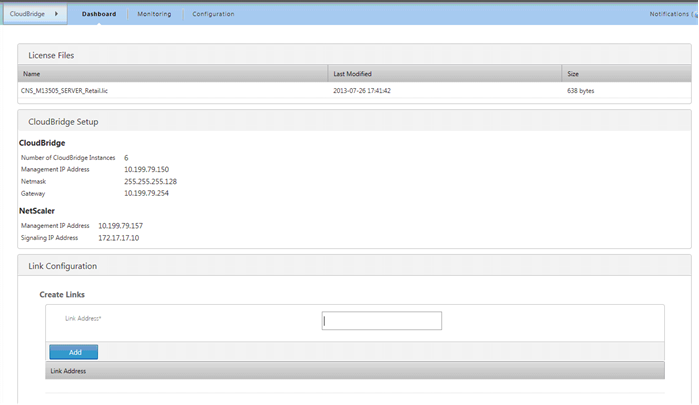
- After the instances are provisioned, add one of your local LAN subnets to the Link Configuration section from list T7 in your worksheet, as shown in the following figure. This subnet is added as a local LAN subnet in the accelerator. If you have more than one LAN subnet, you can add them to the LAN link definition in the Accelerator GUI after the configuration wizard completes. Click Add to add the subnet.
Figure 5. Link Configuration Is at the Bottom of This Page
- Log off, and then log back on. If you see a “Version Incompatibility Detected” message, install the upgrade bundle you downloaded in Step 2.
Basic configuration is complete. Next, perform deployment-mode-specific configuration (such as for WCCP mode).
Note:
After the wizard completes, the appliance is configured for the basic setup. To configure the appliance for a specific deployment scenario, see Deployment Modes.